Author Archive

Managing the streams

Streams aggregate all your profiles in one easy to manage screen. You can toggle between profiles and groups with  a simple click to view the engagement under these profiles. Streams are accessible from the top menu under Social Media.

Your connected profiles will be shown on the left as well as your defined Social Groups. Click on the desired social account or group to display the streams available for these profiles as below:

  • Facebook: On Facebook, you can manage your Page Feed, Messenger Inbox, Reviews, Tagged Posts, and Ads Feed. You can interact with your audience by checking reactions on your posts, commenting, and replying to page messages.
  • Facebook Group: You can check the group’s new feeds and events. Due to Facebook API policy, the feed information is pulled from the date of connecting the group.
  • LinkedIn: On LinkedIn, you can comment on company page posts.
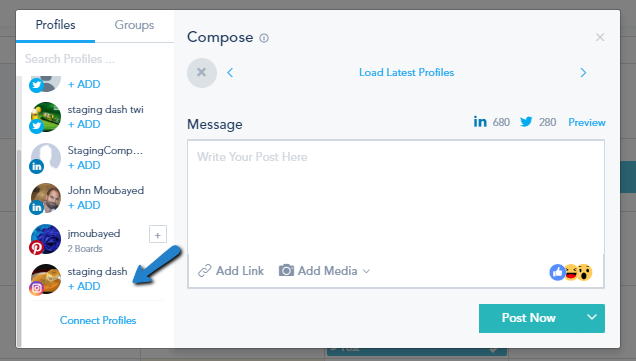
  • Instagram: Instagram lets you interact by replying to comments, liking posts, and viewing your own posts and tagged posts. You can also engage privately through Direct Messages with the option to reply.
  • Pinterest: Pinterest provides a summary of connected boards.
  • Hashtags streams:  Keep an eye on specific keywords across X and Instagram using Hashtags Streams to monitor relevant conversations.
  • Twilio SMS: For Twilio SMS, you can easily check your messages and respond, ensuring timely communication.
  • YouTube Channel: Manage your YouTube channel by replying to comments (published or moderated) and engaging with your audience through comments and likes on your videos and playlists.
  • TikTok: On TikTok, you can track the performance of your videos by checking the number of likes, comments, and views.

Get Started

Personalization

You can personalize your Emails and your Landing Pages by using the Shortcode option:

Click on Shortcodes from the top toolbar, select your target list(s) and pick the correct field you would like to display in your content:
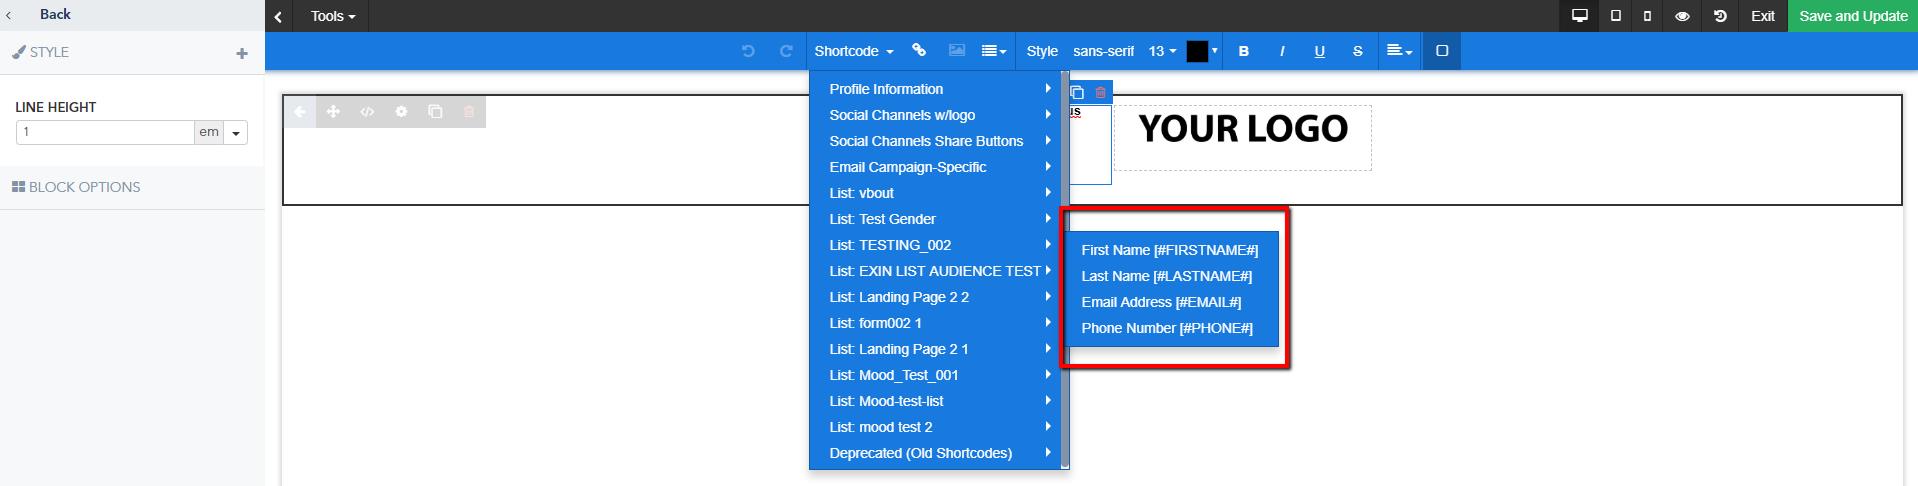
Once you click on your Shortcode, it will be inserted wherever your cursor is. Once the campaign is fully executed and sent the shortcode will be replaced with the proper value available for each contact on your list(s).
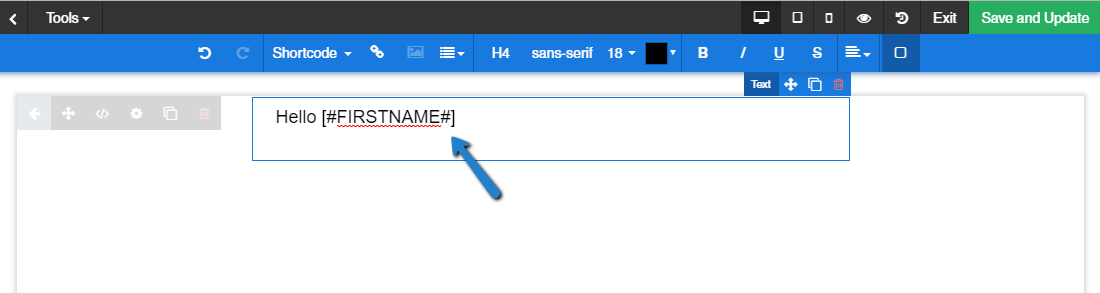
NOTES:

  • If a specific contact does not have a value for the chosen Shortcode, they will see an empty space or a fallback option as described in the command options below.
  • Test emails will show the raw Shortcode instead of a value because the campaign had not executed yet. Don’t panic! the system will change this value once the campaign is executed.
  • When targeting multiple lists, you might need to include multiple Shortcodes in the same line. ex: Hello [COMPANY] [COMPANYNAME]. In this example each Shortcode is a reference to a custom field called company that you might have created for each list.
  • Some lists share similar default system Shortcodes in which case if you are targeting multiple lists you don’t have to insert the Shortcode multiple times.

Below are some commands you can apply to Shortcodes so you can format the data properly:

Shortcode Split Using /2

This is used to split a long shortcode and display only the first part of the collected data. The syntax will look like this:
[#FULLNAME/2#] ex: if a subscriber on a list you captured had a full name Richard Fallah than the campaign will show: Hello Richard.

Shortcode Fall Back using the | Character

If some subscribers on a list had empty data for their name, you will be able to fall back on a different shortcode or static text. Ex: one record The syntax will look like this:

[#FULLNAME|COMPANYAME#] ex: if the data on the list did not have first name but company name than the campaign will show: Hello Company Name.
or
[#FULLNAME|*there*#] ex: if you want to show a static text if the full name was left empty by the subscriber than the campaign will show: Hello there. Note the static text has to be between two asterisks.

Shortcode Combo: 

In case you wanted to combine the above 2 cases in one syntax, you can use them as follows:
[#FULLNAME/2|COMPANYNAME|*there*#]

Shortcode Capitalization: 

If you have a mix of upper and lowercase data within your subscriber’s lists, it might not look too well when sending an email. Ex: Hello JOHN, in typing etiquette, can be interpreted as shouting out loud the person’s name. We added 3 simple syntaxes to help you control your capitalization:

PROPER – Capitalizes the first letter of a shortcode value, regardless of existing format:  [#PROPER FULLNAME#] – ex: if you have JoHN DoE as a record, it will turn it into John Doe.

UPPER – Capitalizes the full shortcode value: [#UPPER FULLNAME#] – ex: if you have JoHN DoE as a record, it will turn it into JOHN DOE.

LOWER – Makes the full shortcode value lowercase: [#LOWER FULLNAME#] if you have JoHN DoE as a record, it will turn it into john doe.

Note that the capitalization syntaxes can be mixed with other formats. ex: [#PROPER FULLNAME/2| LOWER COMPANYNAME|*there*#].

Get Started

Default account shortcodes

A Shortcode is a simple variable that contains a predefined value, ex: [COMPANY_NAME] = Joe’s Bike Shop. You can insert Shortcodes within your content and the value will render as defined under your settings. This is particularly handy when sending lots of campaigns or creating many templates. Beside your contact’s Shortcodes your account comes with a default list of personal Shortcodes, ex: company address, phone and social media channels. To access your default Shortcode list you can visit your Settings page,

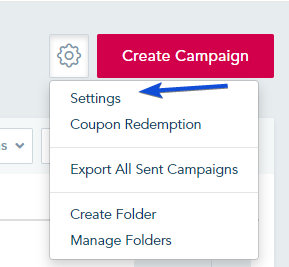
or from your Campaigns page under the gear utility button, choose Settings:


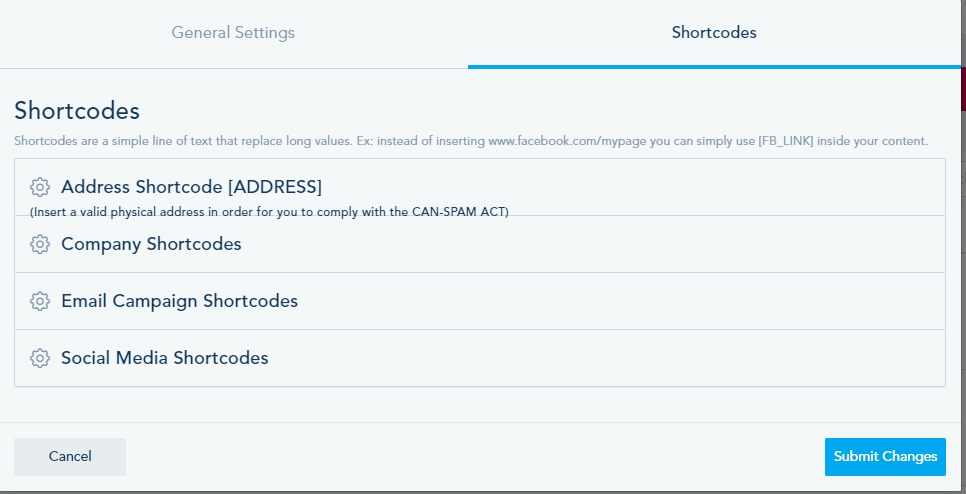
This will allow you to edit:

  1. The Default Sending Values (From email address, Reply To email address, From Name). You can see these populated when you create new email or automation campaigns.
  2. Your default Address Shortcode [ADDRESS] which stores your business address.
  3. Your Company Shortcodes: [PHONE] and [WEBSITE].
  4. Email Campaign Specific Shortcodes that include the text you’d like to show when you use the Unsubscribe [UNSUBSCRIBE_URL] or View Email Online Version Text [ONLINE_URL] of your campaign or adding a redirection link after unsubscribe [UNSUBSCRIBE_REDIRECTION_URL].
  5. Your Social Media Shortcodes with links to your Facebook, Twitter, Linkedin, Instagram, and Pinterest. Use these Shortcodes to invoke their respective icons.
Get Started

Using coupon codes with your email campaigns

Coupons are great to help you gain new clients, show your loyal fans appreciation or entice customers to try new products by offering promotions, coupons, and special offers. The platform’s coupon tool allows you to create unique coupon codes that your staff can validate easily. Our platform will also collect data on customers who redeemed the offer so you can analyze your campaign performance.

Adding Coupon Shortcode to Email Campaign

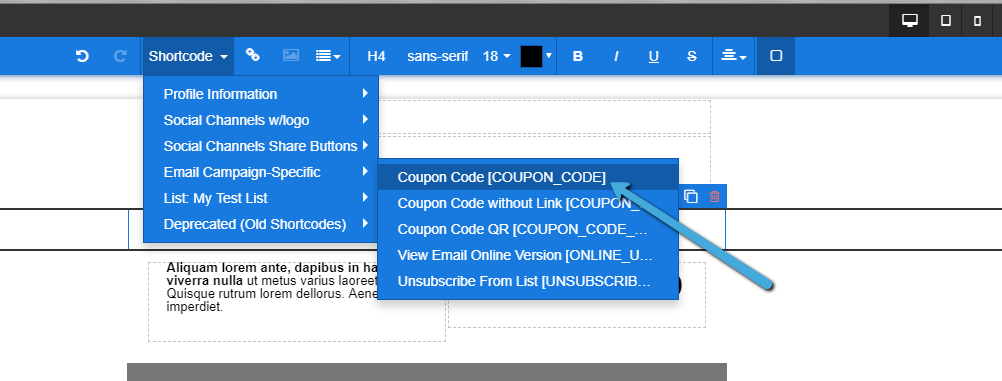
To add a Coupon Code to your campaigns, click on the Shortcode option section on the Builder’s top Toolbar under Email Campaign Specific or add [COUPON_CODE] to where you want to place it.


Redeeming Coupon Code via Email

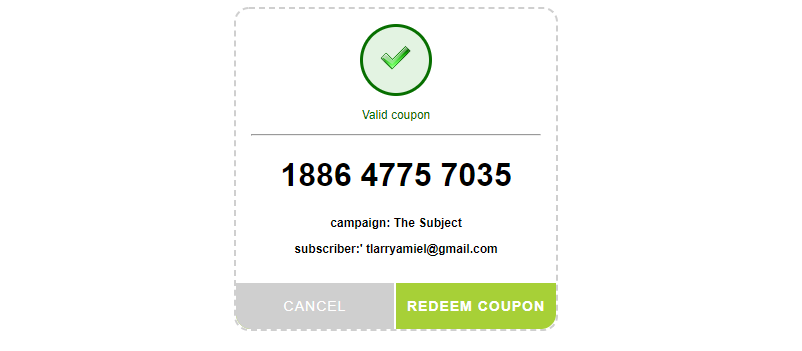
Contacts that receive the Email Campaign will have the Coupon Code link that will redirect to a Coupon Redemption page.

Coupon Code in Email:

Coupon Redemption Page:

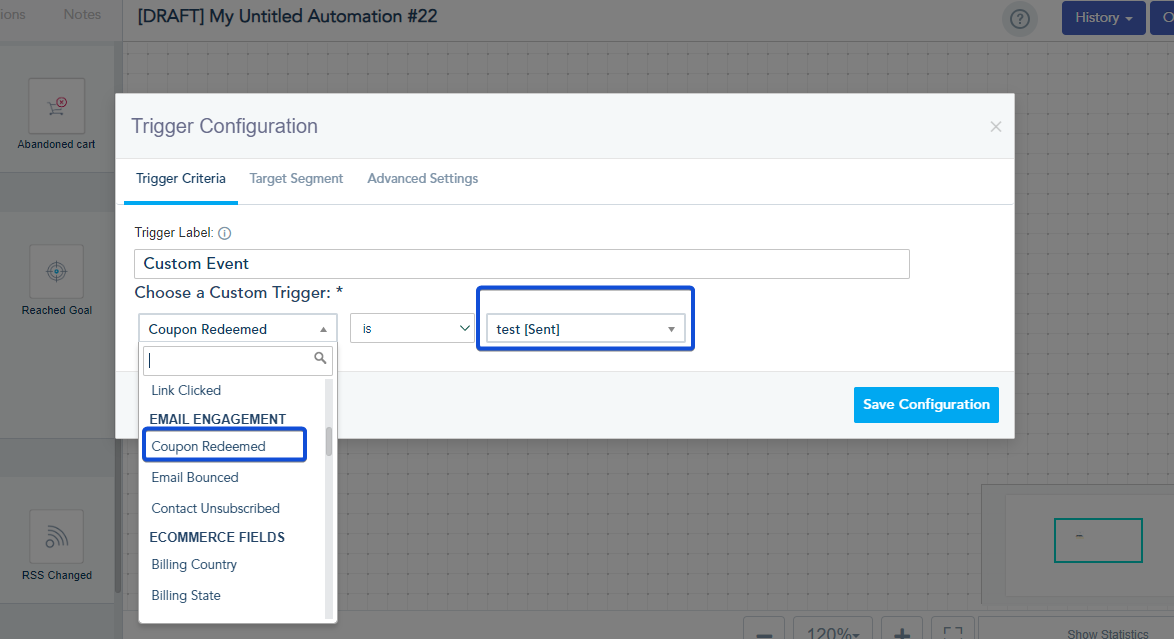
You can trigger contacts that have redeemed the coupon code using the Custom Event trigger.
In the automation builder, add the Custom Event trigger, choose Coupon Redeemed option and specify your email campaign.

Redeeming Coupon Code

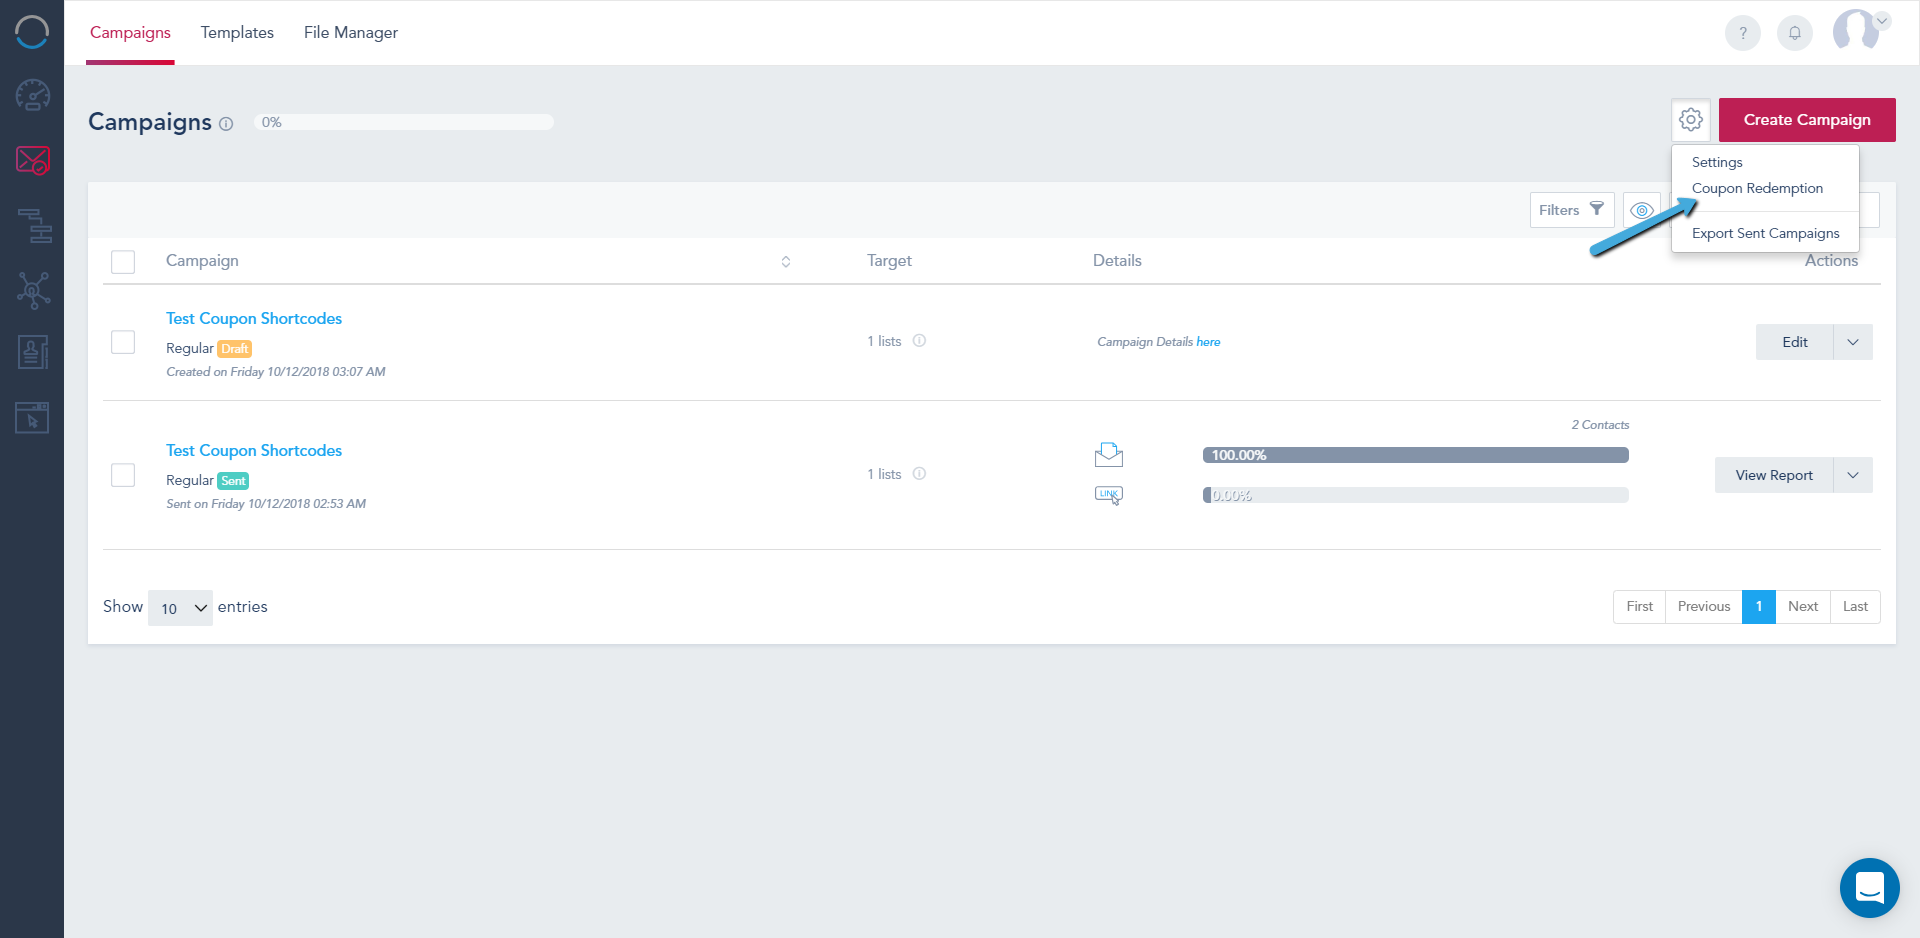
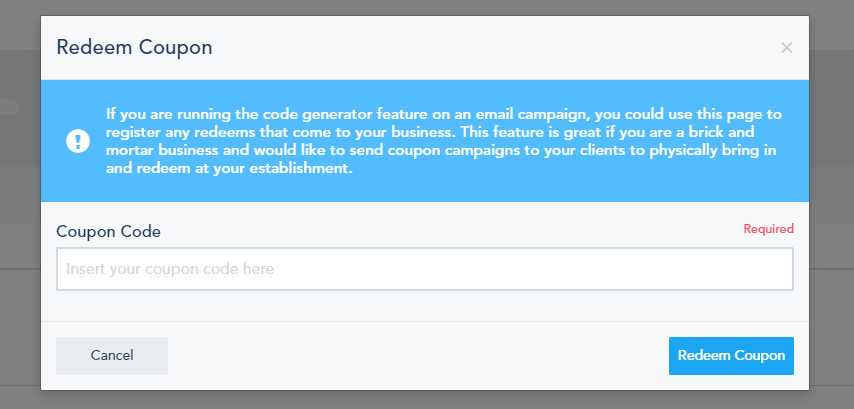
To redeem a Coupon Code, click the Gear Icon on the Campaigns Page. Select the Coupon Redemption option and enter the Coupon Code for the contact in the Textbox to redeem it.

Coupon Redemption:

Redeem Coupon Popup:

Get Started

How to create a Conditional Form

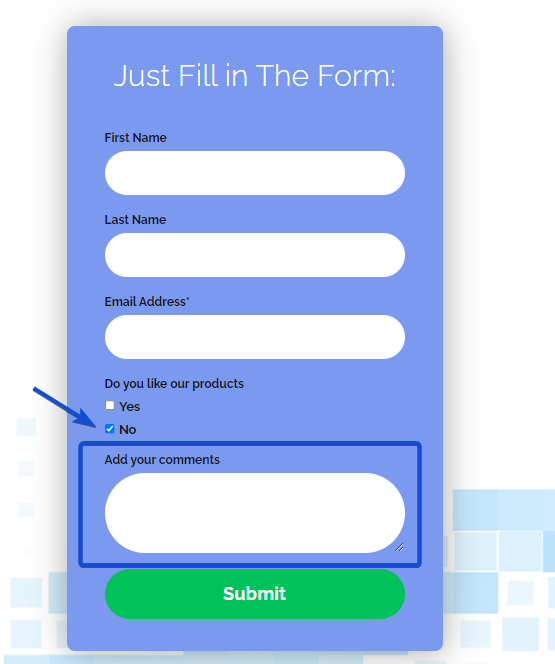
Conditional forms allow you to customize the display of form fields based on specific rules. With the Form Builder, you can easily create conditional forms for use in embed forms (LiteJS), landing pages, and site popups. This guide will walk you through the steps to create conditional forms using the Form Builder.

Step 1: Access the Form Builder and Select Your List

  1. From your account, navigate to the “Lists” view.
  2. Locate the list you want to configure and click on “Fields & Form” for that list.

Step 2: Add Fields to Your Form, Including the Conditional Field

In the Form Builder interface, start by adding the necessary fields to your form, including the field that you want to make conditional.

Step 3: Define Rules for the Conditional Field

  1. Locate the field in the Form Builder that you want to make conditional.
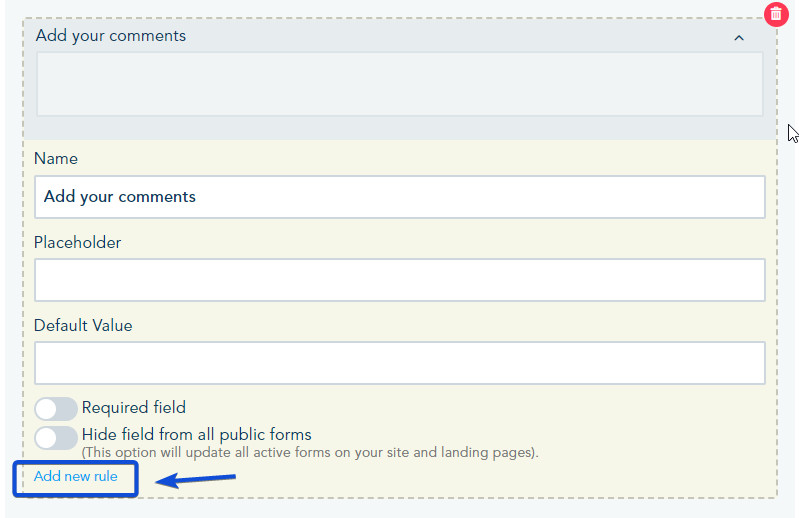
  2. Click on the field, and then click on “Add new rule” to define the condition for its visibility.

Step 4: Configure the Rule

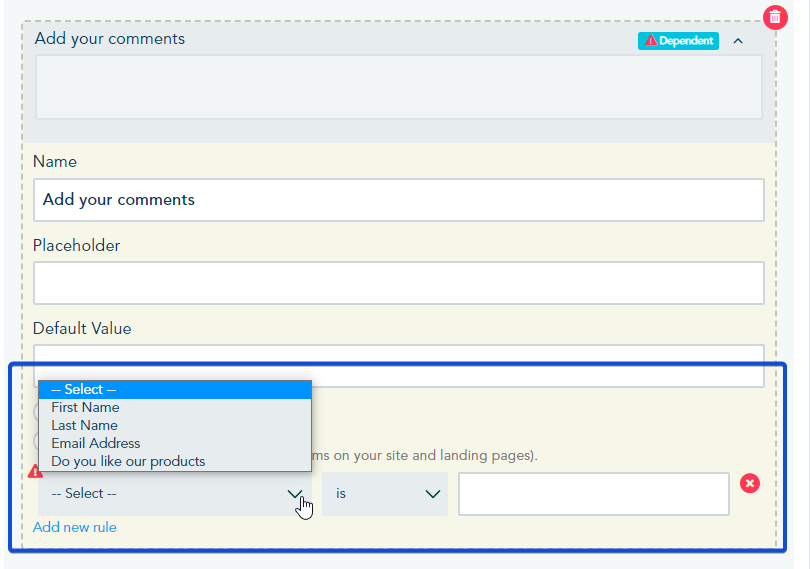
  1. When creating the rule, select a field from the existing ones in the form that will determine the visibility of the conditional field.
  2. Specify the necessary value or condition that triggers the visibility of the conditional field.

Step 5: Add Additional Rules (Optional)

  1. If needed, you can add more rules to further customize the visibility of the conditional field.
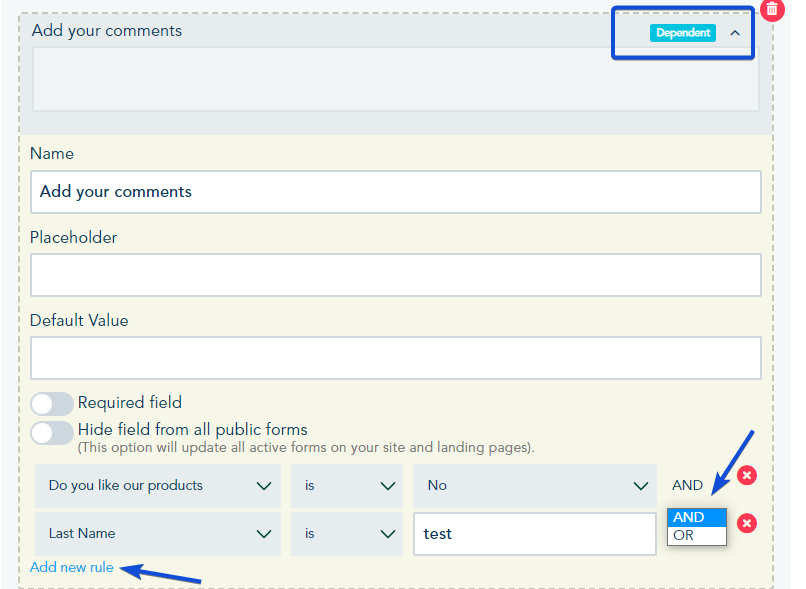
  2. Click on “Add new rule” to add more rules, and make sure to select the appropriate matching condition (AND/OR) between the rules.

Note: Once the rule is created you can notice that the field is labeled as Dependent.

Step 6: Save Your Form
Once you have set up the rules for the conditional field, click on “Save Form” located at the bottom right of the Form Builder interface.

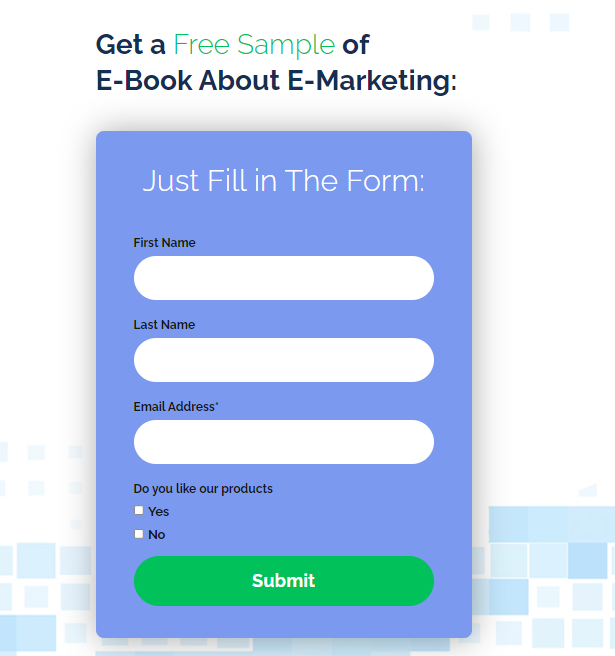
Fill out the form and observe that the conditional field is displayed only when the rule is matched.

Get Started

How to post Short videos on Social Media profiles

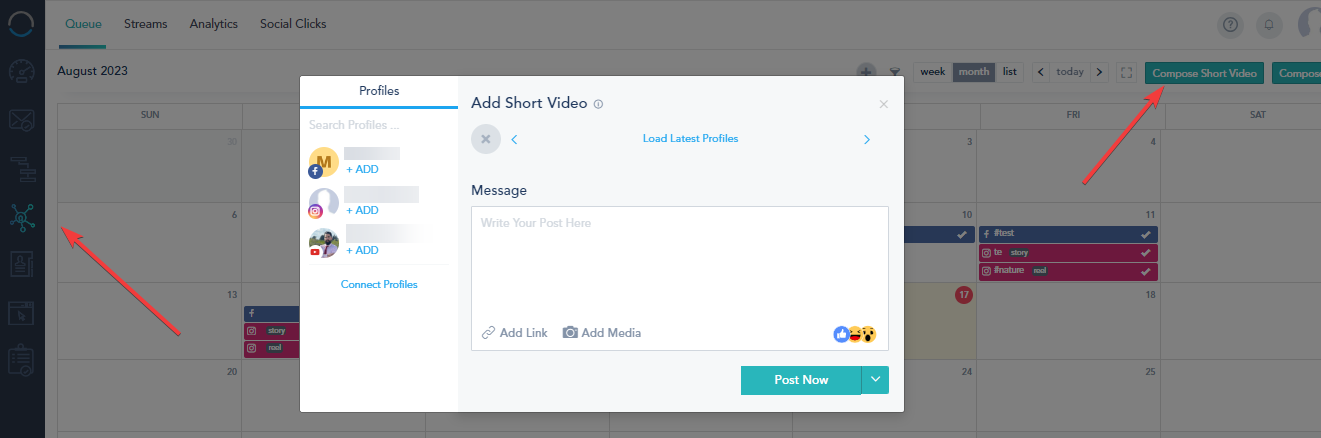
You can use the Compose Short Videos option within the Social Media Section to share brief video content on your social media profiles. This feature enables direct posting to Facebook (Reels) , Instagram (Reels and Story) and Youtube (Shorts) platforms.

Go to Social media section → Queue and click on Compose Short Videos.

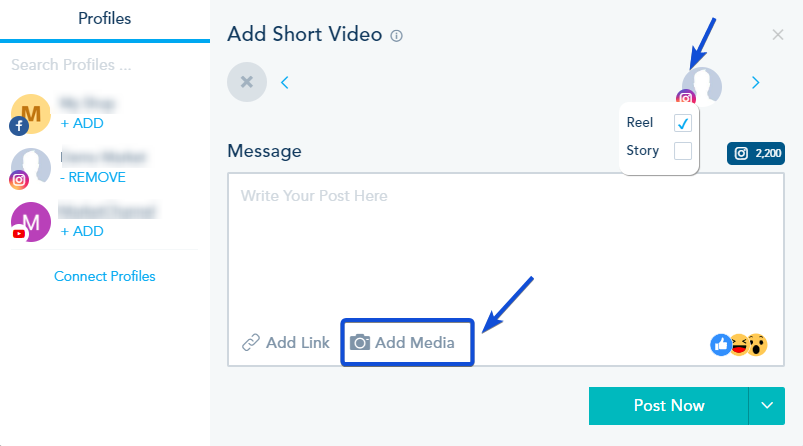
  • Choose your social profiles to post to (Facebook or/ and Instagram or/ and Youtube)
  • Add your media file, you can either upload a new file or access your saved media inside the File Manager.
  • Add your link. This is important if you want to track the click engagement from the different social media channels.
  • While posting to Instagram, you have the option to choose whether to post it as a Reel or Story or both.
  • Confirm whether you’d like to immediately publish your post by clicking Post Now, Schedule it to post on one specific date.

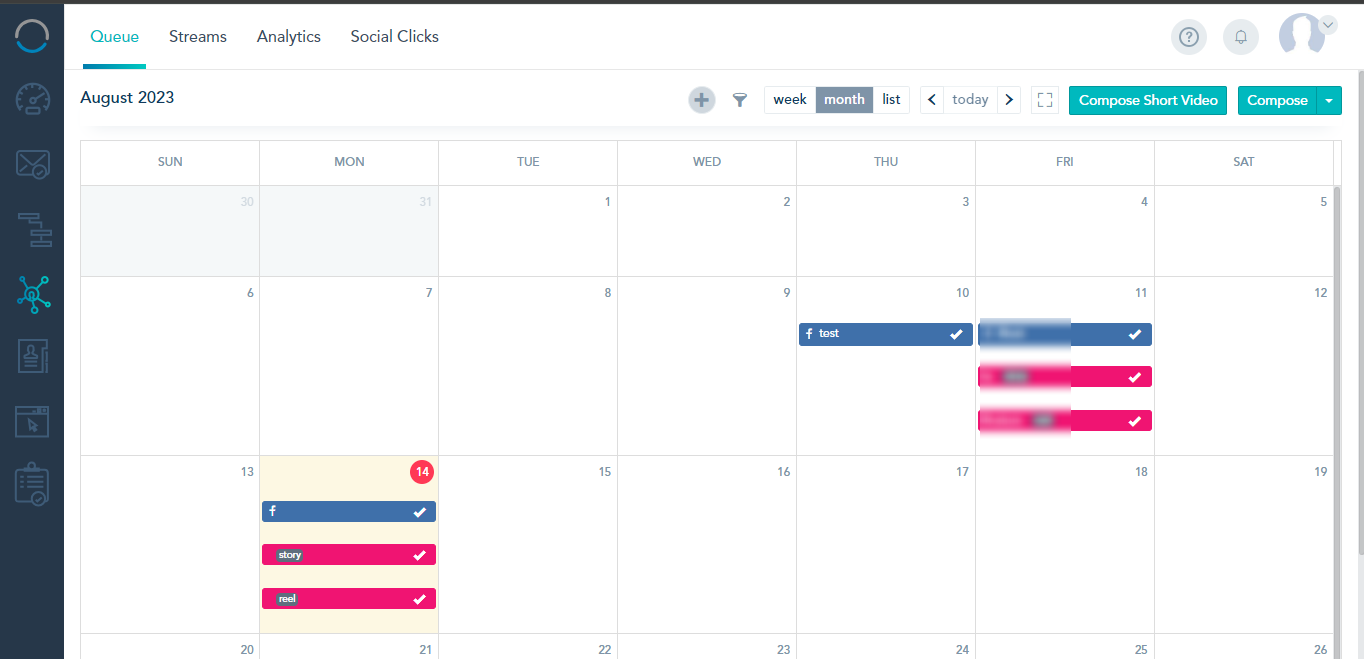
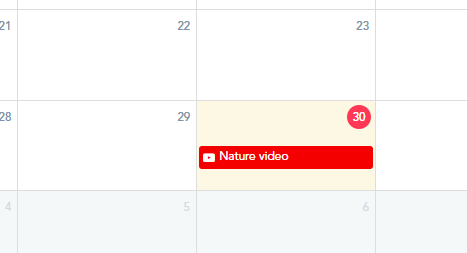
Once your short video is posted or scheduled, you can check it in your Social Calendar.

Get Started

How to post Videos on YouTube Channel

The platform enables you to manage your various Social Media Profiles in one place including sharing videos on your YouTube channel.

To post videos on your YouTube Channel, follow these steps:

  • Connecting your YouTube account
  • Composing the post

Connecting your YouTube account:

You’ll need to connect your YouTube account to the platform. Follow these steps:

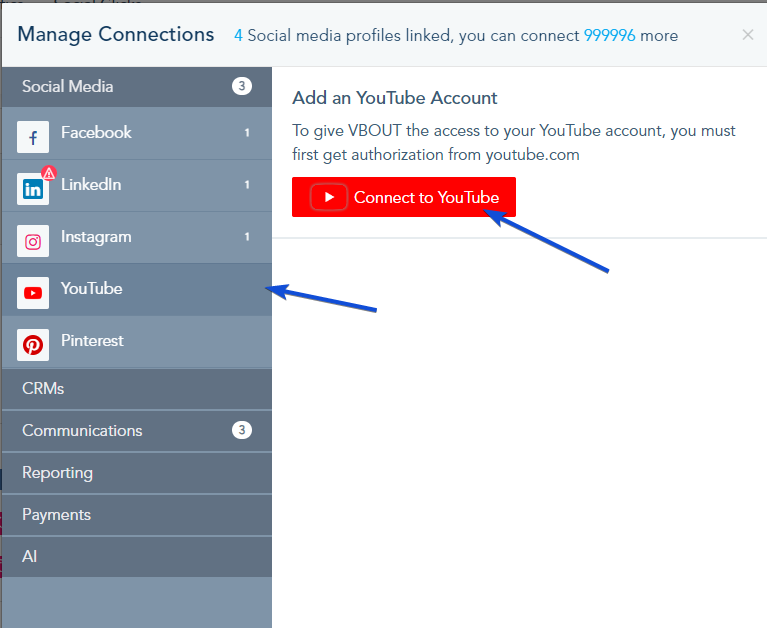
  1. Navigate to the connection center within the platform.
  2. Locate and select the YouTube option.
  3. Click on “Connect to YouTube” to initiate the connection process.

Composing the post:

Once your YouTube account is connected, you can proceed to compose and share your video on your channel

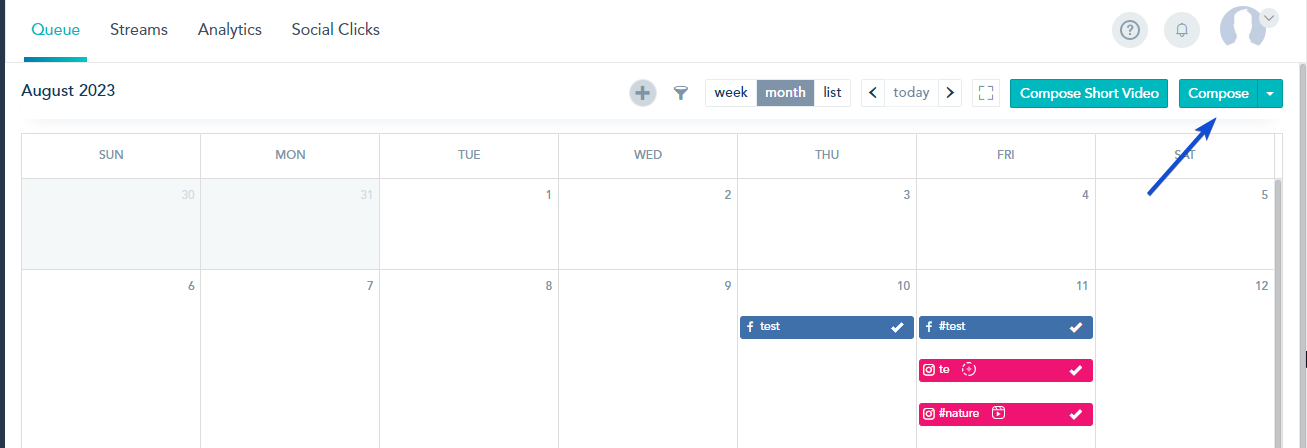
From the Social media tab, Click on Compose.

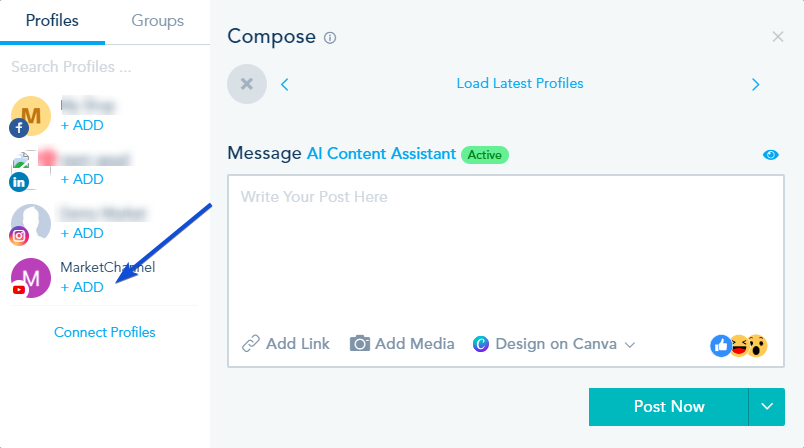
Choose the YouTube channel you wish to post to, if you have multiple channels connected.

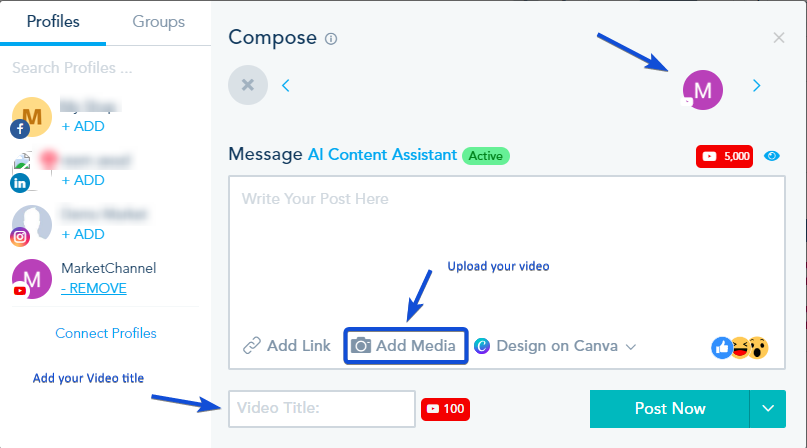
The Account will appear on top right channel grid.

Upload your video file, and choose a compelling title for your video.

Choose Post Now, or Schedule Post to post your video on your YouTube channel. The post will appear on the calendar.


Get Started

Adding media to your social posts

The platform offers many options to add media to your social posts:

  1. Upload new media by dragging and dropping or using the Upload option
  2. Use your file manager to recycle previous content from your library
  3. Animated GIF tab powered by Giphy to search thousands of cool animated GIFs
  4. Open Source Images and Videos powered by Pixabay for access to high-quality stock photos and videos.

Please make sure to review the below Image/Video upload terms:

Image(s) Upload Terms

  • Please make sure your image is less than 3mb in size.
  • Allowed extensions: jpg, jpeg, gif, png
  • Facebook limitations:
    • Facebook supports multiple images that are up to 4 mb.
  • Instagram limitations:
    • Maximum file size: 8MiB
    • Aspect ratio: Must be within a 4:5 to 1.91:1 range
    • Minimum width: 320 (will be scaled up to the minimum if necessary)
    • Maximum width: 1440 (will be scaled down to the maximum if necessary)
    • Height: Varies, depending on width and aspect ratio
    • Formats: JPEG
  • X limitations:
    • X supports uploading up to 4 images excluding gif.

Video Upload Terms

    • Please make sure your video is less than 20mb in size.
    • Facebook limitations:
      • Facebook supports video uploads that are up to 20 minutes long.
      • Allowed extensions: MOV, MPEG, MP4, AVI, MPG, FLV
    • X limitations:
      • X supports video uploads that are up to 30 seconds long.
      • Allowed extensions: MP4 and MOV
      • MP4 format: H264 format with AAC audio
      • Minimum resolution: 32 x 32
      • Maximum resolution: 1920 x 1200 (and 1200 x 1900)
      • Aspect ratios: 1:2.39 – 2.39:1 range (inclusive)
      • Maximum frame rate: 40 fps
      • Maximum bitrate: 25 Mbps
    • Instagram limitations:
      • Container: MOV or MP4 (MPEG-4 Part 14), no edit lists, moov atom at the front of the file.
      • Audio codec: AAC, 48khz sample rate maximum, 1 or 2 channels (mono or stereo).
      • Video codec: HEVC or H264, progressive scan, closed GOP, 4:2:0 chroma subsampling.
      • Frame rate: 23-60 FPS.
      • Picture size:
        • Maximum columns (horizontal pixels): 1920
        • Minimum aspect ratio [cols / rows]: 4 / 5
        • Maximum aspect ratio [cols / rows]: 16 / 9
      • Video bitrate: VBR, 5Mbps maximum
      • Audio bitrate: 128kbps
      • Duration: 60 seconds maximum, 3 seconds minimum
      • File size: 100MB maximum
    • LinkedIn limitations:
      • LinkedIn supports video uploads that are between Three seconds to 30 minutes.
      • File size: Between 75kb and 200MB.
      • Allowed extensions: MP4

You can attach a document to your post, it is only supported on LinkedIn post.

Document Upload Terms

  • When attaching a document to LinkedIn post, all other media (images or video) will be ignored.
  • The file size cannot exceed 100MB and 300 pages.
  • The following file types are supported: PPT, PPTX, DOC, DOCX, PDF.

Get Started

How to export Contacts Tags

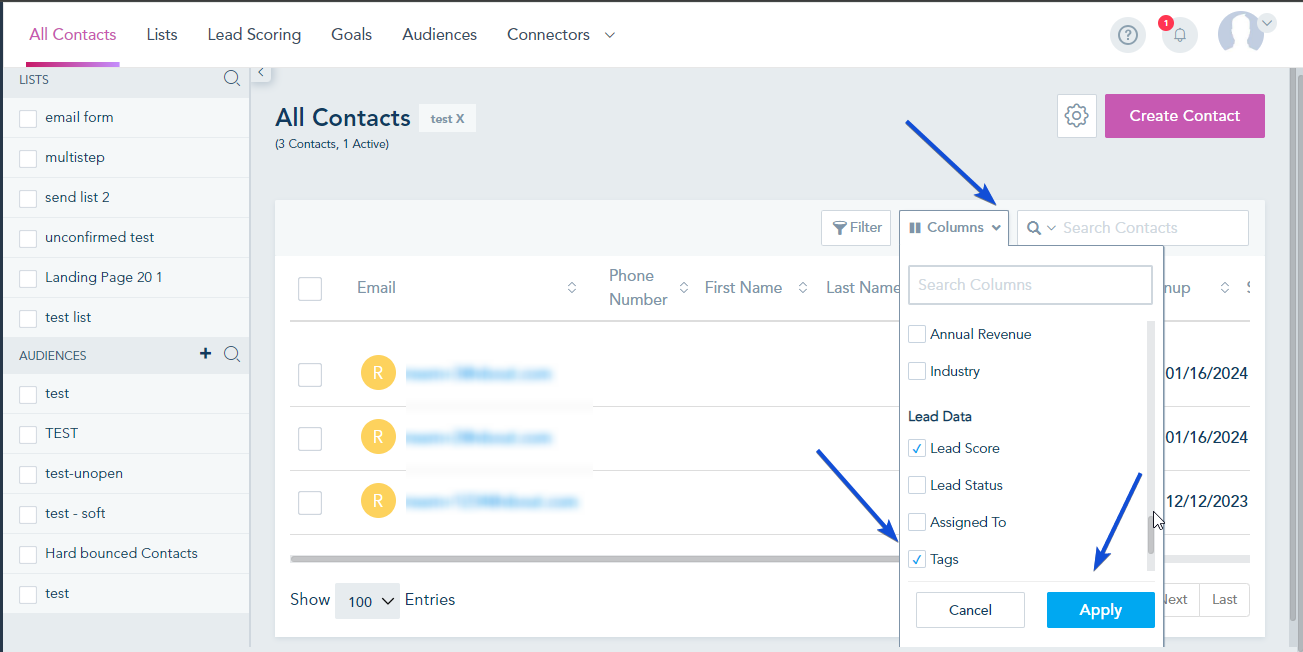
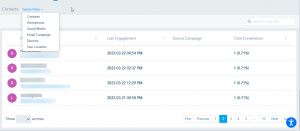
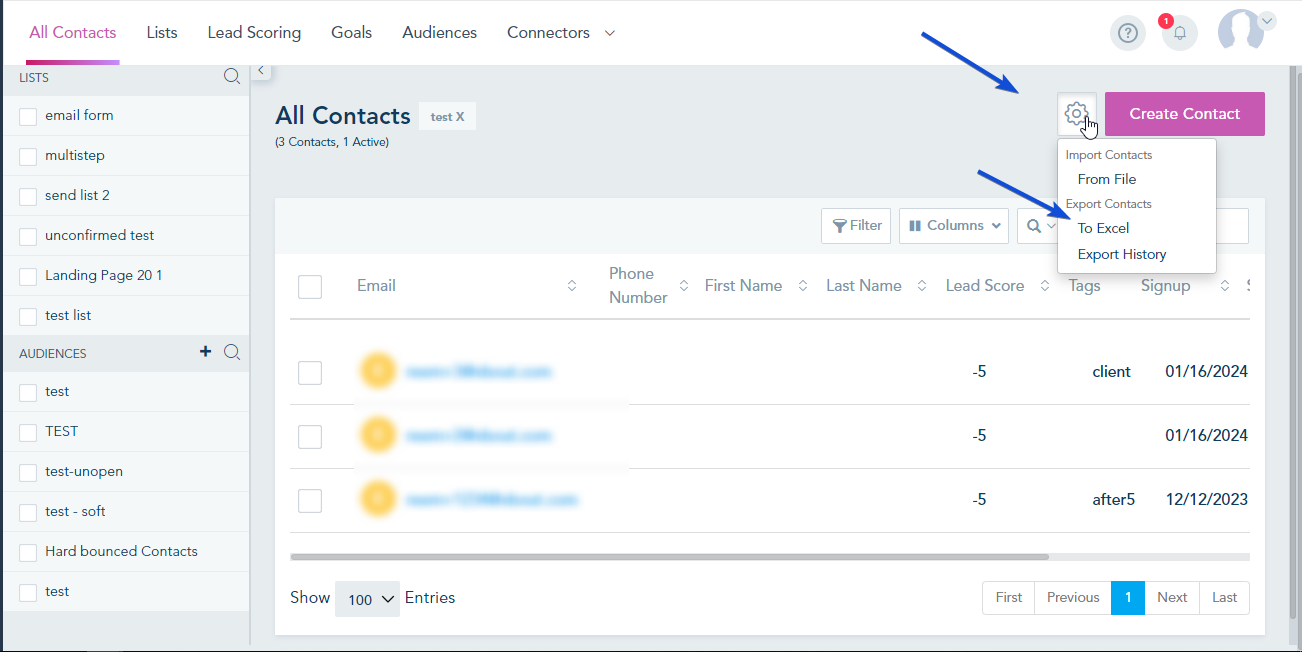
To export contacts with their tags within a list, choose the list from the left filter column, click the Columns option and select the “Tags”  option:

Once you selected Tags and all the list’s fields that you want to export, Export Contacts To Excel.

Get Started

Using dynamic and rich content blocks

The landing page builder offers a few dynamic blocks that you can use. These blocks include RSS feeds, embedded videos, event Calendars and event Countdowns.

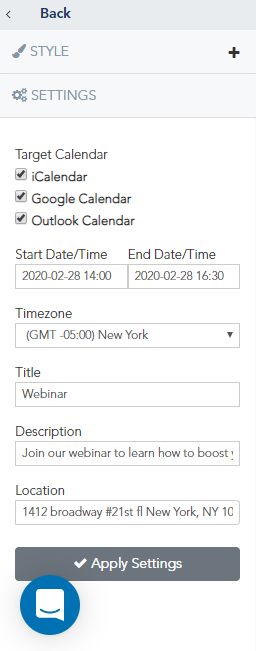
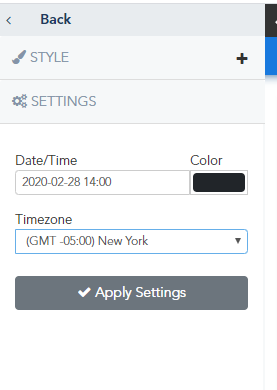
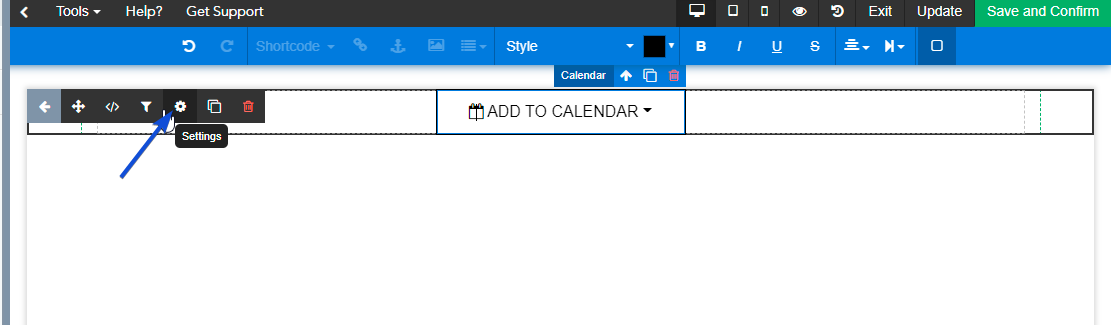
Once you select one of these blocks and drag it to your page, you can access its settings by clicking on the Settings option in the top of the block itself.

This will allow you to edit the settings for this specific block, so for example if it’s a calendar block, you will be able to select the calendar type (iCalendar, Google Calendar or Outlook Online), input the start and end dates, title, description, location and time zone for the event. This way once you publish your landing page, if someone clicks on the Add to Calendar button, they will automatically be able to add the event to their personal calendar.

The same rule applies to the countdown block, you will be able to edit its settings and specify the targeted date and time.

For RSS feeds blocks, you can input the RSS feed URL inside the block settings. And for the Videos blocks, you can also embed the Youtube/Vimeo/MP4 URL link for example using the block settings option as well which will automatically be reflected on the block itself.

Get Started

Add custom tracking

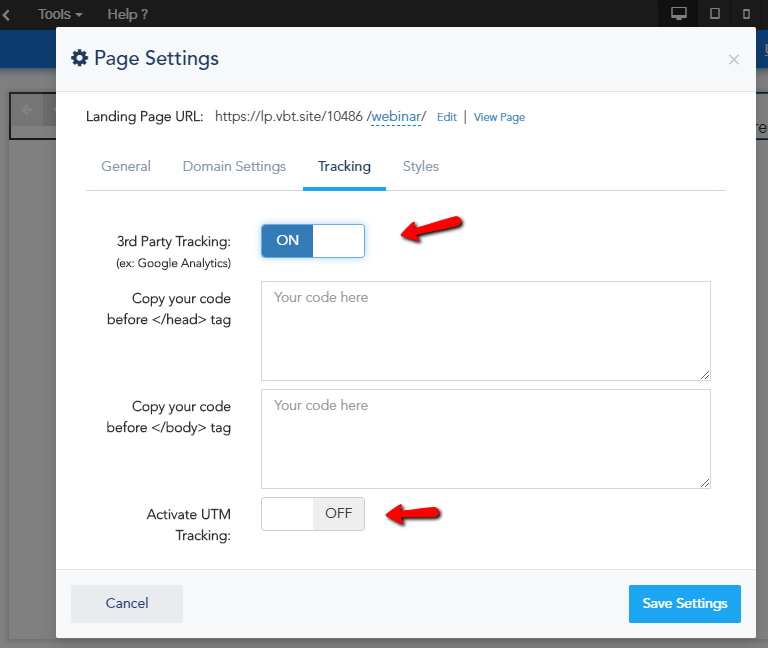
If you’d like to use your own custom tracking (Google Analytics or others…) on your Landing Pages, you can do that from your landing page Settings window.

In Landing Page Classic Builder:

  1. Go to the Settings option from the left sidebar.
  2. Click on the Tracking tab from within the settings popup.
  3. Activate the 3rd Party Tracking option and you will see two fields for your tracking code, one for the code that needs to be inserted before the closing </head> tag and the bottom field for the code that needs to be inserted inside the closing </body> tag. Some services require two code options, ex: Google Tag Manager, while others might only require one, ex: Google Analytics.
  4. You can also Activate UTM Tracking

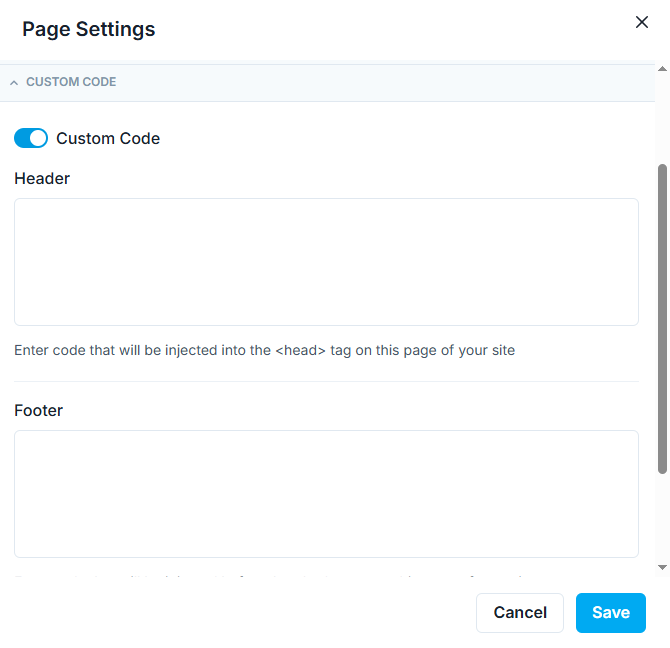
In Landing Page New Builder:

  1. Go to the Page Settings.
  2. Click on the Custom Code from within the settings sections.
  3. Activate the Custom Code option and you will see two fields for your tracking code, one for the code that needs to be inserted in the header and the bottom field for the code that needs to be inserted inside the footer.
  4. You can also Activate UTM Tracking

Get Started

Landing page personalization


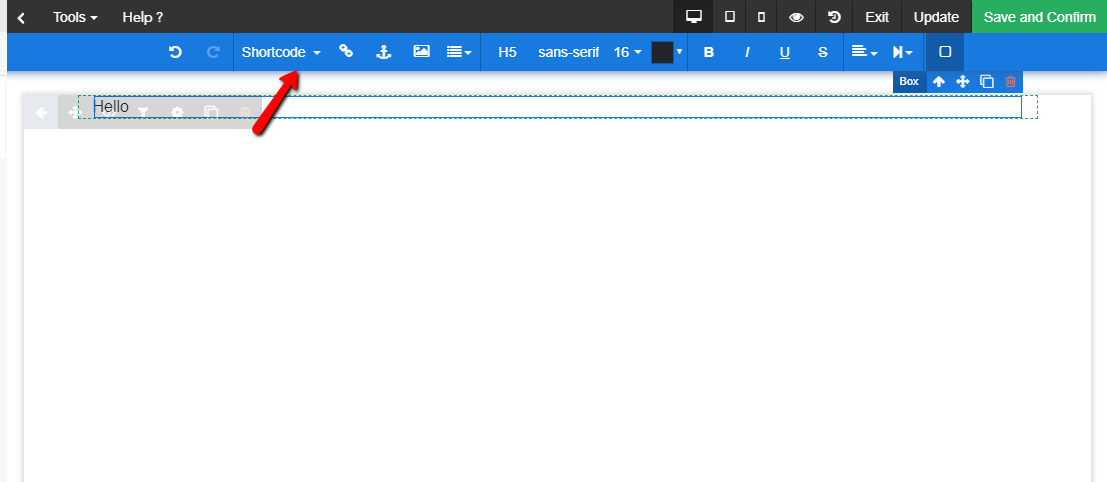
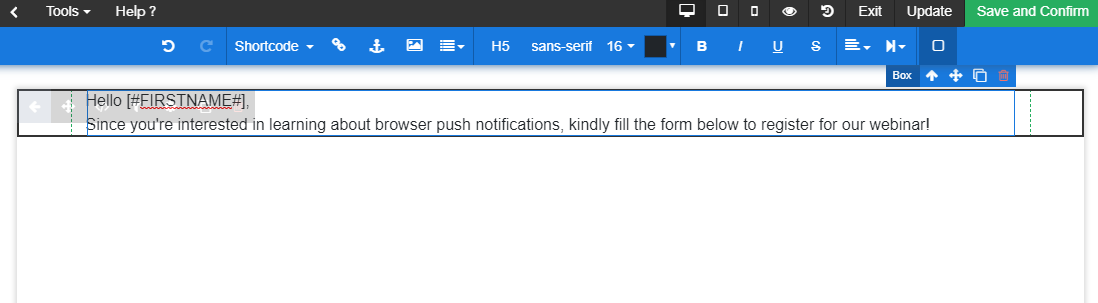
To add personalization to your Landing Pages, you can use the Shortcode option available inside the builder.

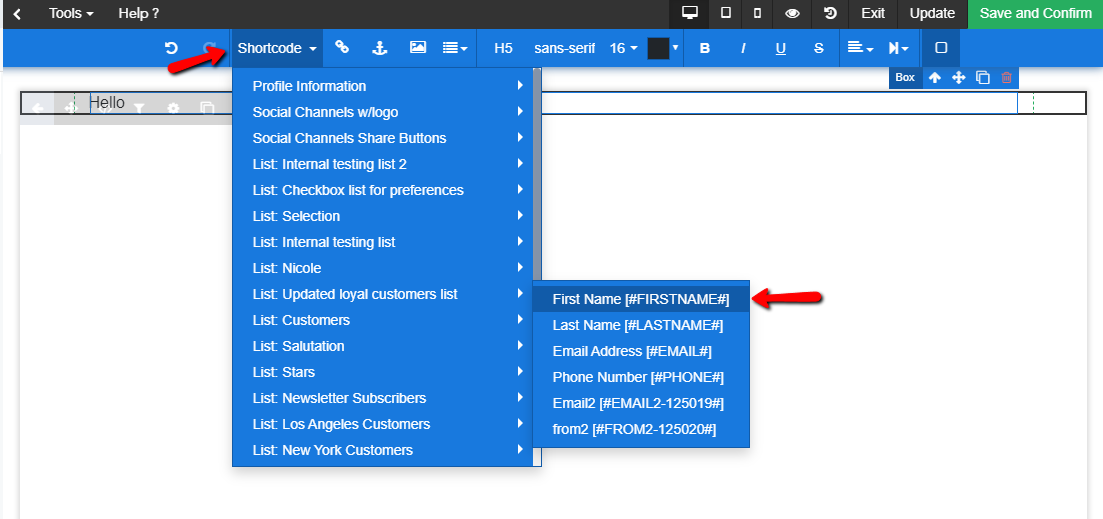
Once you click on Shortcode, hover over to select which list and which element to choose:


This will allow you to add List Shortcodes to your Landing Page text and personalize the experience for your recipients.

If you choose First Name from a specific list, you will see the following:

[#FIRSTNAME#] will be replaced with the First Name value from the list chosen.

In order to better understand Shortcode, click here.

Get Started

Landing page SEO setting

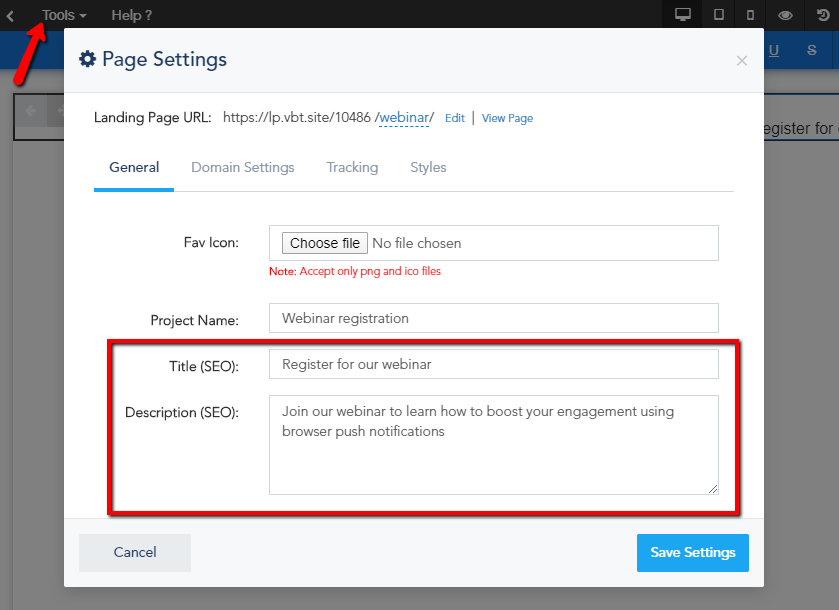
To edit your Landing Page SEO settings while inside the Builder, go to Page Settings from Tools. The settings menu will open, you can input your SEO title and description for this page inside the bottom two fields within the first General settings tab. Once you are done, hit Save Settings and then save your landing page changes from the top right for them to take effect.

Get Started

How to create a subaccount – Pro shared Email Plan

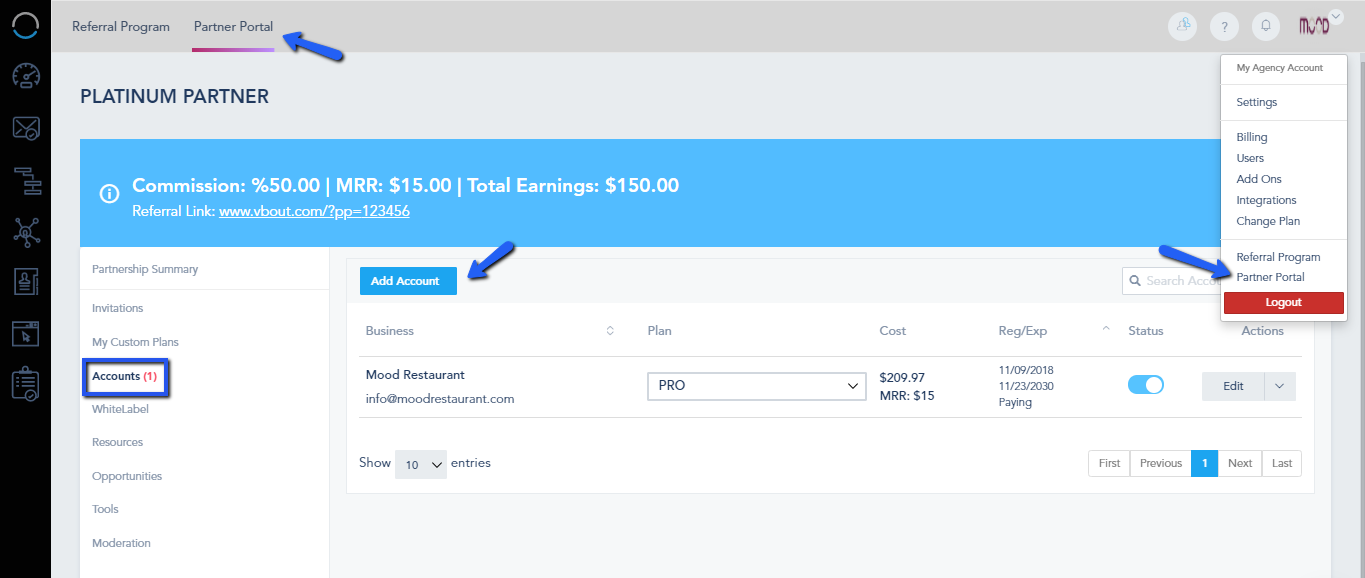
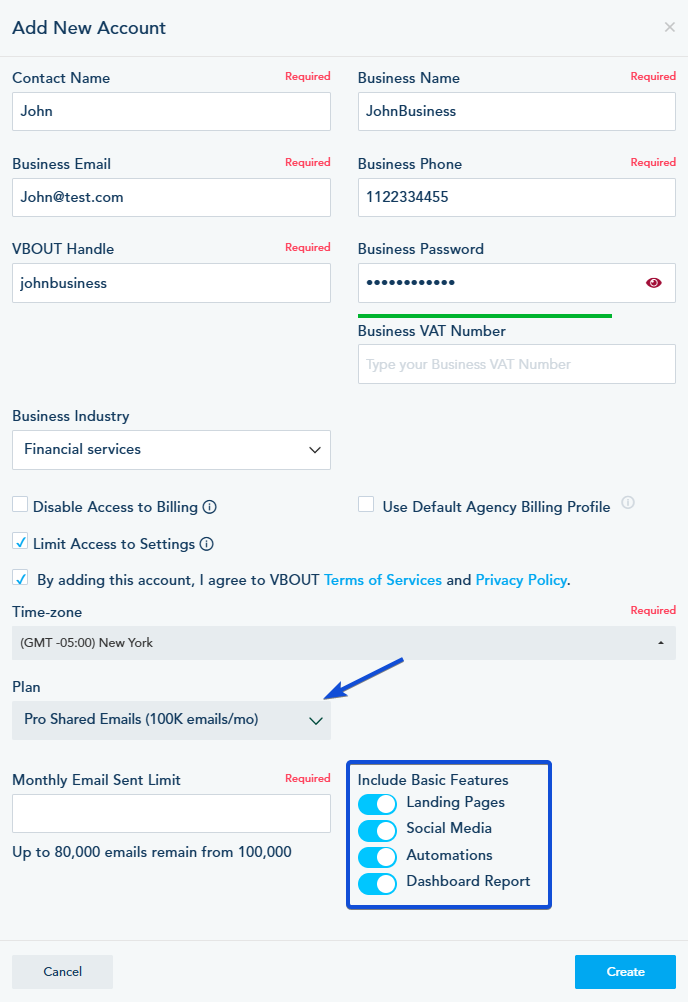
To add a new Client License, go to Partner Portal > Accounts > Add Account:

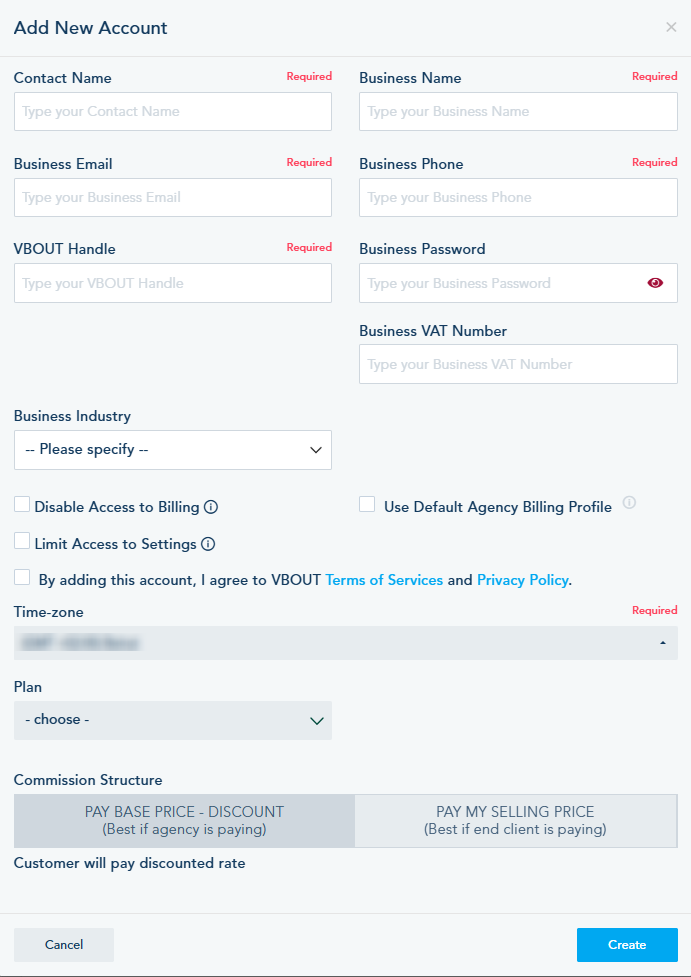
Configure the Account the way you want:

  • Contact Name: The client’s name.
  • Business Name: The business’s name.
  • Business Email: The business’s email address which will be the account’s default email address.
  • Business Phone: The business’s phone number.
  • VBOUT Handle: This will be the same as the Business Name.
  • Business Password: The business password that the default email address will use to login.
  • Business VAT Number: The Business’s VAT Number.
  • Disable Access to Billing: Choose whether to allow the business to access its billing page or not.
  • Use Default Agency Billing Profile: Future registrations to this plan will automatically use the agency billing profile to process monthly membership and add-on purchases. Note that you can always change the individual card on file for each sub-account in the future.
  • Limit Access to Settings: Account’s owner will not have access to users.
  • Time-zone: The account’s time zone.
  • Plan: Choose the plan Pro Shared Emails
  • Monthly Email Sent Limit: Specify the number of emails allocated for this sub-account per month. Please note that this number will be deducted from the agency monthly limit.
  • Include Basic Features: You can turn on the features you want to activate in the account.
  • Commission Structure: Choose whether you want it to be “Discount to paid amount” or “Normal Commission Payout”.

Here’s how this page will look like after adding the required information:

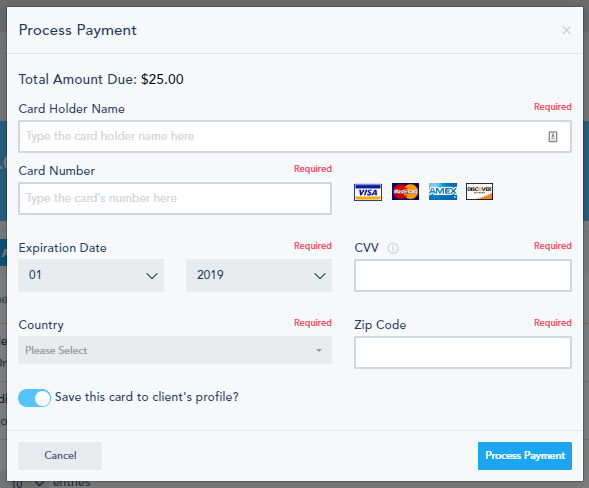
Once you click on create, you will have to fill the billing information:

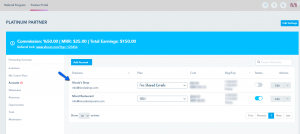
Afterward, the account will appear here:

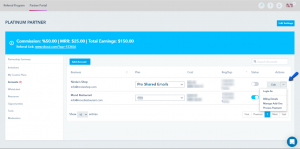
You will be able to edit it here:

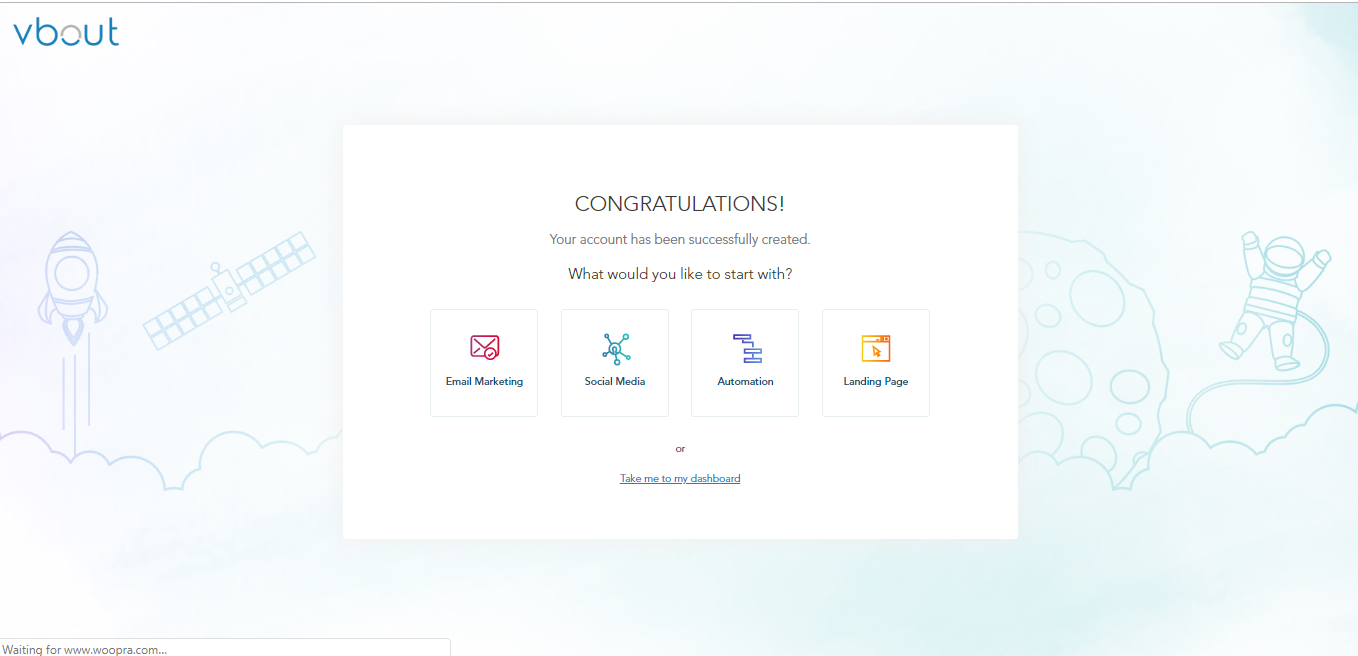
Once the client logs into their account for the first time, they will be redirected to this page:

Where they choose whether to go to the dashboard or start with one of these features.

Get Started

GDPR compliance tools

Our platform is GDPR compliant and we provide tools to help our users comply with GDPR as well. Please see the list below:
​
1- Ability to export contact history
​
2- One-click erase contact option

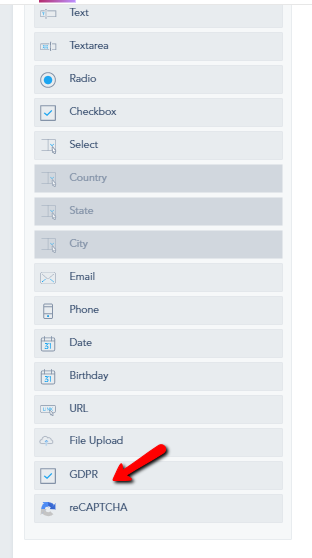
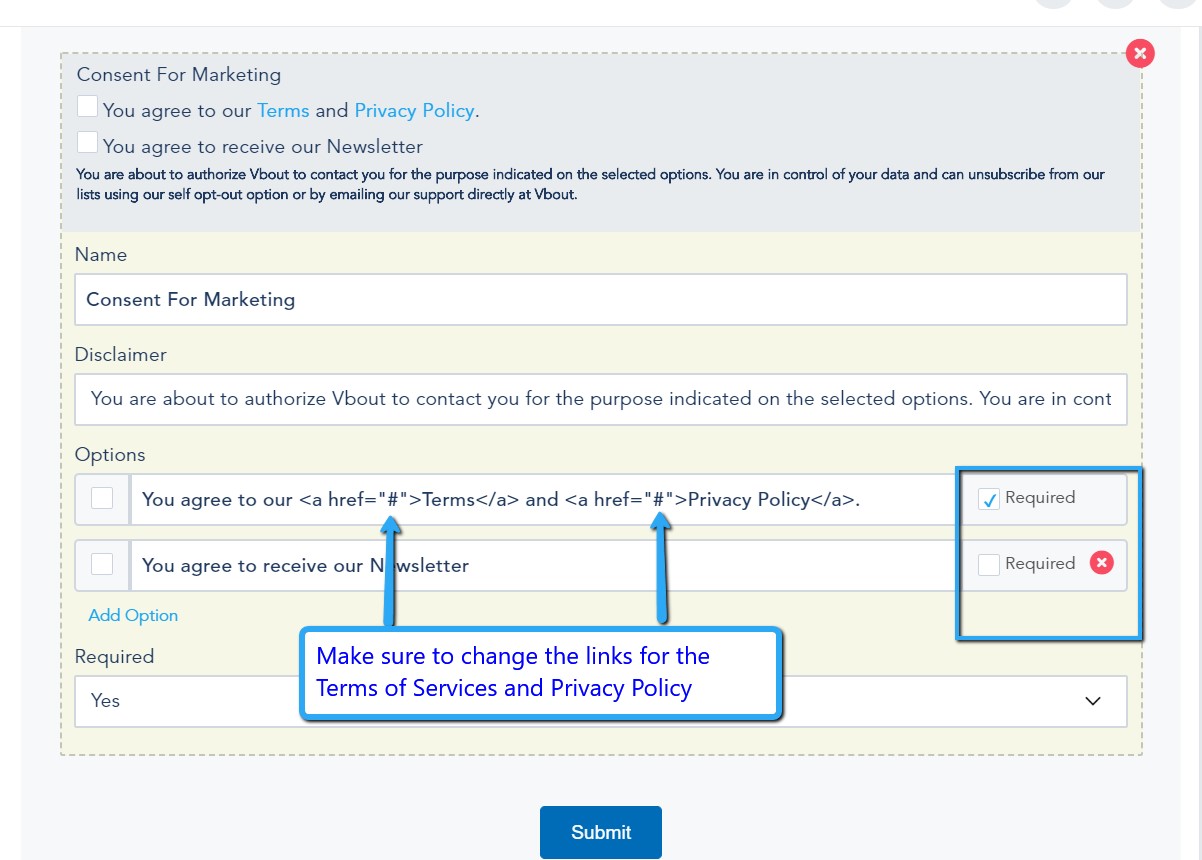
3- Adding a field on the forms, to ask for consent

help-page-003

Get Started

Allow adding contacts without an email to a List

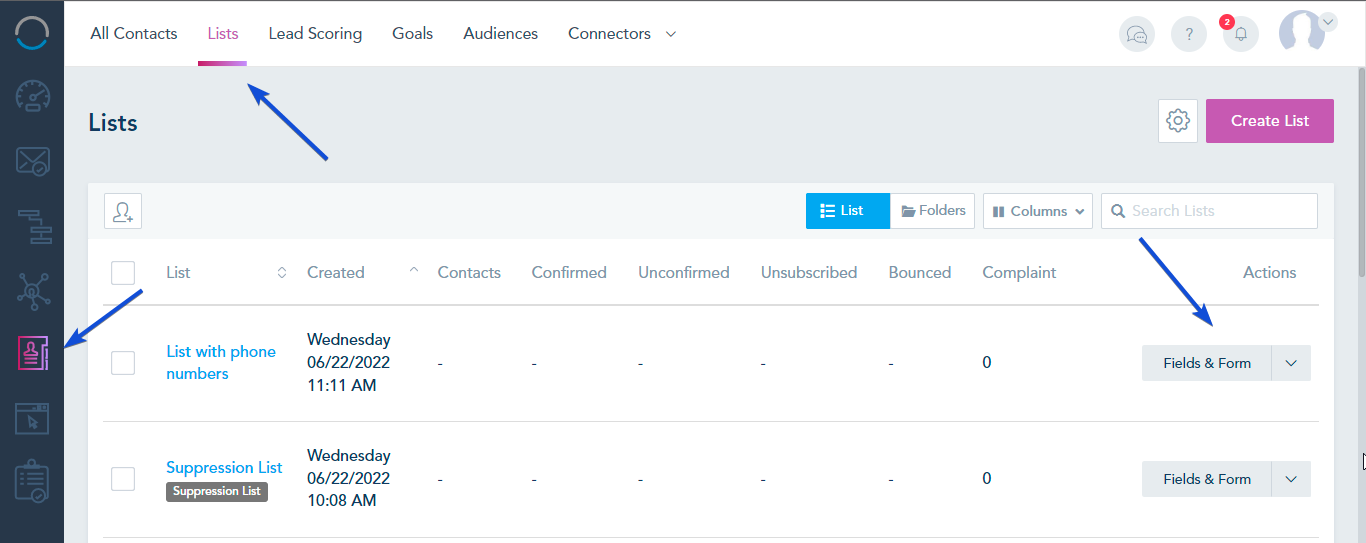
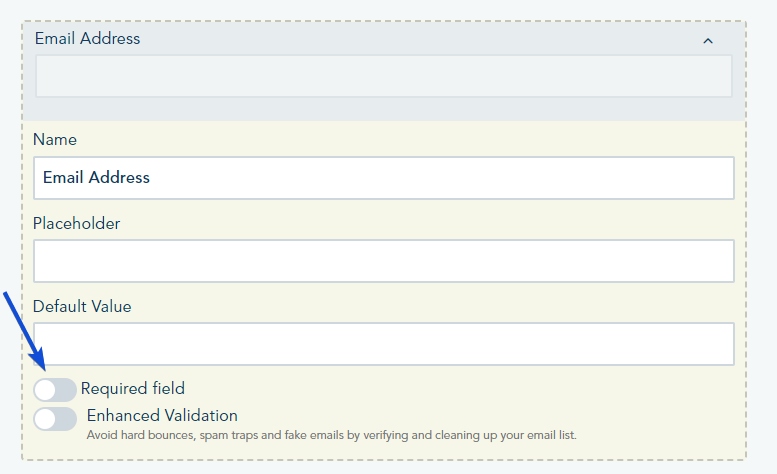
By default, when adding a contact to a list using opt-in forms, mass upload, API or third-party integration, you have to provide an email address with the contact which is the primary identifier of that contact. To override this setting and allow adding contacts without an email (ex: Contact us form on your website), navigate to your Lists page and from the right side options drop-down choose Fields & Form. Expand the Email Address field and mark it Not Required.

Note: This setting can impact the performance of your automation.

Get Started

Audiences

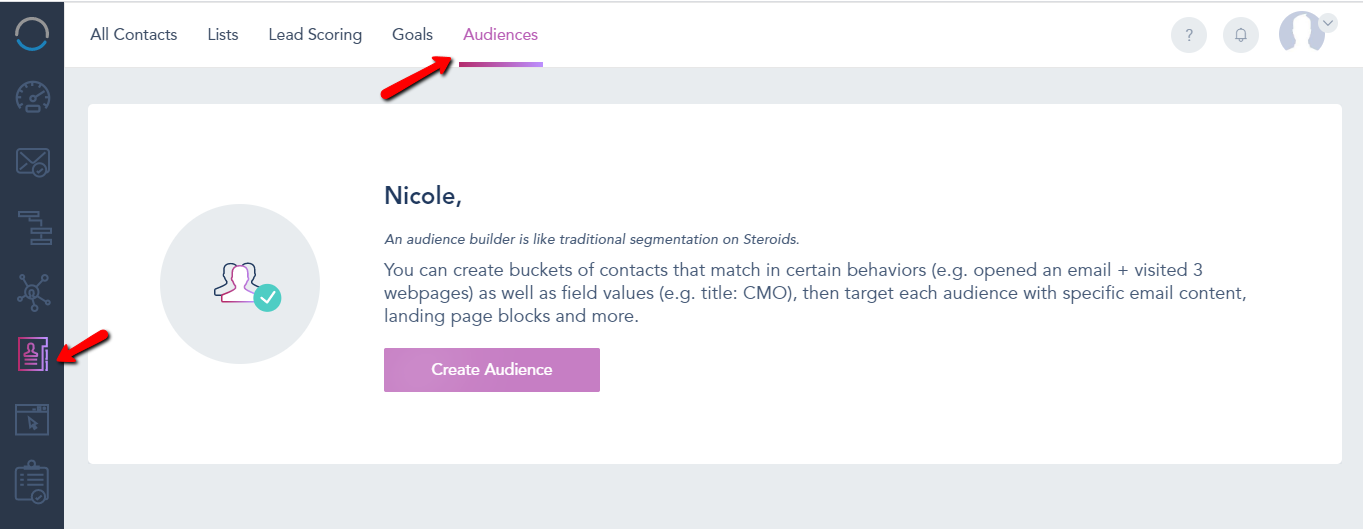
Audiences allow you to segment your lists based on specific criteria that you choose. The platform allows you to Create Audiences from your current contact lists. To do that, click on the Contacts option from the left sidebar, then select the Audiences tab in the top.

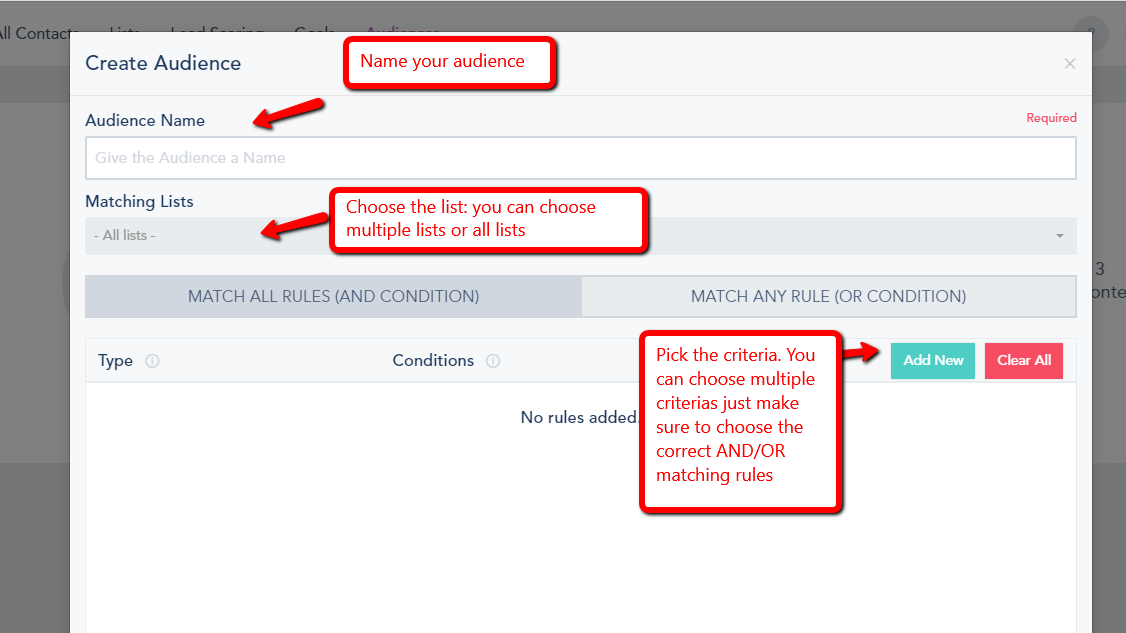
To create your first audience, click on Create Audience. You will be presented with a form window where you can give your Audience a name, choose your source list(s) that will be used to create this Audience (You can leave this option empty to apply the rules on ALL LISTS). Next you can specify your rules, for example, you can group contacts based on their behavior (opened your last campaign), or based on field values (Title field is CMO), or other rules…

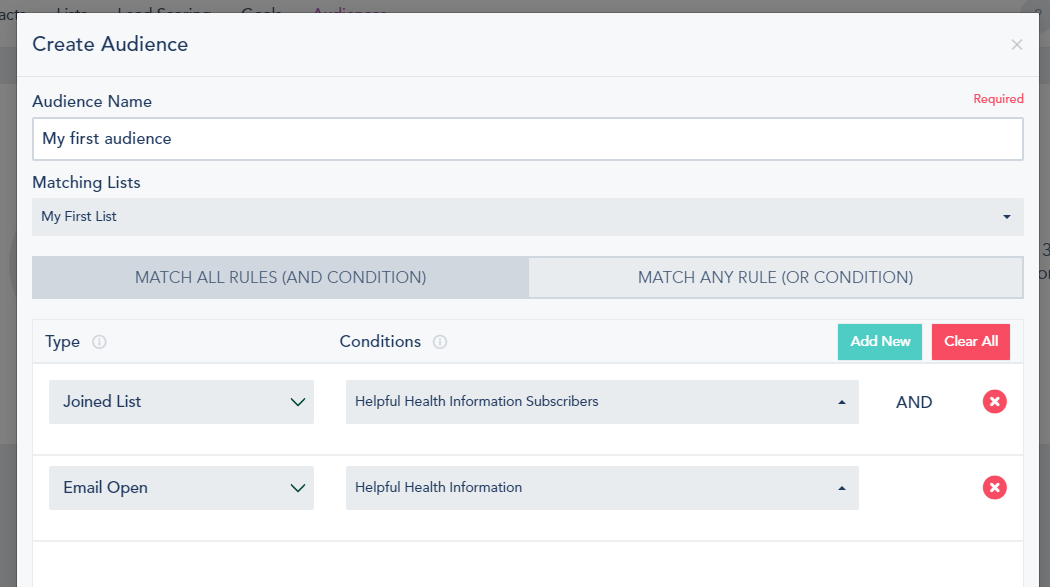
This is another screenshot showing more options being used inside the audience settings.

Audiences can be used later on to send specific email campaigns or inside Automation to target a particular group of contacts.

Get Started

Setting up lead scoring

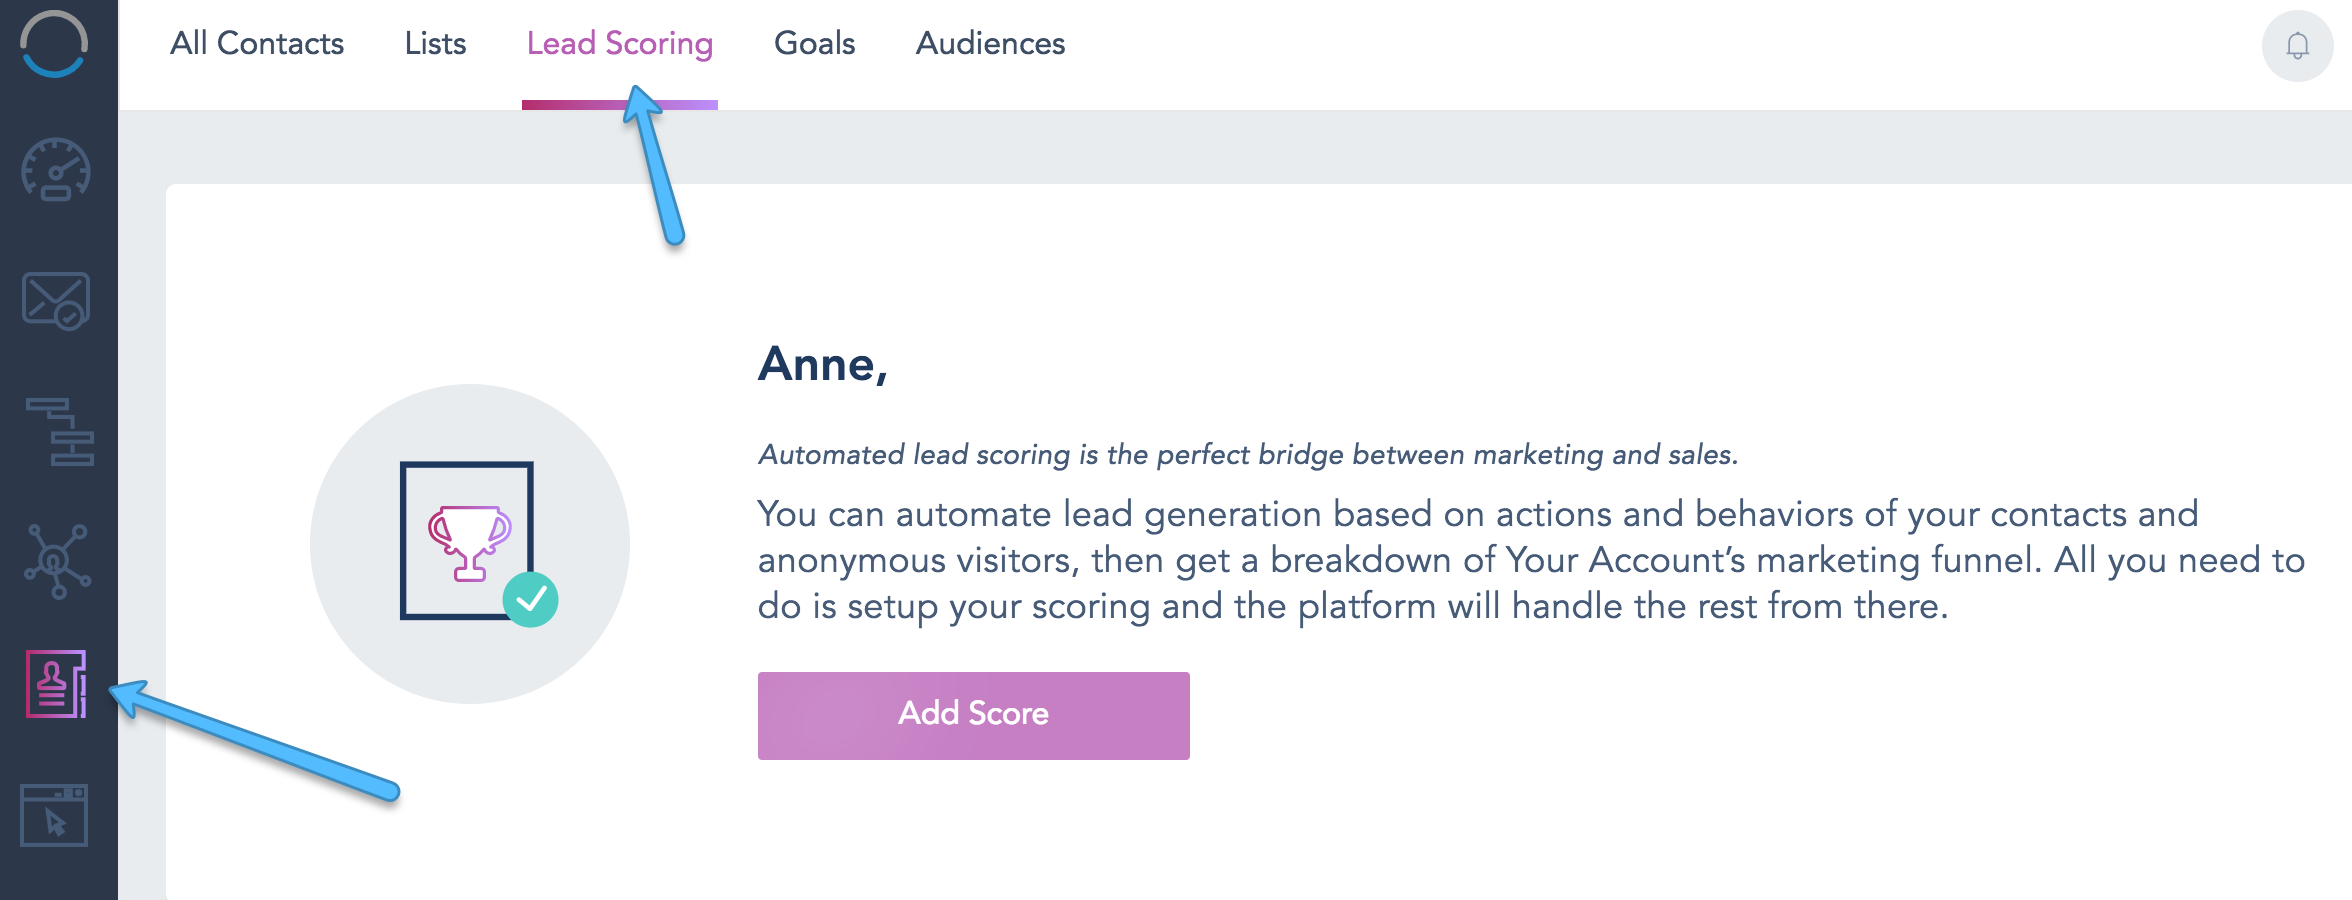
To setup a new lead score, Go to Contacts – > Lead Scoring, click on Add Score.

Note: Lead scoring is an Add-On that must be installed or part of your plan.

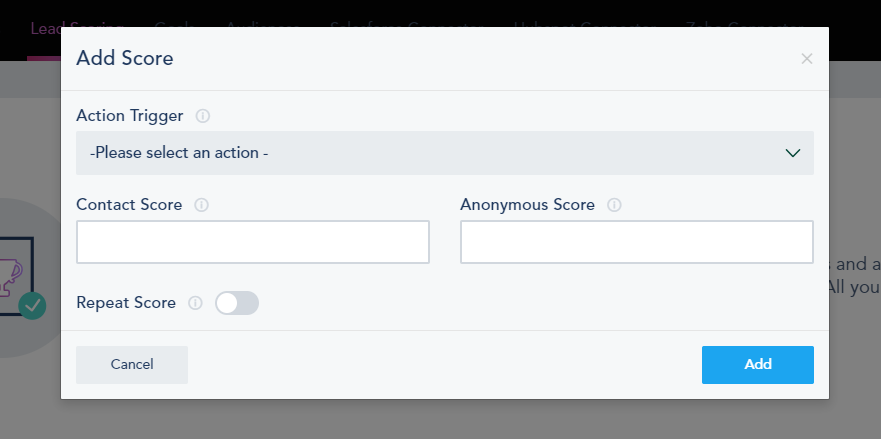
A popup window will appear where you can assign the score rules. You will be prompted with the following configurations:

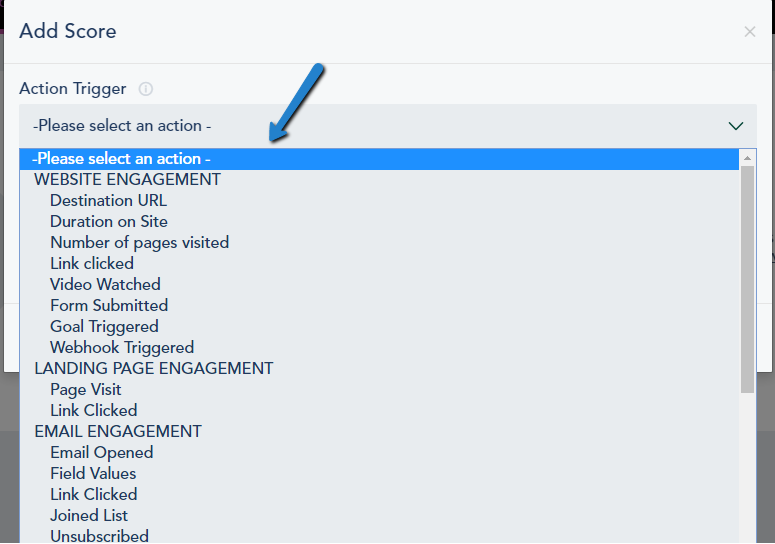
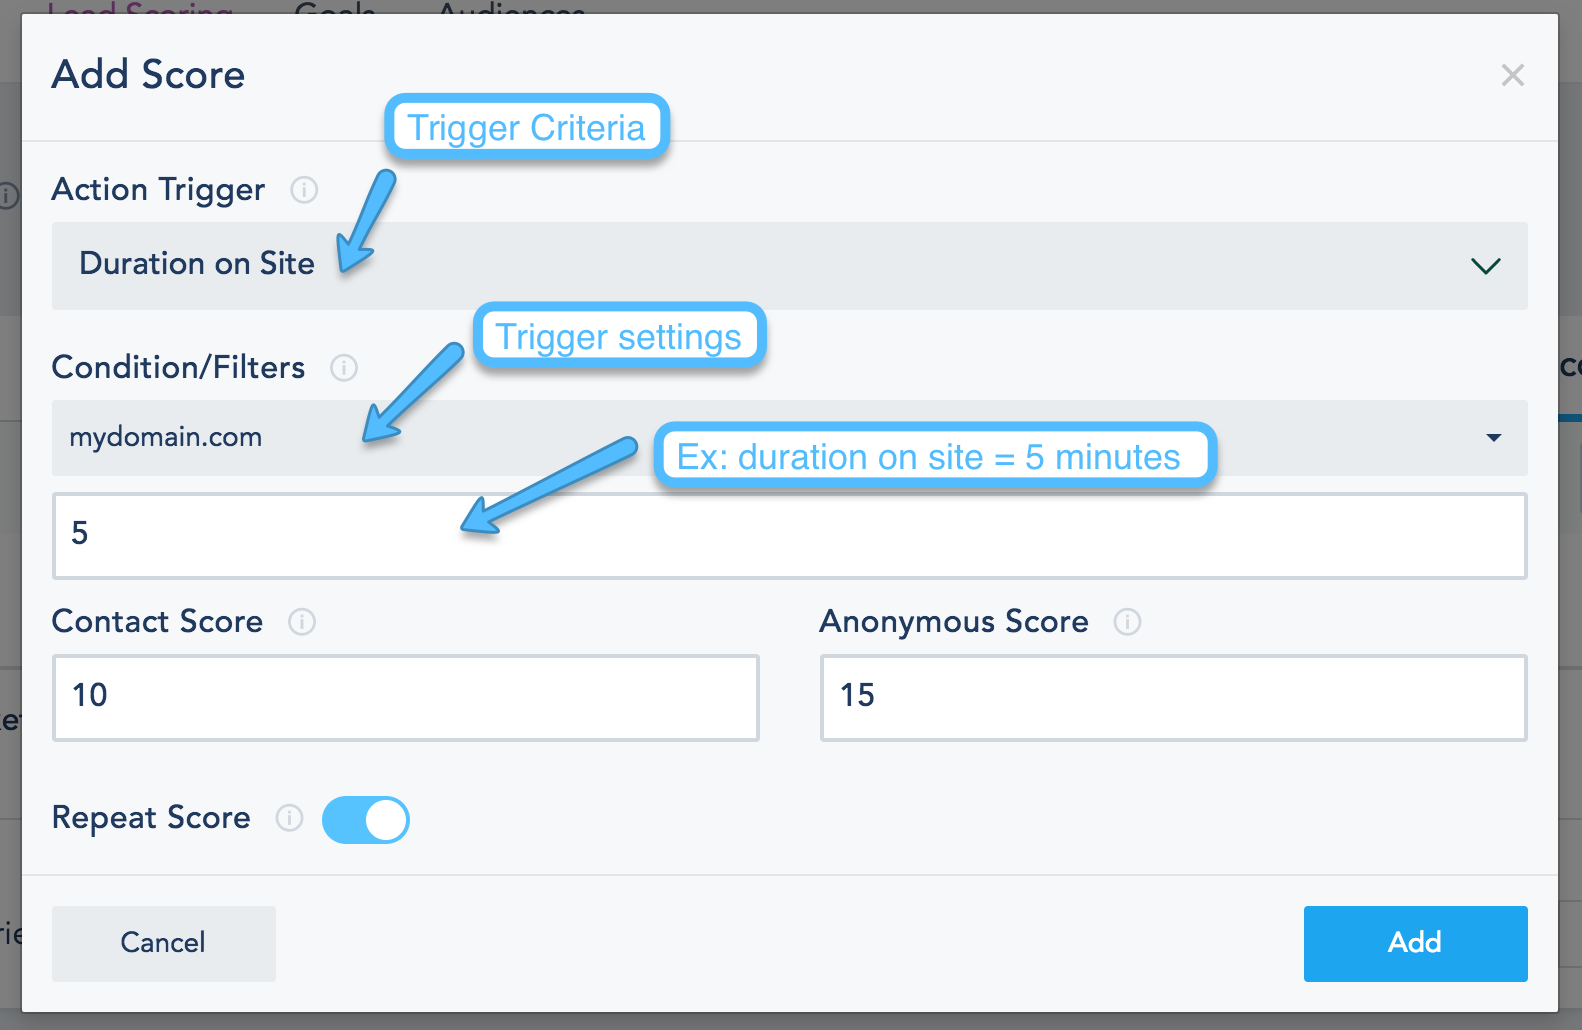
  1. An Action Trigger which is the type of engagement or data that the person will be scored on (Ex: a duration on site, Watched a video, opened an email or their company size is 1-10 employees.).
  2. Each Action Trigger has its own Conditions/Filters that must be completed (Ex: if you choose duration on site, you will need to specify which domain you are targeting in this field and the time spent)
  3. The Contact Score and Anonymous Score once a user and/or his data match your Action Triggers and Conditions. You might want to accelerate the scoring for known contacts by assigning them higher scores than anonymous visitors, for certain actions considering you have identifiable contact information on them.
  4. Choose if you want to repeat the scoring process each time it is matched or do it one single time.

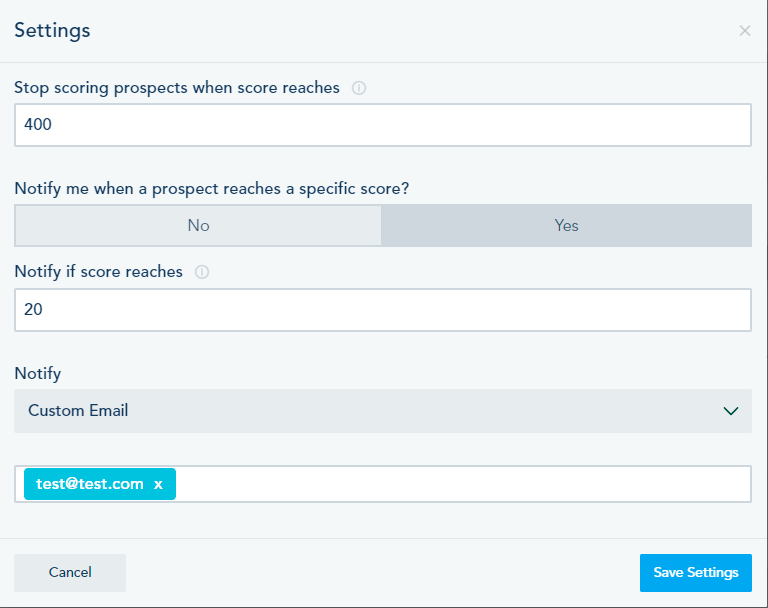
When you click on the gear next to Add Score button:

The popup will let you configure the maximum score leads can reach as well as enable a notification alert once a lead has reached a certain score that you specify.

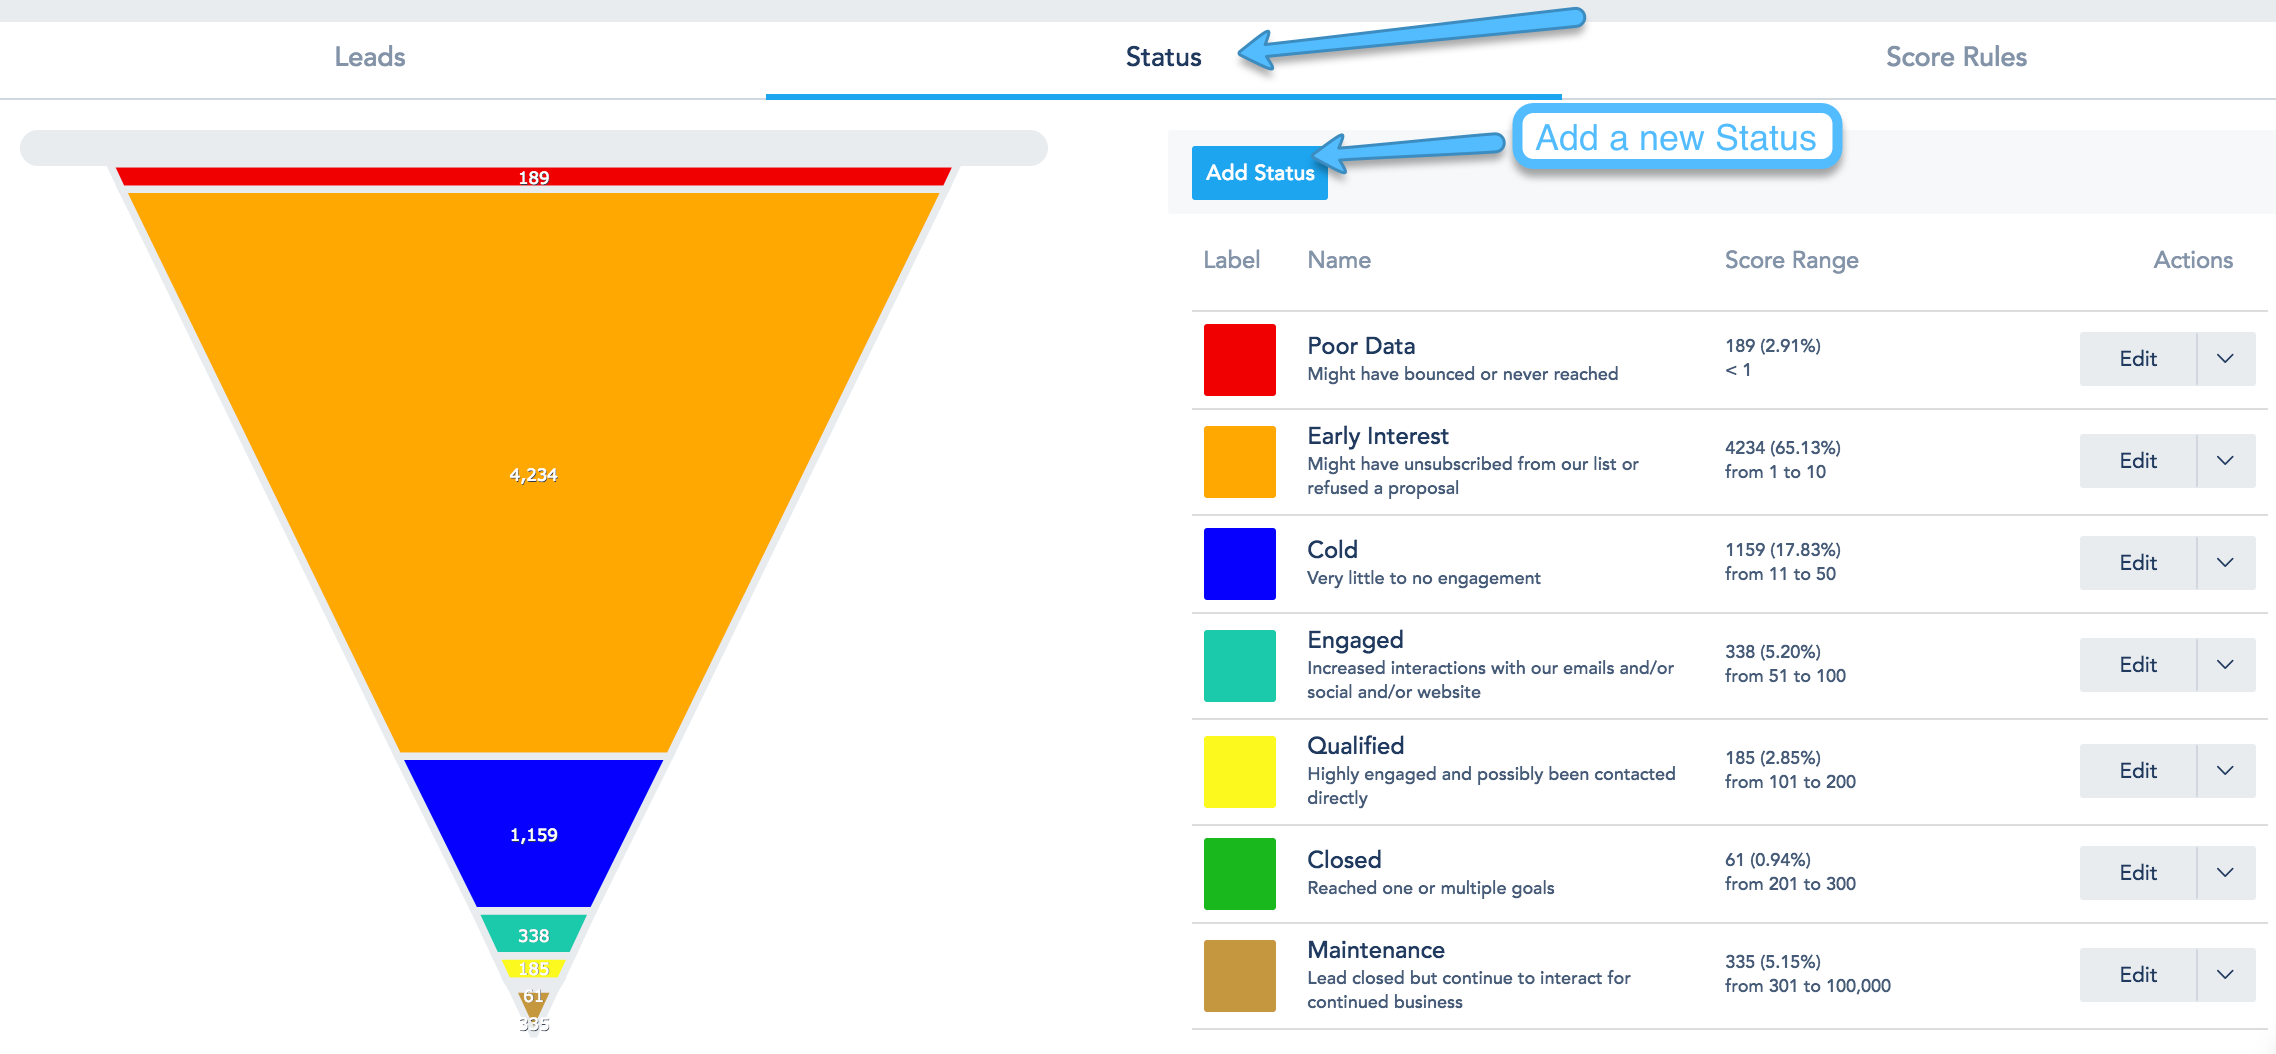
You can explore your Leads, their Status and your Score Rules through:

LeadsStatusScore Rules
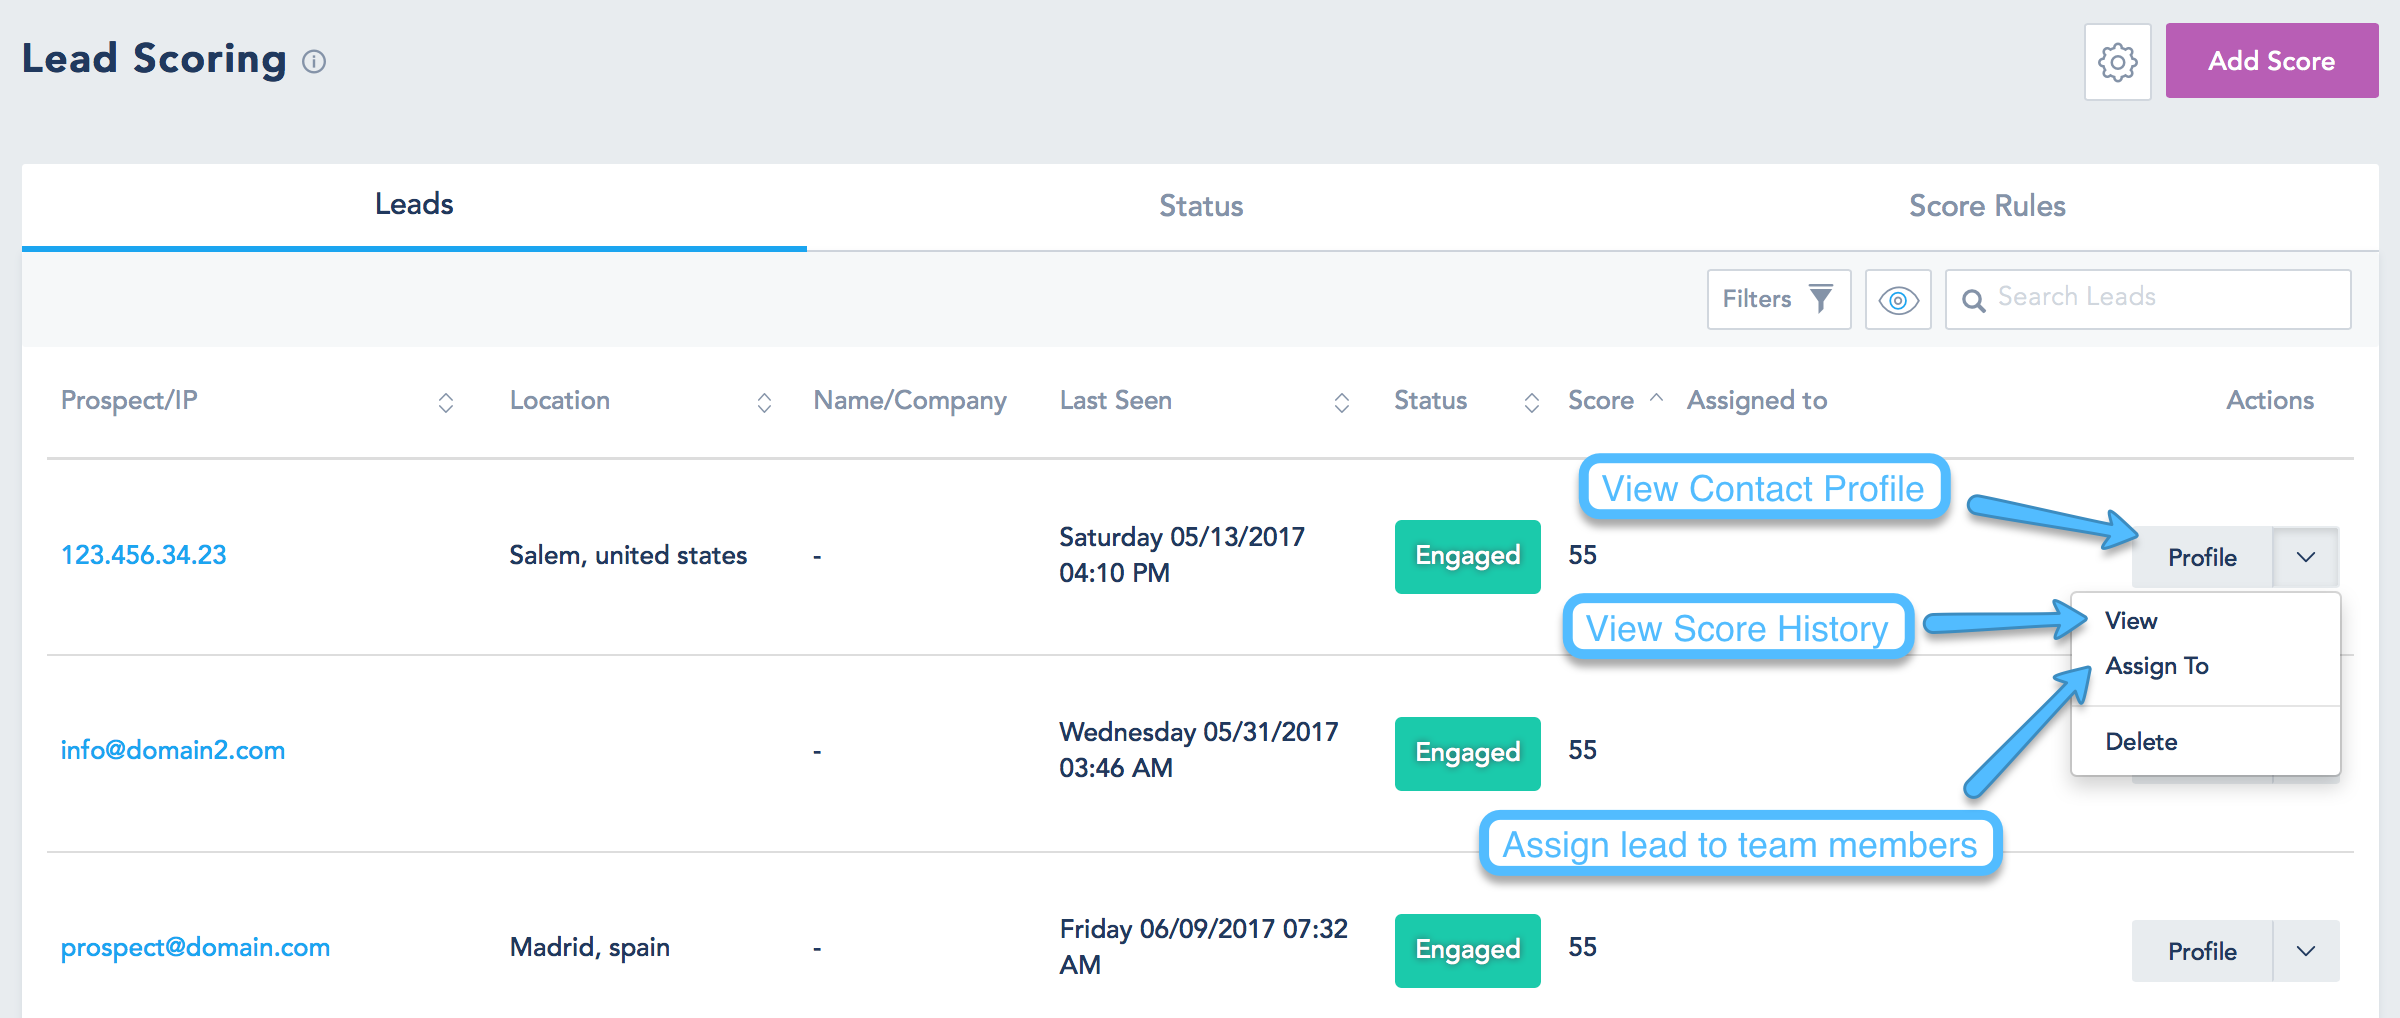
That’s how your Leads will appear:

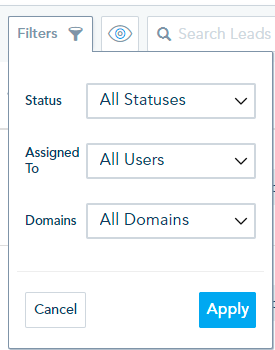
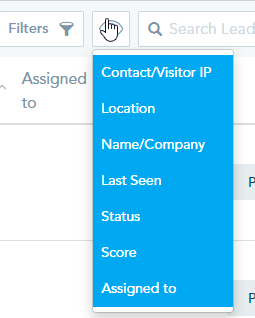
You can search leads,  filter them by type (contacts vs anonymous), status, by assigned users or by domains. You can also click on a record to view their profile timeline. If you are working in a team environment you can assign leads to different team members from the Assign To option.

Score Status is a great way to group your leads into human identifiable jargon that will help you take actions manually or through a journey workflow on your dashboard. Your account will come with a predefined set of label that you can click and modify to match your own funnel.

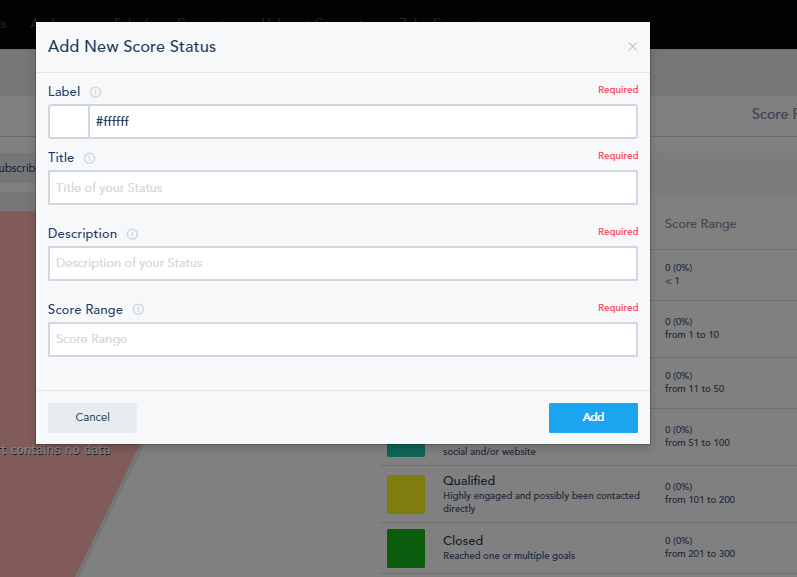
To add a new status, go to the Status tab and click Add Status.


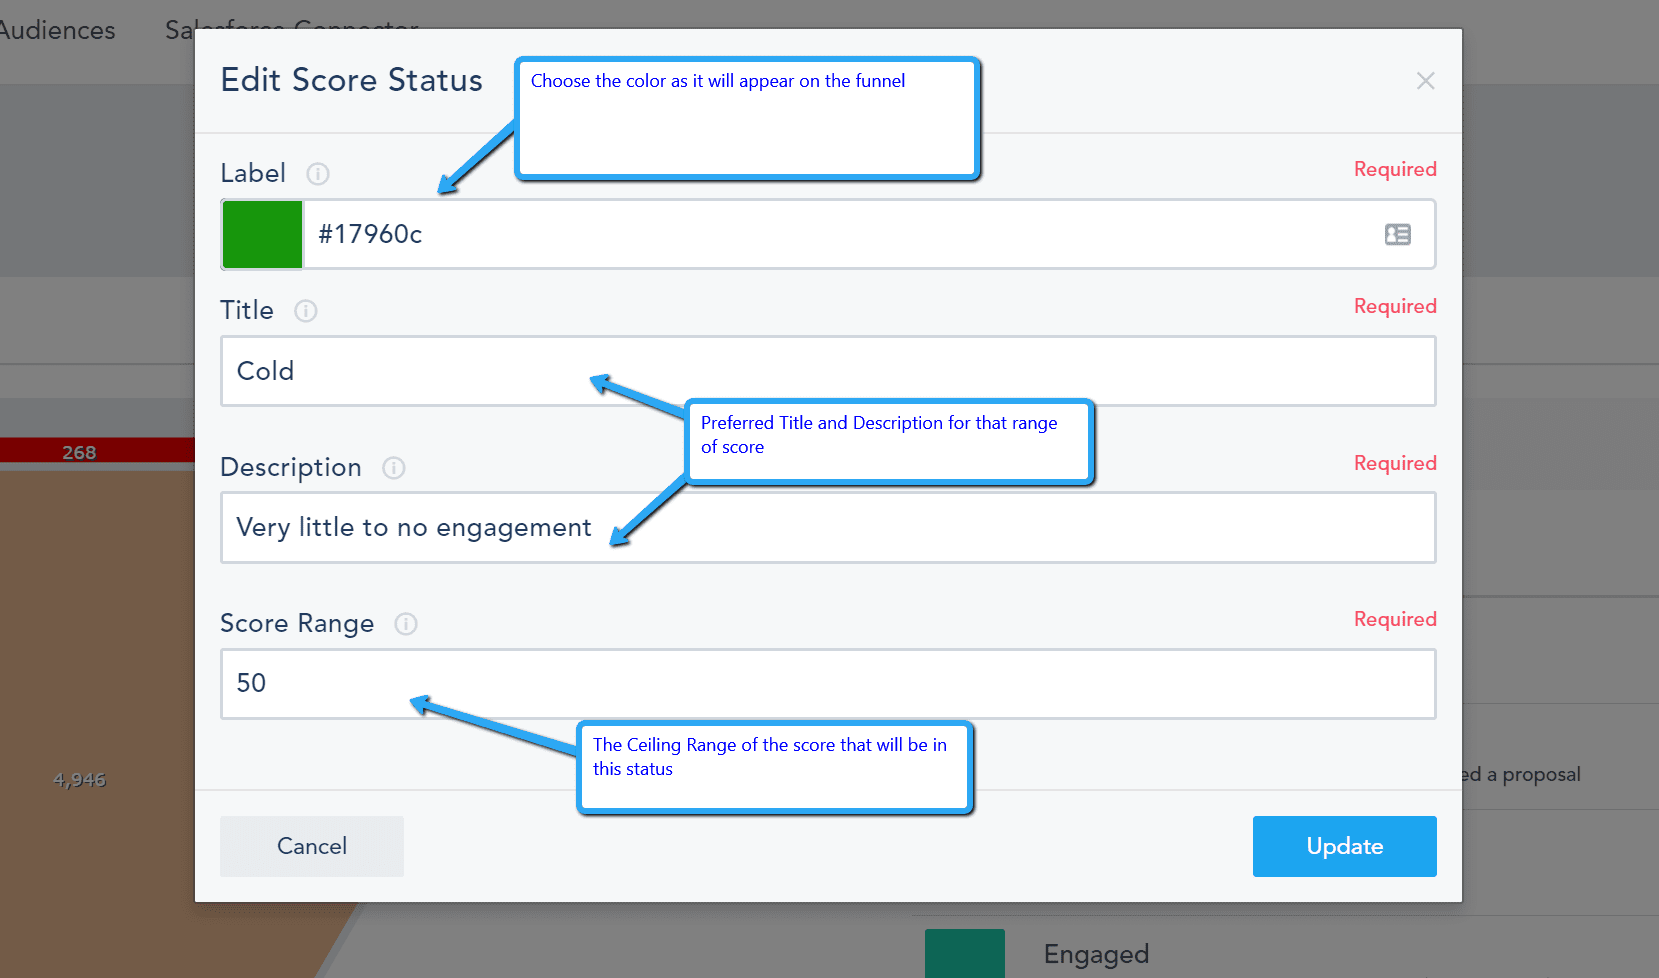
Adding a new Status Label will ask you for the following information:

  1. Color for that label as it will appear on your funnel.
  2. Label Title and Description as preferred by you and your team.
  3. The Ceiling Range of the score that will be in this status. The system will automatically pick up the number from the the previous score and calculate the range accordingly. In the example below, if you put 50 and the previous score was 10 then for this label, anyone that fall into the range of 11-50 will be labeled as Cold Lead.

    You can also edit predefined Status:

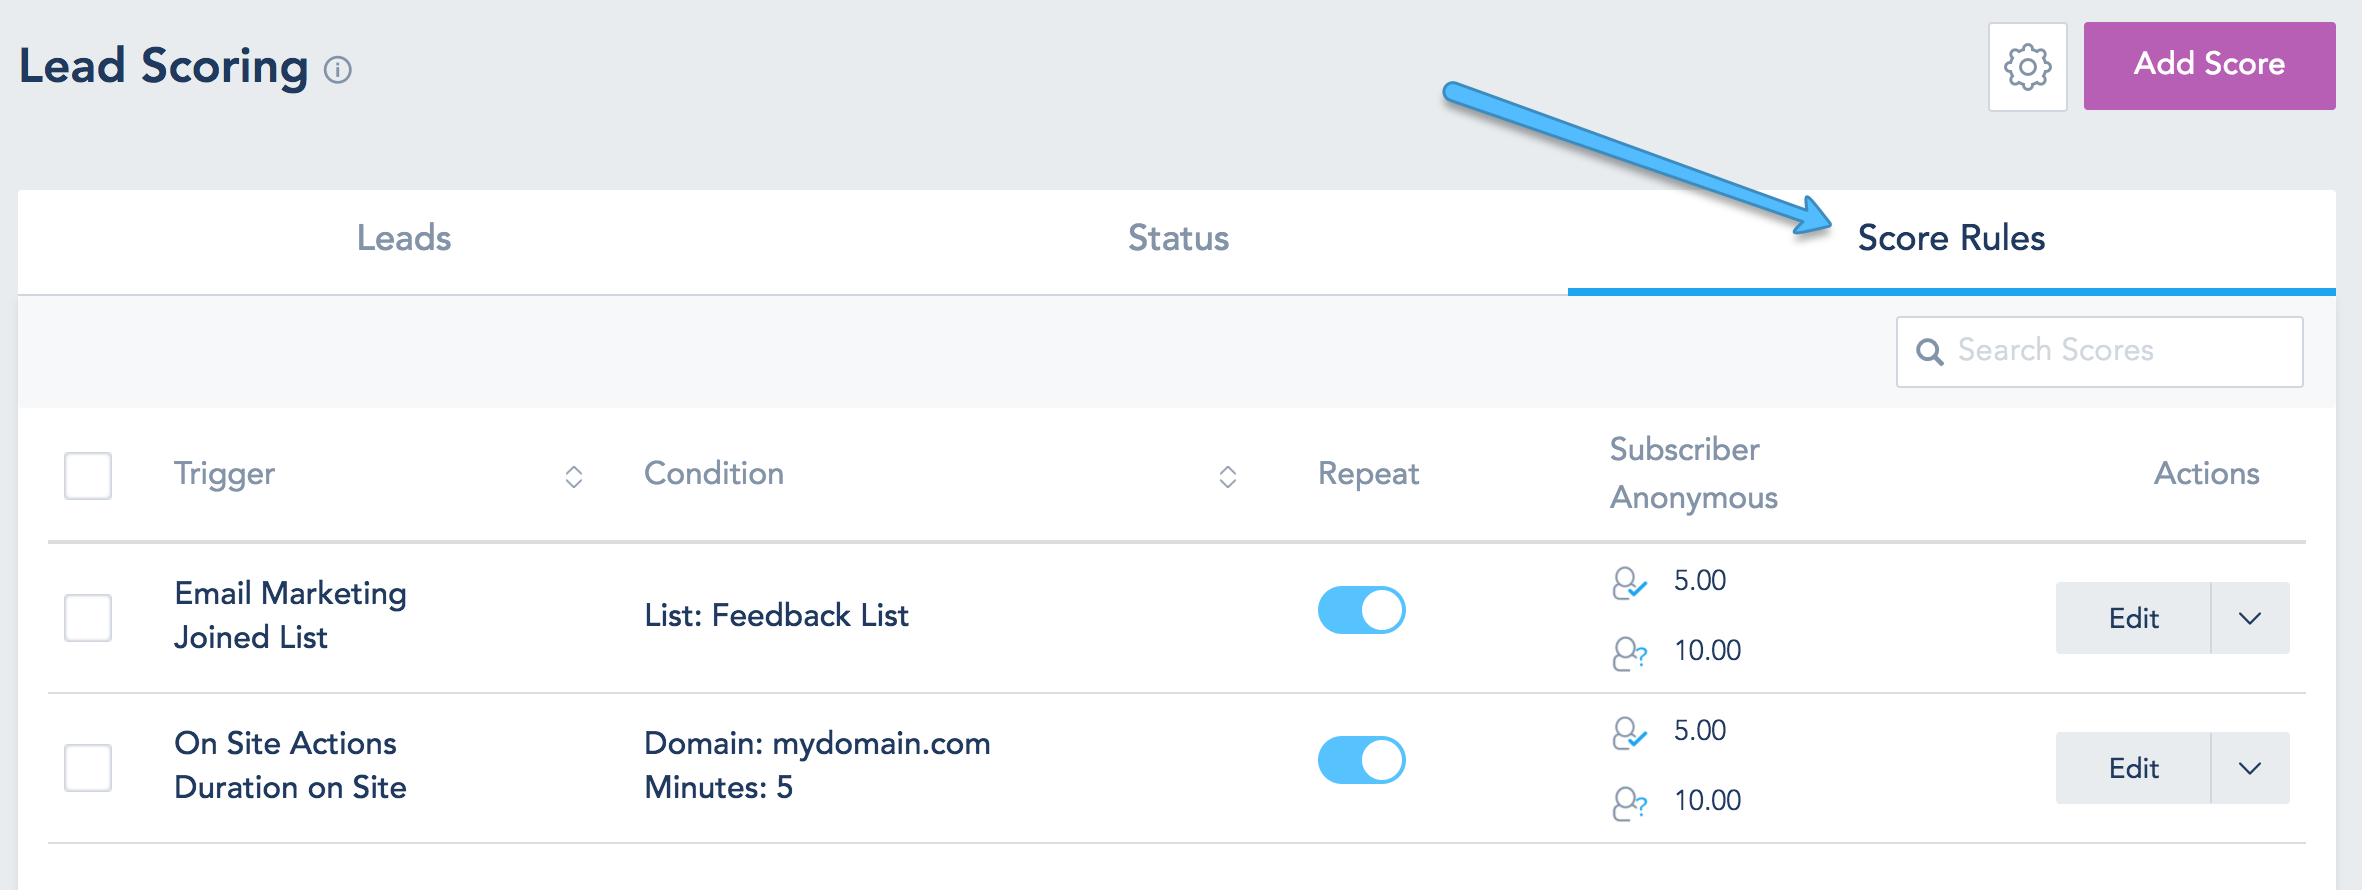
To access the list of scores and make changes to them click the Score Rules tab.


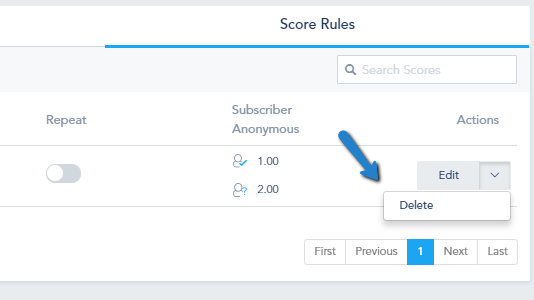
You can also Delete the Scores you no longer want by choosing Delete from the Dropdown Menu

Get Started

Setting up goals

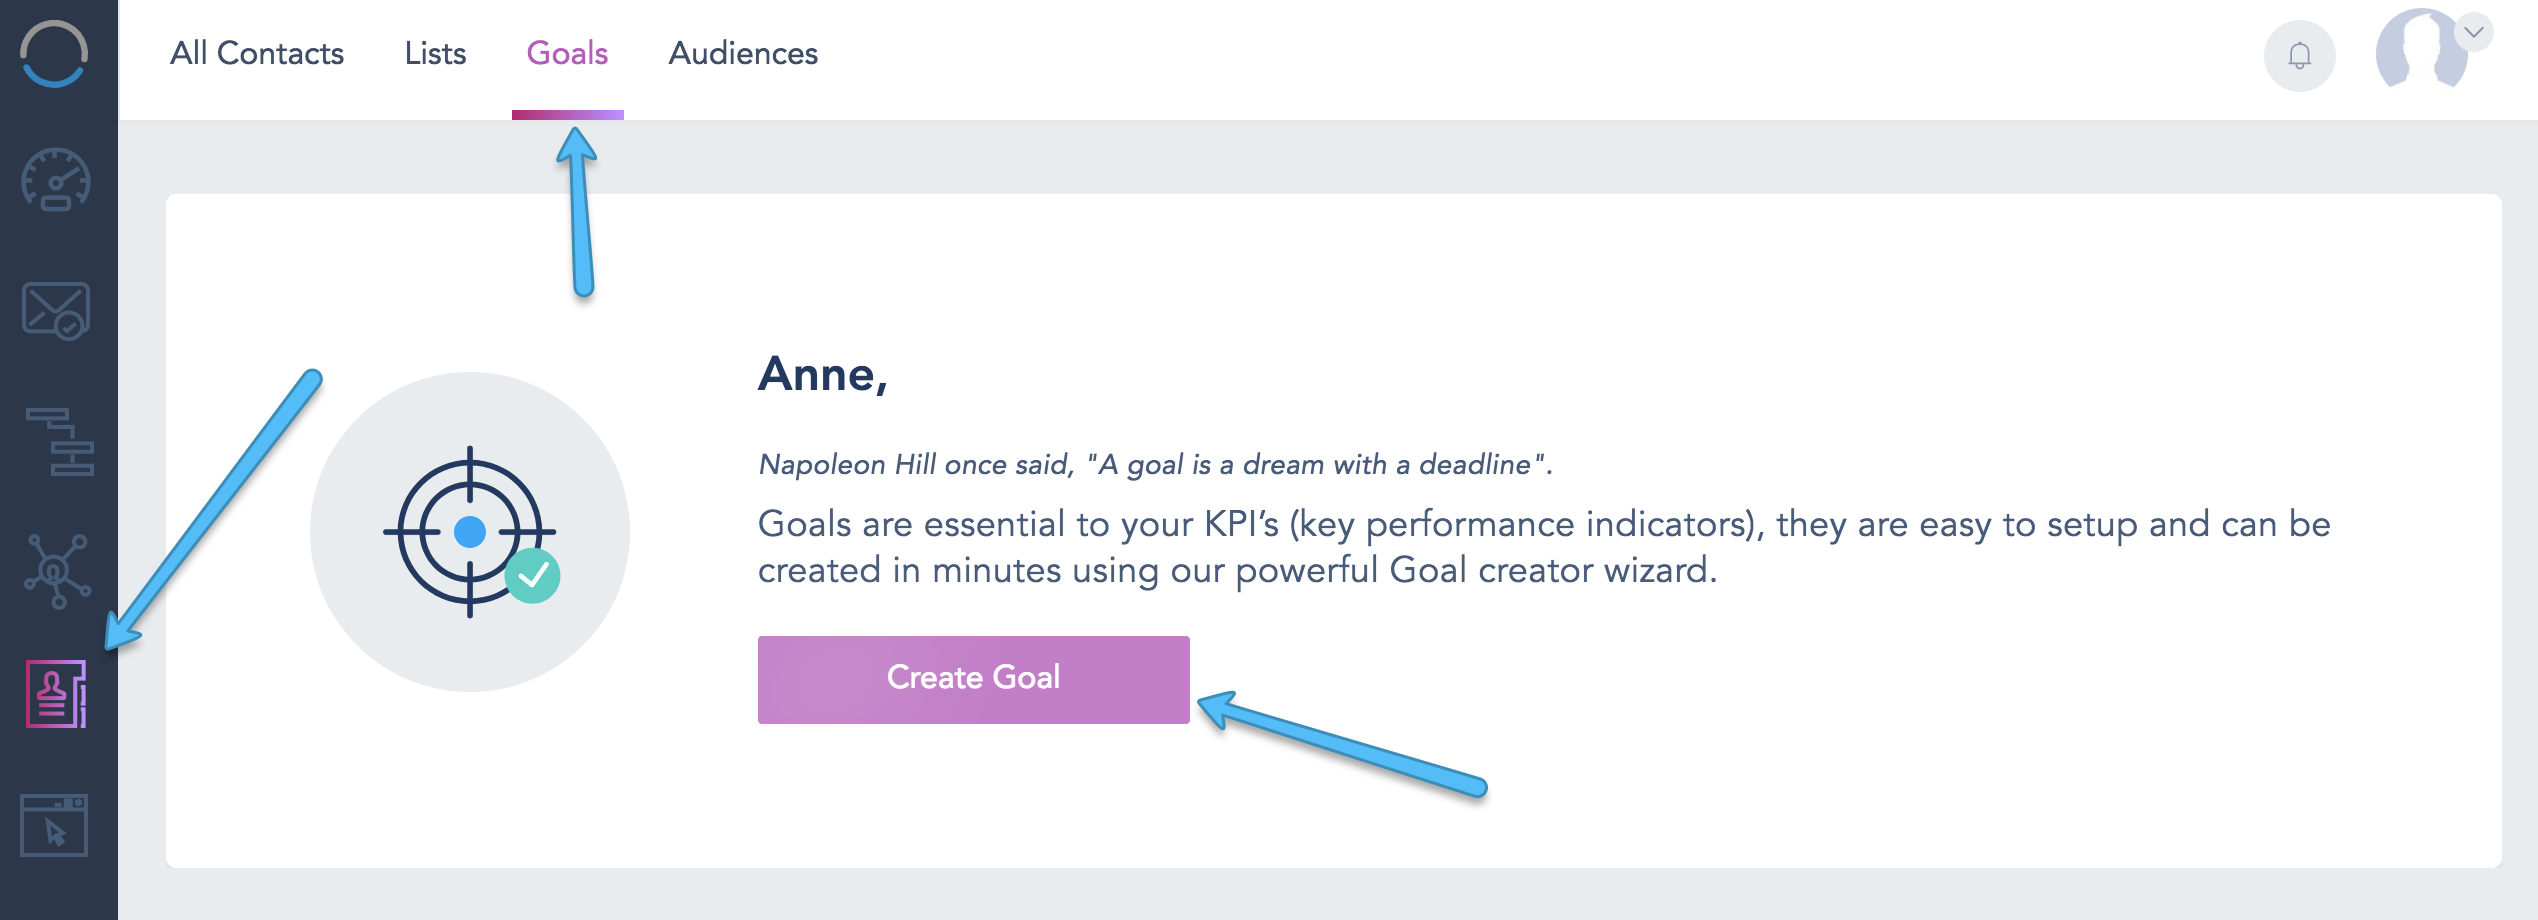
Goal setting is a great way to measure the effectiveness of your campaigns. Once you’ve identified your main Goals and KPI’s (Key Performance Indicators), you can use the Goals feature on your account to get in depth information on these goals. To create a goal go to Contacts option and then select Goals from the top menu.

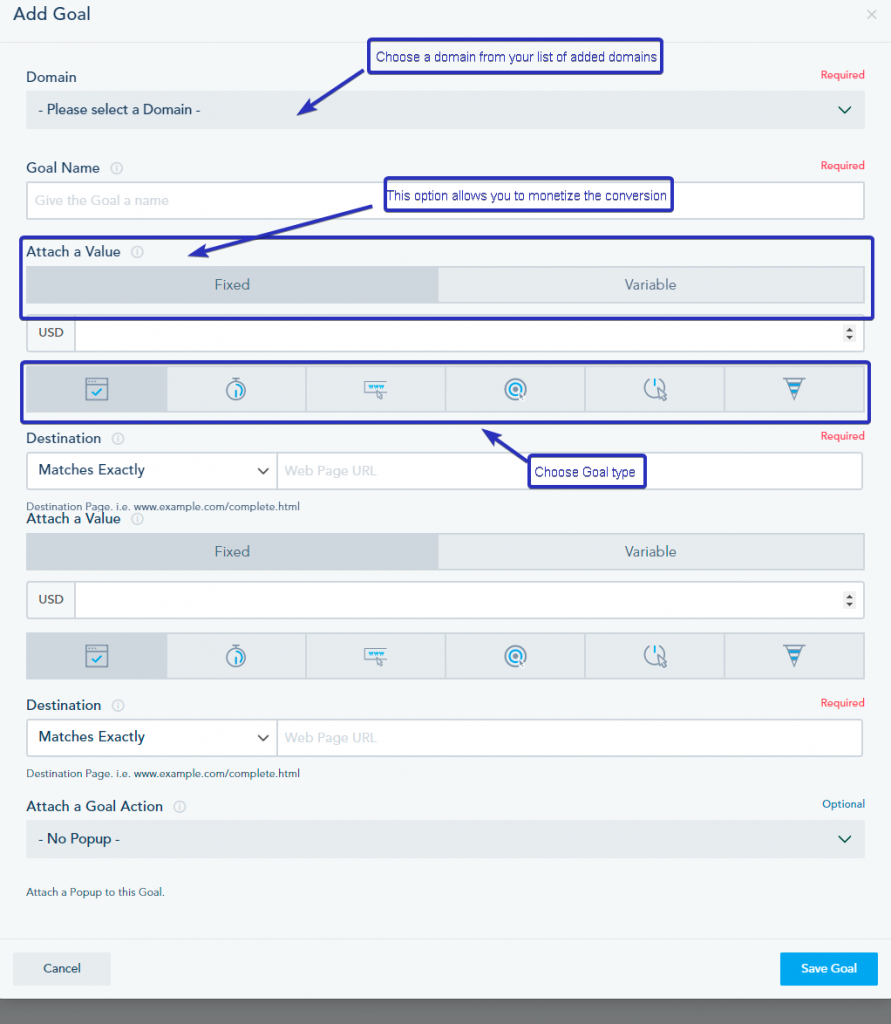
Click Create Goal to configure a new one. You will be promoted with a setup window to complete the process as below:

  1. If you have multiple domains connected to your account make sure to select the correct domain for this goal. Domains have to be properly verified.
  2. Give your goal a name for your own reference (ex: Completed Checkout Process)
  3. OPTIONAL: Choose if you wish to attach a money value to the goal once it is completed. The value can be fixed (by choosing Fixed) or you can get the dynamic value from your platform or e-commerce checkout by adding additional code to your tracking code (if you click on Variable). Each website might have a different TOTAL variable so you might want to consult with your developer and coordinate with the support team.
  4. Next, choose your goal type from the following: Destination URL – Duration – Pages Visited – PPC Referral – Event Triggered (Clicked Link(s), Wached Video(s), Submitted Form) – Funnel Tracking. Depending on your choice, you might need to input some additional details before you have your Goal ready to be deployed.
  5. OPTIONAL: Choose to trigger a Webhook once a goal has been completed by a user. You need to create a webhook before you can choose it from this option.

It’s worth noting that you can also trigger webhooks once your goal has been fulfilled. You will need to have had created the webhook beforehand to be able to choose it in this last optional step.

Get Started

Reading goals analytics

To access the analytics on your goals:

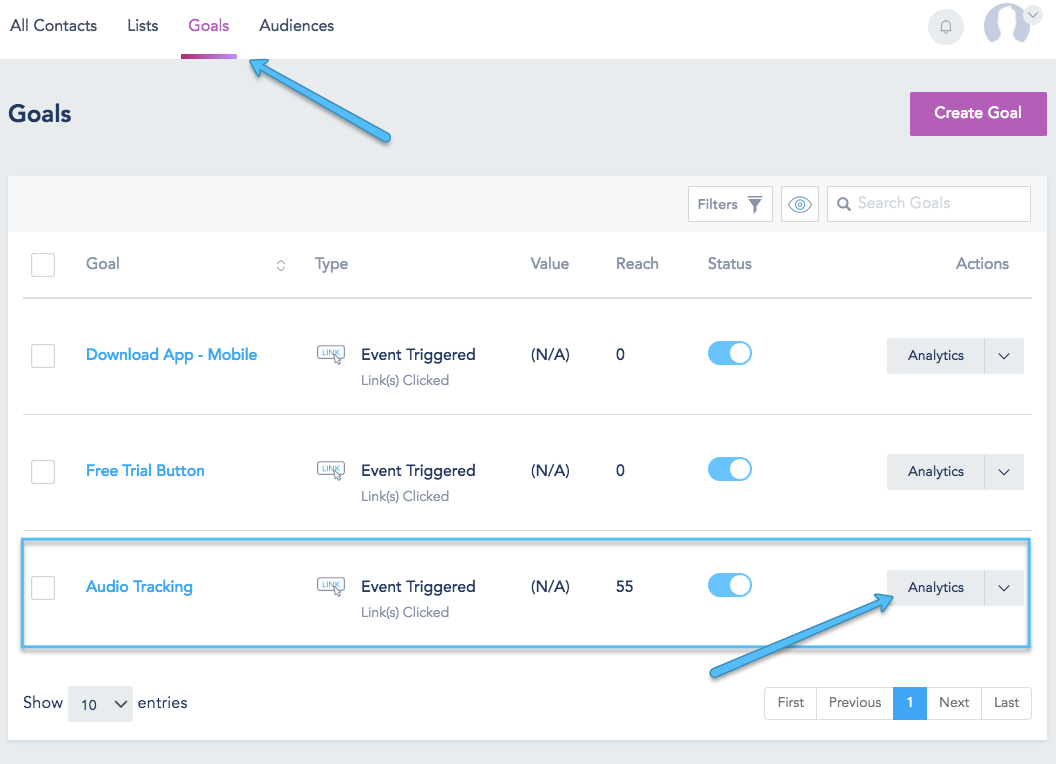
  1. Click on Contacts > Goals from the top bar when in Contacts option.
  2. The page will display a table summary of your goals type and performance summary. Find your desired goal and click on the Analytics option next to that goals.
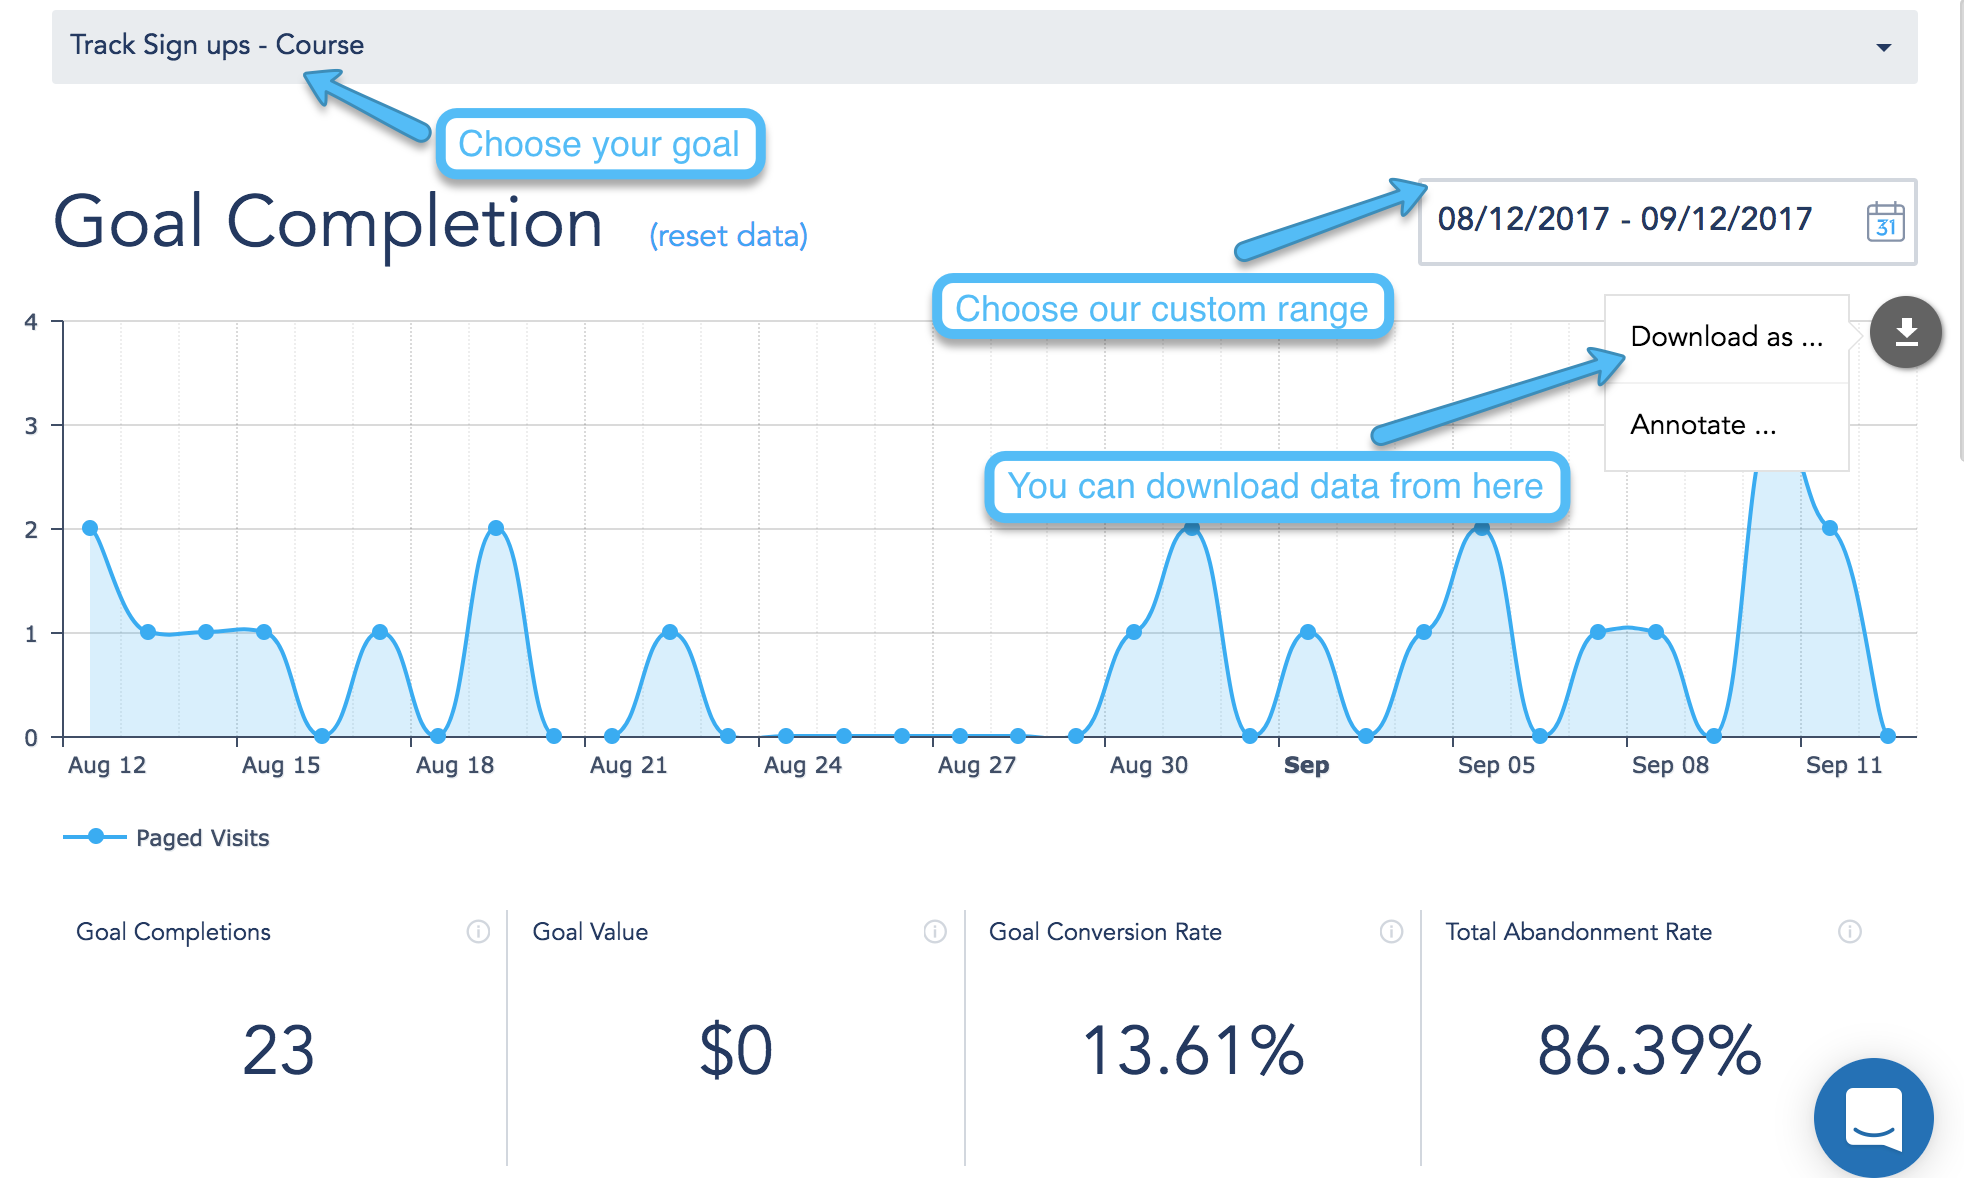
  3. The top preview of the report include a drop down to easily switch between goals and a line-chart of the daily conversion of that goal. You can change the default time period of that report by clicking on the date-picker.
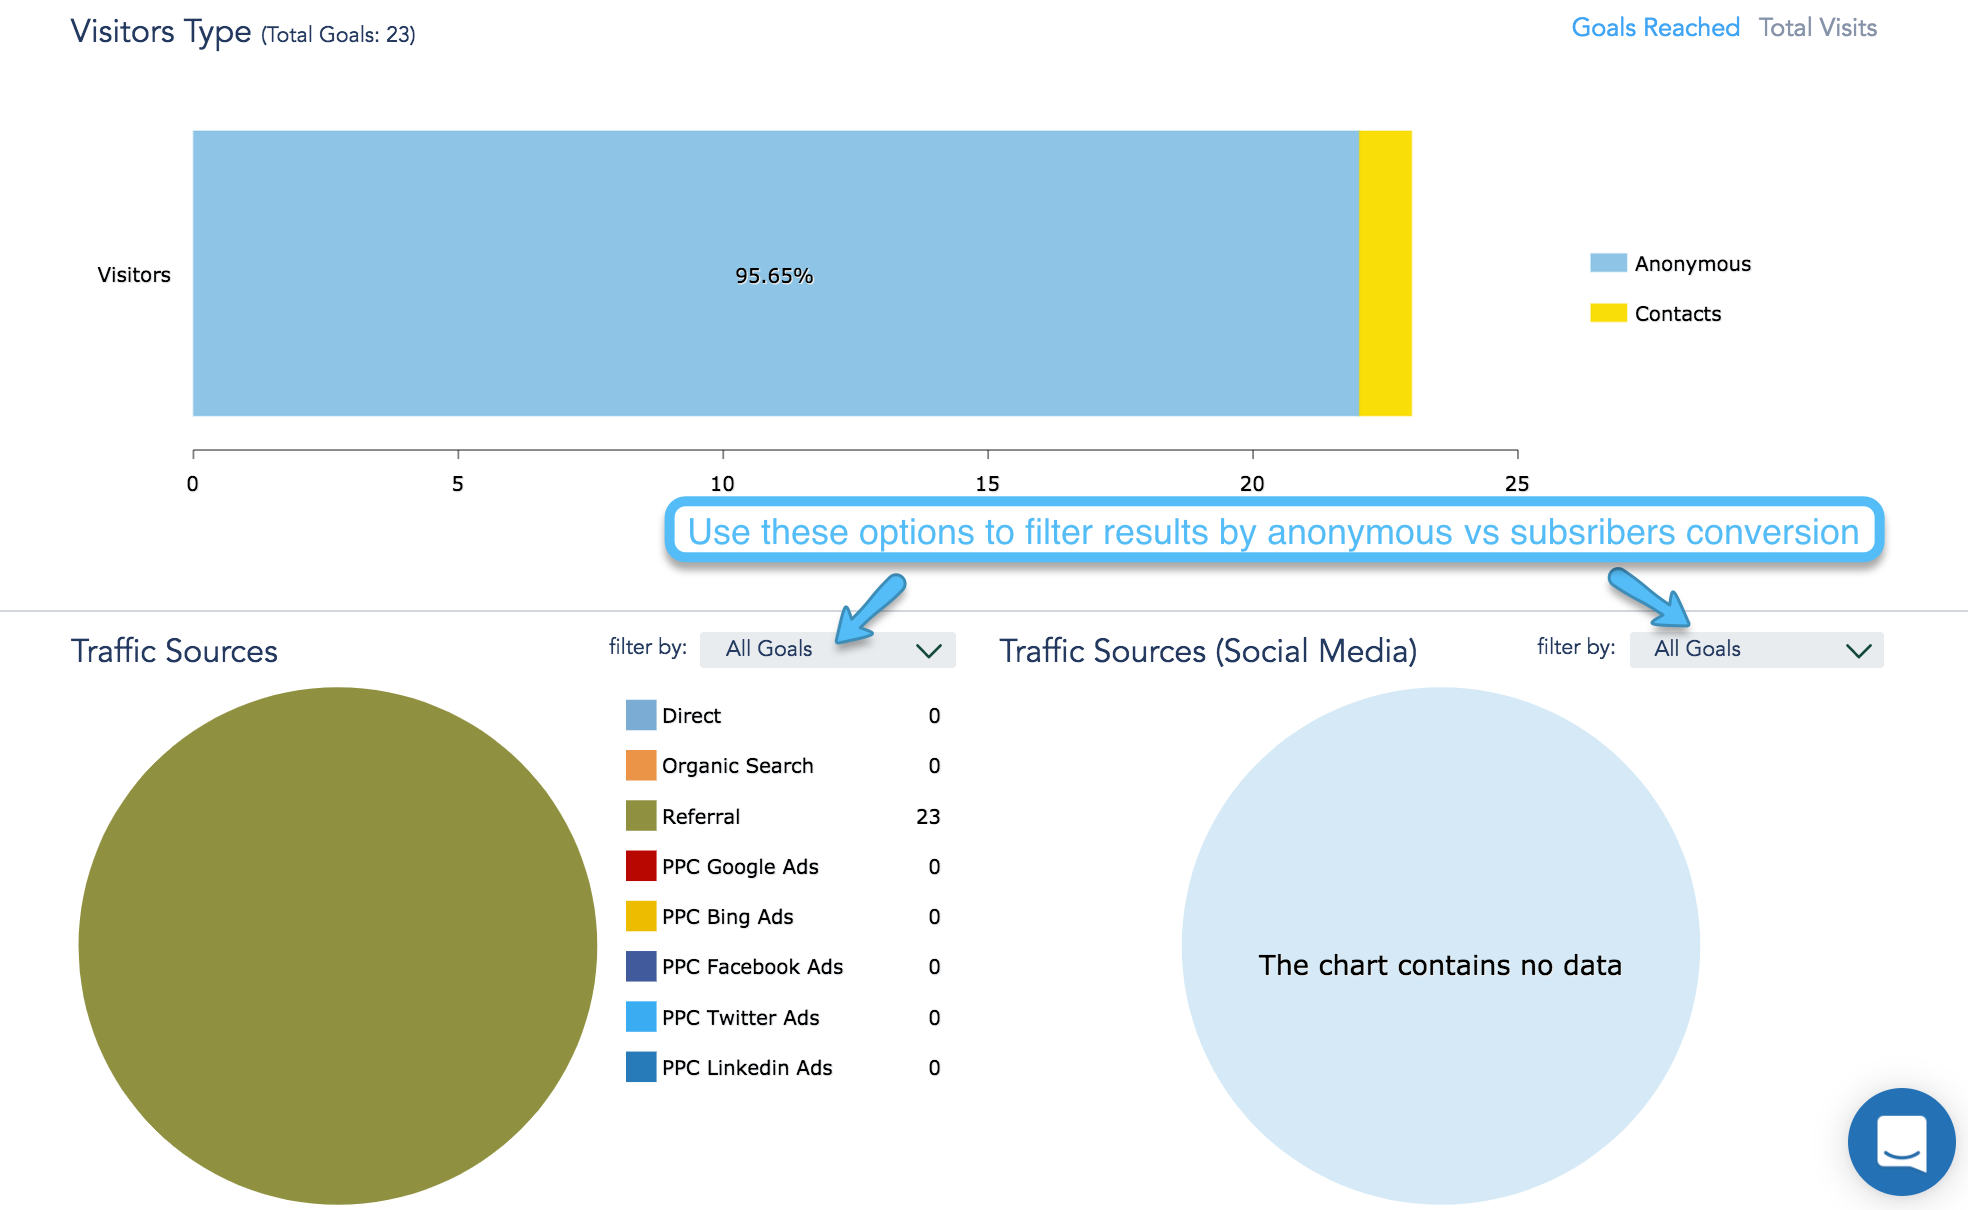
  4. The bar chart displays the percentages for the types of users who reached that goal. It is broken down by Anonymous (random visitors without contact information) and Contacts (Active contacts that are cookied and can be found under your Contacts lists).
  5. Traffic Sources displays 2 pie charts broken down by the original source of users who reached the goal, whereas the left panel represents Direct, Organic, Referral and PPC sources and the right pie chart represents all conversions that came from Social Media.
  6. The table below gives you a detailed breakdown of who are the Contacts that reached your goal, the Anonymous IP’s and their full profile, which social media events and email campaigns triggered this goal,  the demographics of the users as well as conversion by device type.

Get Started

Manage campaign screens

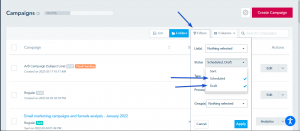
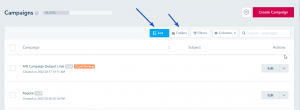
The campaigns page comes with a set of options to search, filter and manage individual campaigns. To sort your campaigns by their status, Scheduled, Sent or Draft, click the filter icon from the top of the table.

You can also sort campaigns by lists using the same filter option but instead of Status, use the Lists select field. Other sorting methods are by campaign Type (Regular vs A/B Testing), Process (Normal vs Chunk sending), or Groups.

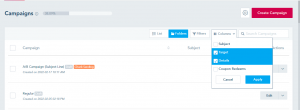
The Campaigns page also lets you manage your view and control how much information is displayed on the table view of campaign details. To change the view, click on the column drop-down and choose what you’d like to show/hide from the table columns.

Also, you have the option to choose between list and folders view.

Lastly, you can search for a specific campaign name by using the top right search field and entering the desired name.

Get Started

What is RFC 5322

Each of us send tens of thousands of emails per year, but rarely do we think about the complex standards that make these digital messages possible. RFC 5322 is one such standard, a document that might not be well-known outside IT circles, yet it plays a crucial role in how emails are structured and understood across different systems. Let’s break down this standard to understand its importance better.

Understanding RFC 5322: The Foundation of Emails

RFC 5322, or the Internet Message Format, sets the guidelines for email format and structure. It’s like the rulebook that ensures every email you send reaches its destination looking as intended, regardless of the email client or server.

What Does RFC 5322 Cover?

  1. Header Fields and Body: The standard specifies how emails are divided into header fields and an optional body. The header includes details like the sender, recipient, and subject, while the body contains the actual message.
  2. Syntax Rules: It defines how field names and bodies should be formatted. For instance, field names are composed of printable US-ASCII characters, barring colons.
  3. Line Length Limits: There’s a maximum line length in the email body (998 characters) and a recommended limit (78 characters), ensuring emails display correctly across different devices.

The Significance of RFC 5322 in Email Communication

  1. Compatibility: By standardizing email formats, RFC 5322 ensures that an email sent from one client is displayed correctly in another, maintaining the integrity of the message.
  2. Flexibility and Structure: The standard allows for ‘folding’ and ‘unfolding’ in email headers, letting long headers span multiple lines for better readability.
  3. Adaptability: While it focuses on US-ASCII characters, RFC 5322 has been adapted to work with various character encodings, showing its flexibility.

The Impact on Everyday Email Usage

For the average email user, RFC 5322 works behind the scenes to provide a seamless experience. However, understanding its basics can be beneficial:

  • Troubleshooting: Knowing about email structure helps in diagnosing issues like formatting errors or delivery problems.
  • Email Creation Tools: If you’re using or developing email-related software, understanding RFC 5322 is vital to ensure compatibility and adherence to standards.

Looking Ahead: The Evolution of Email Standards

While RFC 5322 has been crucial in shaping email communication, the digital world is always evolving. New standards and updates will continue to emerge as we find more efficient, secure, and user-friendly ways to communicate. Keeping an eye on these developments is key for anyone in the tech field.

In conclusion, RFC 5322 might not be something you think about when sending a quick email, but it’s an essential cog in the email communication machine. By defining the rules and standards for email formats, it ensures that our messages are delivered and displayed correctly, no matter where they’re sent. So, the next time you hit send on an email, spare a thought for the complex standards like RFC 5322 that make it all possible!


Written with the help of ChatGPT.

Adding Team Members

Adding a Team Member

To add a new team member under your account:

1. Click on your profile icon located in the top right corner.
2. Select Settings from the dropdown menu.
3. Navigate to the Users tab.
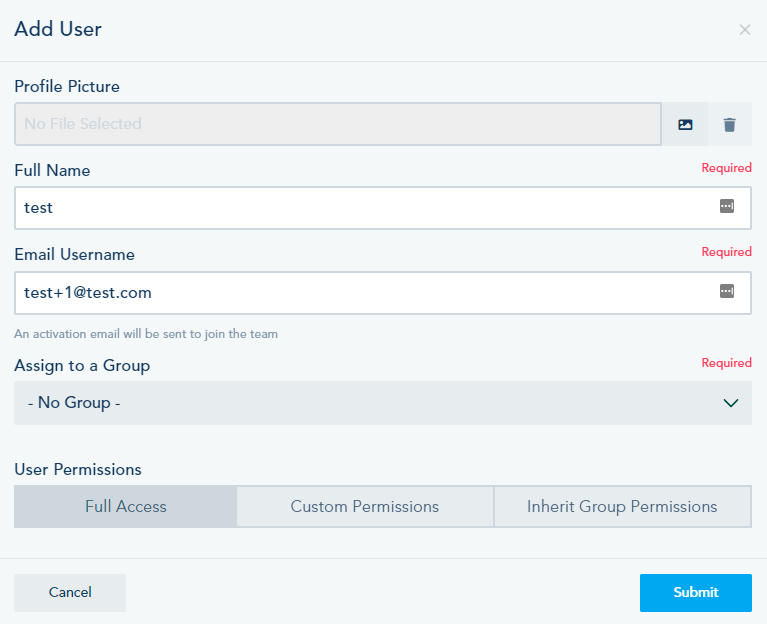
4. Click on Add User.

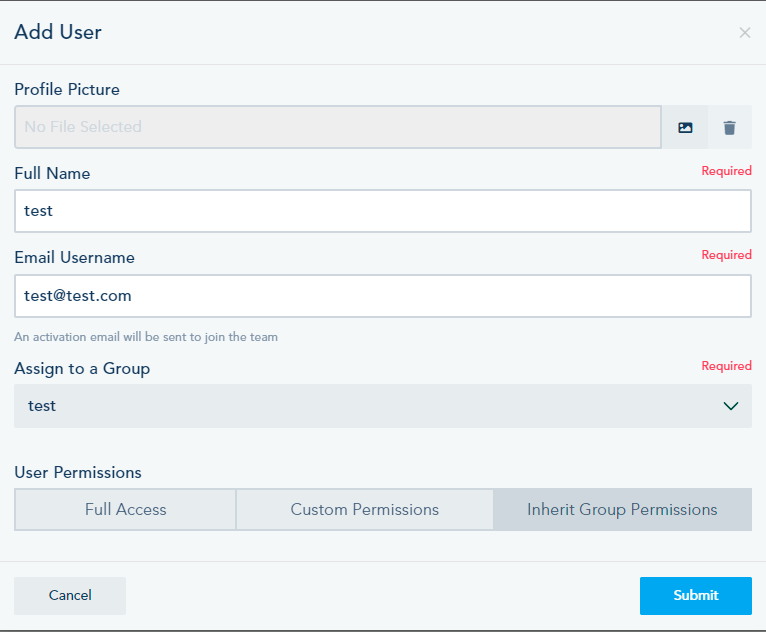
User Details:

• Fill in the required fields for the new team member.

• Choose between giving full permissions or assigning custom ones based on the individual’s role within the company.

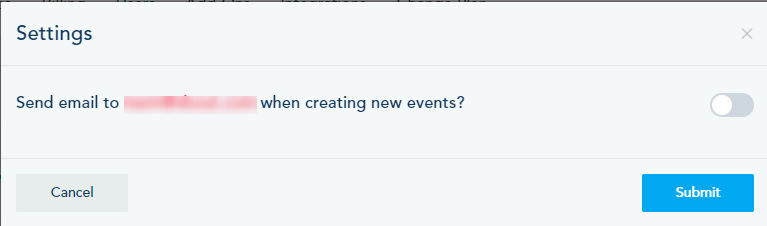
When you click on the settings gear, you will be prompted with the following option:

Deleting a User

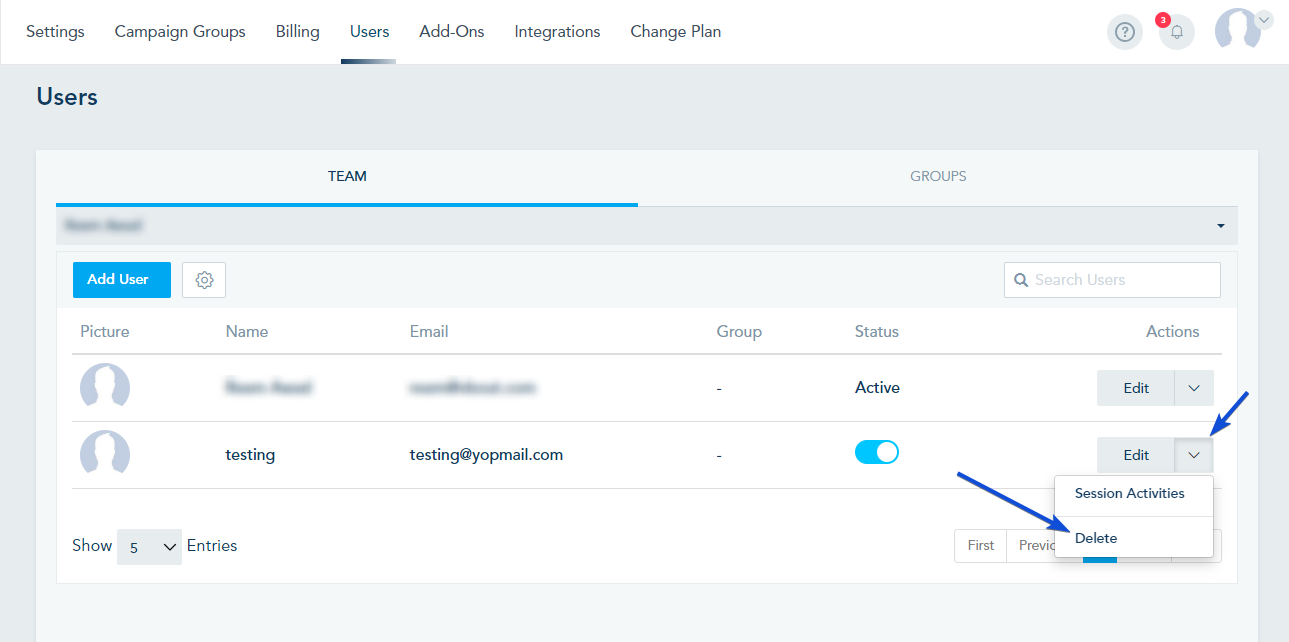
To delete a user, click on the dropdown menu next to the user’s name and select Delete.

Creating a Group

To create a group of users:

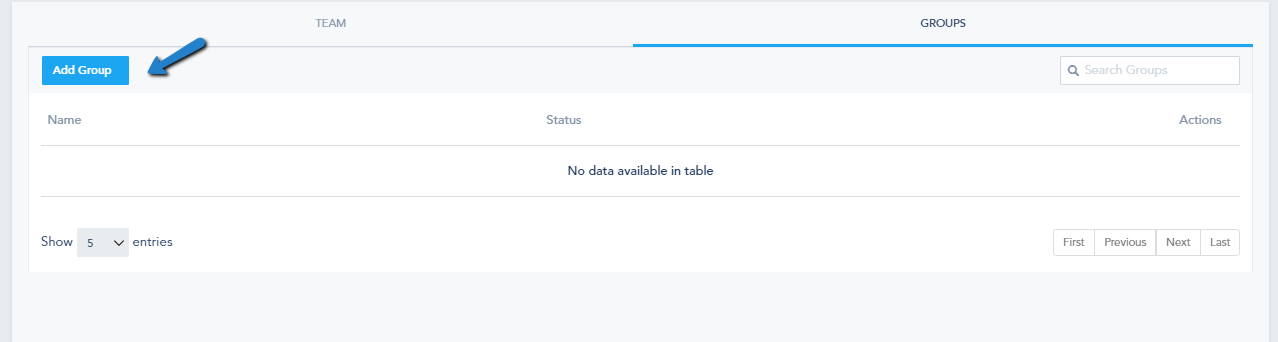
• Click on Add Group.

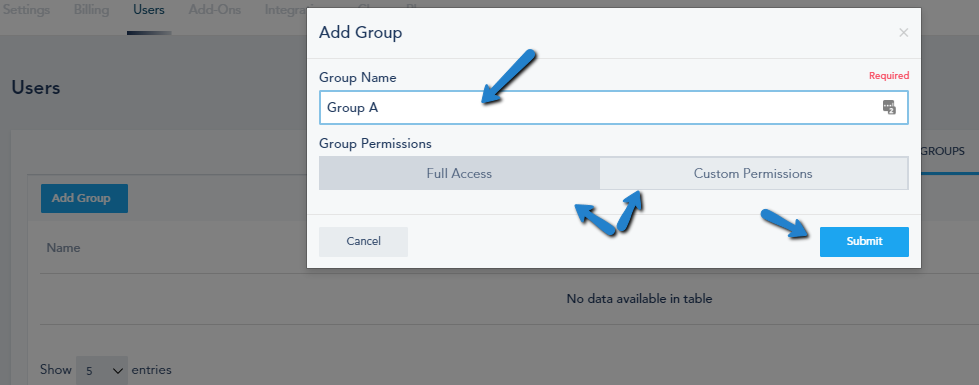
• Provide a name for the group.
• Choose group permissions.
• Click Submit.

Editing/Deleting a Group:

• To edit a group, select Edit.

• To delete a group, click on the dropdown menu next to the group’s name and choose Delete.

For Agency Accounts:

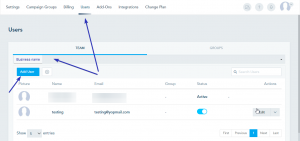
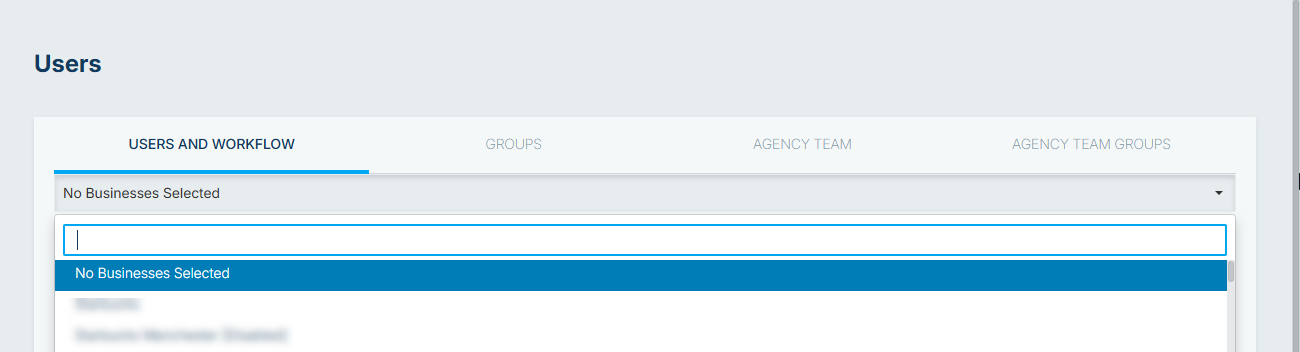
When adding a new user under an agency account, specify the associated account from under  USERS AND WORFLOW.

1. Choose the business from the available options.

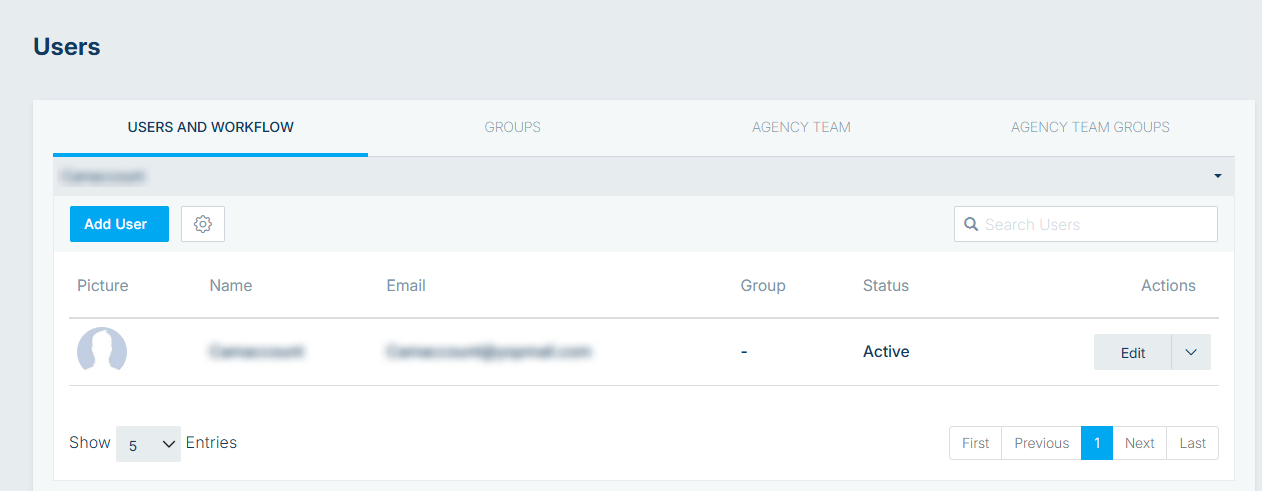
2. After selecting a business, you’ll see the following:

Adding a Team Member

After selecting the business, you can create a new team member by clicking on Add User.

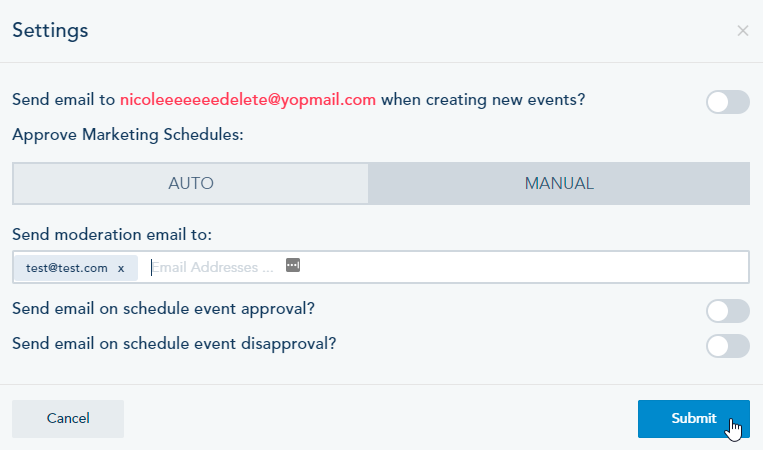
Social Media Post Approval:

• Click the gear icon next to Add User to access additional settings.
• From the settings, you can manually approve scheduled Social Media posts.

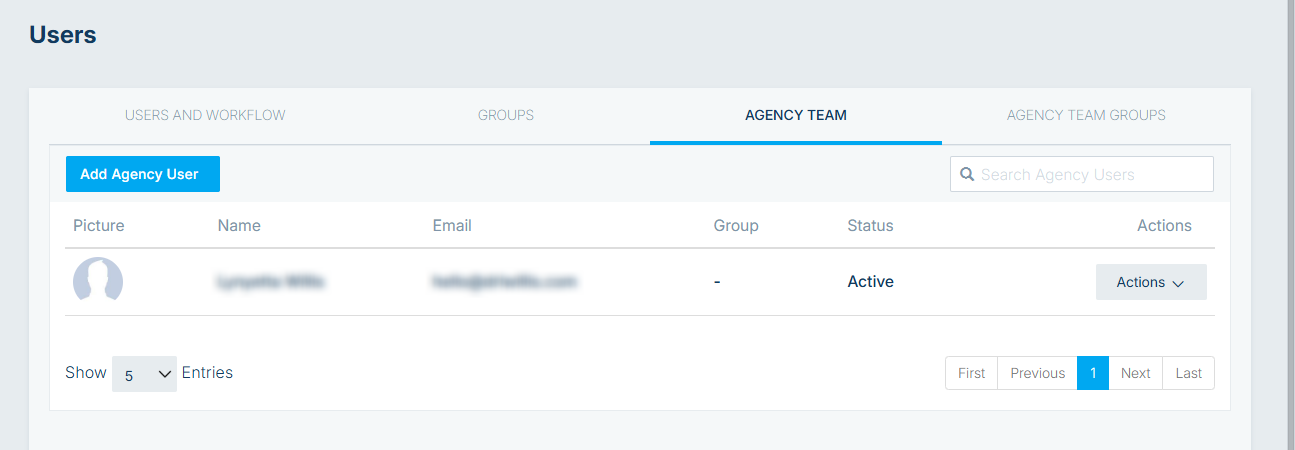
Agency Team:

Agency users will have access to the agency and subaccounts.

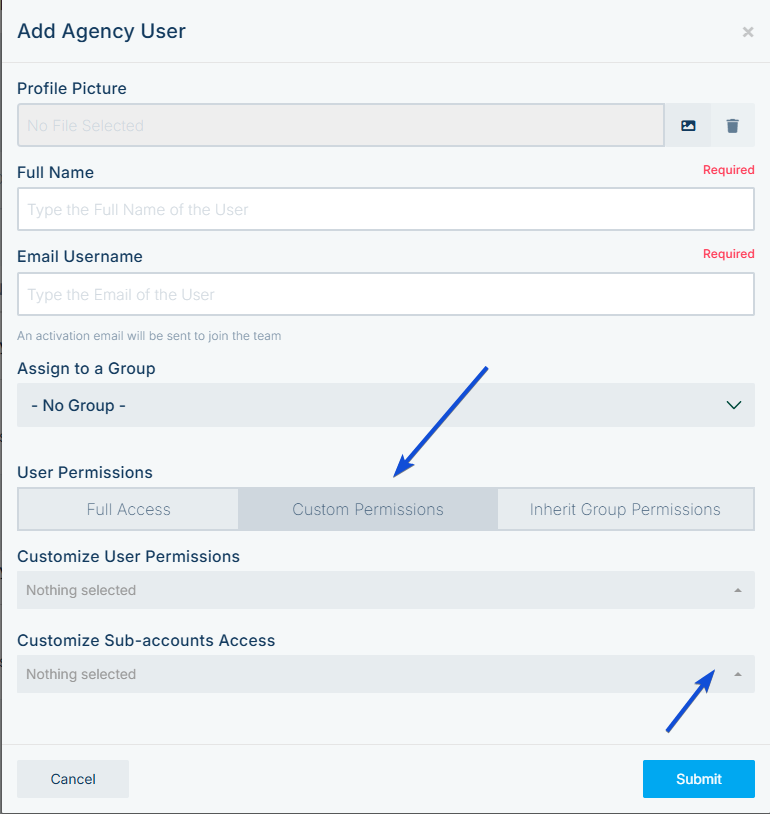
• Within the Agency Team section, choose to Add Agency User.

• Provide the necessary information.

Note: You can’t choose an existing Email Username:

Managing Agency Users:

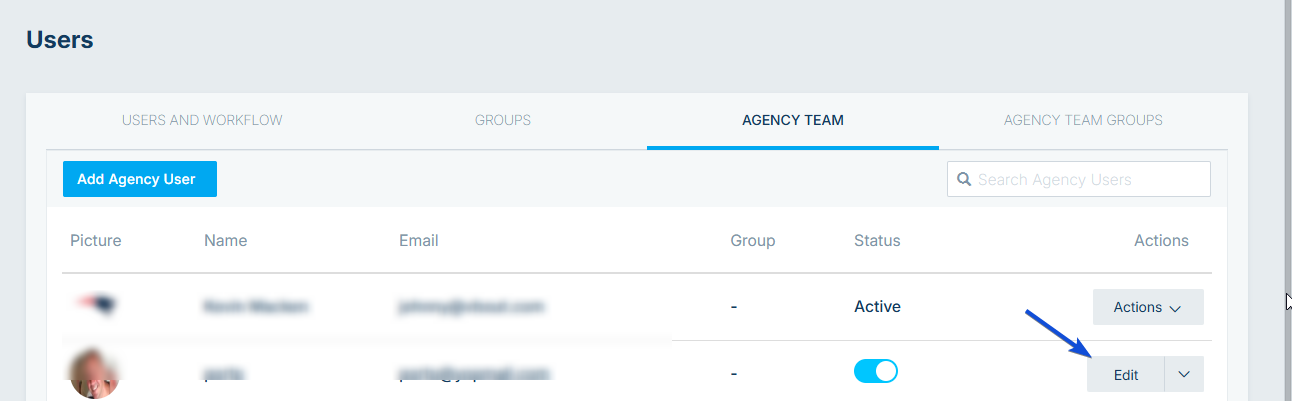
• To edit an Agency User, select Edit.

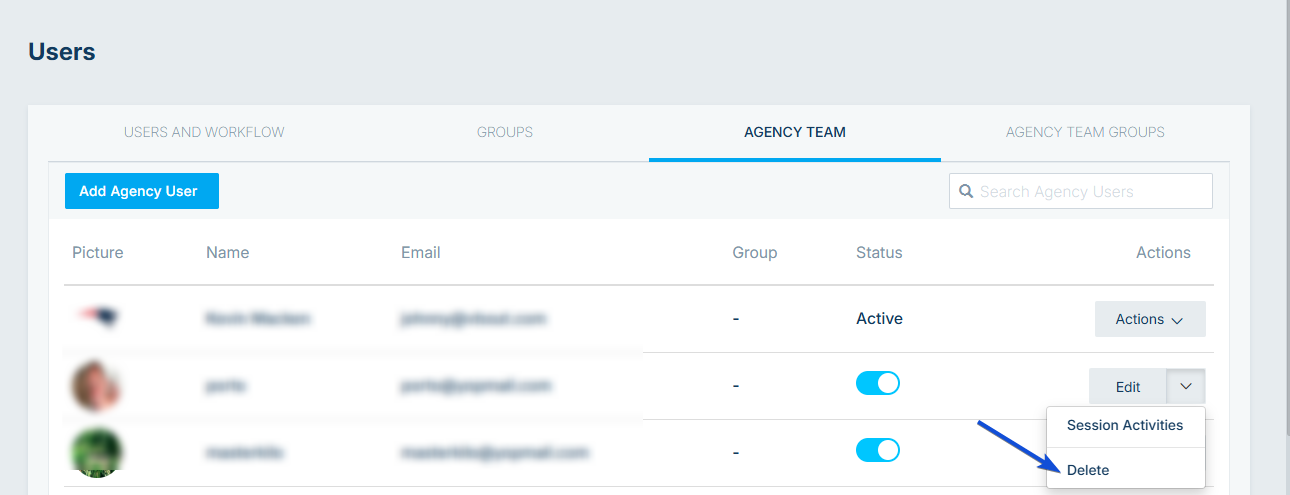
• To delete an Agency User, click on the dropdown menu next to the user’s name and choose Delete.

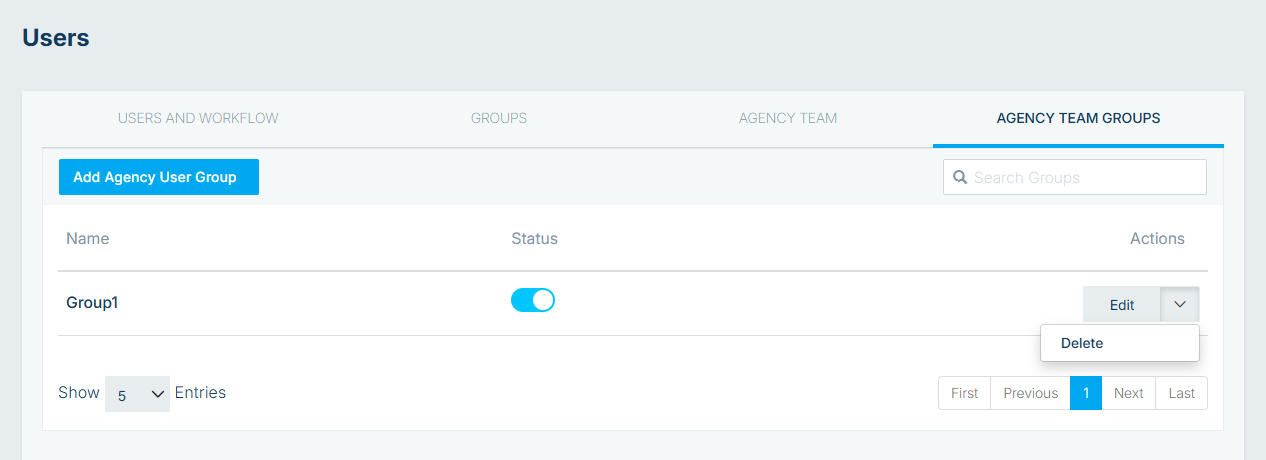
Agency Team Group:

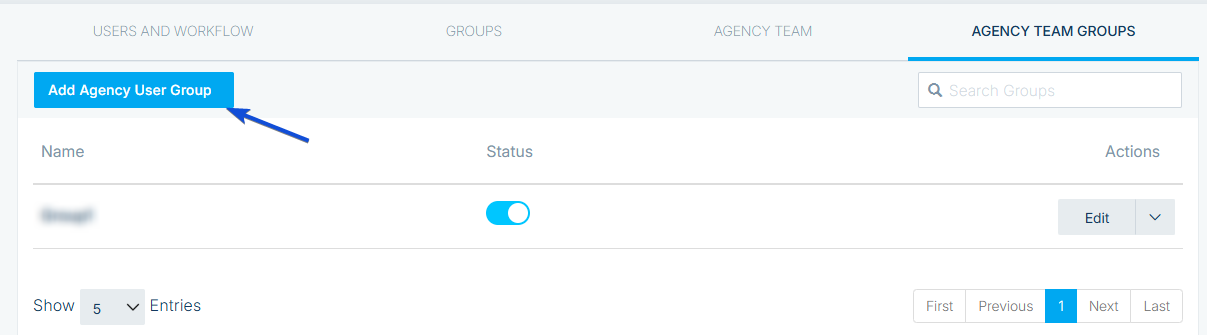
An agency Team group can be assigned to agency users. To create such group:

• Click on Add Agency User Group.

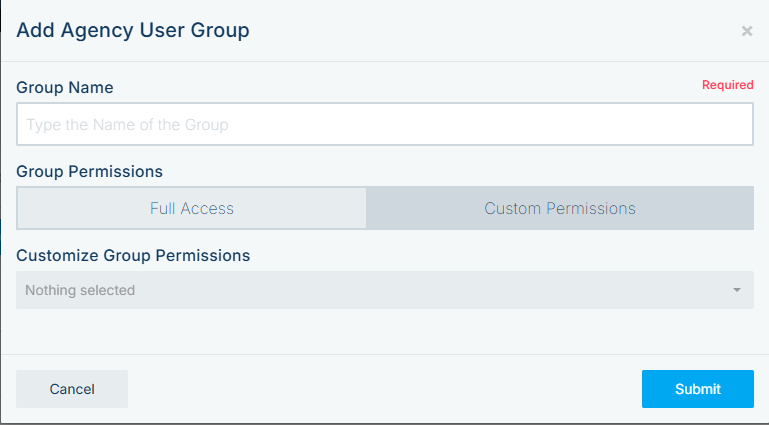
• Provide a name for the group.
• Choose group permissions.
• Click Submit.

Editing/Deleting an Agency Group:

• To edit a group, select Edit.
• To delete a group, click on the dropdown menu next to the group’s name and choose Delete.

Get Started