Author Archive

How to hide the form after submission

In case you need to hide the form on your landing page after your leads submit it, please follow the below steps:

1- Create a Custom shortcode.

  • Navigate to your Settings -> Shortcodes and select Custom Shortcodes.
  • Create a new custom shortcode.
  • Give your new shortcode a name and title.
  • In the content area, paste the following CSS code:
    <style>
       .vbfs-rows{display:none !important;}
       .vbf-submit{display:none !important;}
    </style>

2- Edit the form success message

  • Go to your form settings.
  • Locate the editor for the success message.
  • Insert the custom shortcode you’ve created into the success message editor.


Get Started

How to setup a Browser Push on a Landing Page

Browser Push is a great way to turn your page visitors into subscribers, without providing identifiable data beyond their browser ID. This also lets you offer existing email subscribers, new ways to receive messages from you, in real time, without opening their inbox.

Below is a guide to activate and set up Browser Push on your landing page.

BROWSER PUSH SETUP:

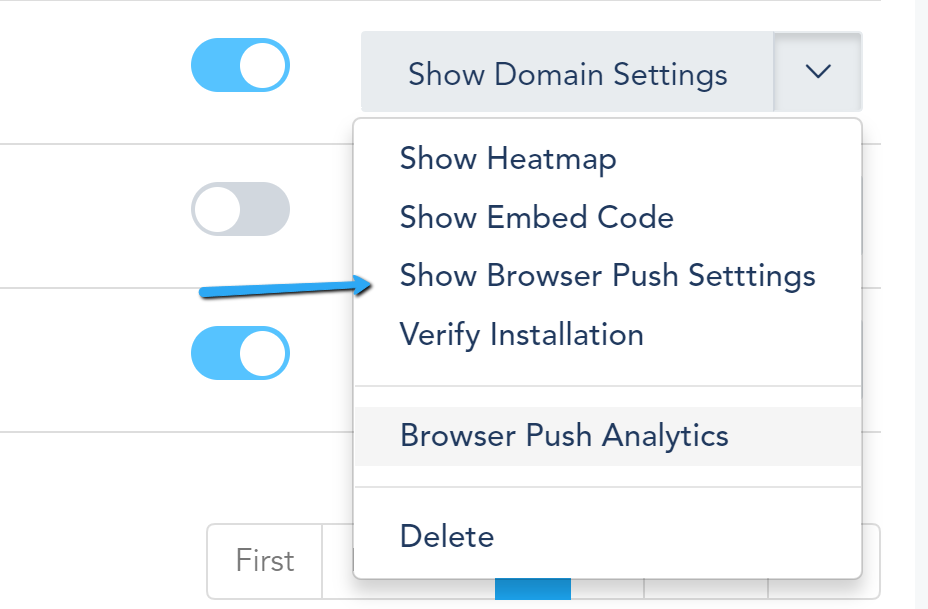
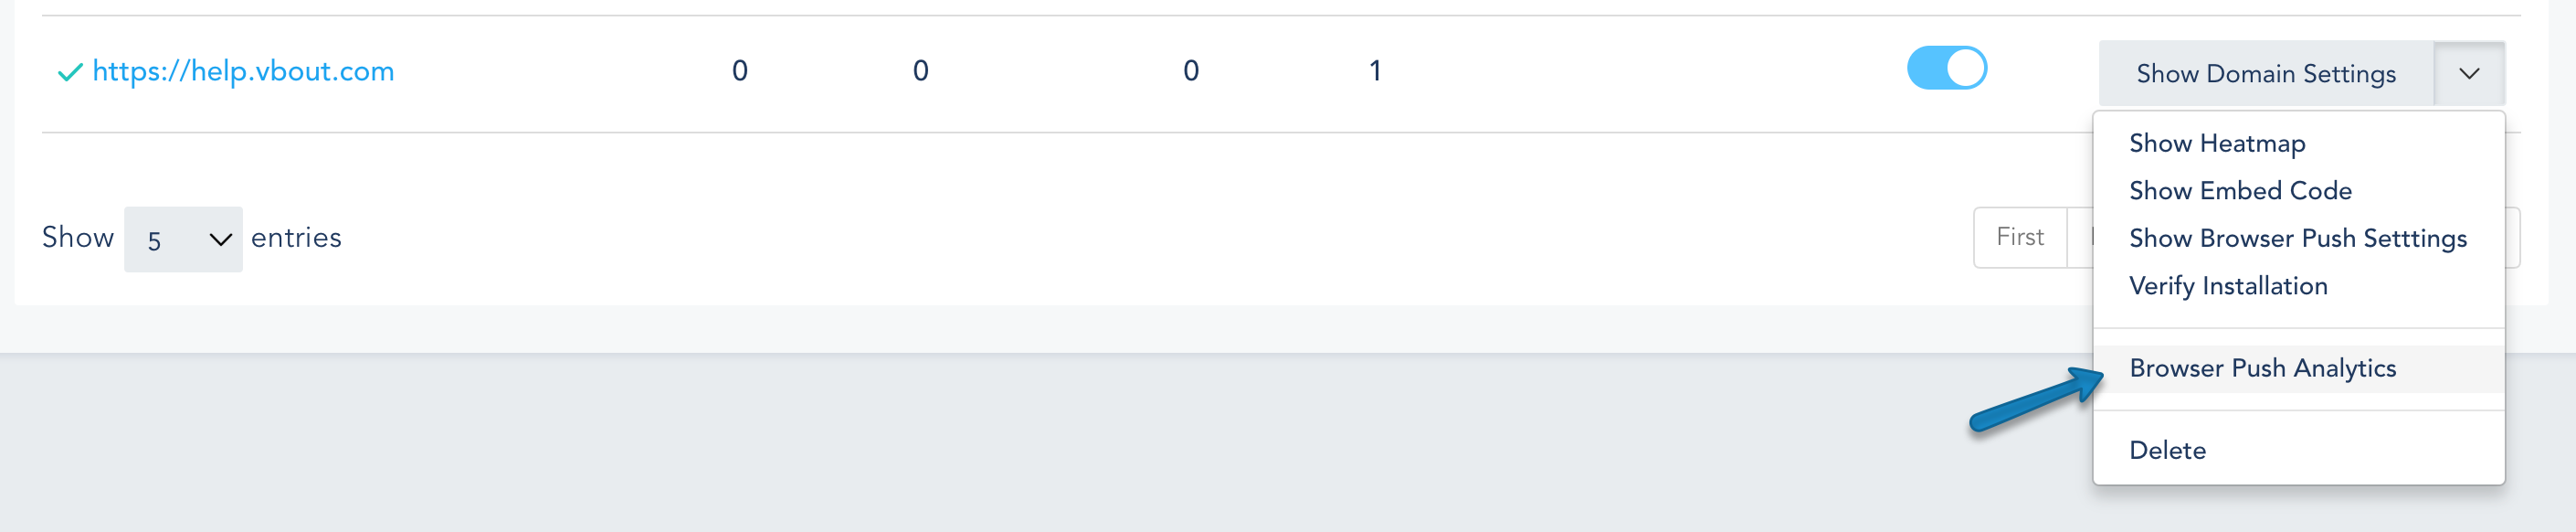
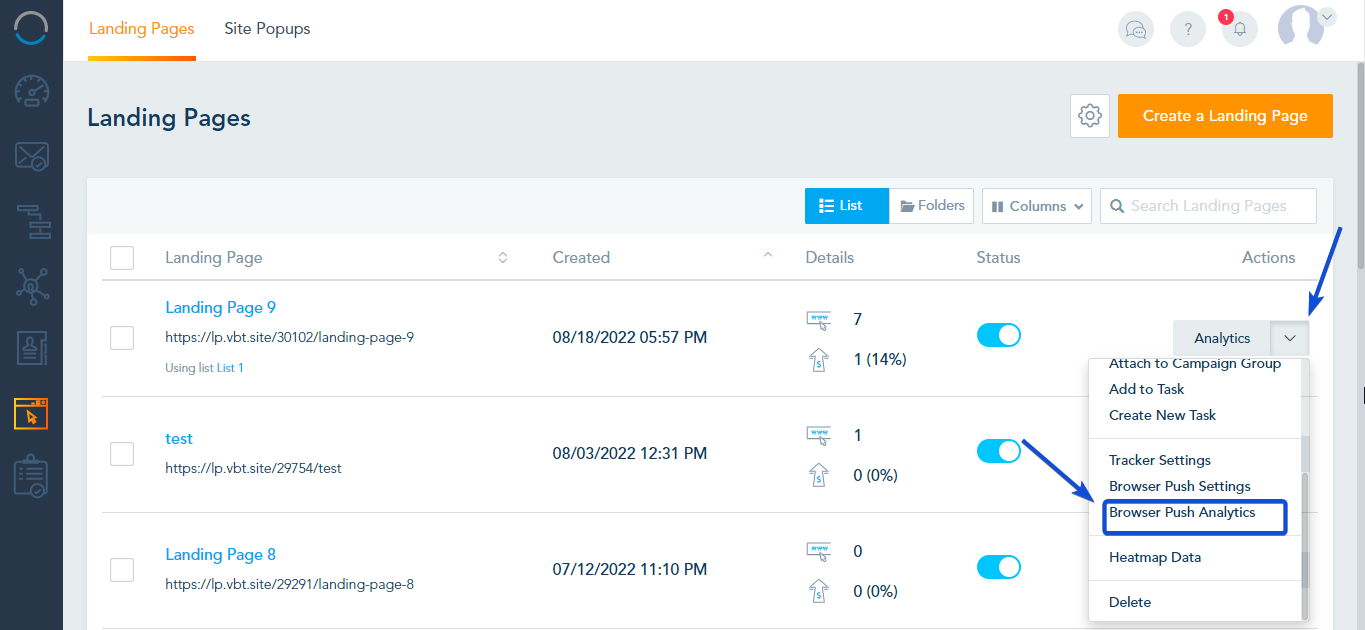
Go to Landing Page  -> Landing Pages, open the menu next to your landing page, and select Browser Push Settings.
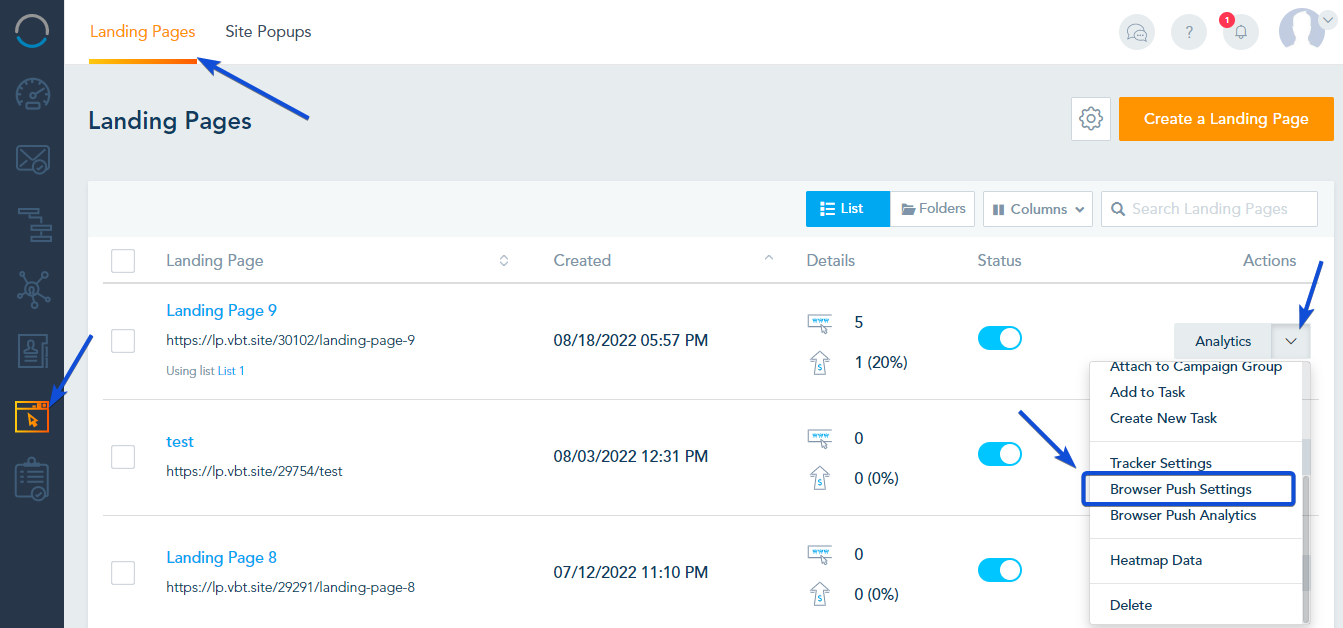
Once selected, a new window will be open to set up your Browser Push.

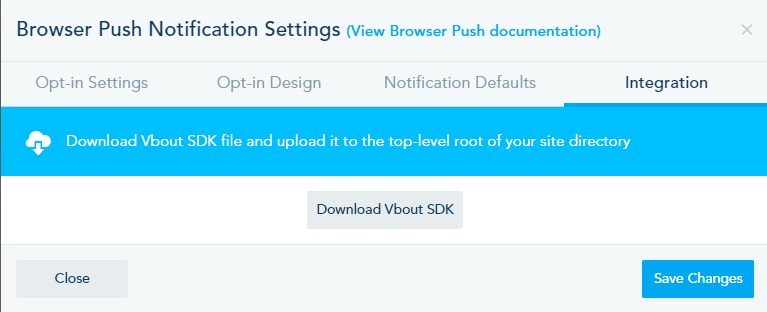
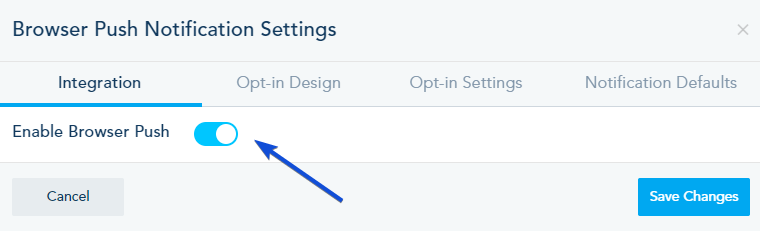
IntegrationOpt-in DesignOpt-in SettingsNotification Defaults
Toggle on the button in order to enable the Browser Push.
 

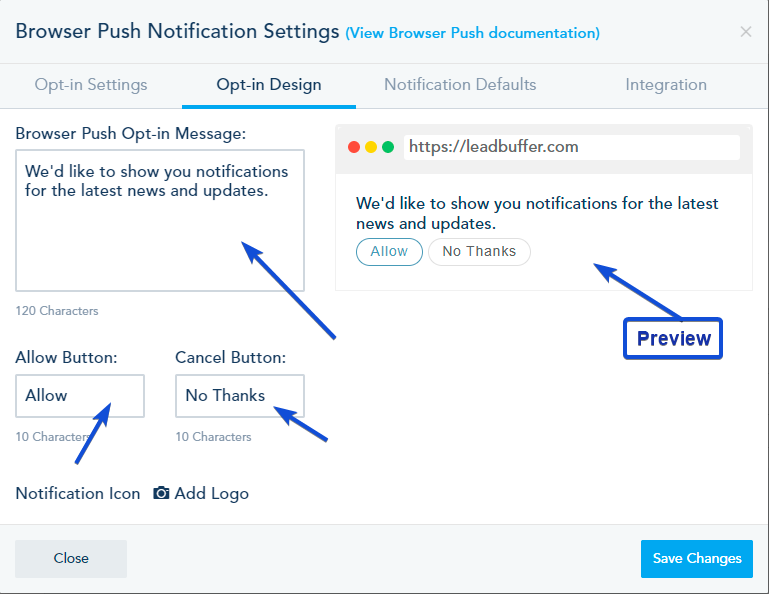
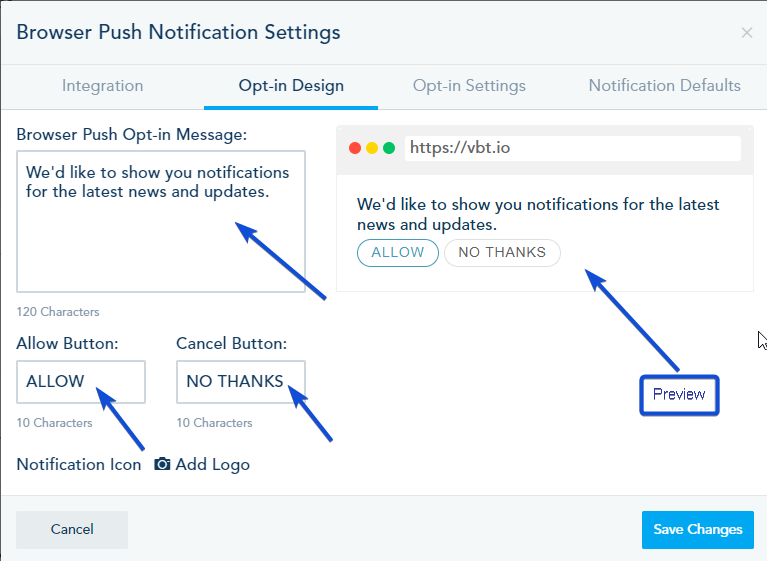
In Popup Design, you can customize the main permission prompt, asking visitors if they wish to opt-in to your Browser Push list. Note that this is different from the default browser permission behavior which normally offers no delay or customization options. The prompt from the Popup Design will give visitors the option to Allow or Decline the browser push option.
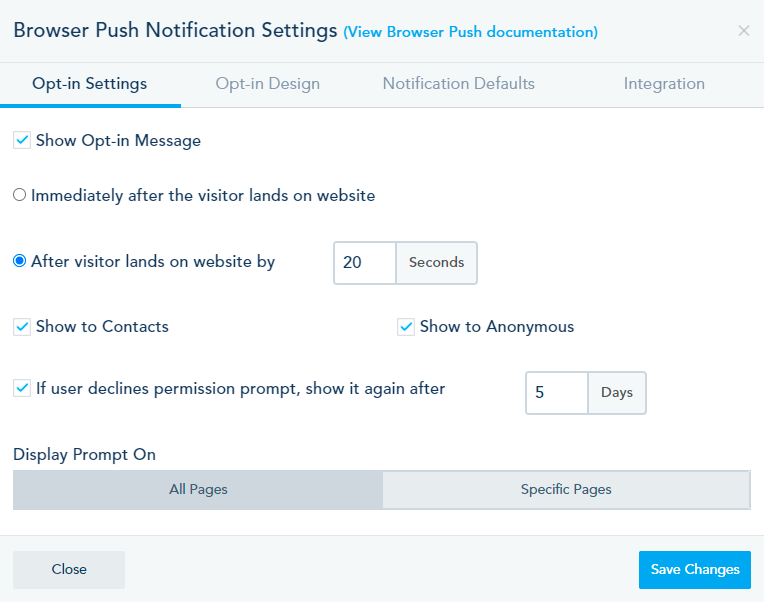
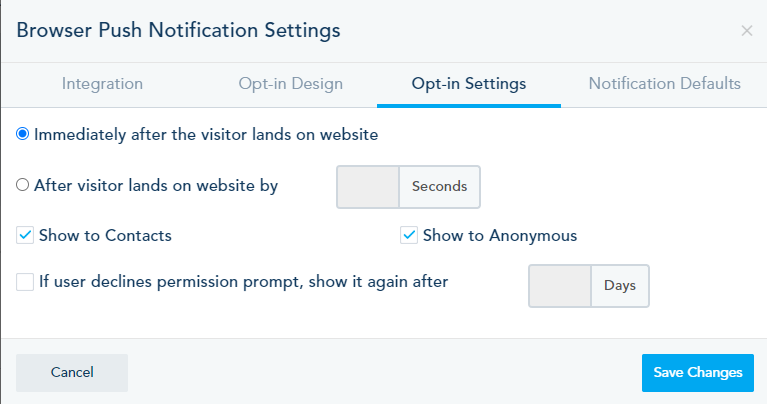
Here you can make the prompt to opt-in smarter by adding some delays, segment them to activate on your cookied contacts, anonymous or both, as well as a re-opt-in option and target pages to show this prompt. The biggest mistake marketers make is to blindly trigger the default Browser Push prompt, which does not give visitors enough time to build a relationship with you.
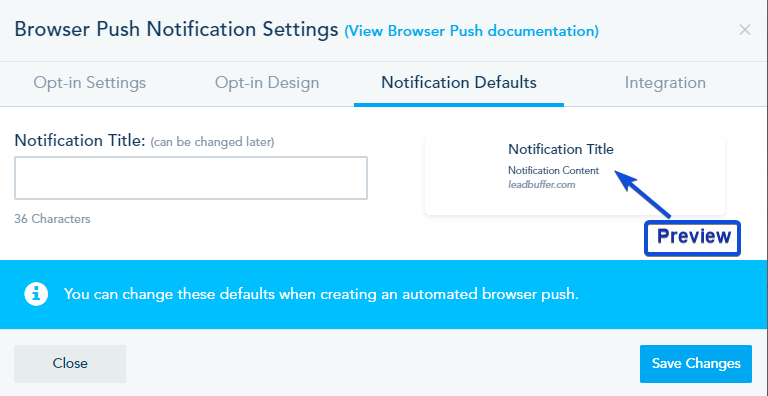
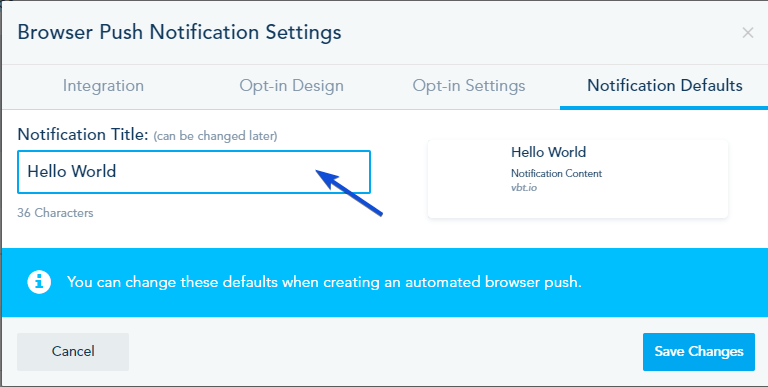
Here you can put the Title of your Notification and see a live preview of your changes.
 

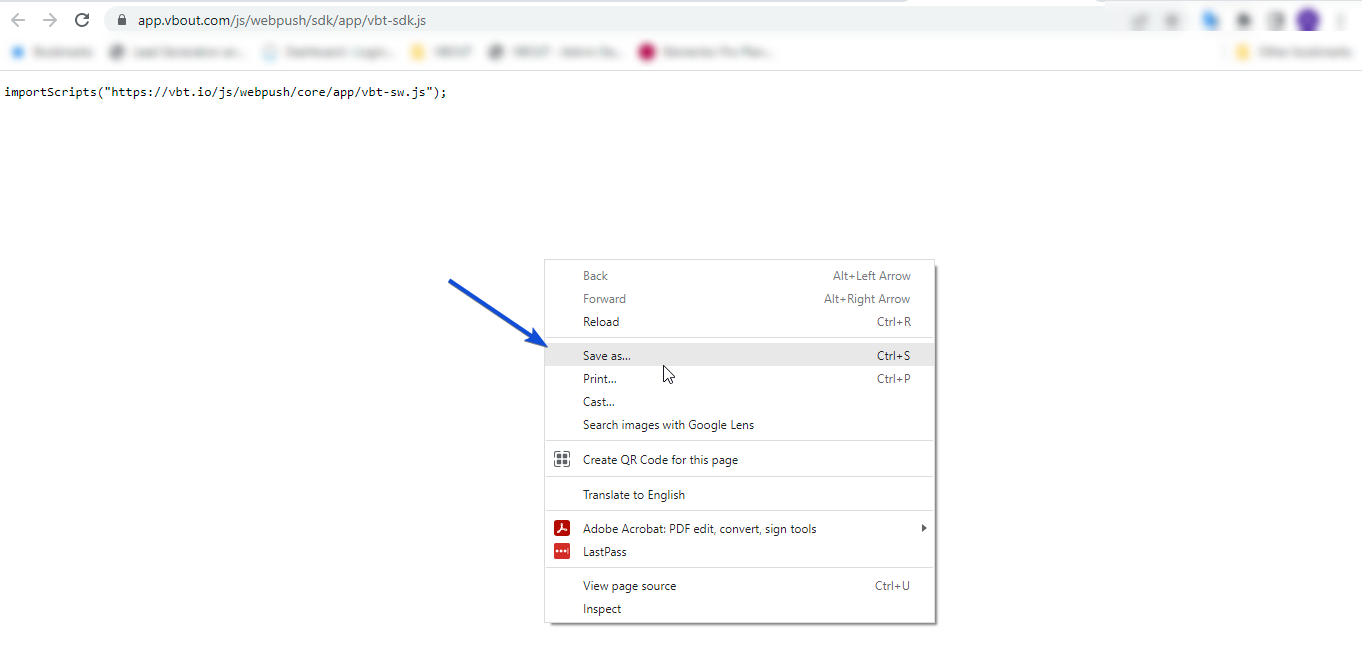
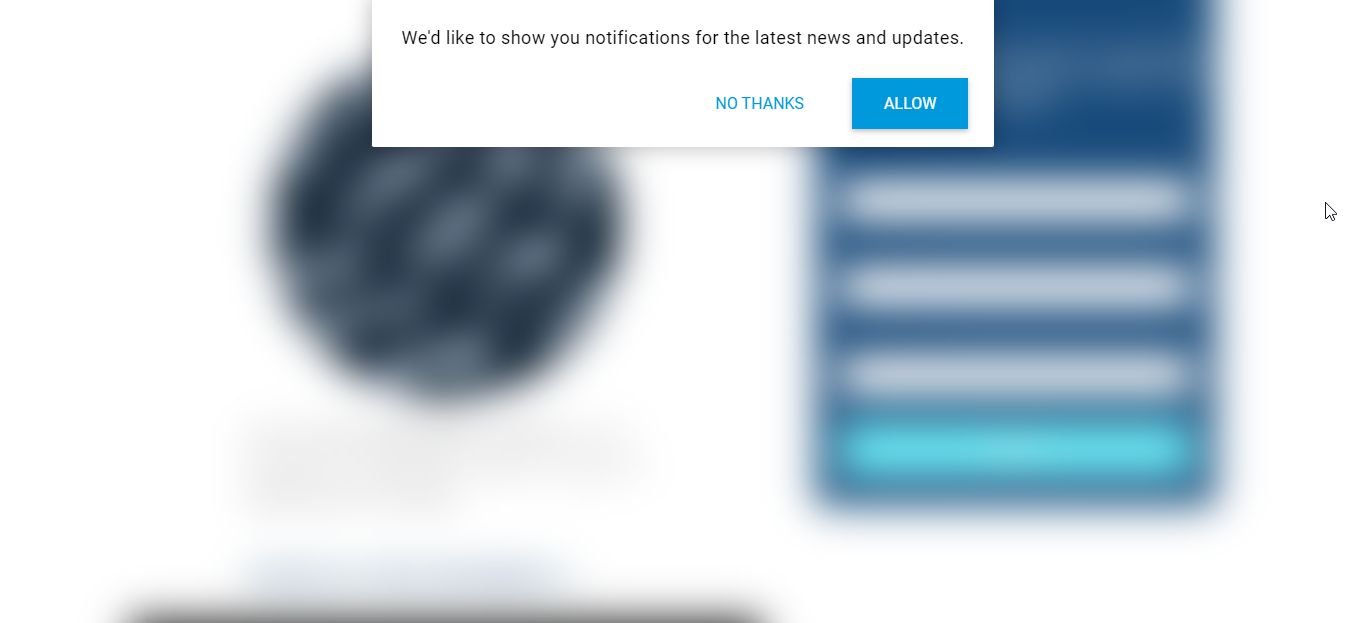
Once you finish the setup above, visit your landing page to test the installation. If the message below did not show, that means that there is something wrong with the installation.
BROWSER PUSH ANALYTICS:

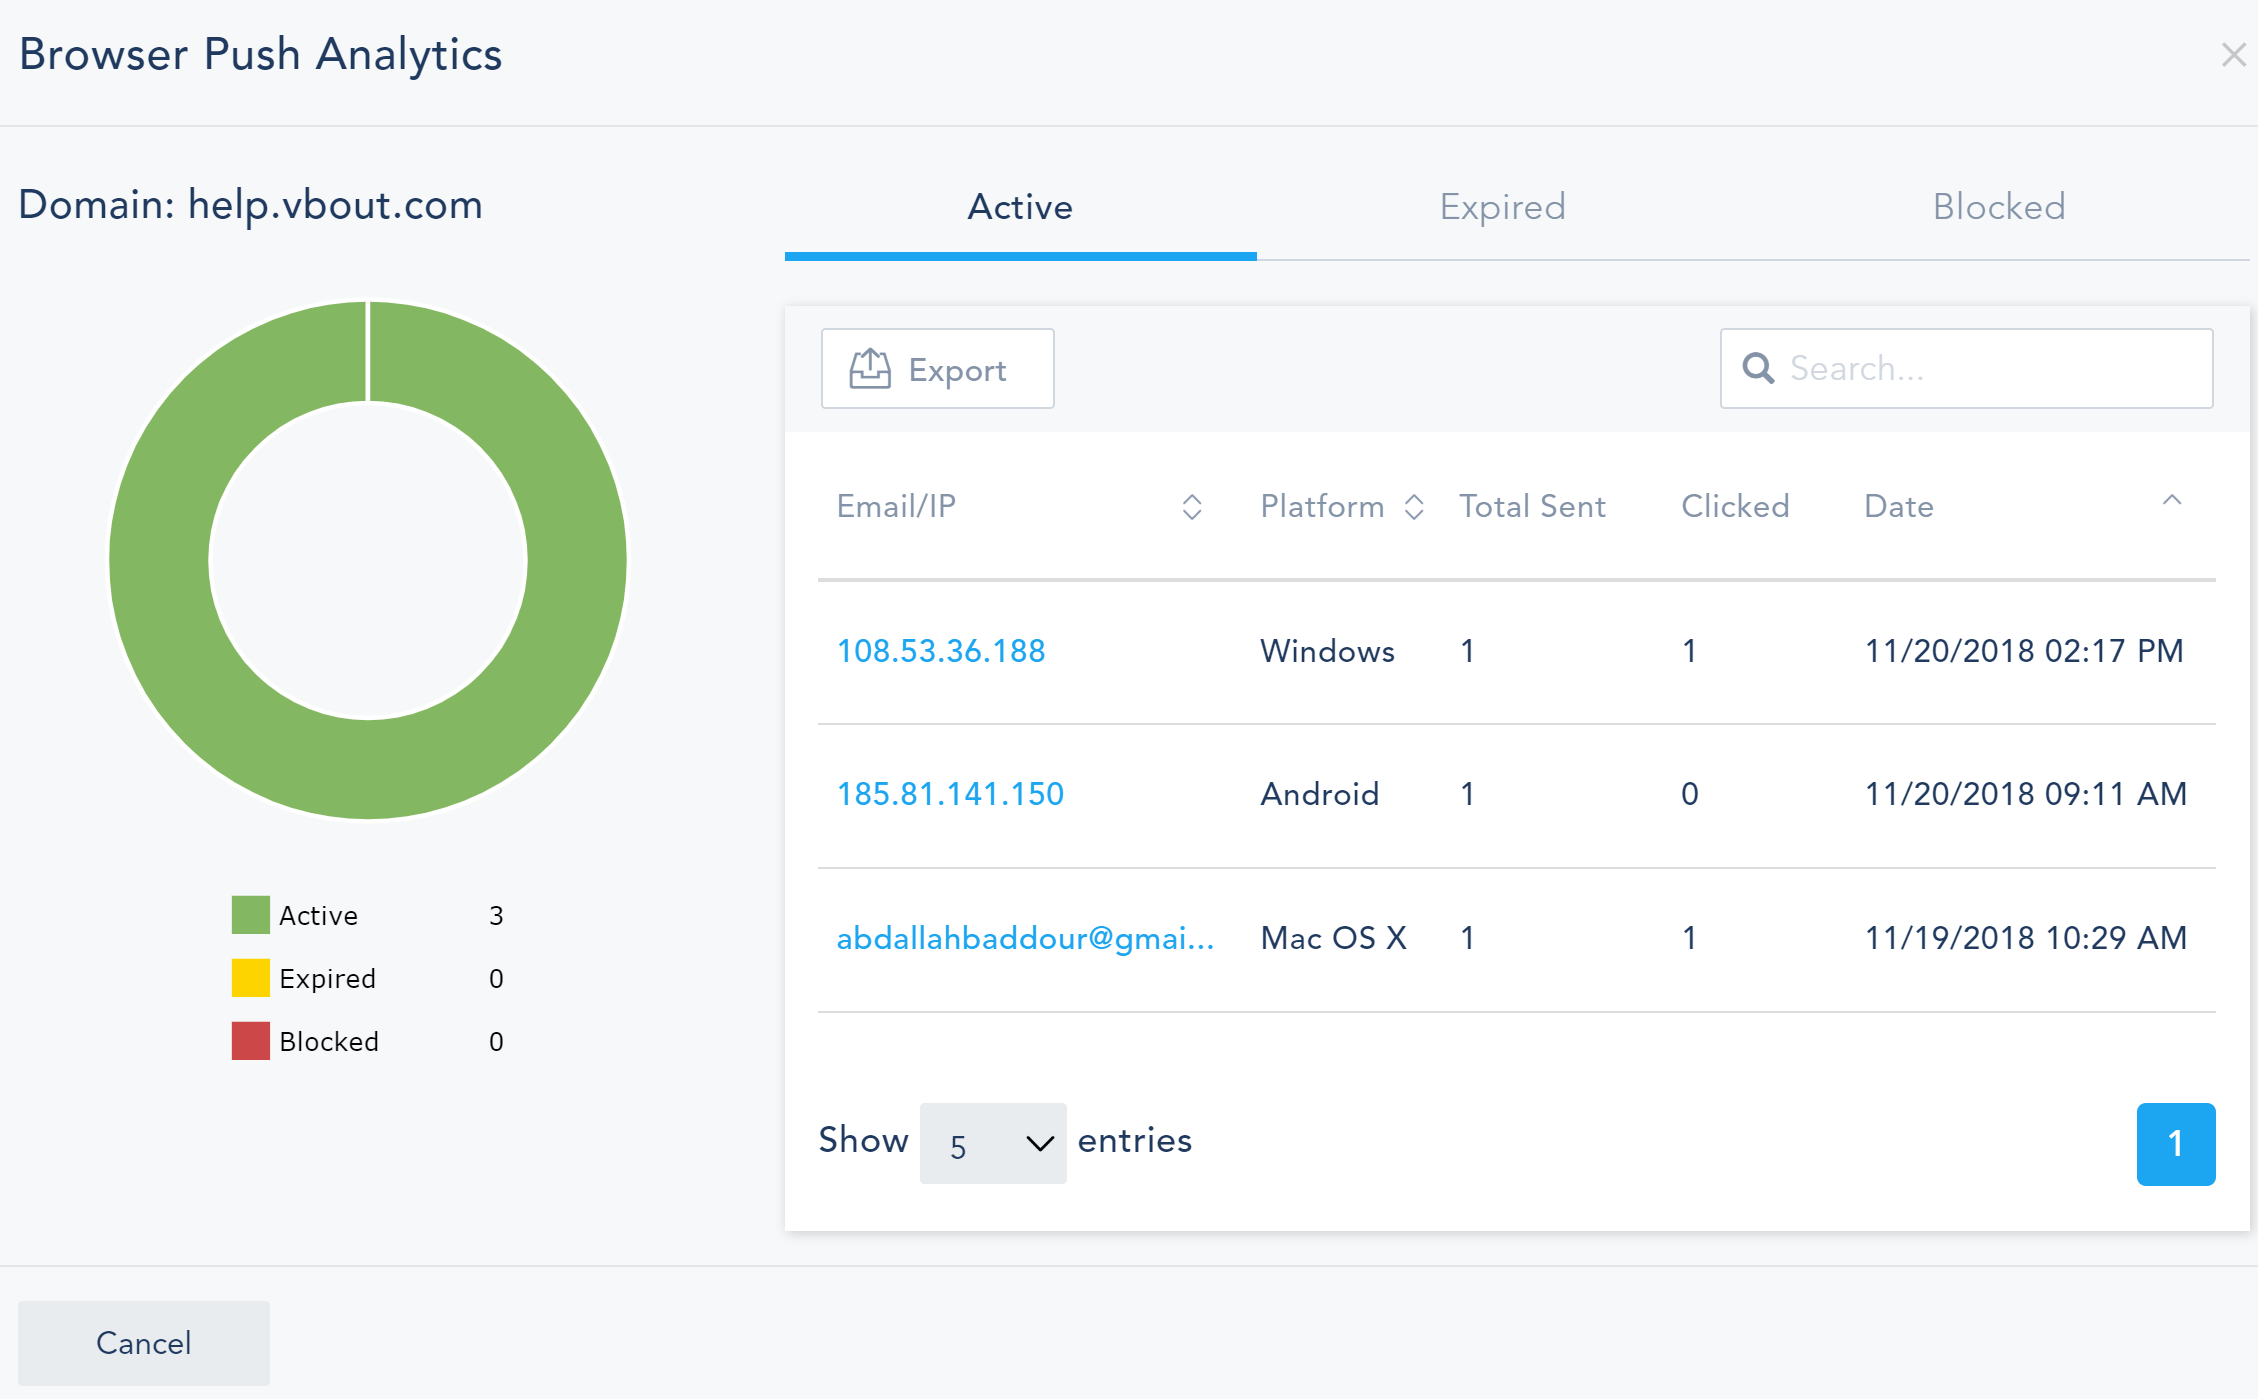
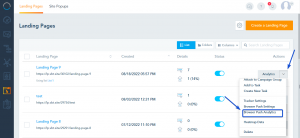
  • When a visitor clicks on Allow, they will automatically be added to your Browser Push Subscribers. You can view them by clicking on Browser Push Analytics.
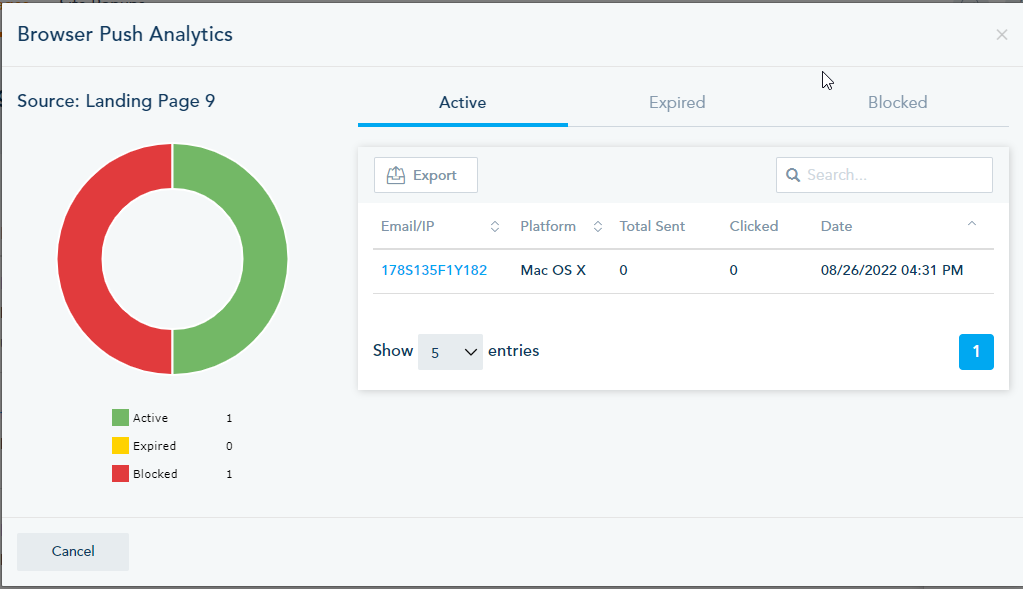
  • Browser Push Analytics displays a detailed report on your subscribers. Toggle between the tabs to view records in the Active tab, with meta-details on the device, total messages sent Clicks and date of signup. If the subscriber was a cookied contact with an email on a list, the platform will automatically merge the record, otherwise you will see an anonymous IP as a subscriber. Click on the Email/IP to access to the full user profile with detailed activities.
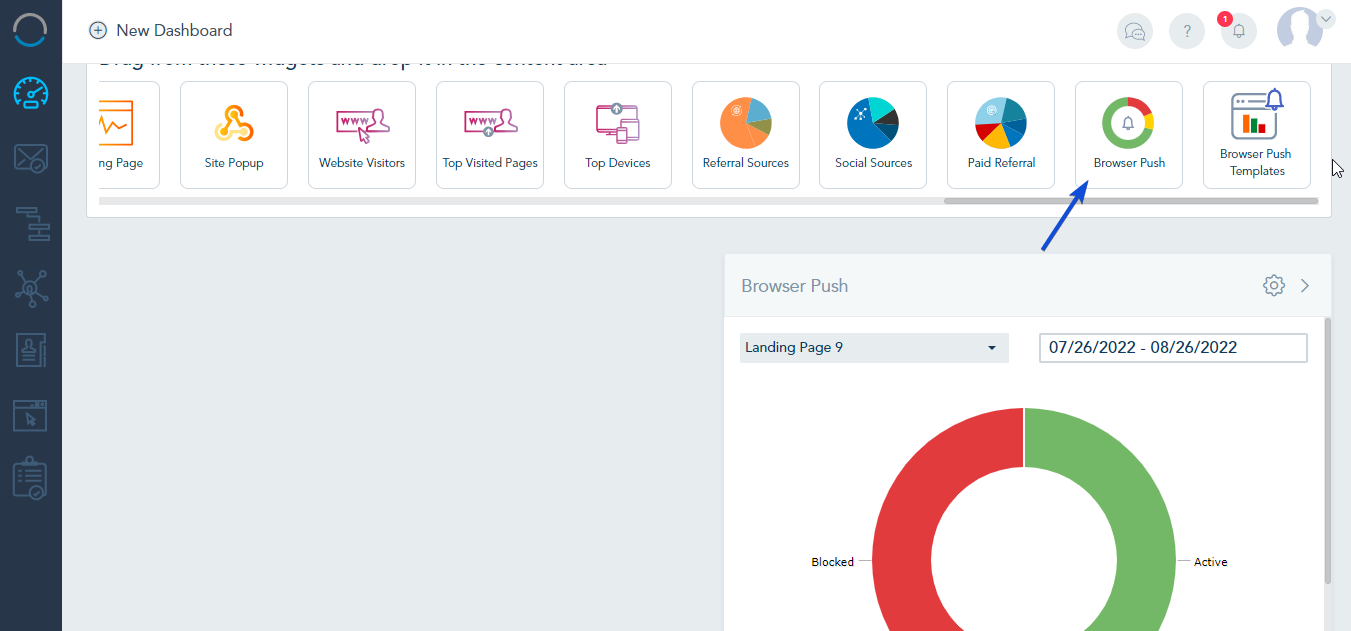
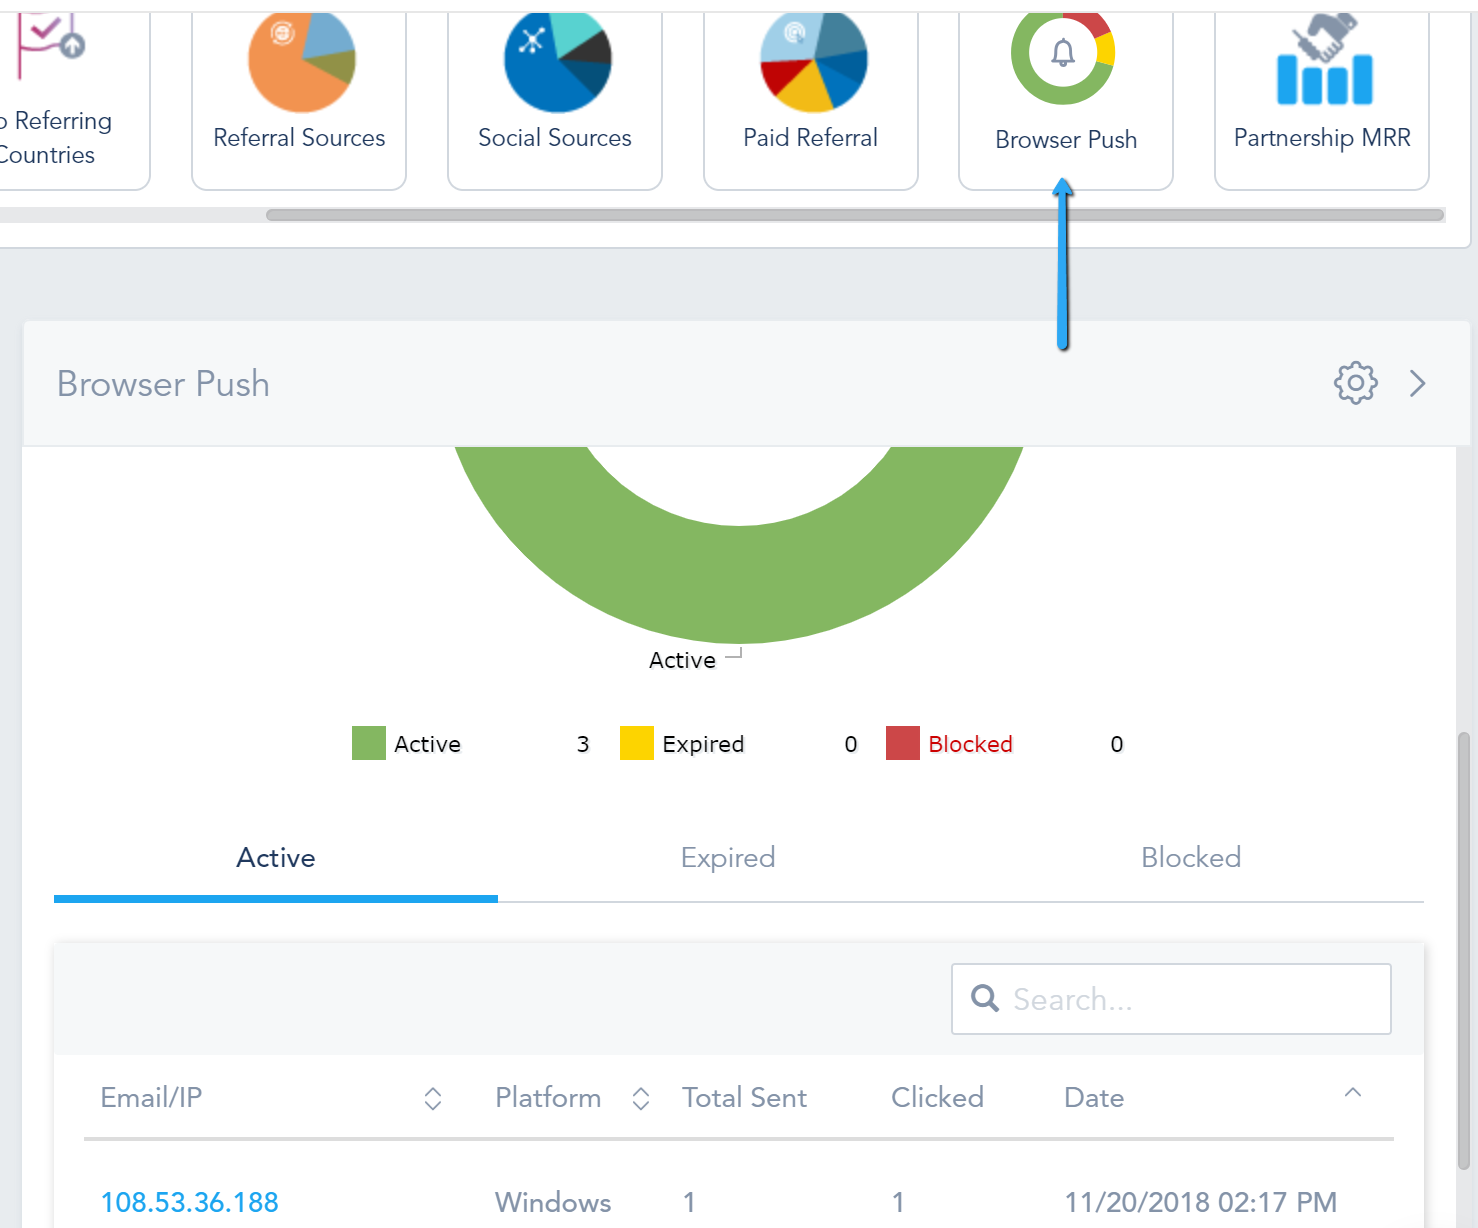
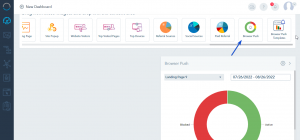
  • You can also include an automated report on your Browser Push, by landing page, under your Dashboard Reports.
Get Started

Enhanced Email Address Validation

Email validation lets you check and validate the quality of your contacts’ email addresses, so you can control how those emails are handled. It can help you detect, with high accuracy, hard bounces, spam traps, and fake email addresses by verifying and cleaning up your email list.

This feature will be available when installing the Enhanced Email Validation Add-on and is based on a monthly credit count.

You will have the option to unsubscribe these contacts based on the email validation status response.

The returned statuses are: Valid, Neutral, Risky, Undeliverable, and Typo.

Valid: The email server is ready to accept emails to this email address

Neutral: The email is a temporary address to receive letters and expires after a certain time period.

Risky:

  • The email account is suspended, disabled, or limited and cannot receive emails
  • The SMTP response is invalid or the destination server reported an internal error.
  • Some anti-spam technology is blocking the verification progress.
  • The email address is maintained by an ISP or a third party that neither clicks nor opens emails.

Undeliverable:

  • The email server is dead, and no connection to it could be established.
  • The email address does not exist
  • The domain email server is not installed or is incorrect so the emails are not deliverable.
  • The delivery failed
  • The delivery failed because a relaying problem took place

Typo: There is a syntax error in the email address

You can use the Enhanced Email Validation from different views within the platform.

Email Validation while importing contacts:

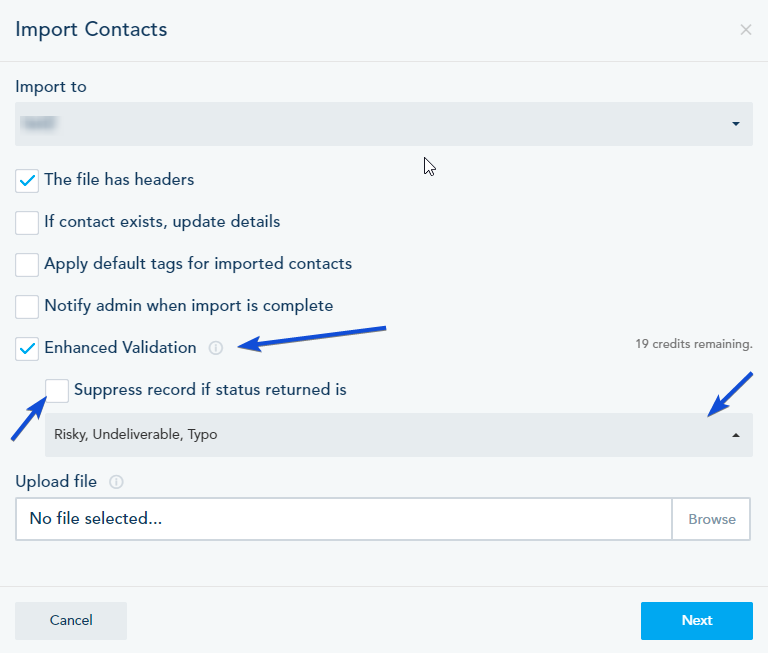
When mass importing your contacts, you have the option to validate your contacts’ email addresses.

In Mass Import settings, turn on the Enhance Validation option.

You can select the status to unsubscribe the contact.

Email Validation in Form

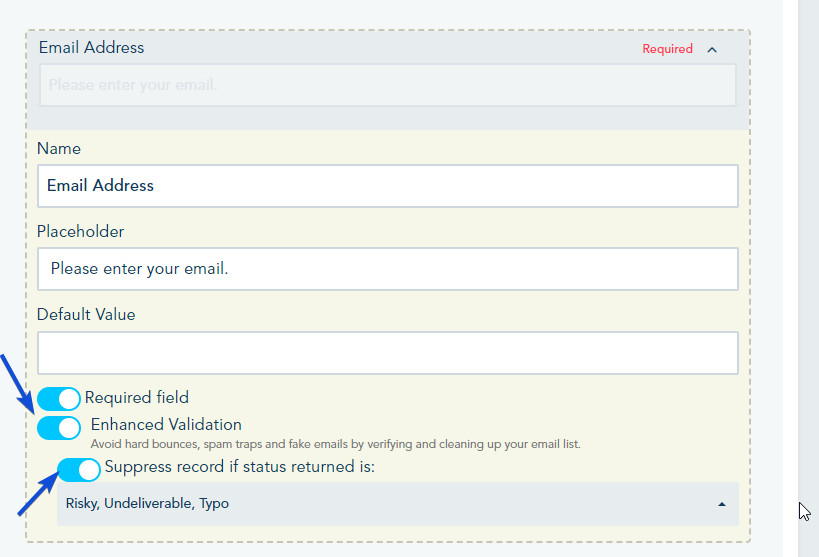
You have the option to enable enhanced validation when the contact signup to your form.

In the Form builder, turn on the Enhance Validation option.

Email Validation of a List:

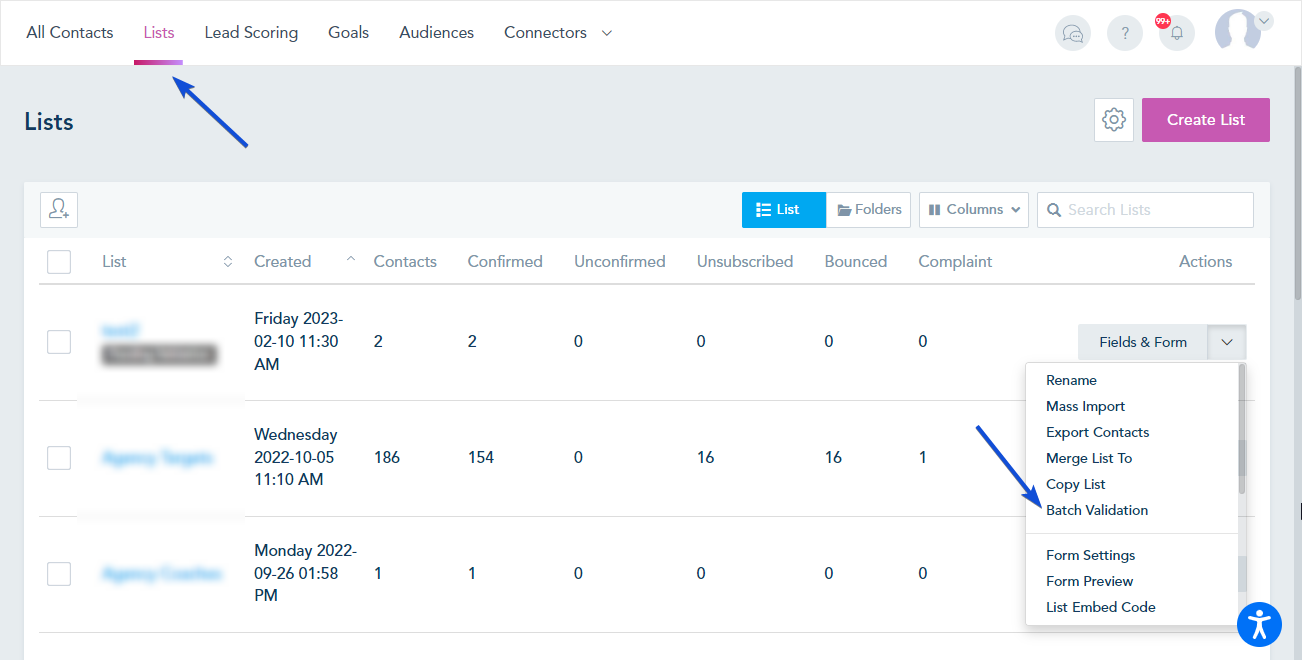
Go to Lists, choose Batch Validation from the drop-down menu next to the list.

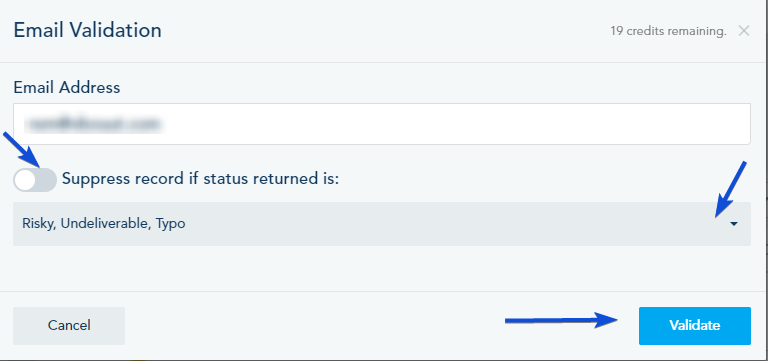
Choose your options and, click on Validate.

Email Validation of a Contact

From the All Contacts page, choose Email Validation from the drop-down menu of the contact.

Also, you can choose Email Validation from drop-down menu inside the Lead profile.

Choose your options and, click on Validate.


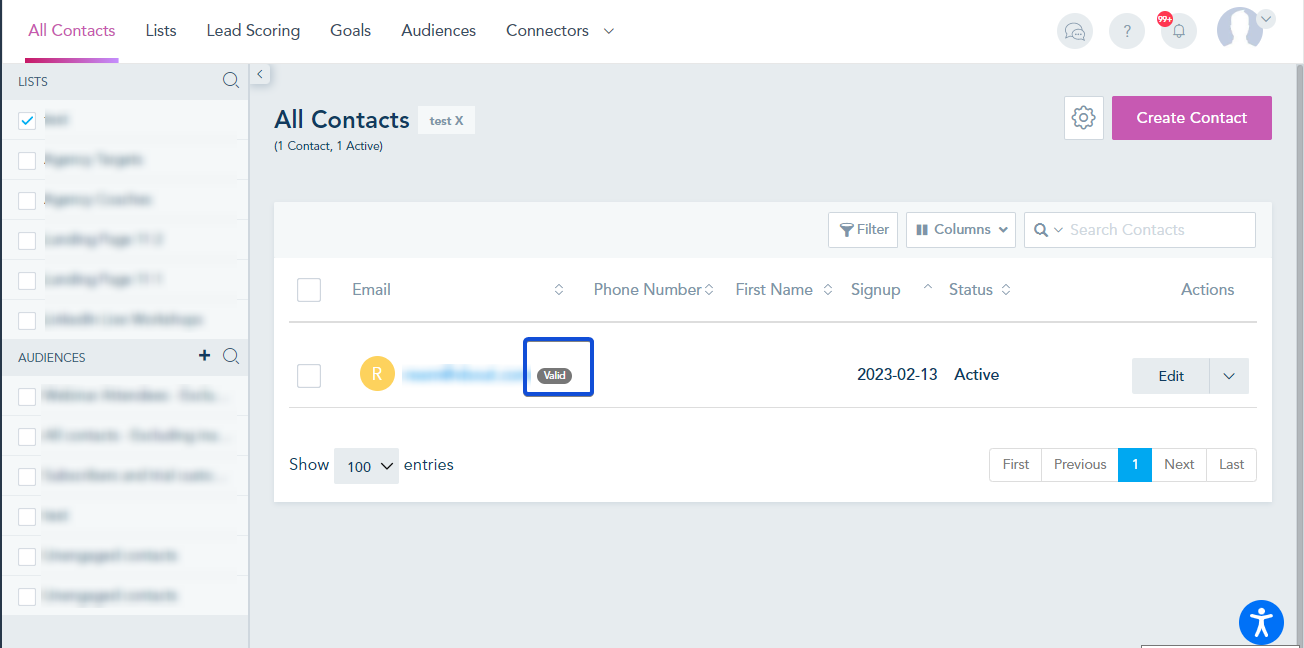
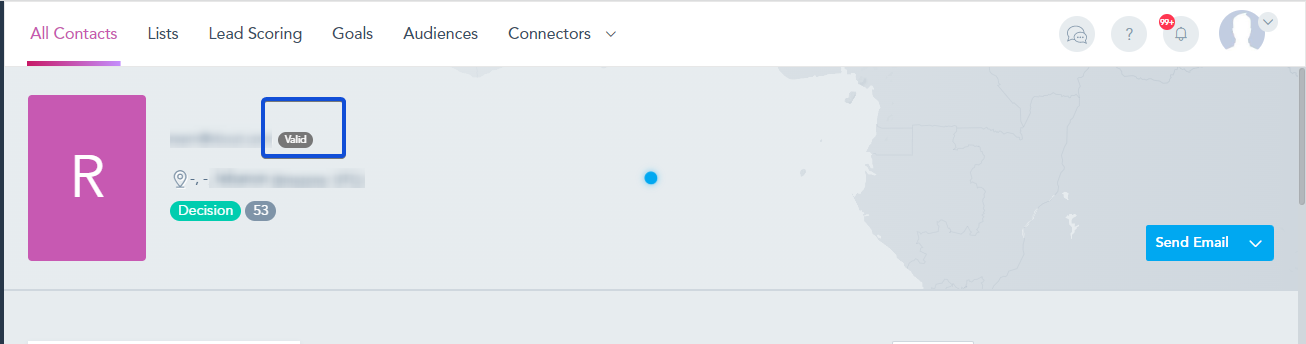
Once the validation process is completed, you can see the email status on the All Contacts page and inside the Lead profile.

Get Started

How to exclude Lists/Audiences when sending email campaigns

When sending your email campaigns, you can choose to send them only to specific contacts among the recipients you have selected. To do this, follow these steps:

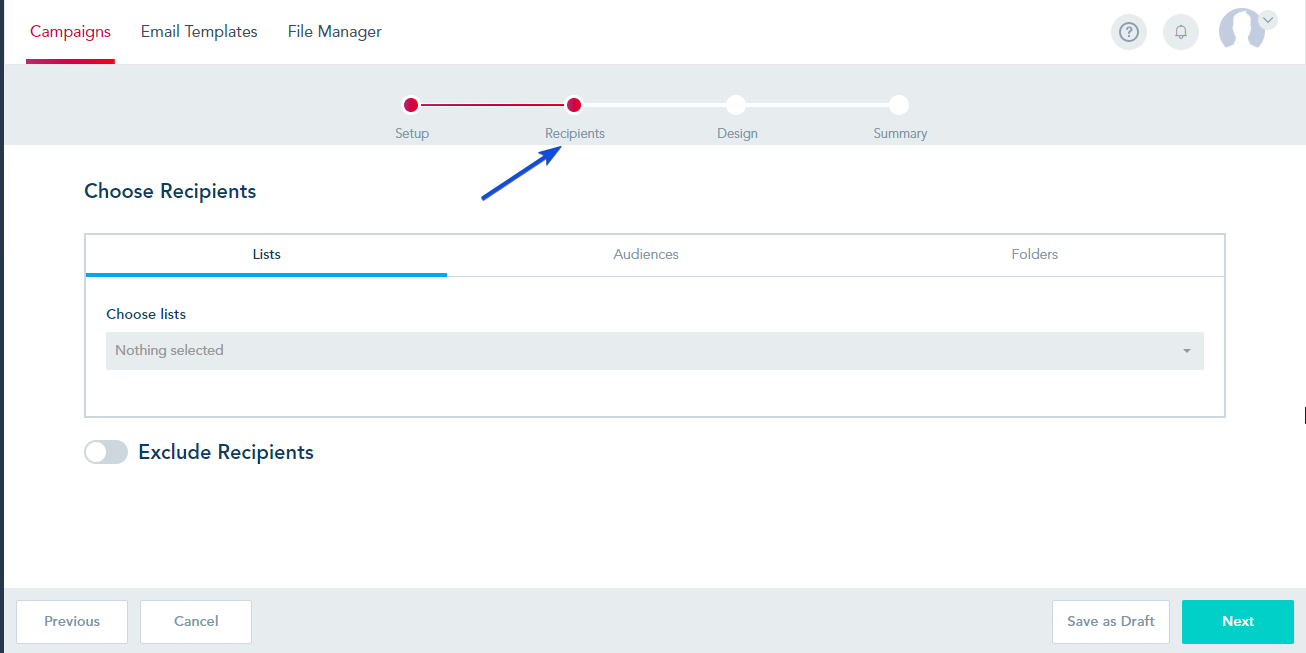
  • Set up your campaign and navigate to the Recipient tab.

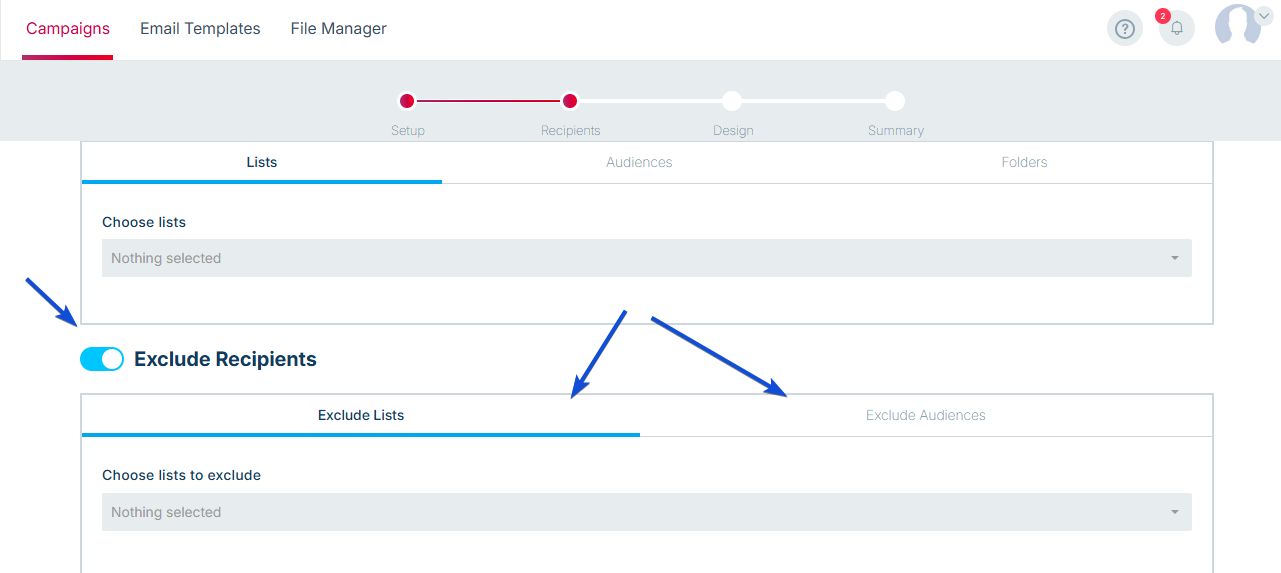
  • After selecting your recipients from Lists, audiences, or folders, enable the “Exclude Recipients” option.
  • Choose a specific list or audience that you want to exclude from receiving the email.

Once you proceed, your email will be sent to all the recipients you have chosen, except for those on the excluded list/audience.

Get Started

Activepieces Integration

By connecting Activepieces with VBOUT, you will have the ability to integrate seamlessly with various third-party applications. This integration opens up a world of possibilities for users, allowing them to automate tasks, synchronize data, and optimize their processes across multiple platforms.

Step 1: Login to Activepieces and Access the Flows Page

  1. Enter your login credentials to access your Activepieces account.
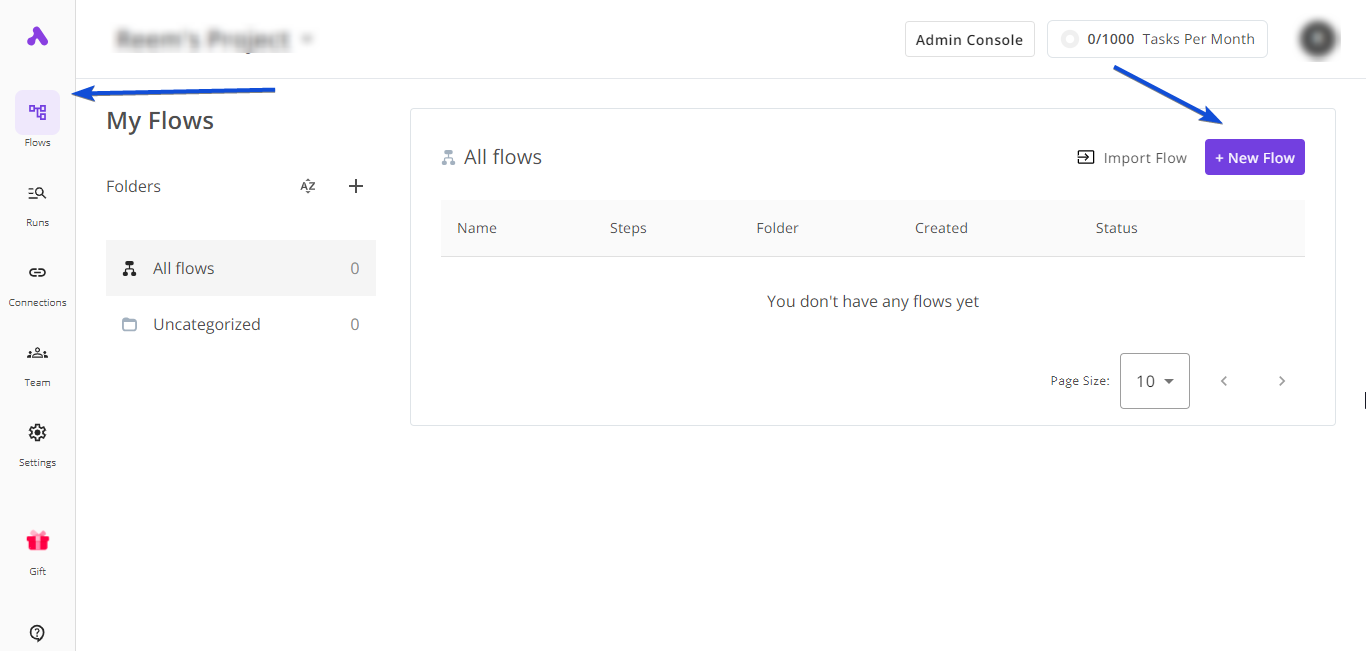
  2. Once logged in, locate and click on the “Flows” page in the navigation menu.
  3. Add a new flow.

Step 2: Select VBOUT from the List of Apps

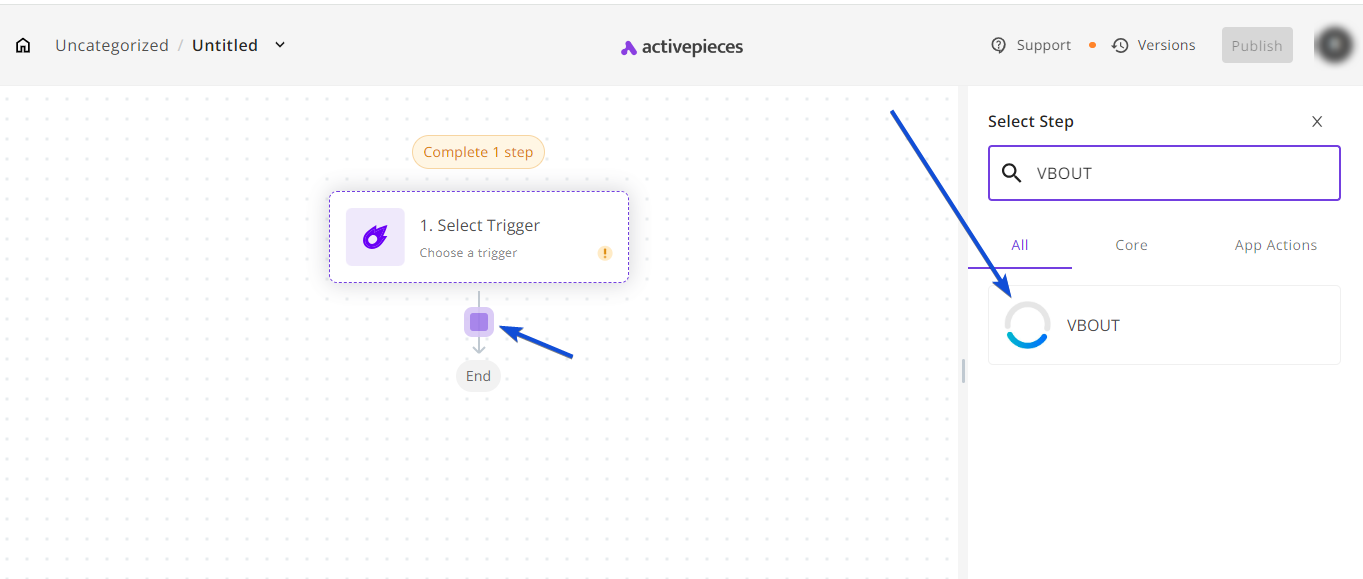
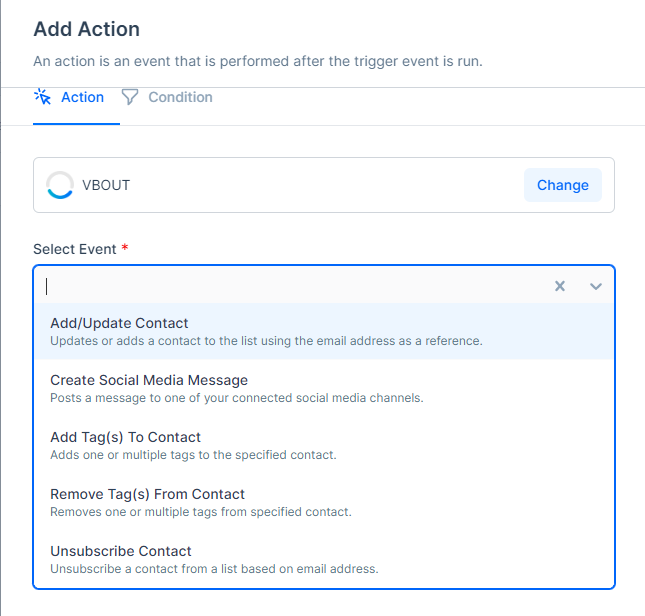
  1. Once you add and configure your trigger, click on the + icon to add an action to your flow.
  2. In the list of available apps, find and select “VBOUT” as your desired integration.


Step 3: Start your VBOUT action setup

    1. Choose an action from the list of available actions.
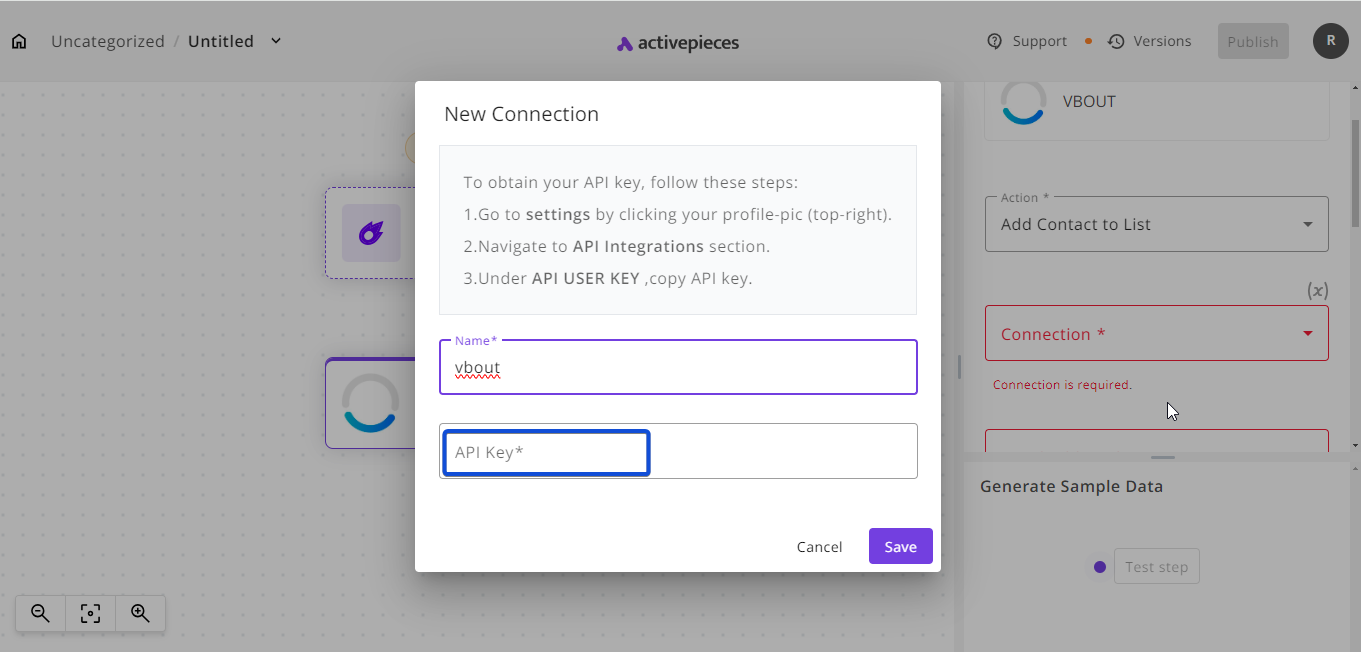
    2. Add a new connection
    3. Provide a name for your connection and add our API key.
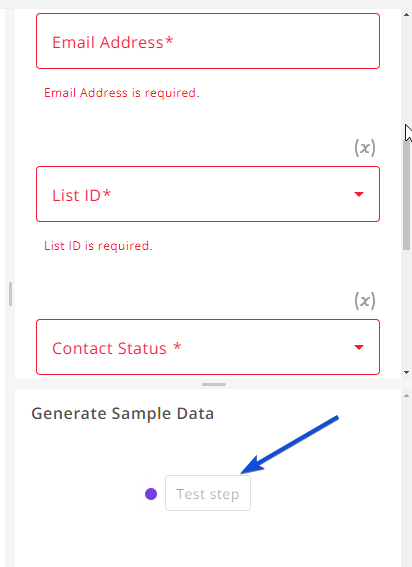
    4. Map the required fields and all the fields you need to your related data field.
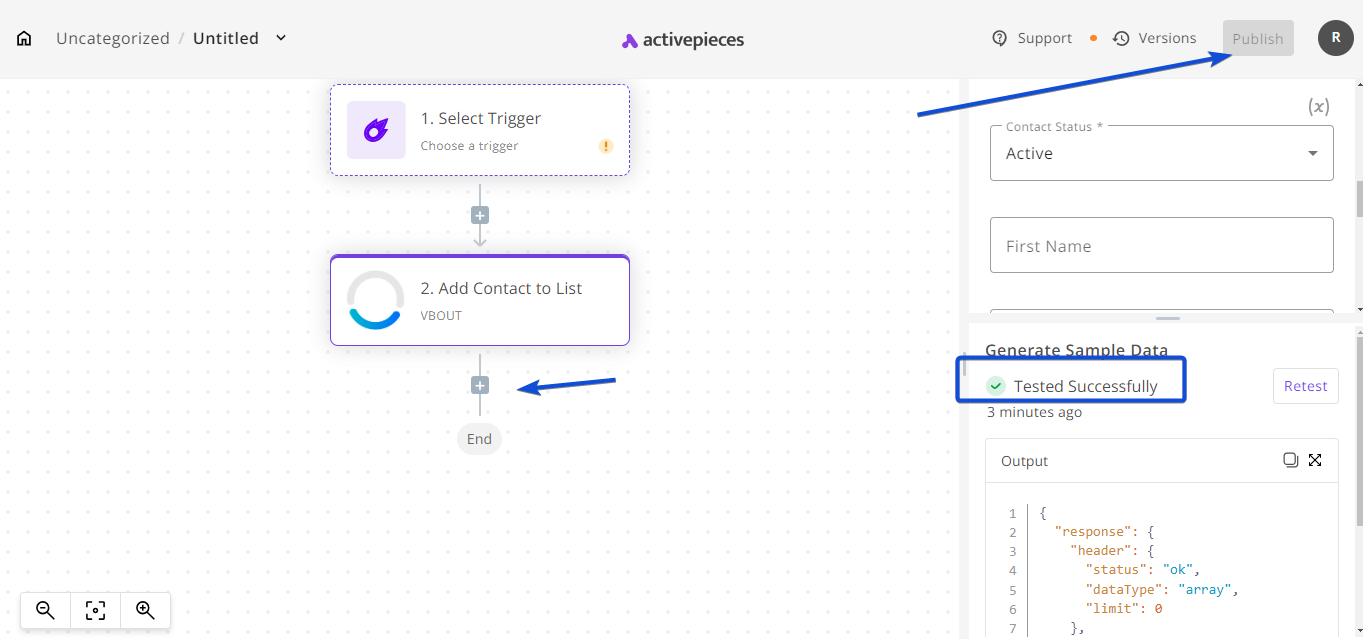
    5. Once done, click on Test Step to test you setup.

Once done building your flow, click on Publish.

List of available VBOUT Action

  • Add Contact to List
  • Add Tag to Contact
  • Create Email List
  • Create Email Marketing Campaign
  • Create Social Media Message
  • Get Contact by Email
  • Get List Details with Custom Fields
  • Remove Tags from Contact
  • Unsubscribe Contact
  • Update Contact


Get Started

How to post Instagram Story

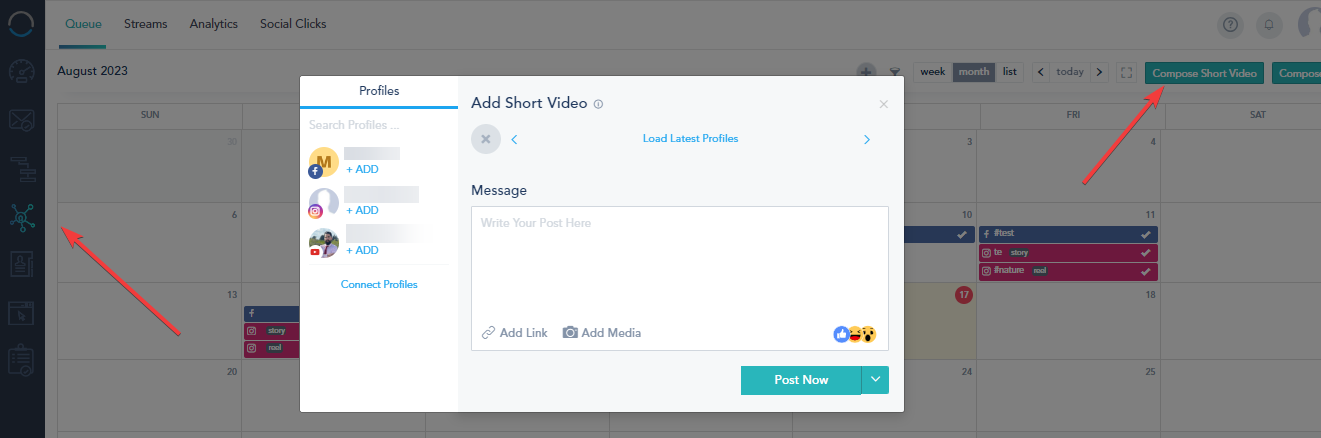
You can use the Compose Short Videos option within the Social Media Section to post Stories on your Instagram account.

Go to Social media section → Queue and click on Compose Short Videos.

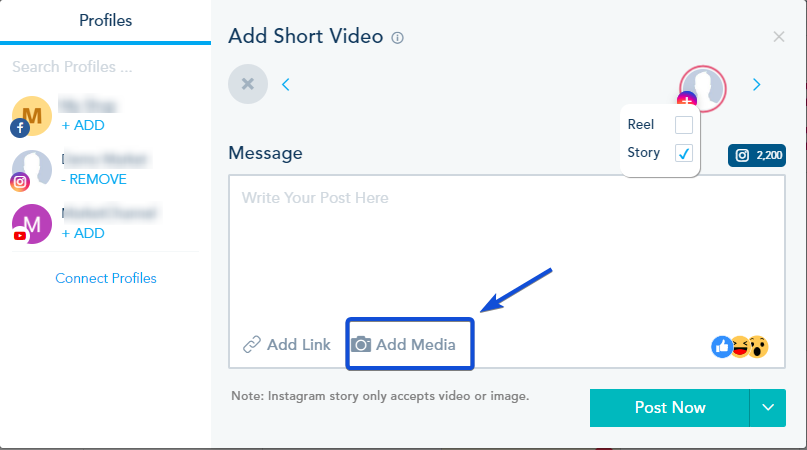
  • Choose your Instagram account
  • Add your media file, you can either upload a new file or access your saved media inside the File Manager.
  • Click on the chosen Instagram account,  and choose to post it as a Story.

  • Confirm whether you’d like to immediately publish your post by clicking Post Now, Schedule it to post on one specific date.

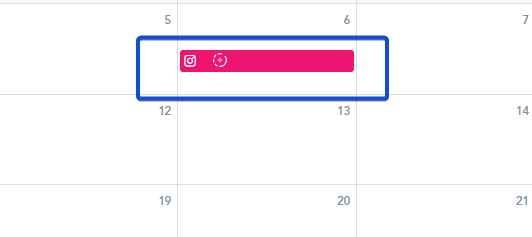
Once your Story is posted or scheduled, you can check it in your Social Calendar.

Get Started

Manage Custom Plans

The custom plans feature will allow you to create a-la-carte marketing plans, for your customers. This means you can create a plan that includes Email Marketing and call it “Email Frenzy Gold”.

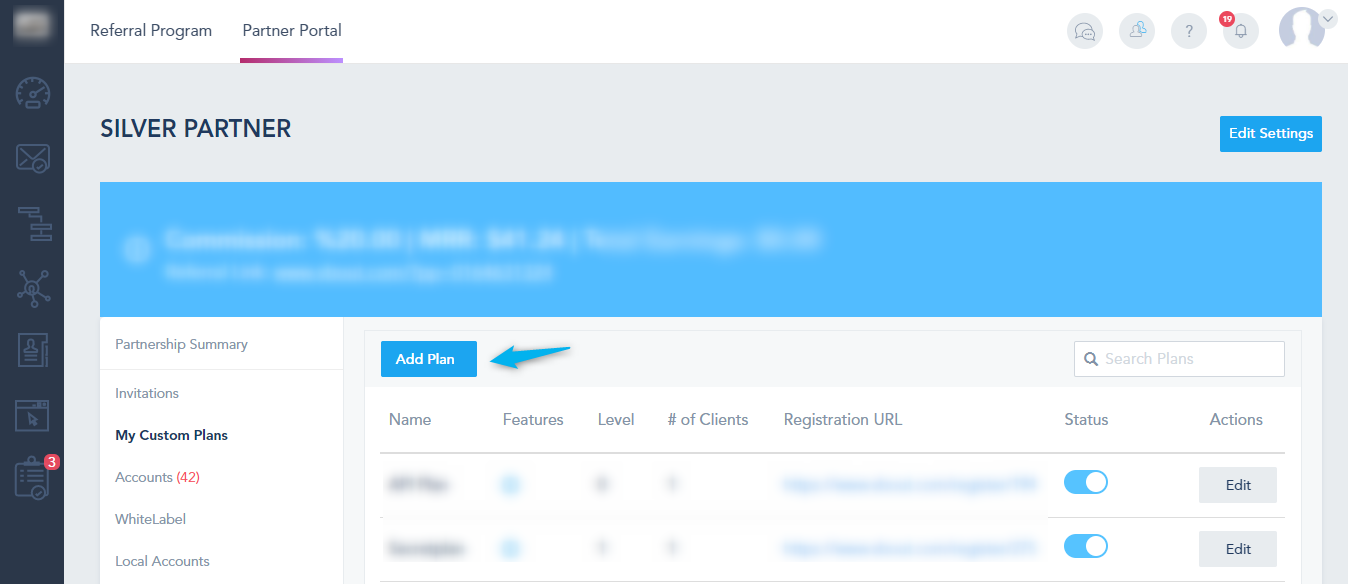
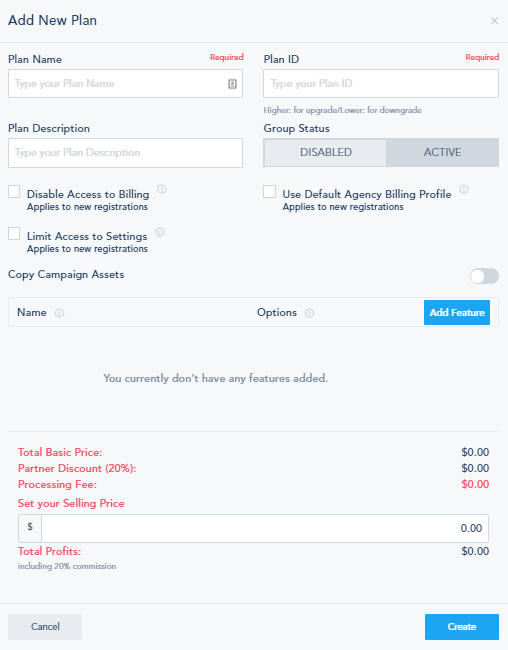
To add a new custom plan, you can click on My Custom Plans from the left partnership side menu, then click on Add Plan:

  1. You will need to give your new plan a name, a description and an ID to specify the orders of the plans for your client’s upgrade/downgrade process.
  2. You should choose to activate or not the following options:
    • Disable Access to Billing: Choose whether to allow the business to access its billing page or not.
    • Use Default Agency Billing Profile: Future registrations to this plan will automatically use the agency billing profile to process monthly membership and add-on purchases. Note that you can always change the individual card on file for each sub-account in the future.
    • Limit Access to Settings: Account’s owner will not have access to users.
    • Copy Campaign Assets: If you want to copy campaign assets to the new account created.
  3. Next, you must add a new feature to your plan by clicking on the plus sign. On the drop, you can choose the  product you wish to offer then choose from the different plan limits and pricing options offered exclusively from this portal. (for example you can choose the Email Marketing product, with 10,000 emails/mo or 50,000 emails/mo…). Once you finish adding all the products and limits press Add to add the product into the plan.
  4. The system will automatically display the total base price for the features you picked minus your discount as a partner. You also have the ability to set your own price for your customers and upsell the plans as you see fit. Total Profits = Selling Price – 0.3*(Total Base Price) – Processing fees.

Once you finish that, you will need to click on Create in the bottom right to actually create the plan. If you list your custom plans you will see that each one of them will have its own unique registration URL which will be used to sign up to this custom plan.

Your customers can use the custom plan URL above to sign up to the platform. Signups will be attributed to your partners account and be shown under the Customers section of your portal.

Get Started

Get started with API calls

Using API calls detailed in this link, you will need some required parameters, please check below how to get some of these parameters from your account.

API Key

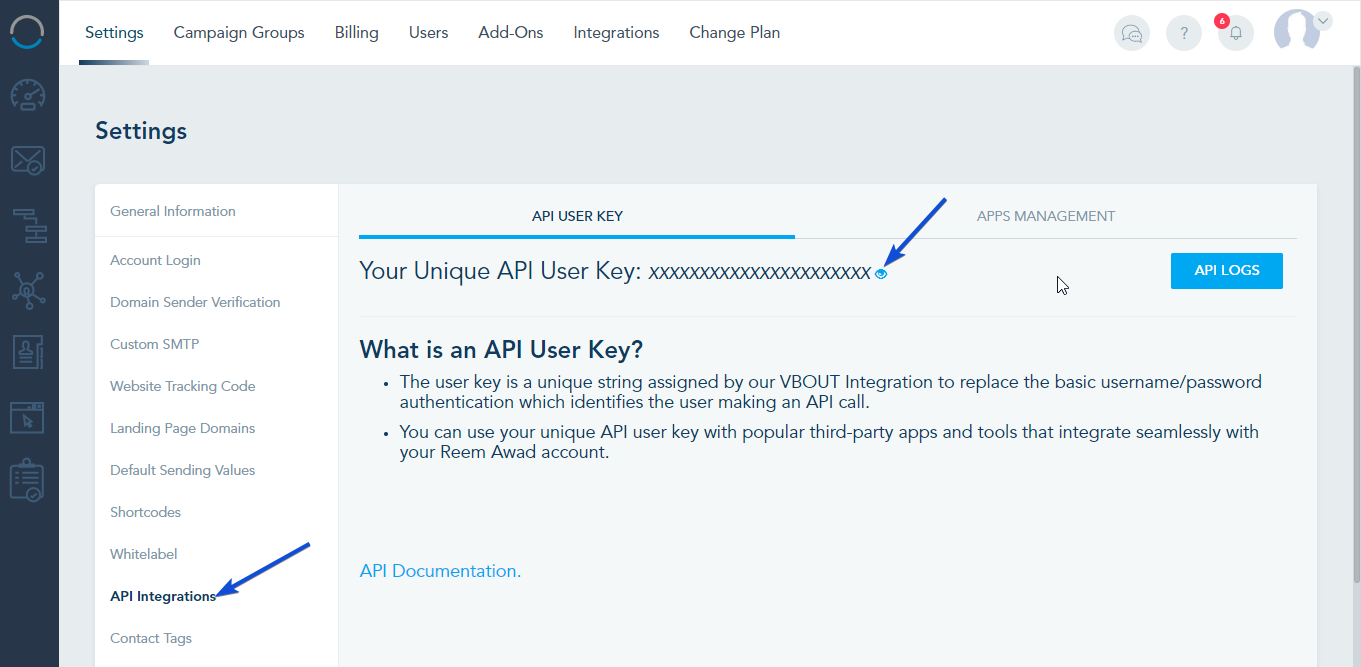
Go to Settings -> API integration.

List ID

Go to the list page, and you can find the List id in the URL.

Field ID

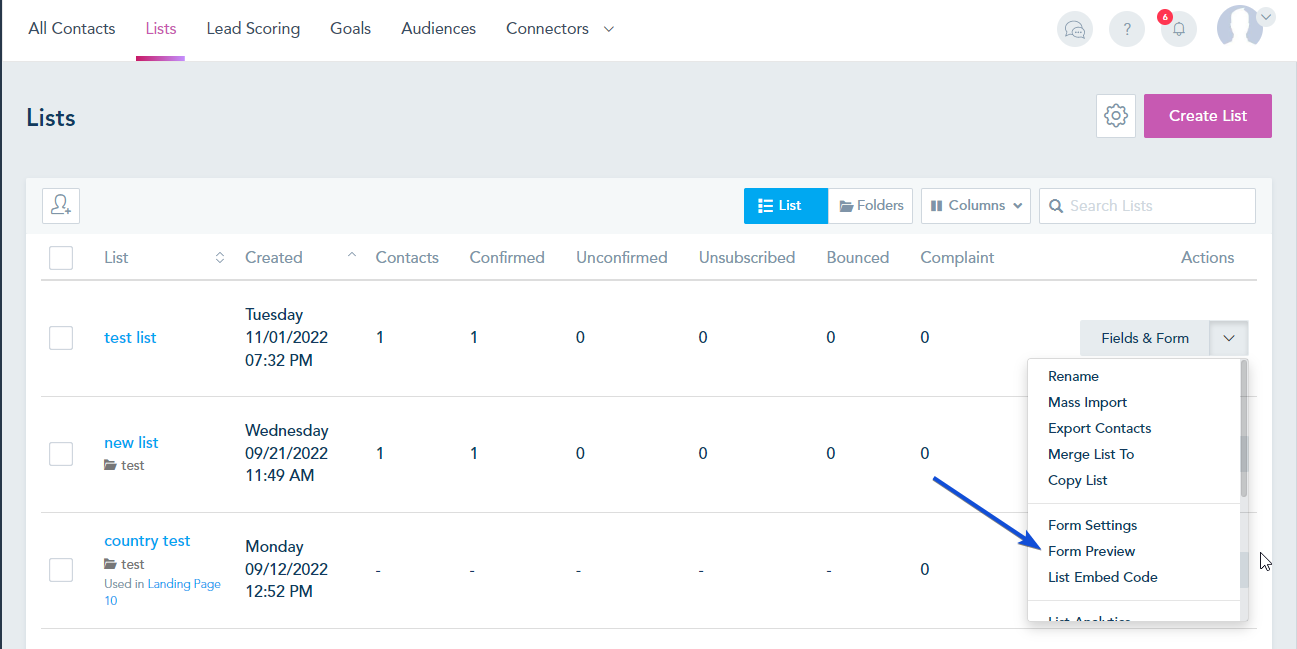
Go to your List Form preview.

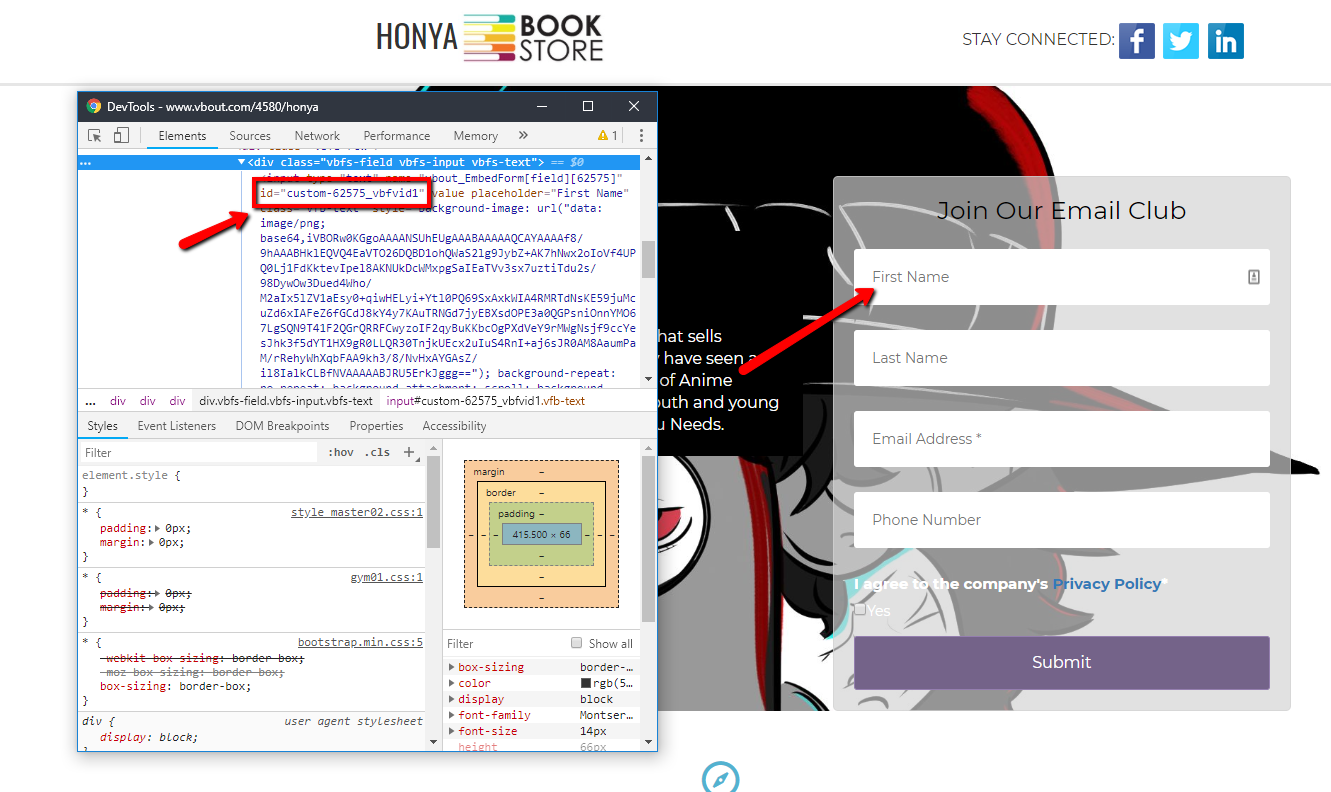
Right click on the field -> Inspect, and you can find the Field ID in the line code.

You can also get the IDs (List and Fields) using this API call.

Contact ID

Open the Lead profile, you can find the contact ID in the URL.


Get Started

How to update contact details using Shortcode

You can update contact field details with the value of another existing field using Shortcode. This can be achieved using Automation.

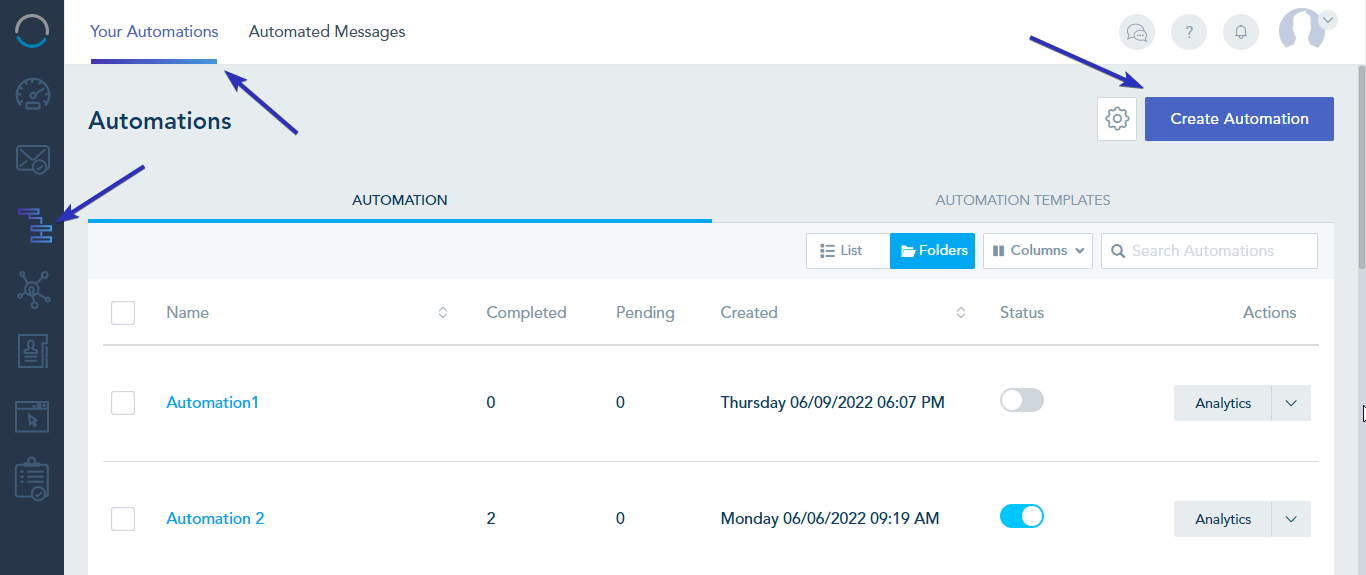
From the Automation tab -> Your Automations – > Create Automation.

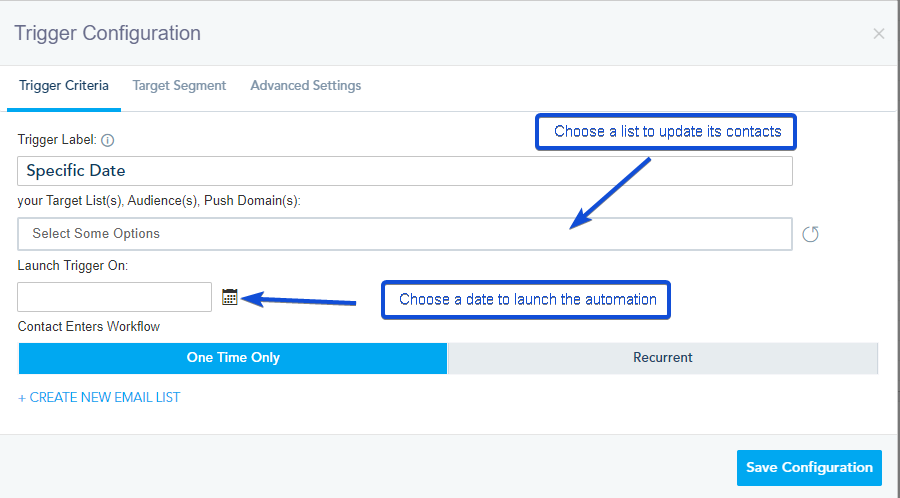
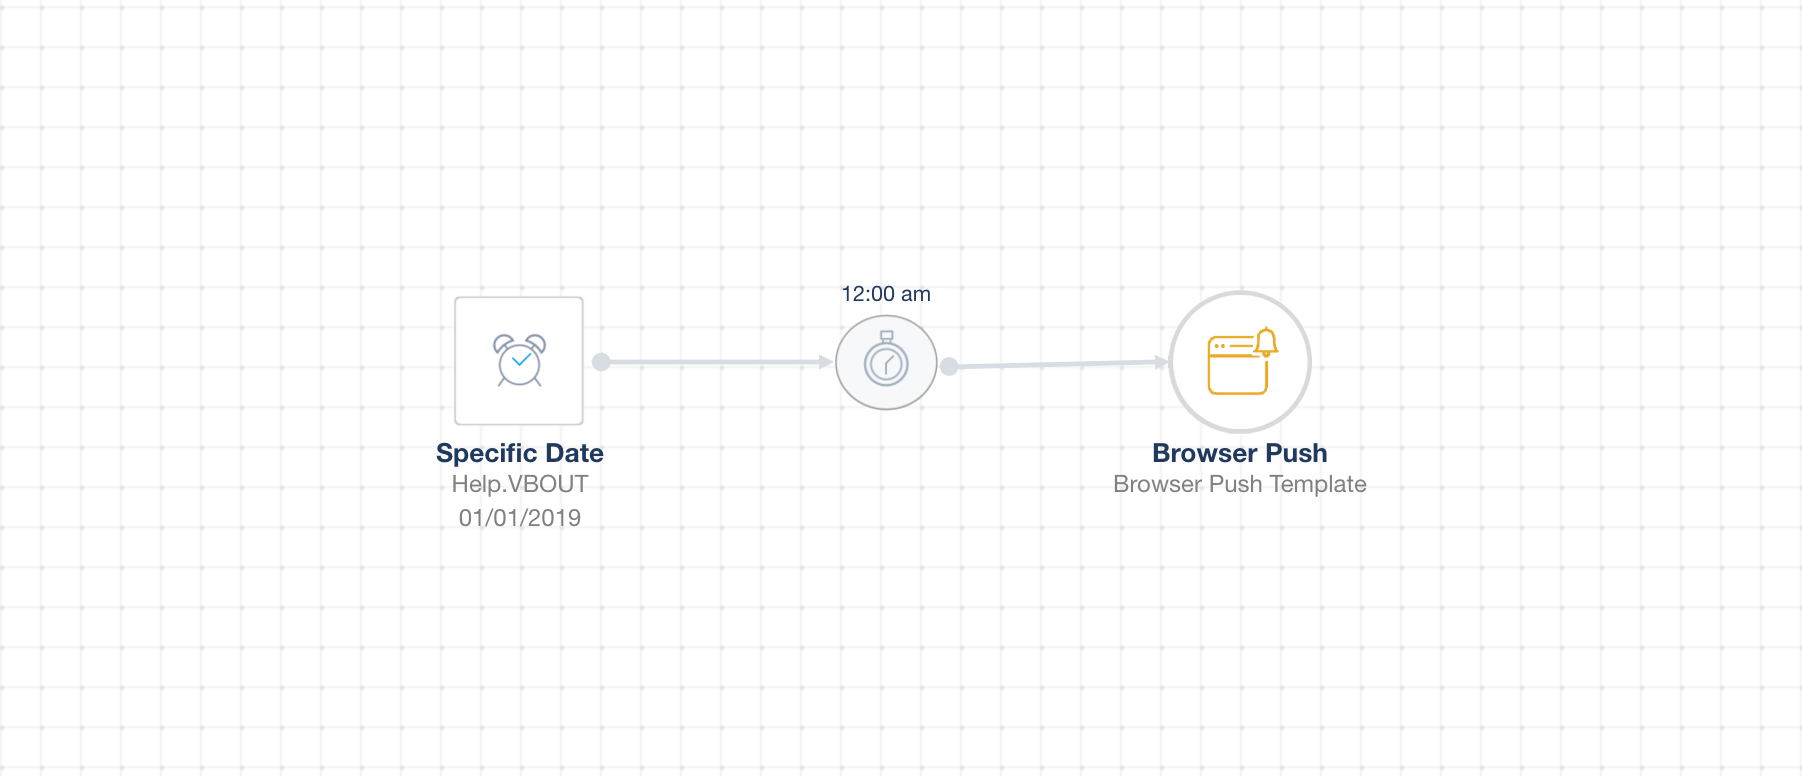
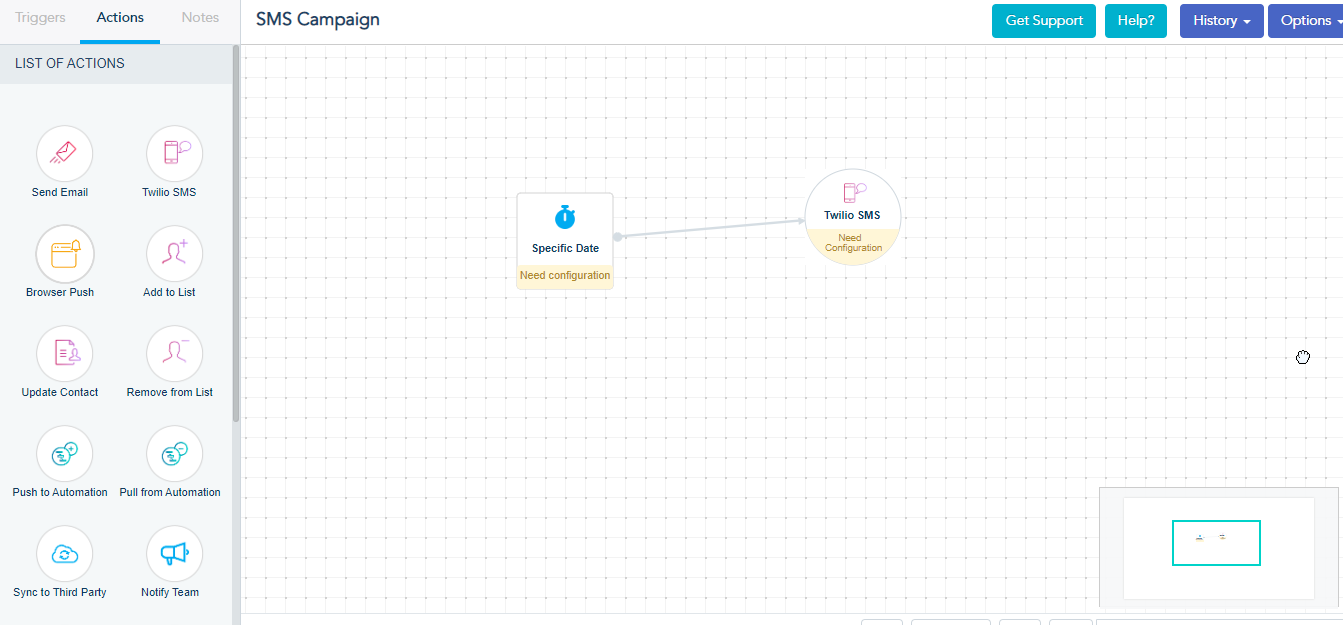
To create the automation, use the Specific Date trigger connected to the Update Contact action.

In the trigger configuration, choose the list you want to update its contacts and a date to launch the automation.

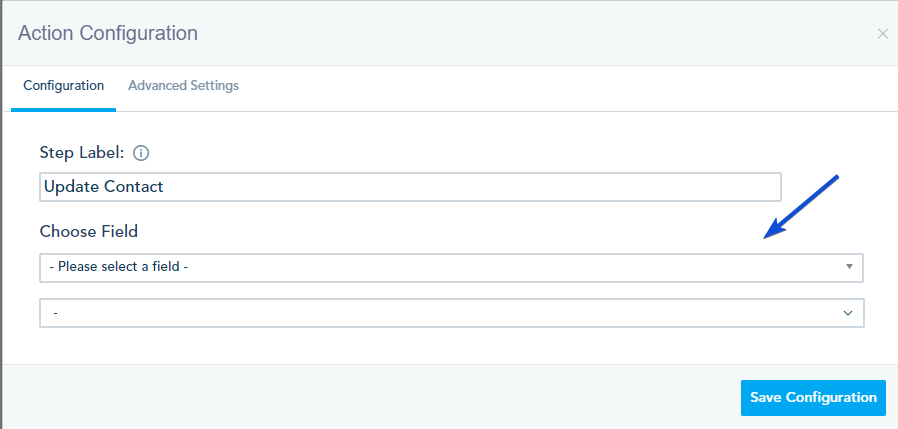
In the Update Contact Action configuration, choose the field you want to update.

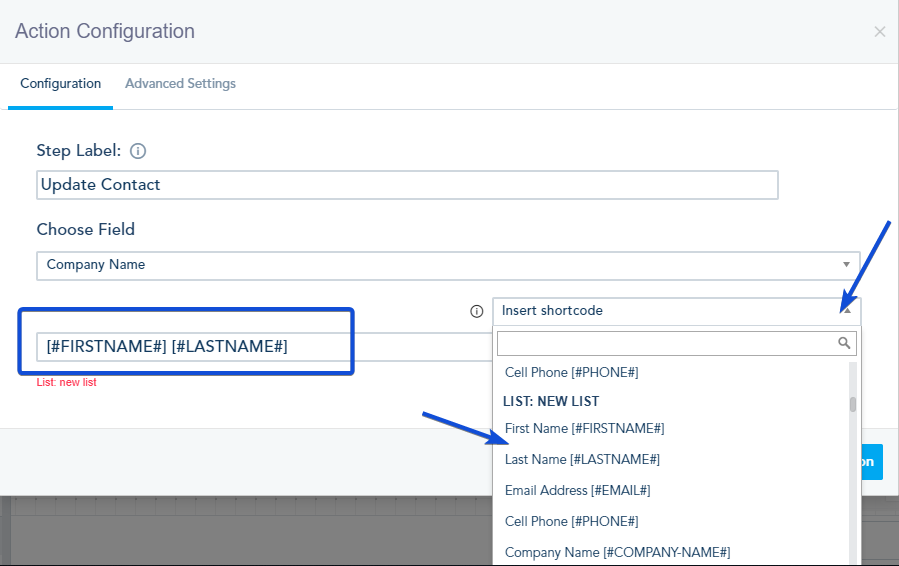
Once, you choose the field, an option to insert Shortcode will show.  You can select the shortcode of the field you need to use its value. For example, updating the “Company Name” field to the “Firstname Lastname” of the contact.

Once done, save and publish the automation.

After the automation is completed, the contacts will be updated by the value you have selected.

Get Started

Using whitelabel option

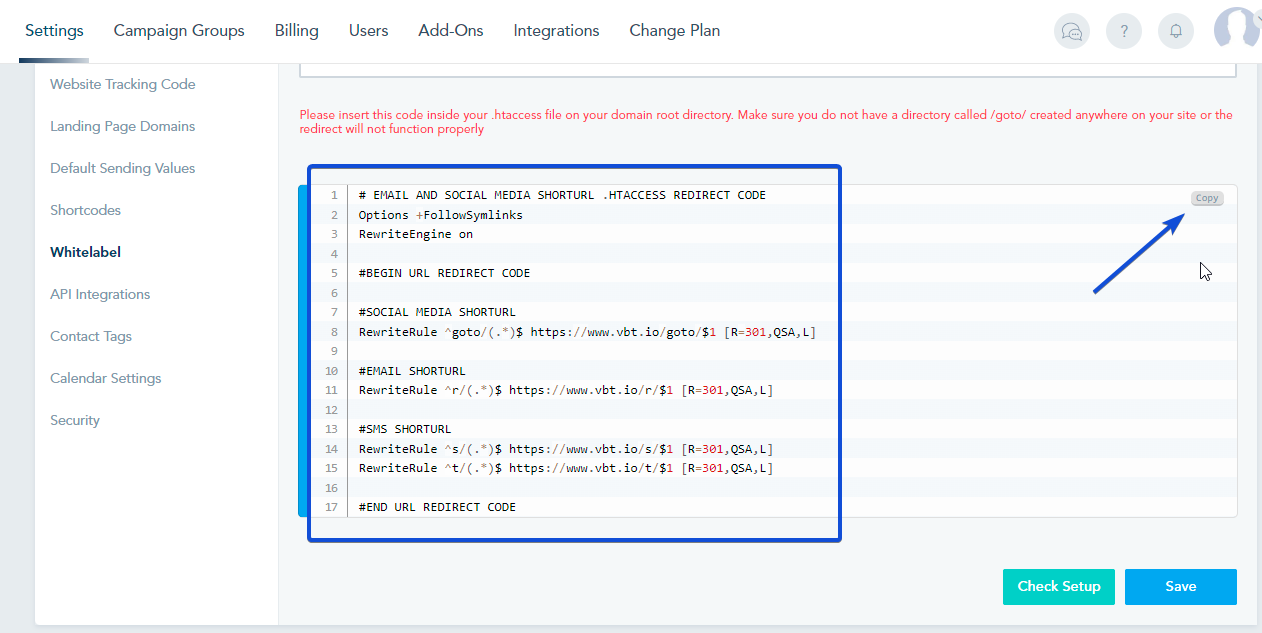
The whitelabel option allows you to use your own branding and domain resources so that you can completely hide VBOUT from your end users. There are three options that you can explore:

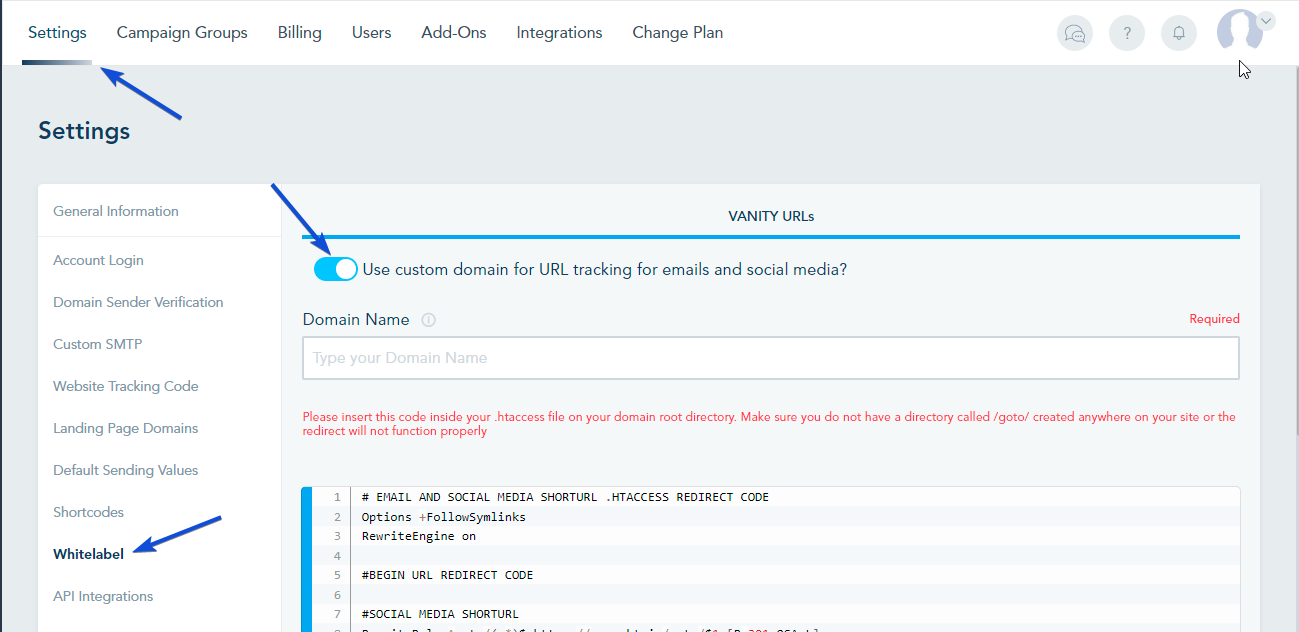
  1. Vanity URLs: This option when activated will allow you to use your own custom domain for tracking email and social media links. This way when your contacts click on any link you send them via email or social media posts, they will see your custom domain instead of VBOUT.
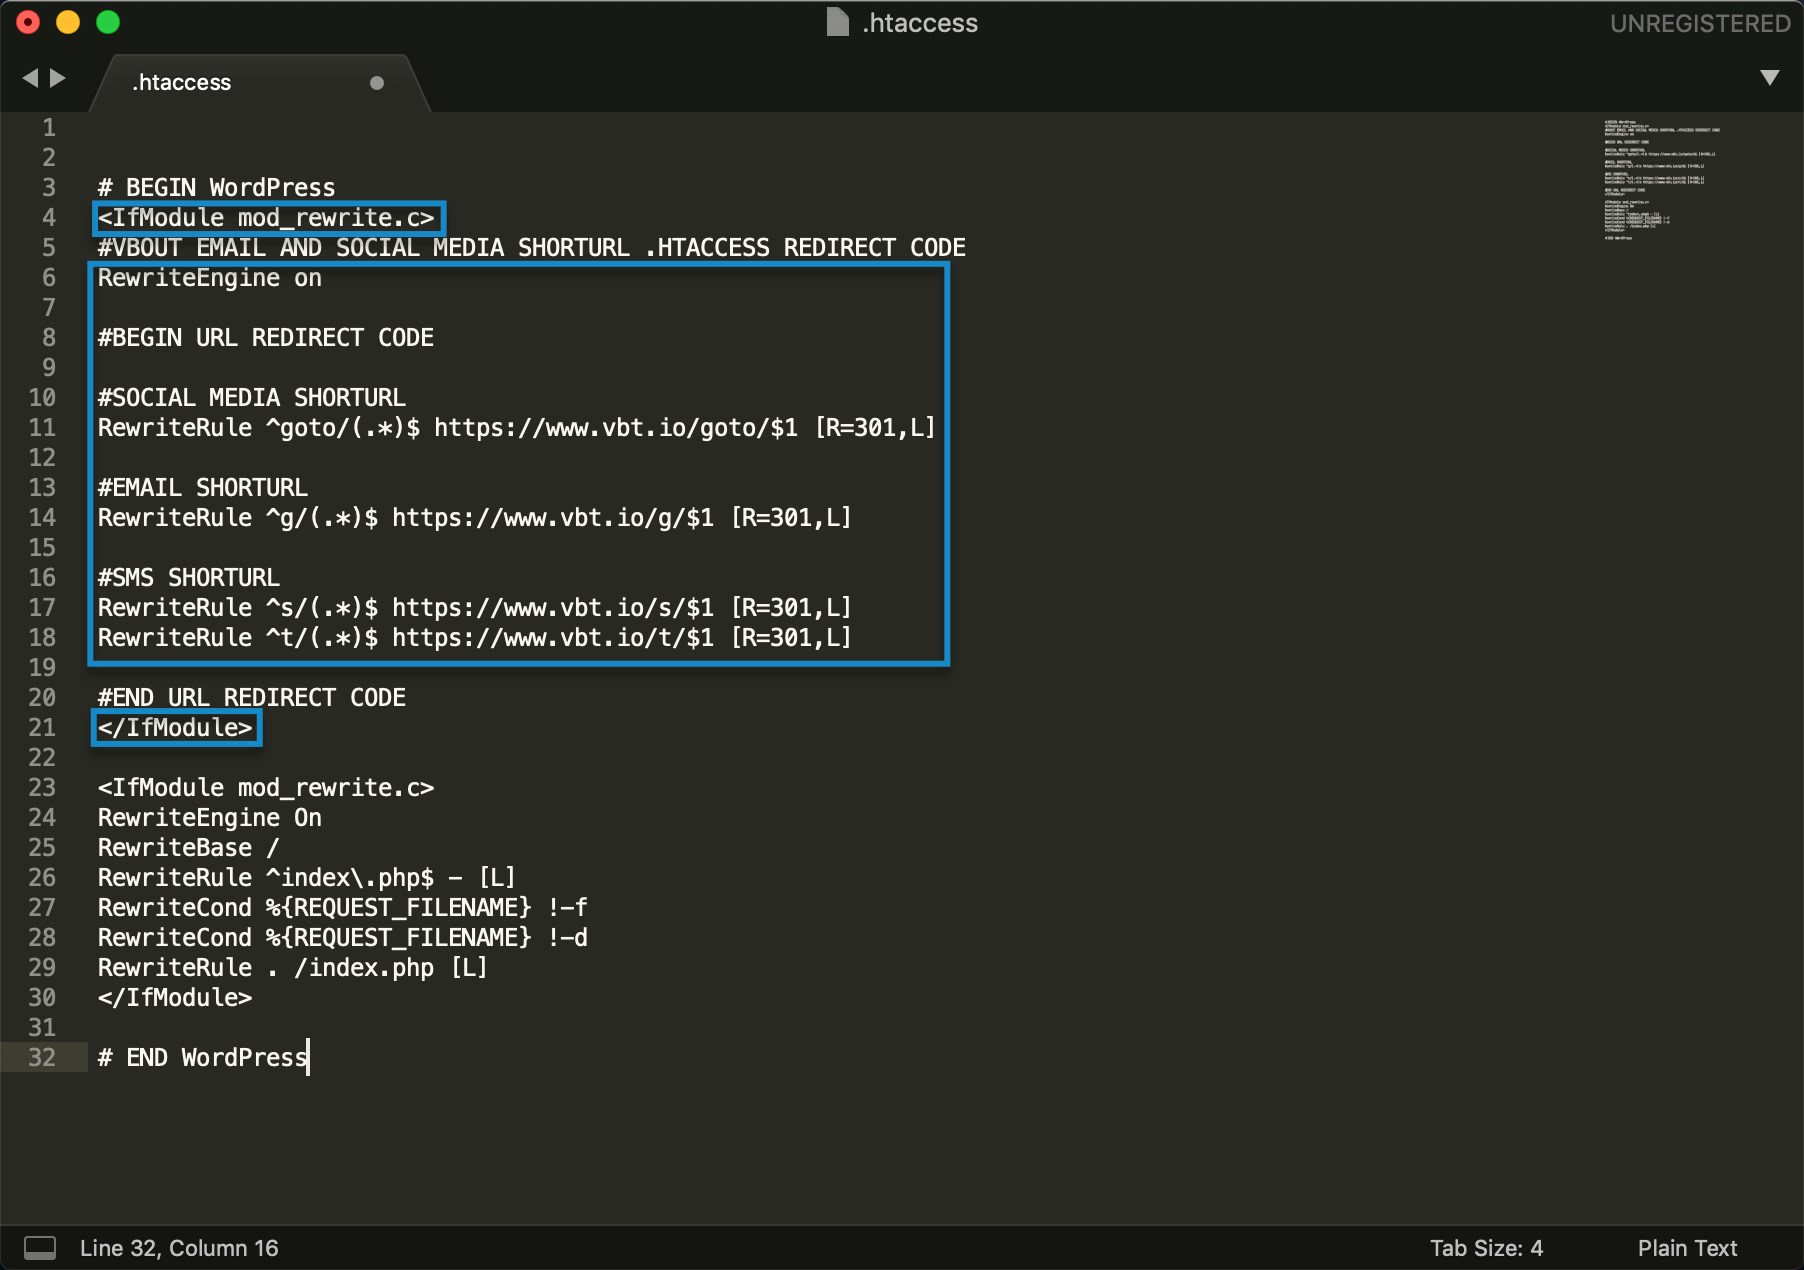
    Note: This option requires adding some code that is provided to your .htaccess file in order for this to be fully functional.
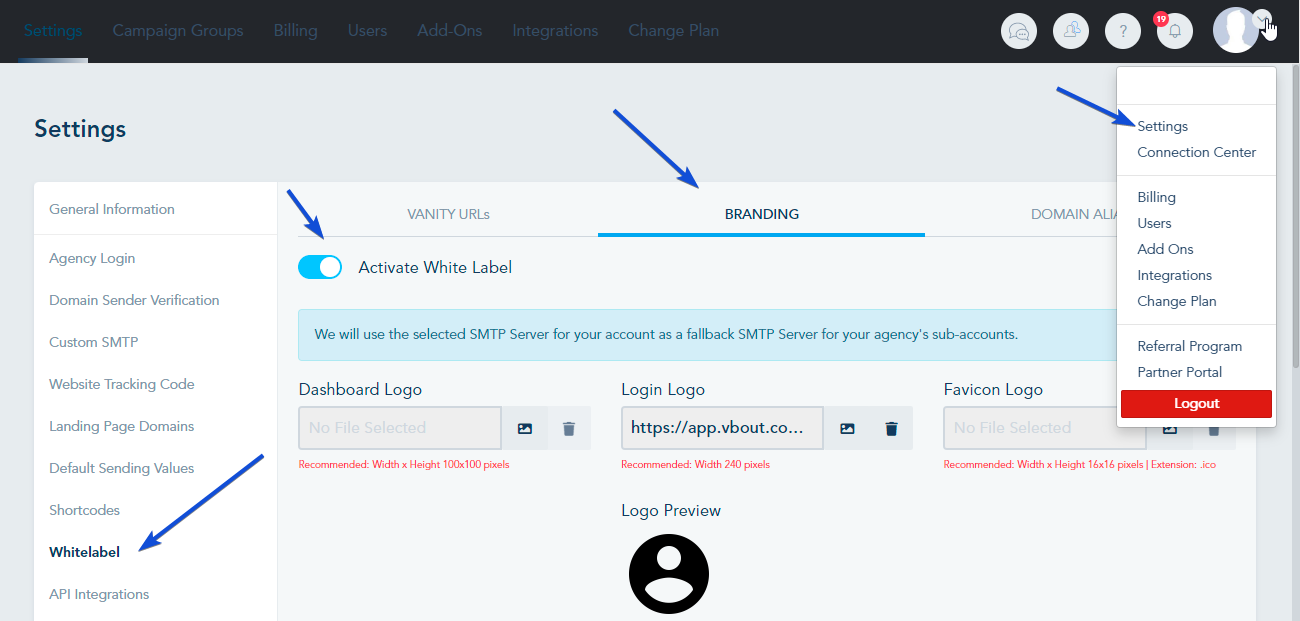
  2. Branding: This option will allow you to upload your own logo to the dashboard as well as your own signature. End users trying to login will see that instead of the usual VBOUT Branding.
  3. Domain Alias: This option will allow you to use your own custom domain for users to use to access the dashboard. You can also specify an exit domain name when users logout of the dashboard.

Get Started

Landing Page Image Preview

When sharing your landing pages on social media and messaging apps, you have the option to choose the image thumbnail, for the link preview, that gets automatically generated.

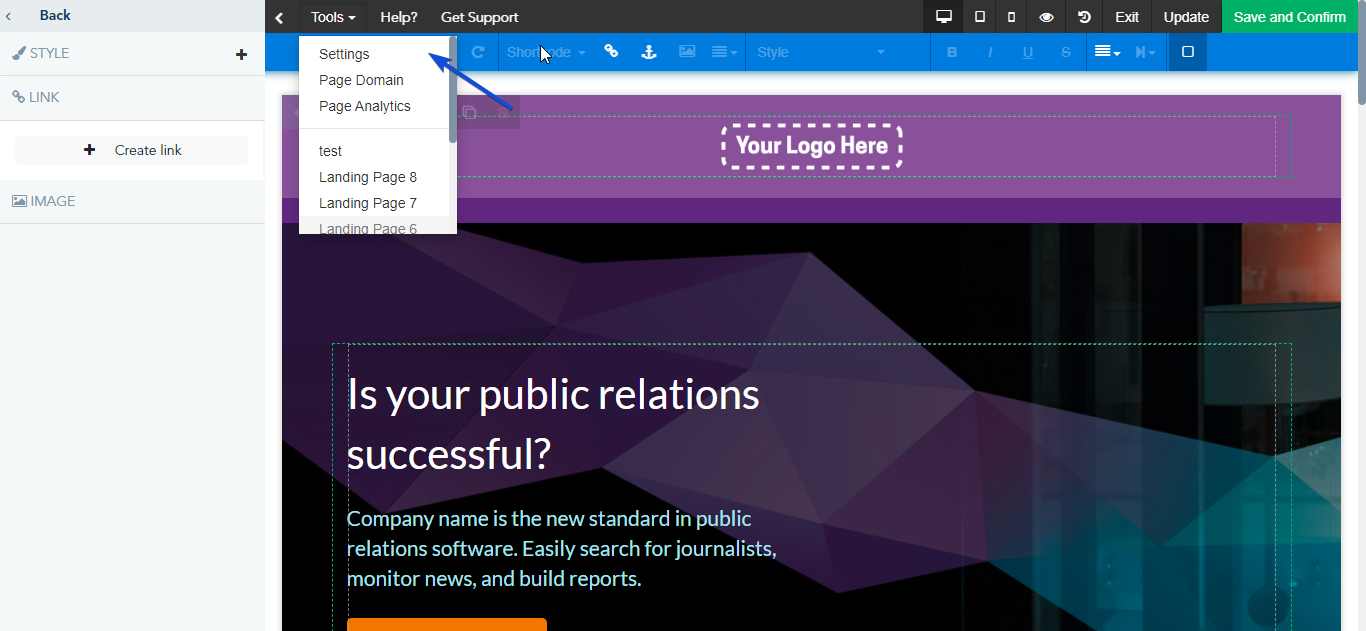
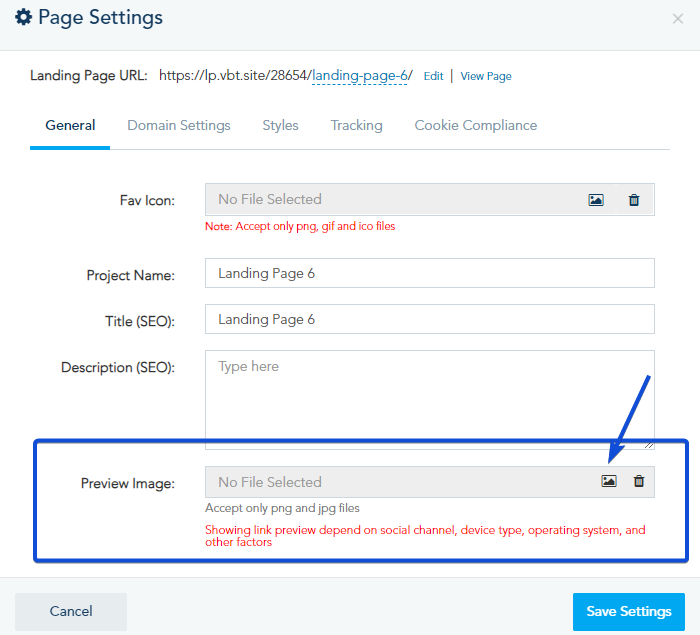
You can add the Image Preview in the Page Settings of your Landing page, from the top menu of the builder, go to Tools -> Settings.

In General section, in the Preview Image option, click on the image icon to add an image.


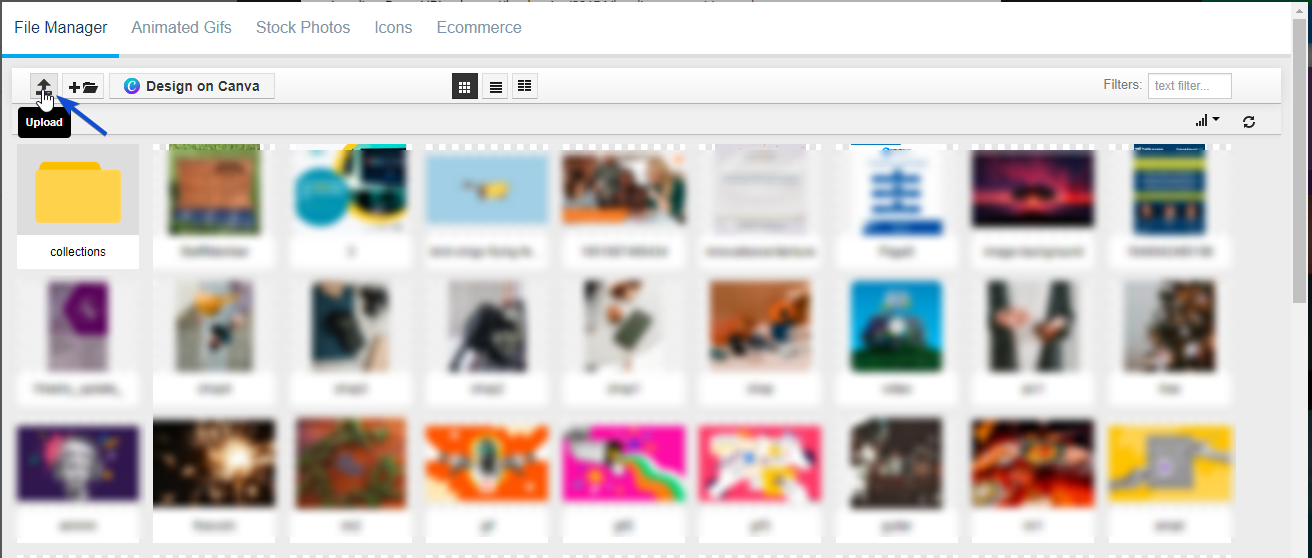
Once you click on the image icon, you will be redirected to the File Manager, where you can choose from the existing images or upload a new image.

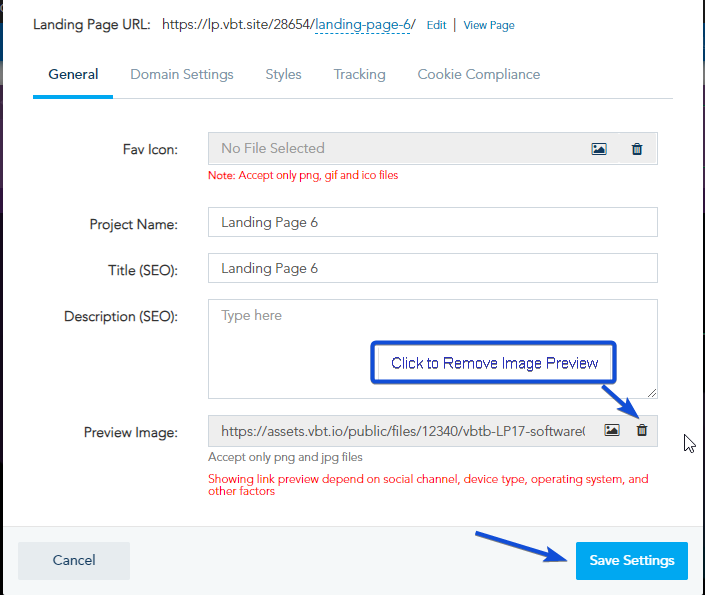
Once done, click on Save Settings.

Note: You always have the choice to remove the image preview by clicking on the delete icon.

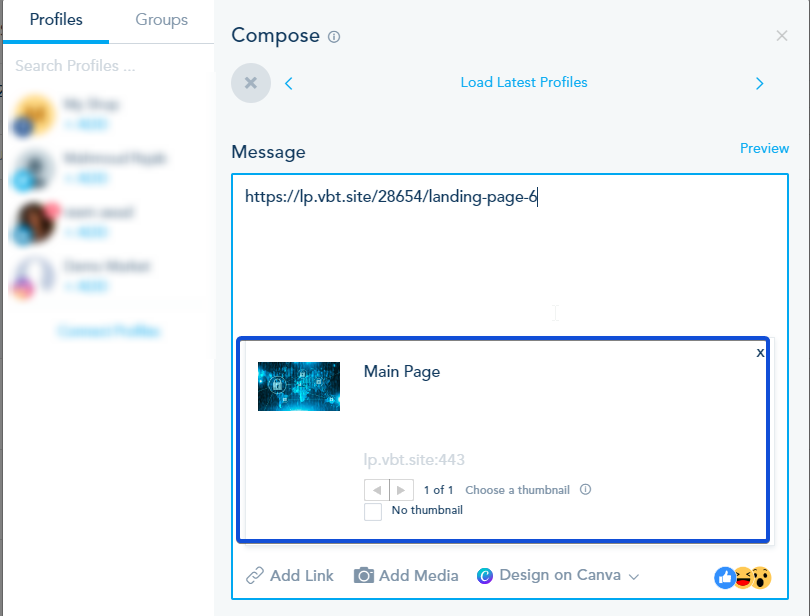
When adding the landing page to your social channel post, the chosen image will appear as a preview.


Get Started

Automation Advanced Settings – Delayed Actions

Sometimes the automation action is overdue for its execution time, now you have the option to decide how to proceed in case this happens.

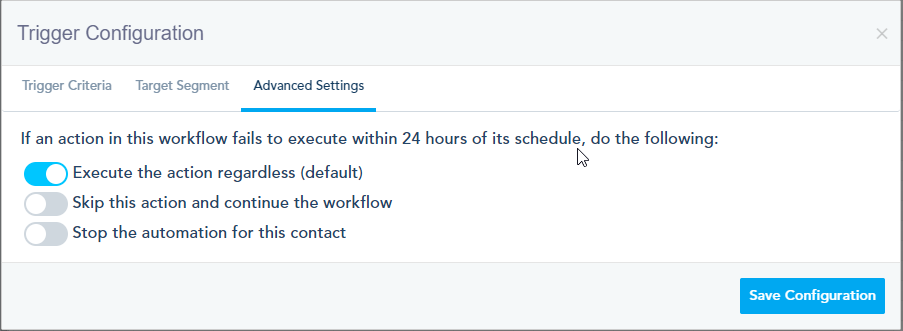
In the trigger Advanced Settings, you can select the action to be performed when the automation step fails to execute within 24 hours of its scheduled time:

  • Execute the action regardless, which is the default behavior.
  • Skip this action and continue the workflow.
  • Stop the automation for this contact.

Also, you have the option to specify the overdue behavior for each action in your workflow.

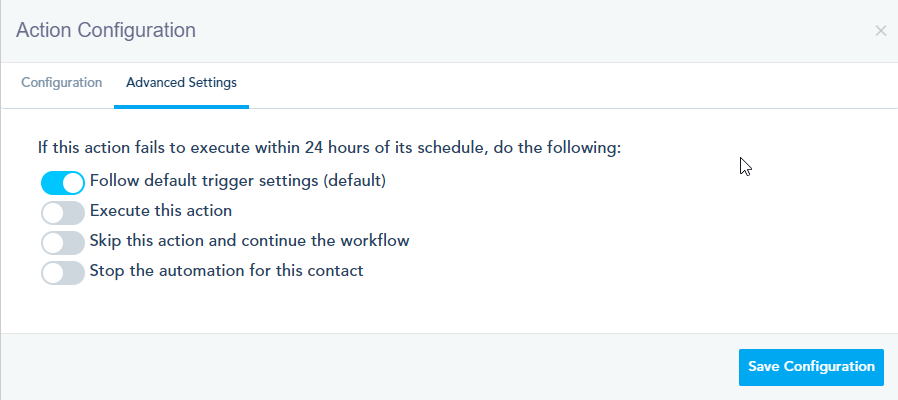
In the action Advanced Settings, you have the below options:

  • Follow default trigger settings, which is the default behavior.
  • Execute this action.
  • Skip this action and continue the workflow.
  • Stop the automation for this contact.

Get Started

How to bulk change the contacts status to active again

In case you need to resend emails to your hard bounced contacts again, you need to change their status to active.

Please follow the below steps in order to achieve this:

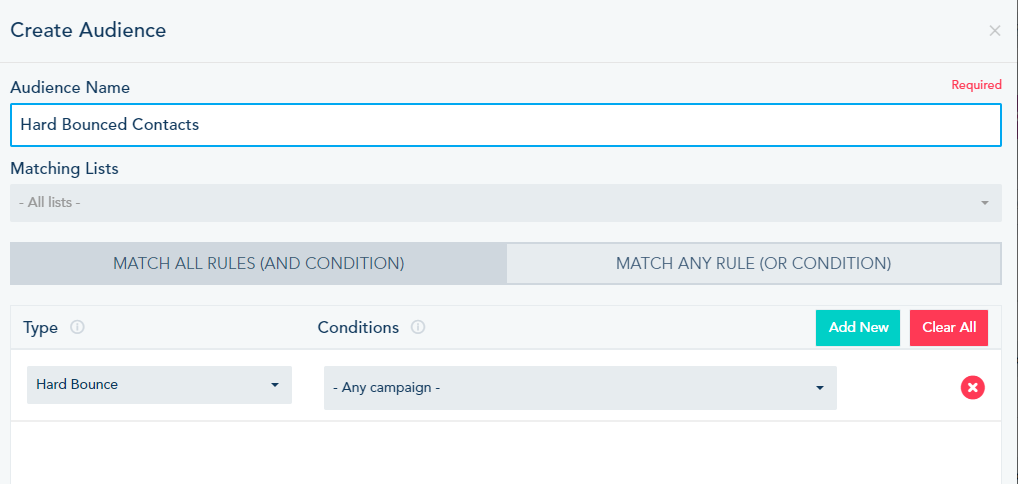
  1. Create an audience of hard bounced contacts:
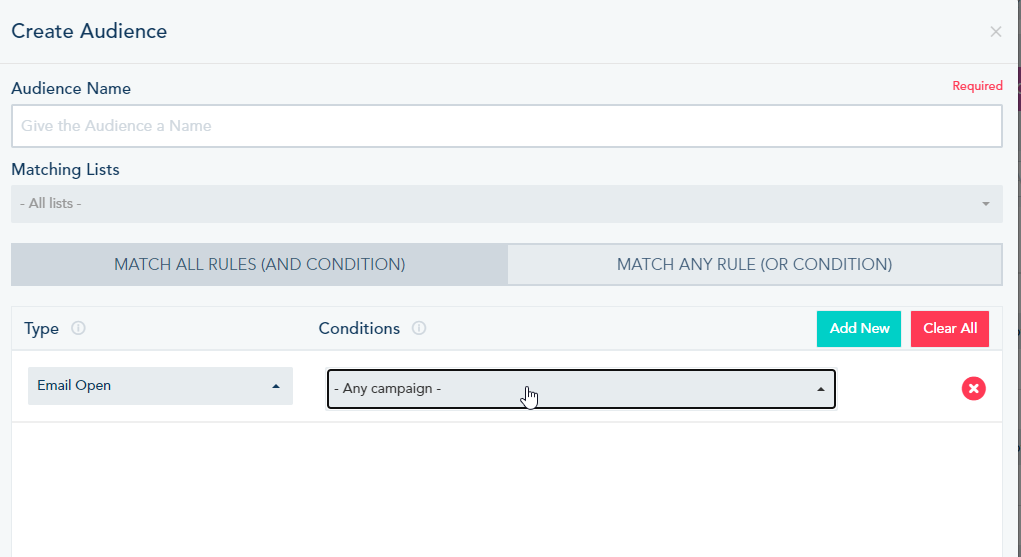
    From the Contacts tab -> Audiences – > Create Audience.Create a new audience, give it a name, choose All lists in the Matching Lists and add the condition for Hard bounce as displayed below.
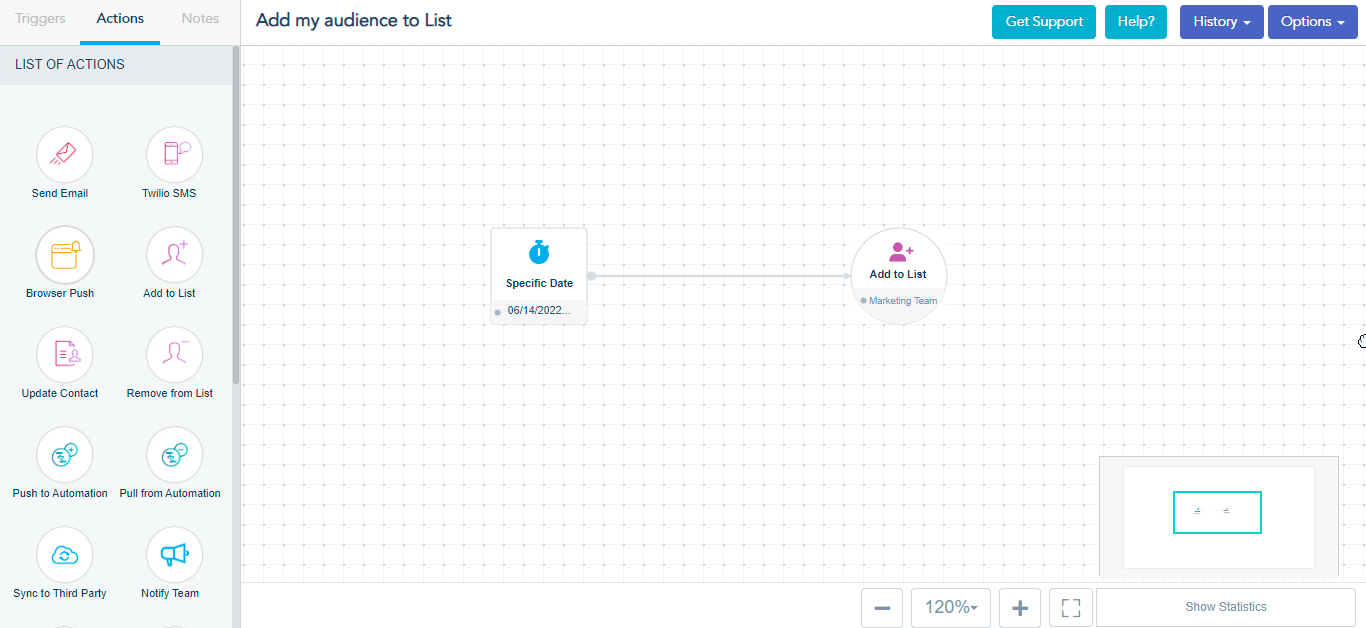
  2. Add the Hard bounced audience to a List:
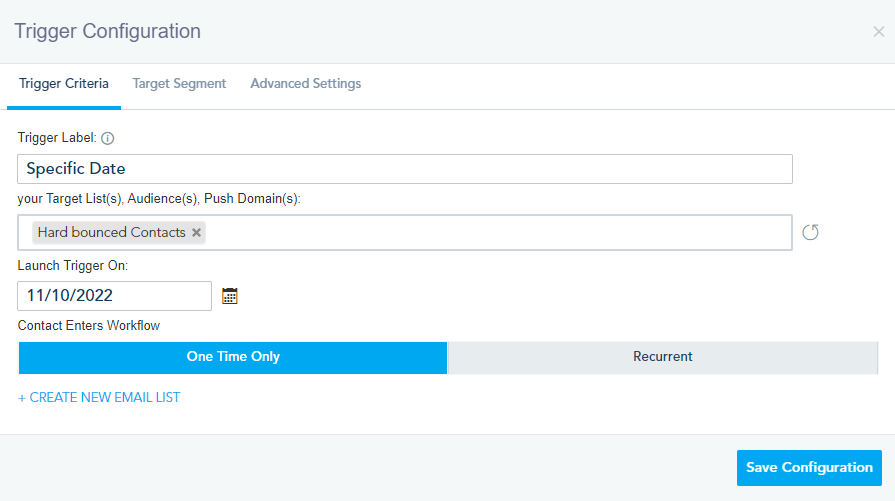
    From the Automation tab -> Your Automations – > Create Automation.To create the automation, choose the Specific Date trigger and link it to Add to list Action.

    In the trigger configuration, choose the audience you want to add to the list and a date to launch the automation.

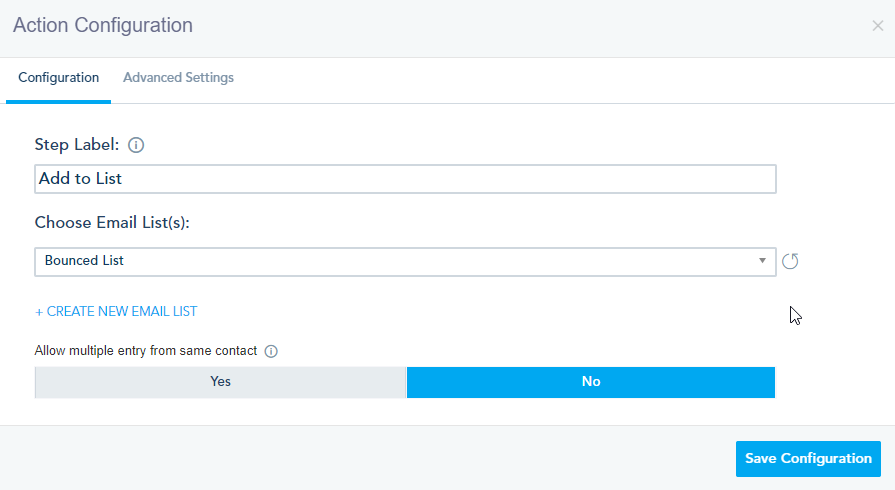
    In the Action configuration, choose the list you want to add your audience to.

    Save the automation and publish it.
    After the automation is completed, the contacts will be added to the chosen list.

  3. Bulk change the contacts’ status to Active:
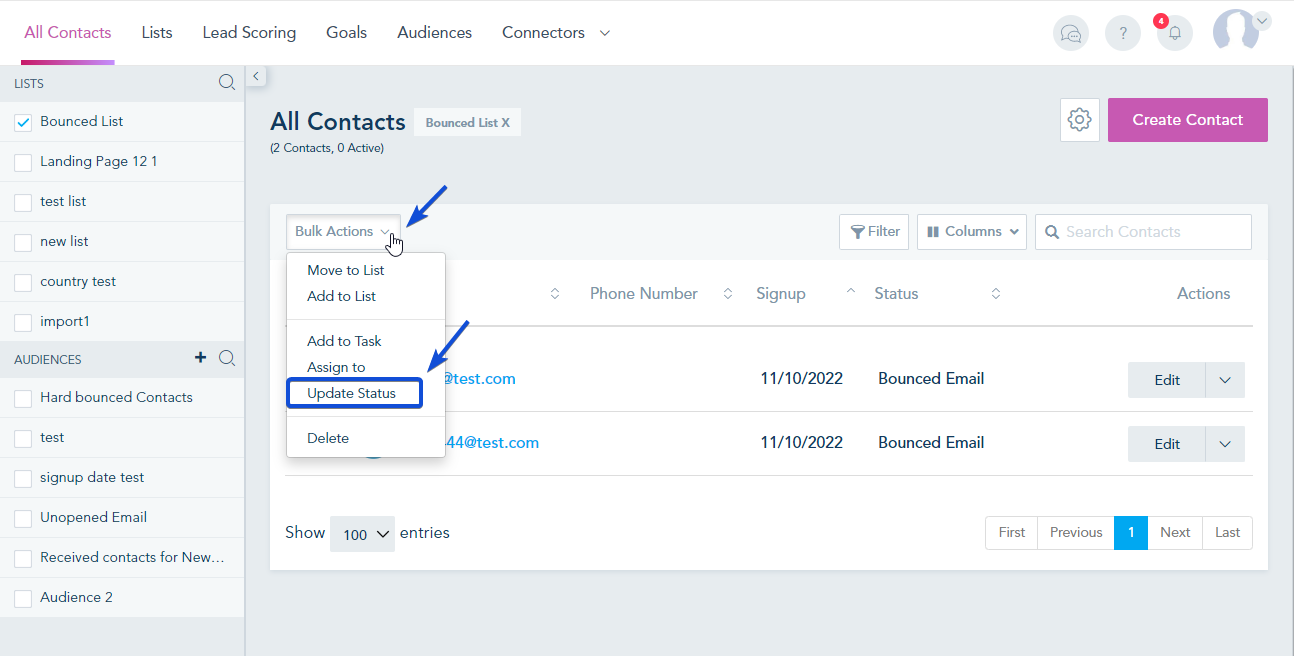
    From the Contacts tab -> Lists – > Open the list of hard bounce contacts.Select all the contacts and click on Bulk Actions -> Update Status.

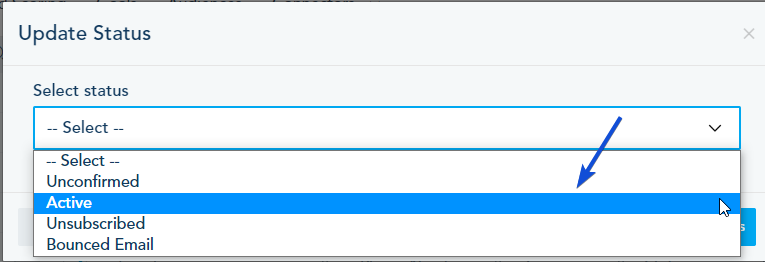
    Select status as Active and click on Update Status.

    Once done, your contacts status will be active and they can receive your emails again.


Get Started

Setting up your File Manager

File Manager lets you organize and manage your files and media in one place to use them when sending Email Campaigns, designing Landing Pages and scheduling Social Media posts. All the assets you add to your File Manager are accessible on your Landing Page Builder, Email Template Builder as well as your Social Media publisher.

NOTE: There is no limit to the storage you have on your account, however, we recommend that you upload files and images that are optimized for web to give your recipients faster loading experience when opening your campaigns or visiting your Landing Pages.

  • Accessing File Manager:
    Go to EMAIL and click on File Manager.
  • Upload:
    To upload an image or a Downloadable PDF, click the Upload button located on the top left of the toolbar and then drag and drop the files to the uploader.
  • New Folder:
    To add folders click New Folder button located on the top left of the toolbar. We recommend using folder names without spaces, ex:” logos-artwork” vs “logos artwork”.
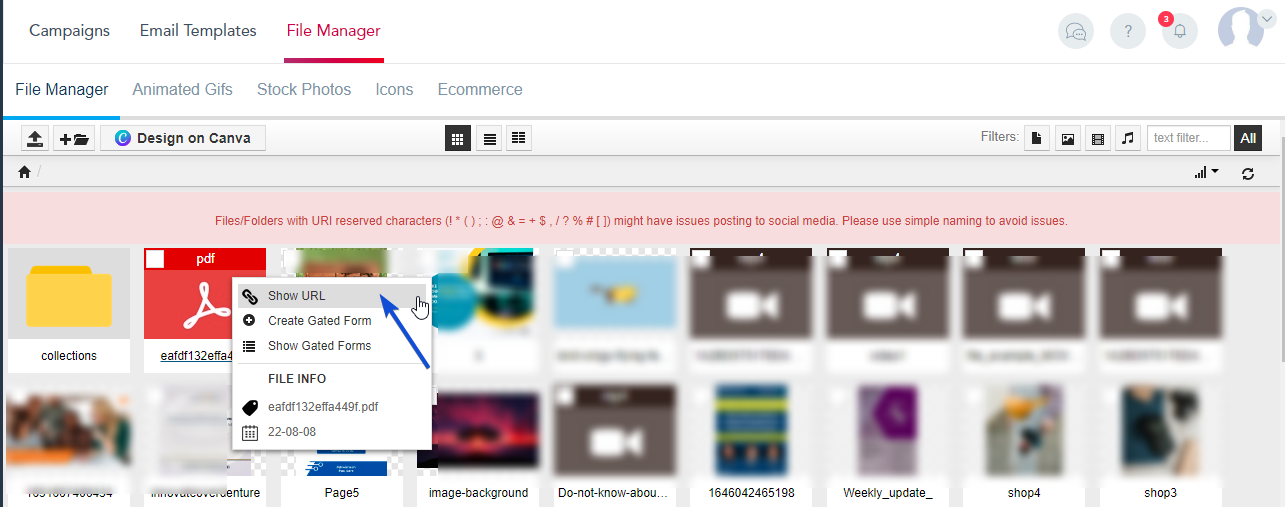
  • show URL:
    If you wish to get the path to an image or a PDF file, right click on the file then click on show URL.
  • Filters:
    To navigate and find files use the Filters located on the top right of the toolbar.

Get Started

Add Cookie Compliance on Landing Pages

You have the option to set cookie compliance on your landing page.

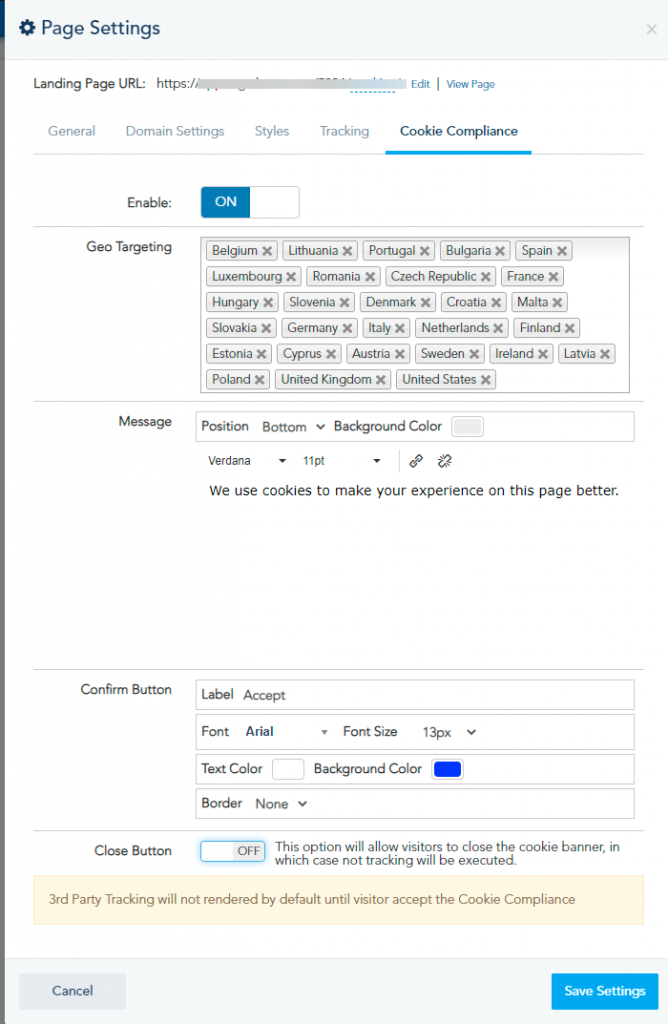
From the landing page builder, go to Tools -> Settings -> Cookie Compliance tab.

When you enable this option, you can customize the following:

  • Geo Location:
    Select the countries where your visitors should see the cookie compliance.
  • Message:
    Set your default message format, change its position, the background color.

Also, you can change the format of the confirm button.

The close button is turned off by default. However, if someone closes the cookie compliance, the tracking will not execute.

Please note that in case the cookie policy is not accepted, the third party tracking and the platform tracking will be disabled.

Get Started

SMS Predictive Sending

SMS Predictive sending is a sending process that will send SMS at the time the recipients are more likely to open their text messages.

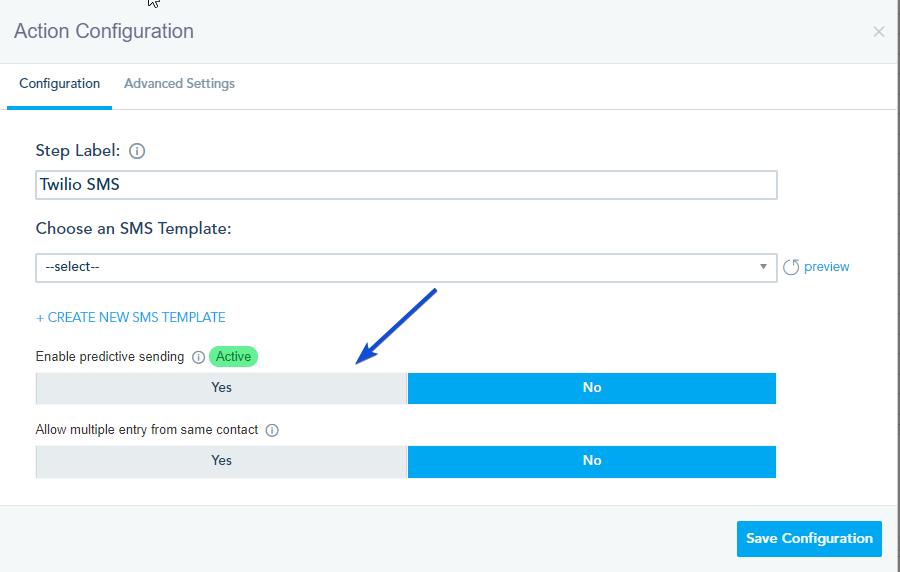
To use SMS Predictive sending in your automation workflow, you need to enable it in each Twilio SMS action you are adding.

The predictive sending time will be based on three factors:

  1. Contact: Check based on previous SMS in case they are known contacts so in this case, we have the best sending day(s)/time(s) and the SMS will be sent based on it.
  2. Business Type: Check if the client business type is known, so in this case, we have the best sending day(s)/time(s) and the SMS will be sent based on it.
  3. Fallback: in case contact & business type are unknown,  the fallback concept is used where it contains the best sending day(s)/time(s) based on market research.

Please note that when activating Predictive sending, the delay advanced timing will not be taken into consideration when sending the SMS.

Get Started

How to mass update contacts in the platform

You can mass update your contacts by uploading an excel file with the updated information into your list.

To update your contacts using Mass Import, follow the steps below:

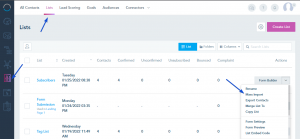
1- Go to your Contacts and select Lists tab from the top.

2- Choose the list you’d like to mass update its contacts and click on Mass Import from the drop-down option.

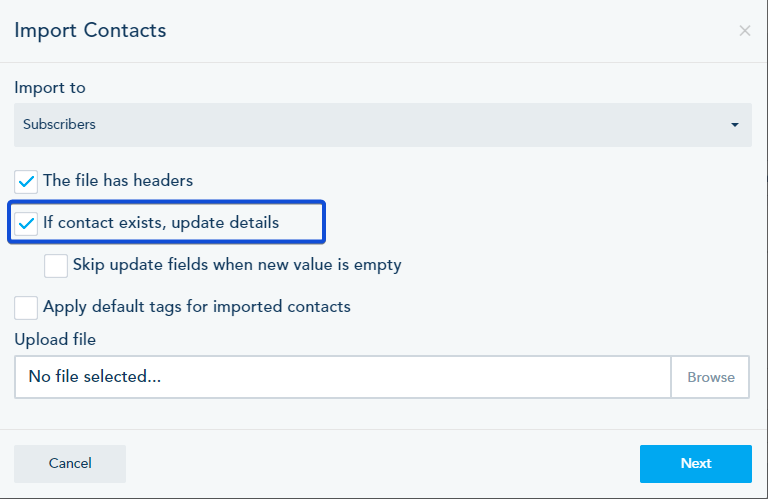
3- A wizard popup will show where you can customize the import process and do your field mapping. The first step includes the list name, already pre-populated, as well as the option to specify if file headers exist on your Excel file (ex: Name, Email, Company, etc…).

Make sure to check the option to update contacts’ details if they were already on that list.

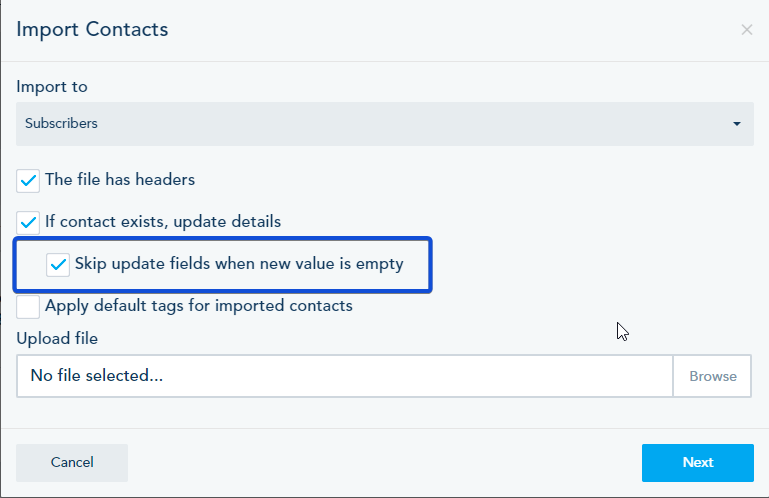
Also, in case you are uploading only the field you want to update, you can check the option to “Skip update fields when new value is empty”. In this way only the value of the updated field will change.

The file to upload must be a CSV with a maximum size limit of 5 MB of data.
Make sure the file is properly formatted and only includes the columns you want to import.
Note: Random characters, badly formatted emails, and missing required fields can break the upload process.

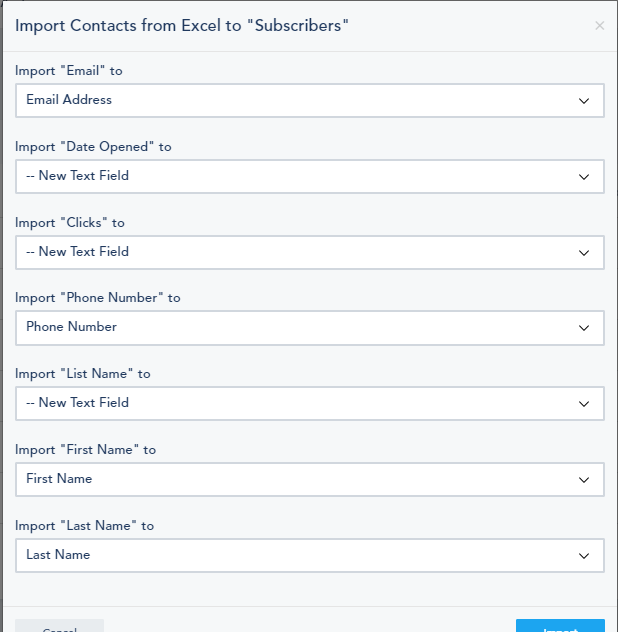
4- After uploading the file, you can proceed to the next step where you map your Excel file columns (NAME ABOVE THE FIELD) to the fields you have created on your account under that list settings.

5- Once you are ready, you can click on Import and the process will start.

6- An email summary of your import will be sent to the account admin email.

Once the process is done, you will have your contacts’ details updated in the list.

Get Started

How to embed Form using the WordPress plugin

After installing VBOUT plugin on WordPress, you can create your Form on VBOUT and embed it on your connected WordPress website.

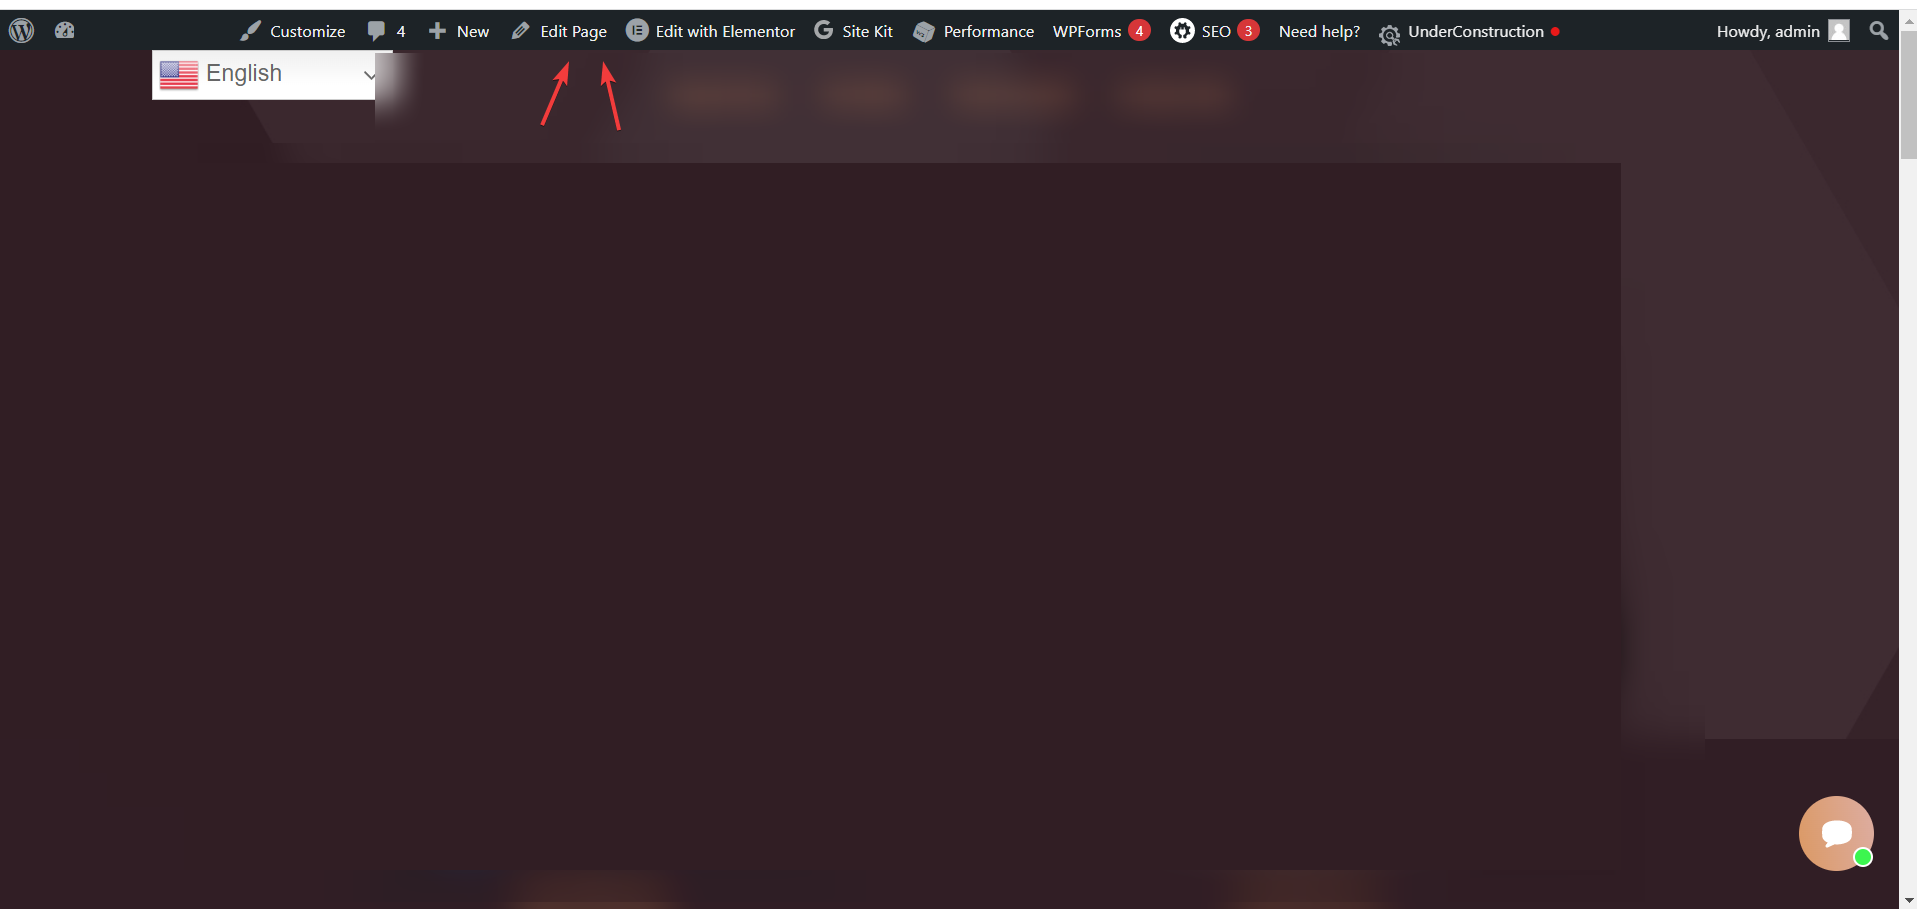
Go to Edit Page option on WordPress.

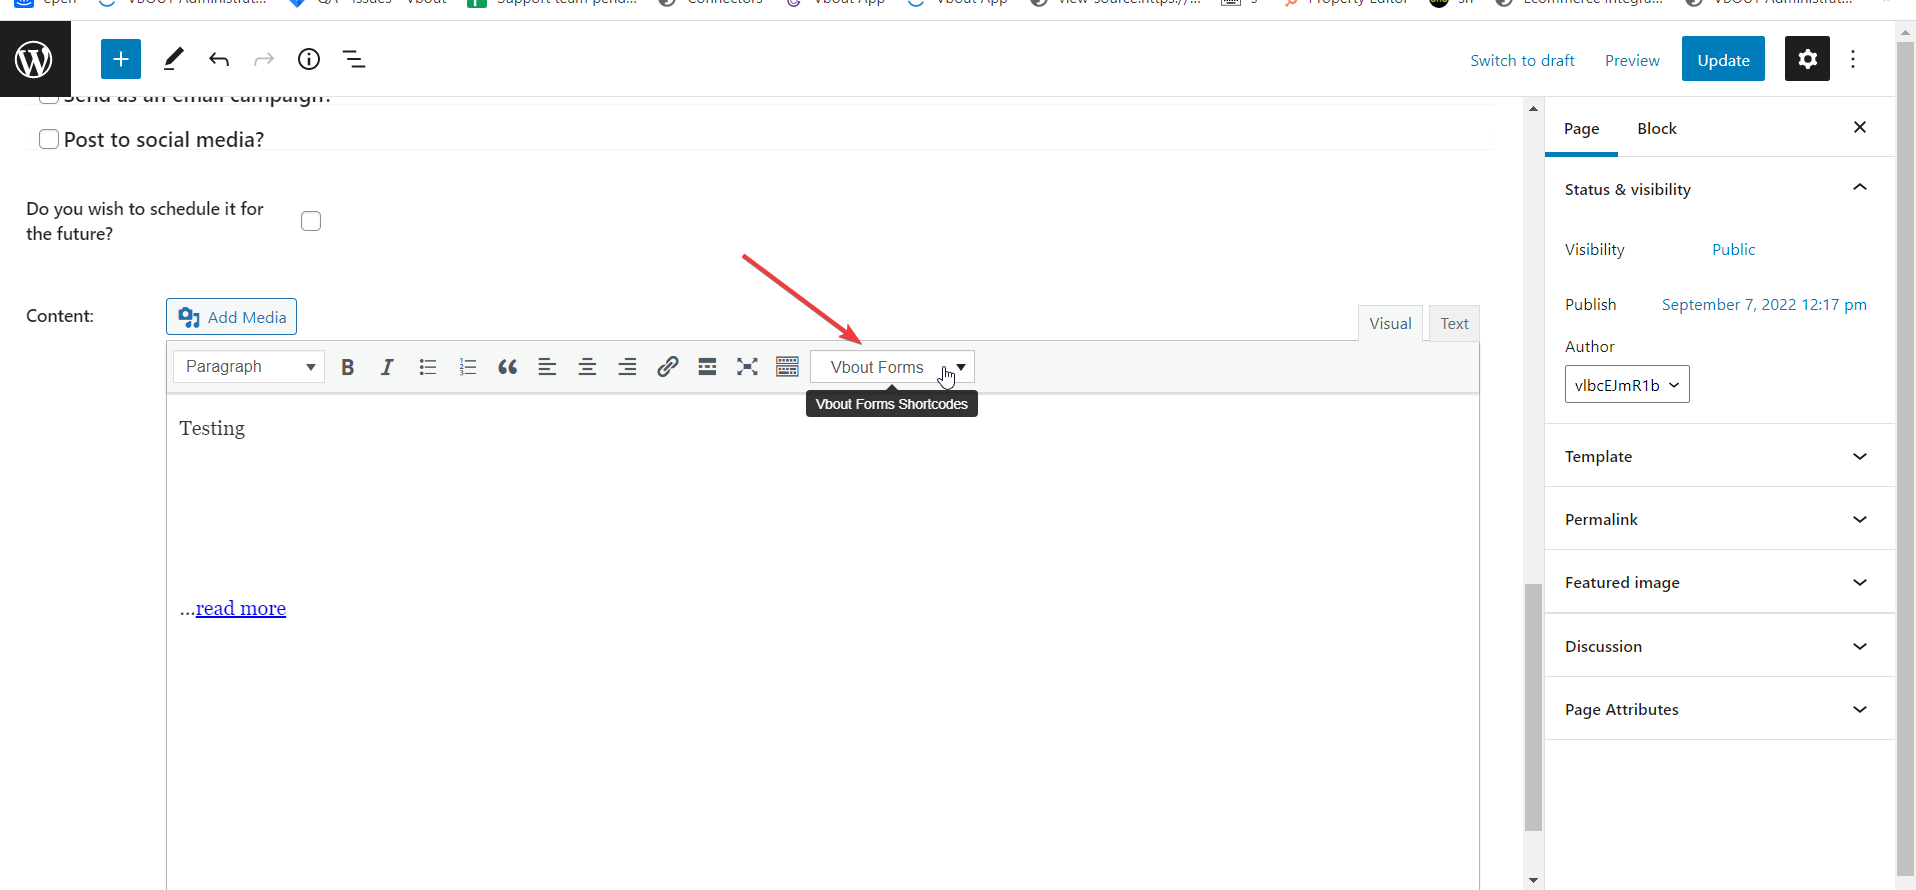
In the Content Section, click on VBOUT Forms Shortcode.

Or you can use this shortcode .

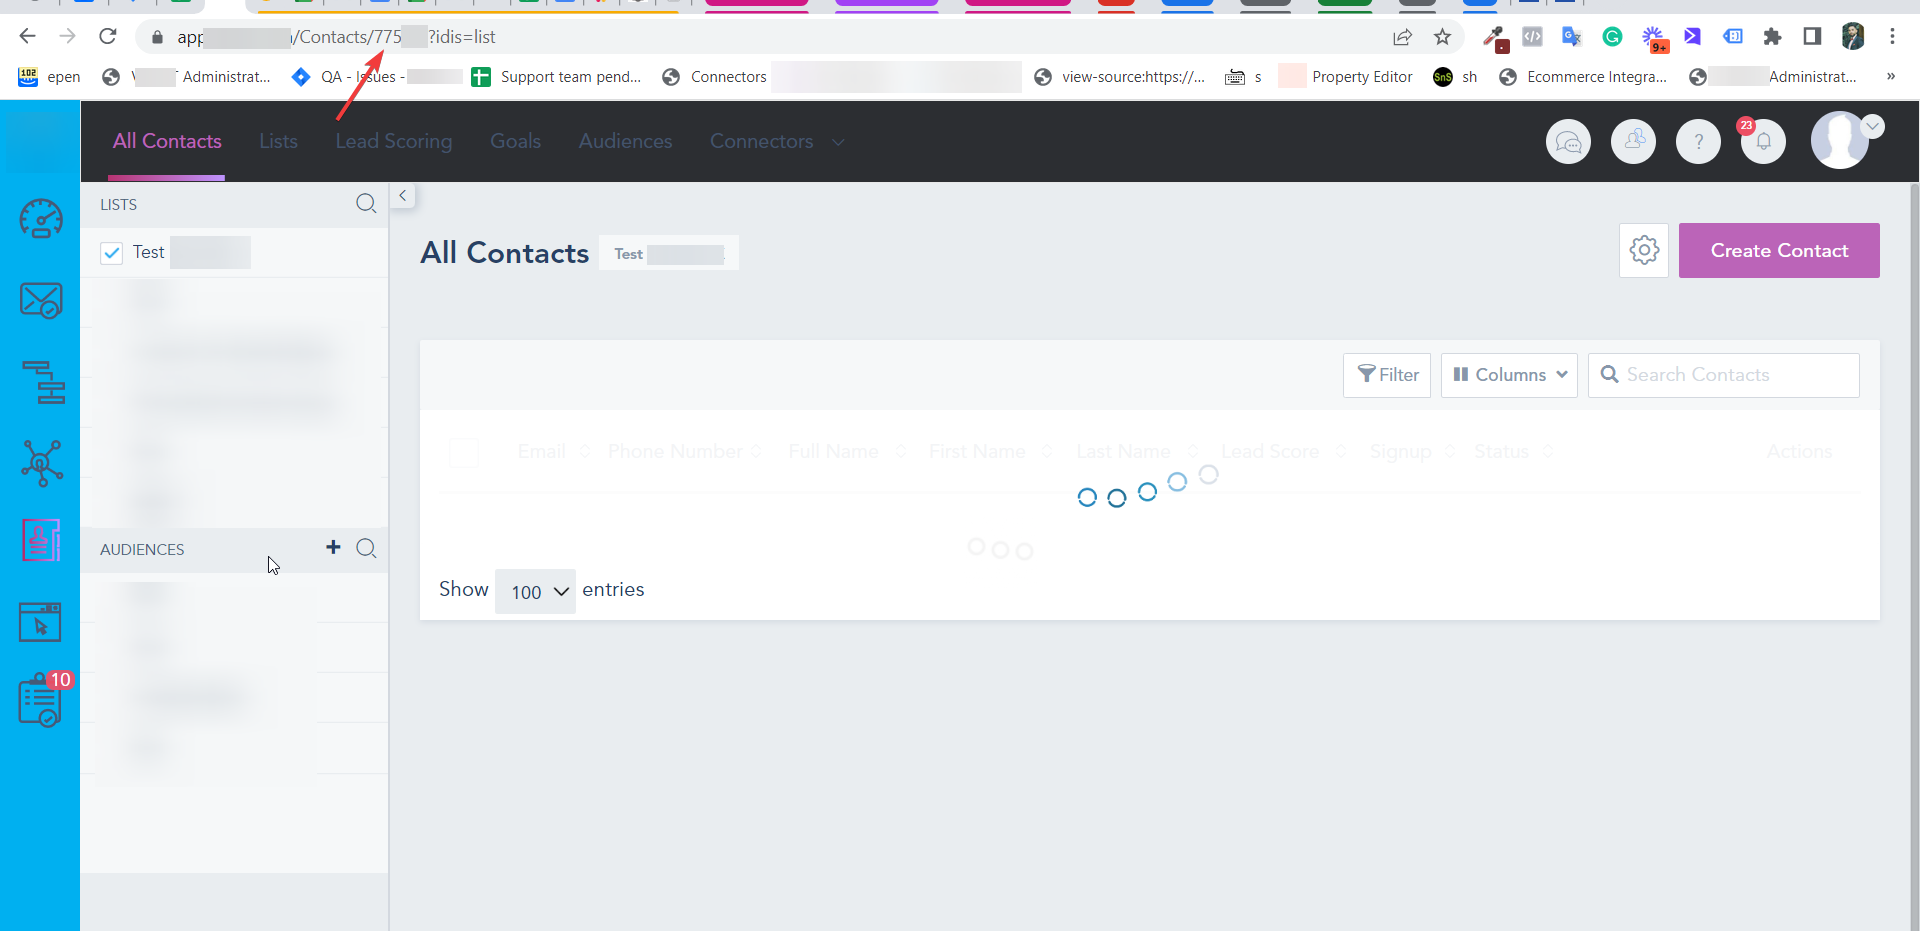
To find your form id, go the Contacts page in VBOUT, Click on Lists tab and open the List/form you want then you can find the form id in the page URL.


Get Started

APIX Drive Integration

The integration with APIX Drive will allow you to add and delete contacts in VBOUT and create publications on Facebook, X, LinkedIn, Pinterest and Instagram based on data from other systems. For example, you can transfer contact data from your website, landing page or Google Sheets to VBOUT and carry out the mailing you need or interact with social networks.

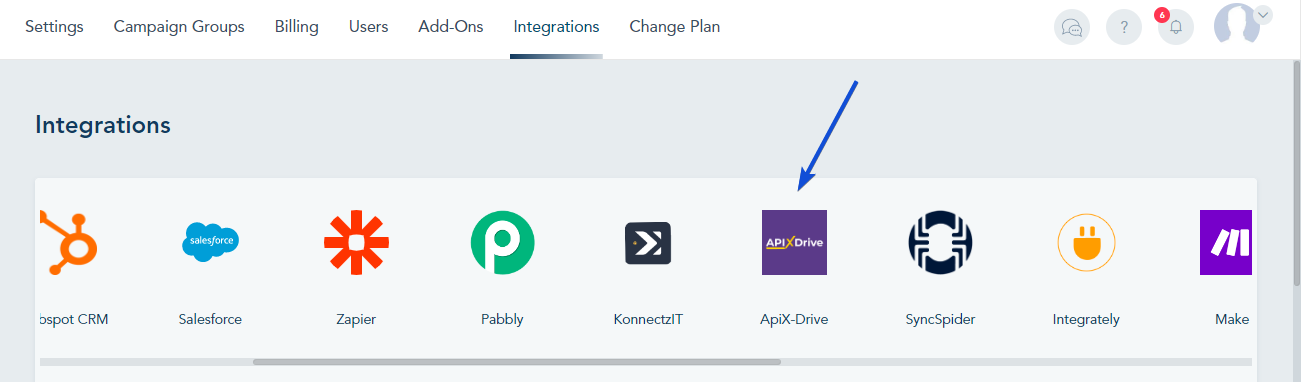
To integrate VBOUT with third party apps using APIX Drive, go to Integrations, and click on APIX Drive:

When you click on APIX Drive, a new tab will be opened where you should login:

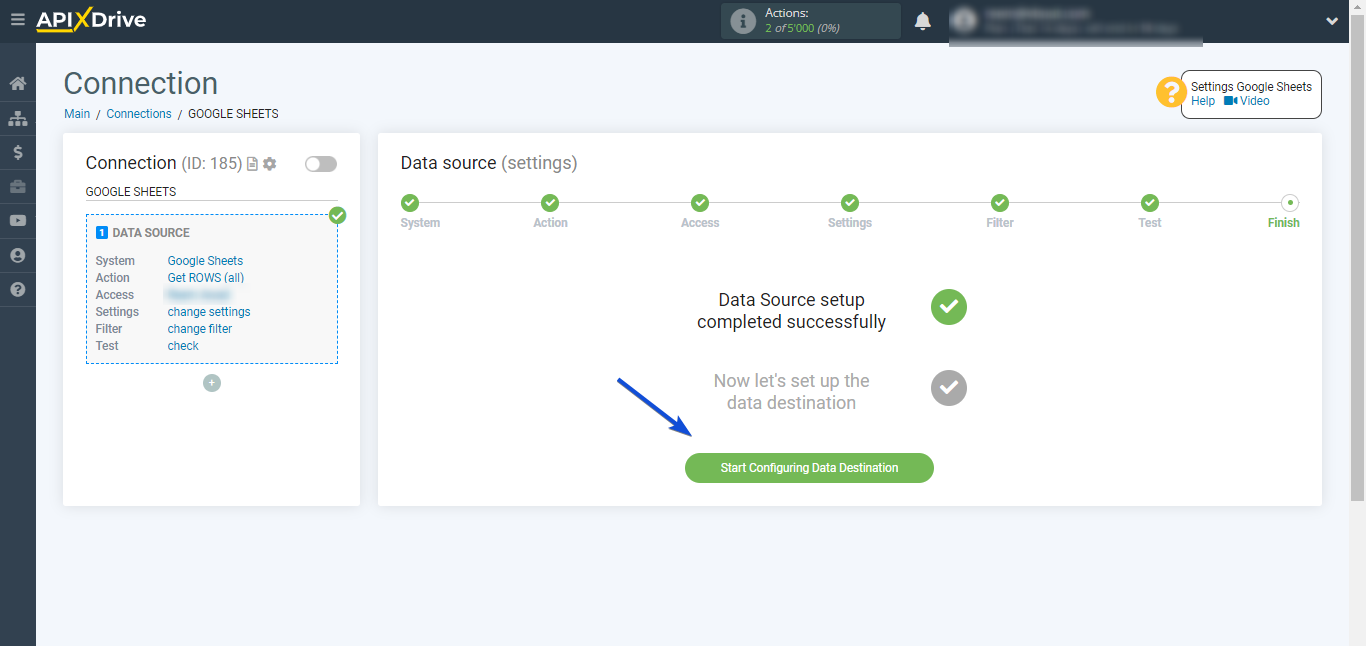
Once you setup your Data Source in APIX Drive, you can start connecting VBOUT as Data Destination by following the below steps:

First, click on Start configuring Data Destination.

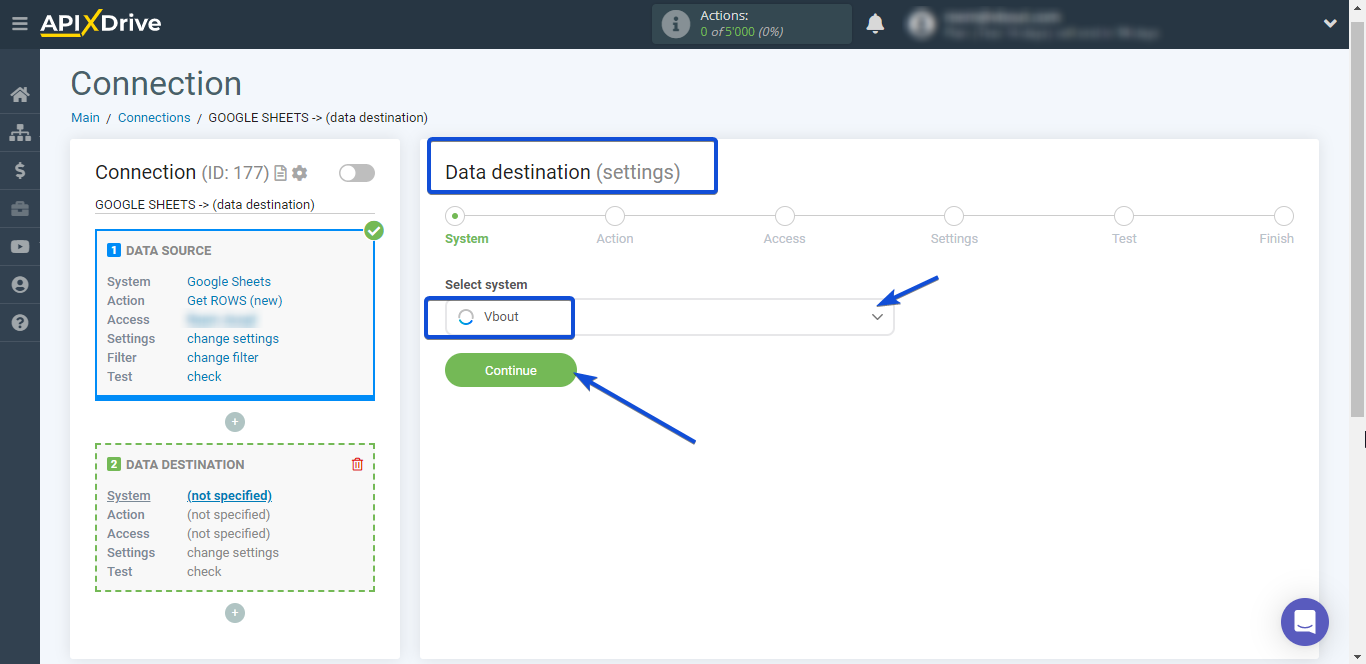
Select VBOUT as the system from the drop-down and click on Continue.

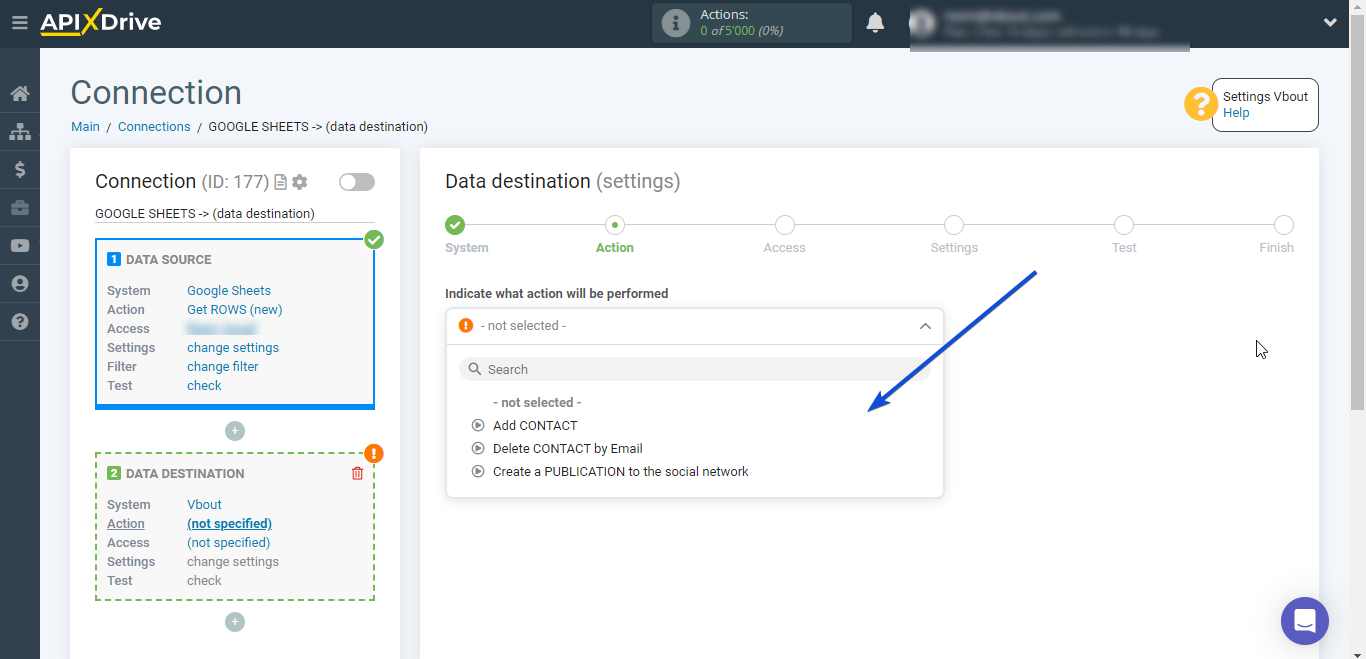
Now, Specify an action in VBOUT.

The available actions are Add contact, Delete by email, and Create publication to the social network.

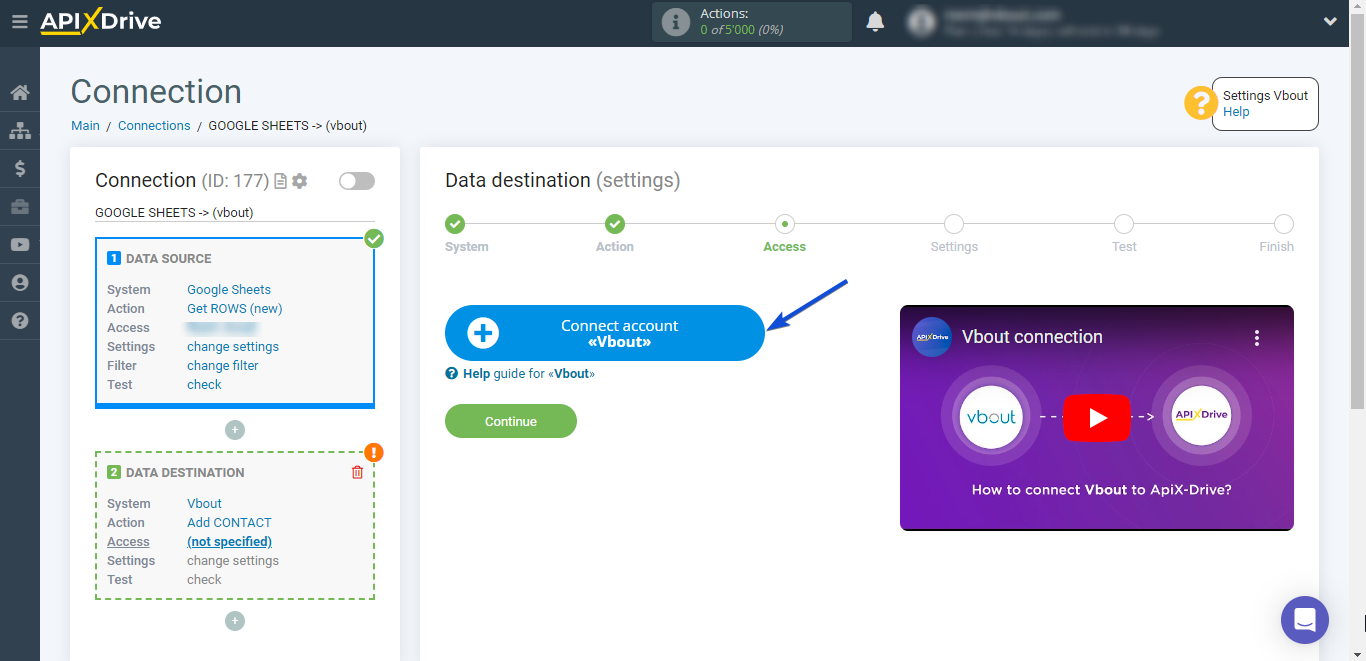
Next, connect your VBOUT account.

You need to add your API key. You can find it by going to your VBOUT account -> Settings -> API integrations.

Once your account is connected, click on Continue.

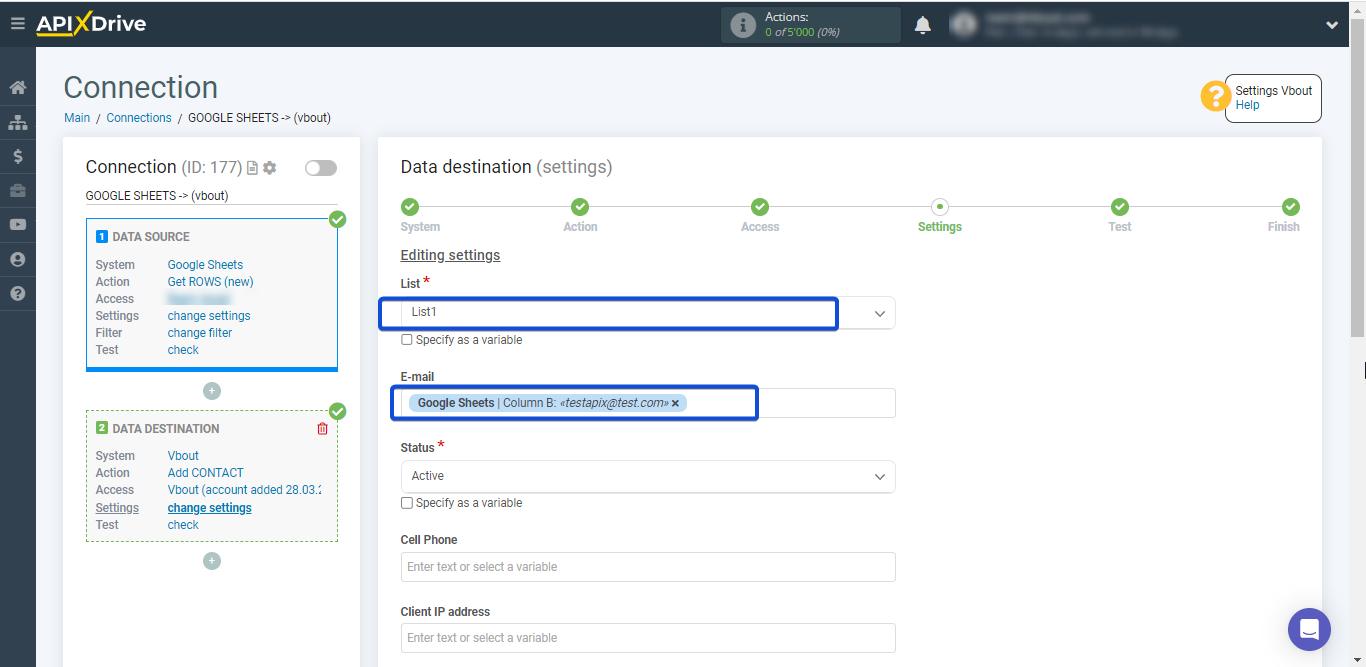
Then, map the fields from the Data Source to the needed fields in VBOUT.

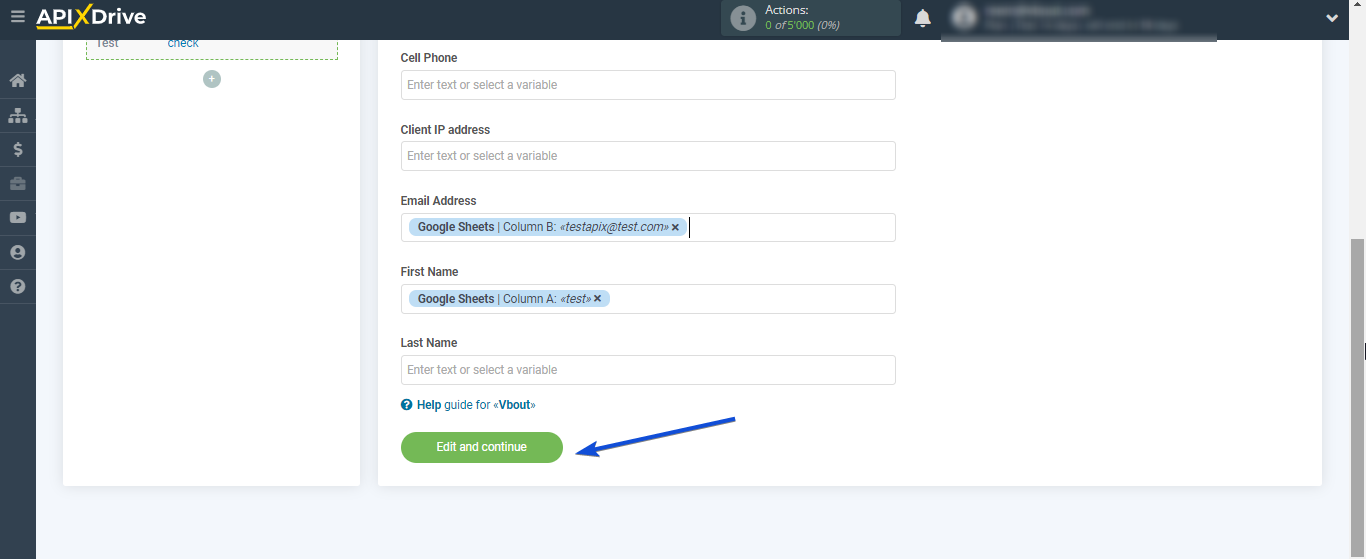
Once done, click on Edit and continue.

To check your setup, click on Send test data to Vbout, then go to your VBOUT account and check the data added.

If the test was successful, click on Next and the Data Destination setup will be completed.

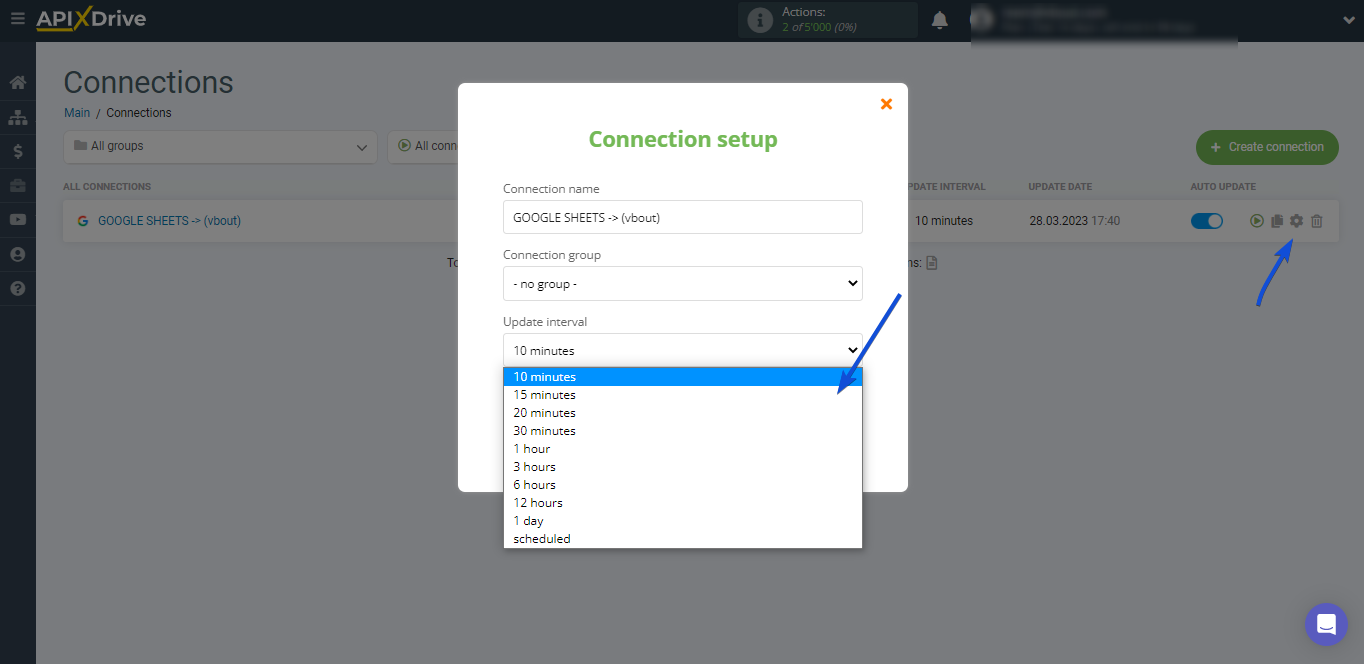
Now, you can start choosing the update interval and enabling auto-update.

To do this, click Enable update.

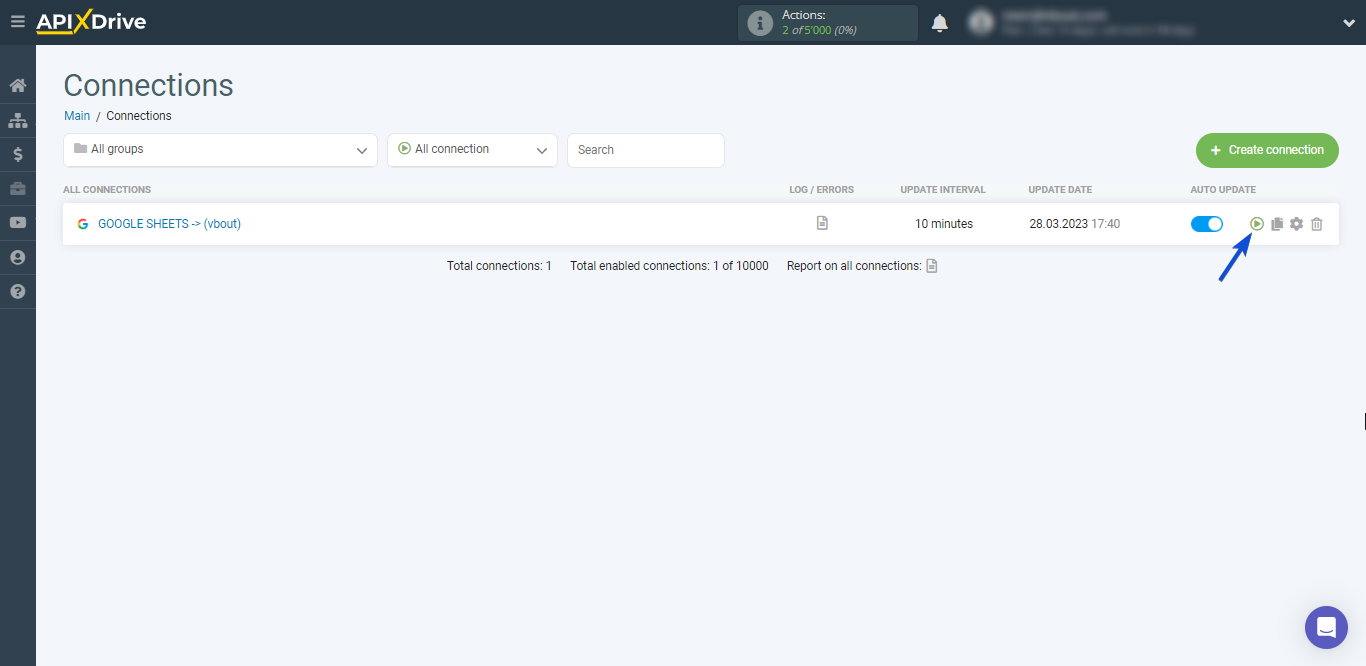
You can choose an interval by clicking on the gear icon.

Note: In order for the scheduled launch to work at the specified time, the interval between the current time and the specified time must be more than 5 minutes.

To perform a one-time data transfer, click on the arrow icon.

Get Started

How to create a Form

Each Form is connected to a List on the platform. To start creating your Form, you need to create a List first.

Click on the Contacts option from the left sidebar, select the Lists tab from the top, and click on the Create List button:

You will be asked to insert the list details:

  • List Name: add a name to your list.
  • List Description: add a brief description of your list.
  • Include in Contact Preferences Page: when this option is turned on, it will add this list to the preference page where the contacts can manage how you communicate with them including unsubscribing or subscribing back to this list.
  • Sender Details: these fields will be prefilled by your default sending values specified in your Settings and you will have the option to modify them when sending an email campaign.

When you have completed all details click on Create.

After you create your list, you can build up the form fields by going to the Fields & Form.

And choose which fields you’d like to add from here:

If you want to remove a field, rename it, change its placeholder, default value,  make it required or not or hide it from all public forms, click on the arrow next to it and you will  be able to change it:

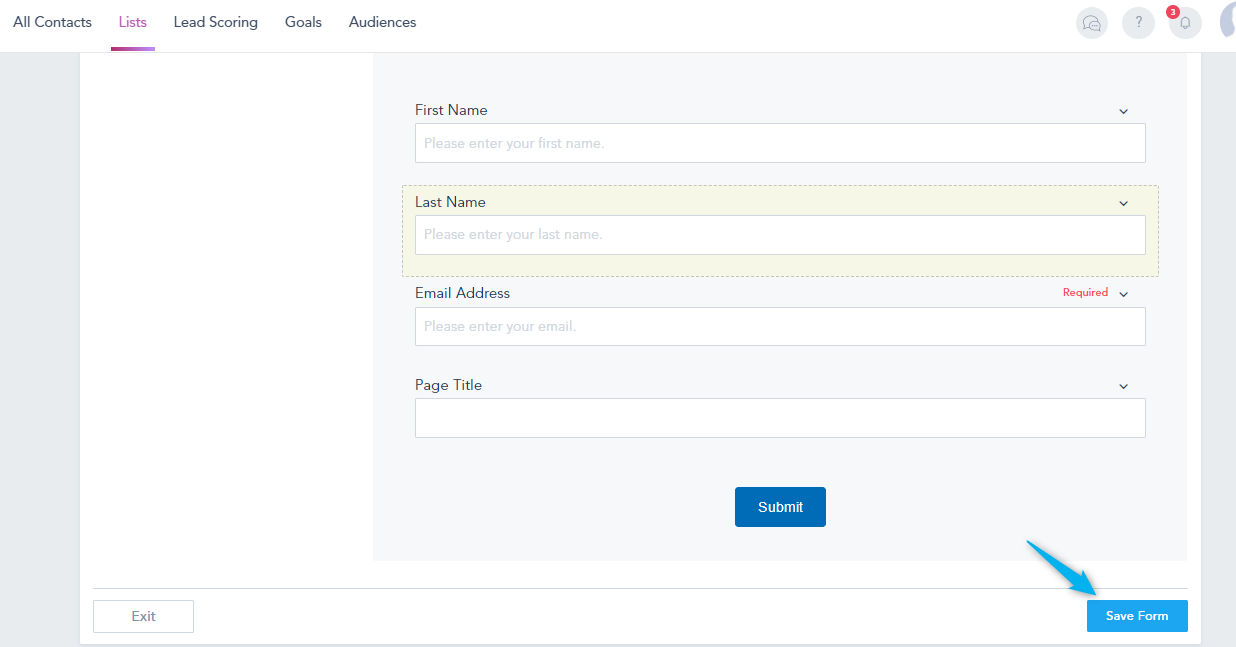
Once you finish customizing your form, save changes:


Get Started

How to enable Social Media posts moderation for agency

In your agency account, you have the option to enable social media post moderation.

Go to Users from the drop-down menu of your profile icon.

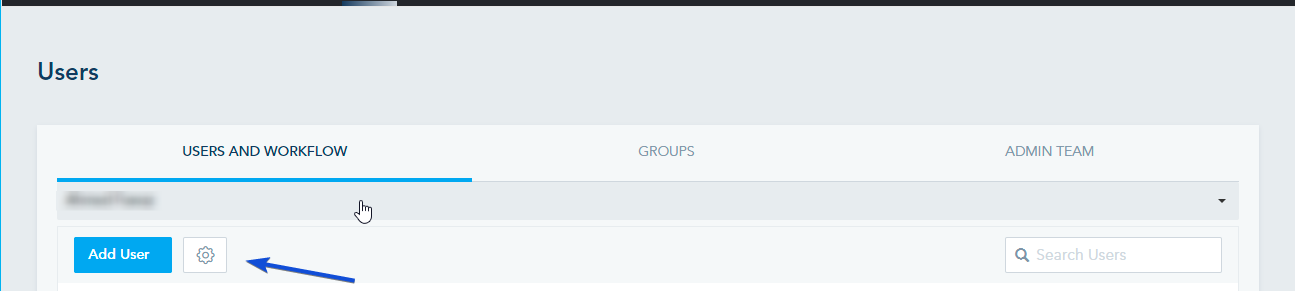
In the Users and Workflow section, choose the account where you want to enable this option and click on the Gear button next to Add User option.

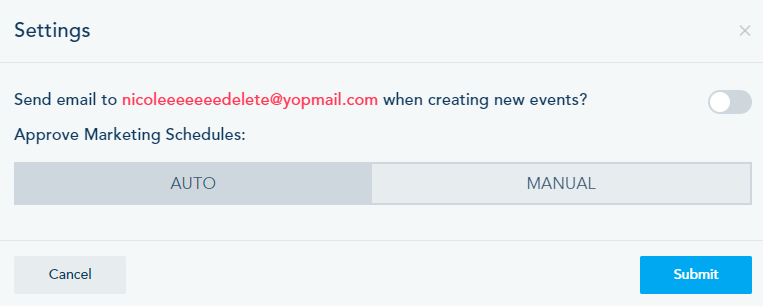
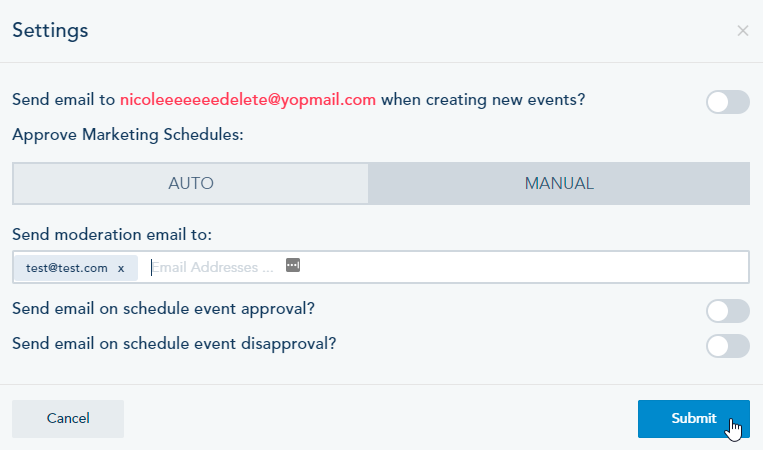
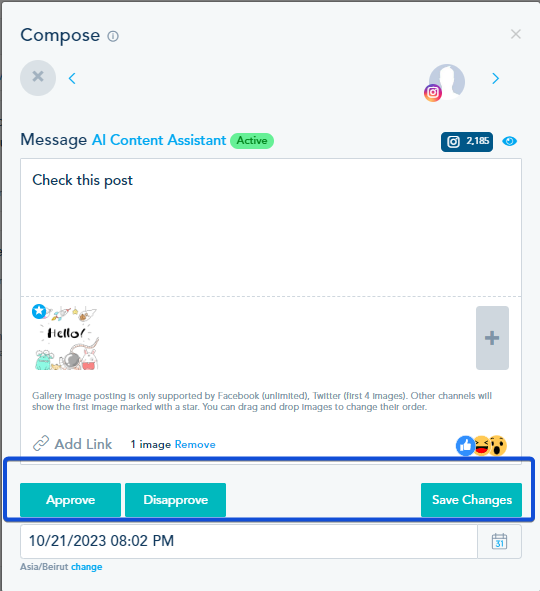
In the Pop-up window, you can choose to Auto or Manually approve the social posts.:

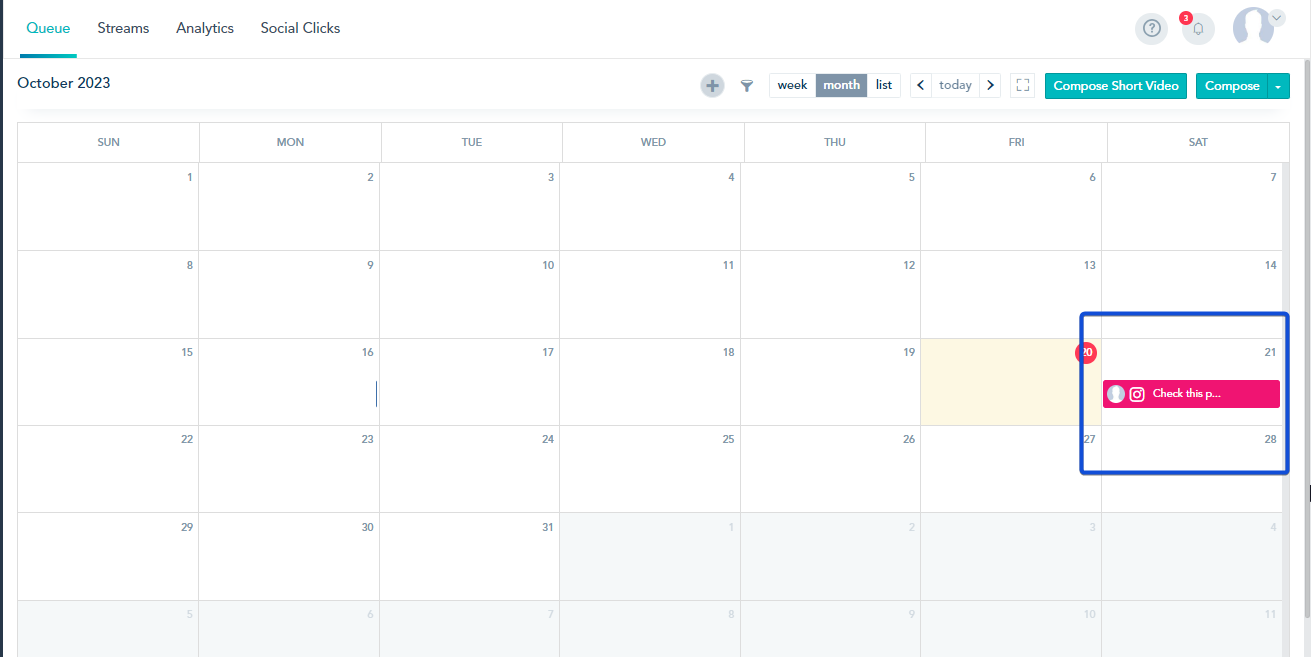
if you choose to manually approve the Social Media scheduled posts, the email moderation will be sent to the admin to approve or disapprove the scheduled event.

Also, you can specify the email address to whom you want to send the moderation email. You can send an email notification after approval or disapproval, by turning on the options displayed and specifying the email address to whom the email will be sent.

Get Started

How to switch the language in your account

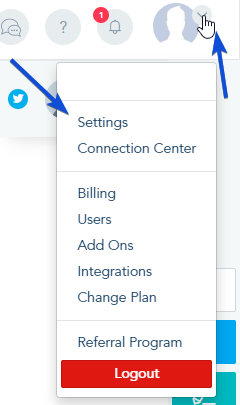
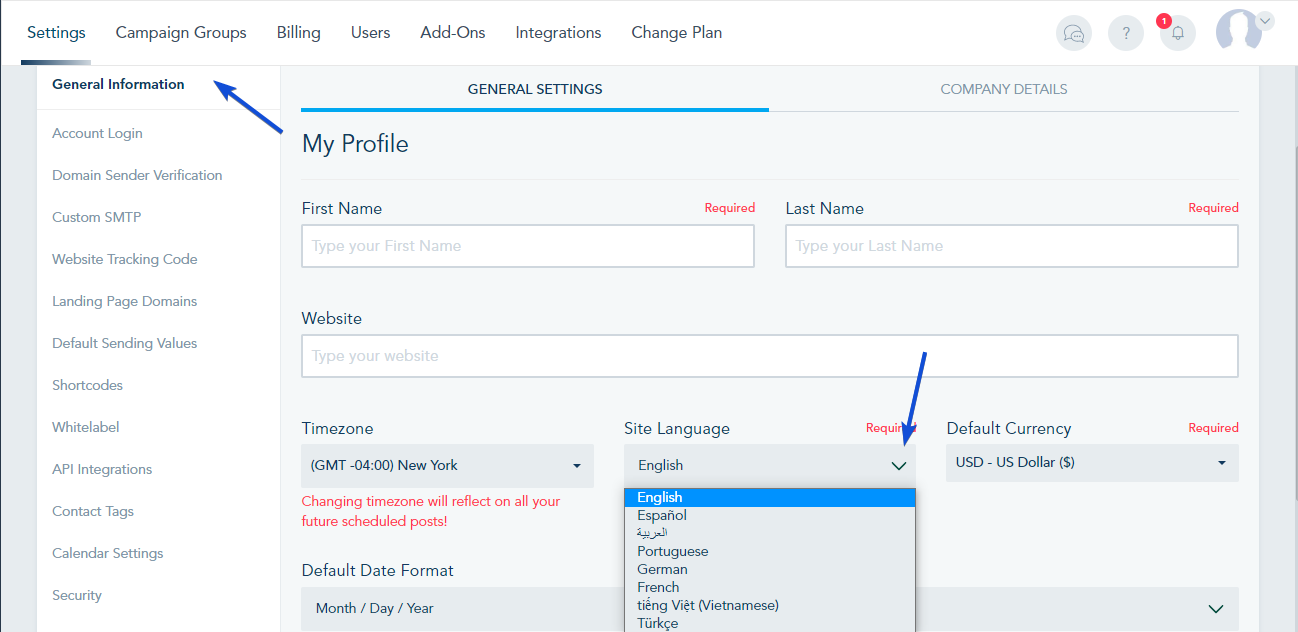
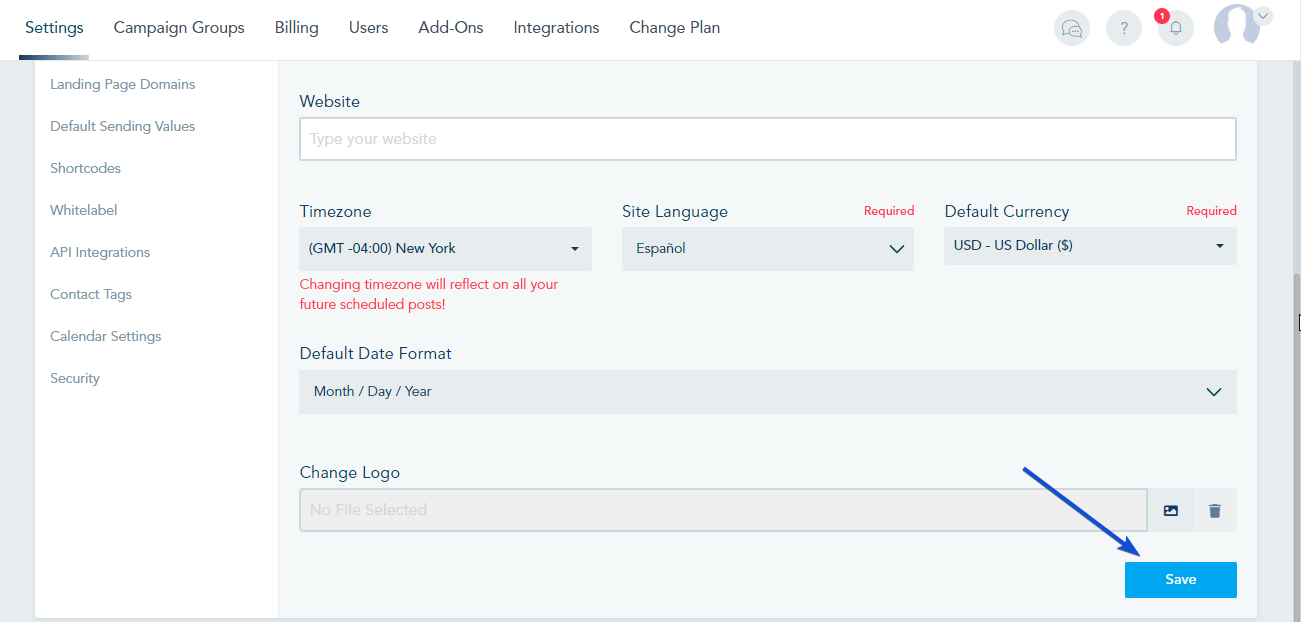
The language of the platform can be changed in the General Settings of your account, click on the profile icon in the top right, and select Settings.

On the General Information page, you have the Site Language option  where you will have multiple language options to choose from.

Once done, click on Save to apply the new language.


Get Started

How to create a wildcard in Godaddy

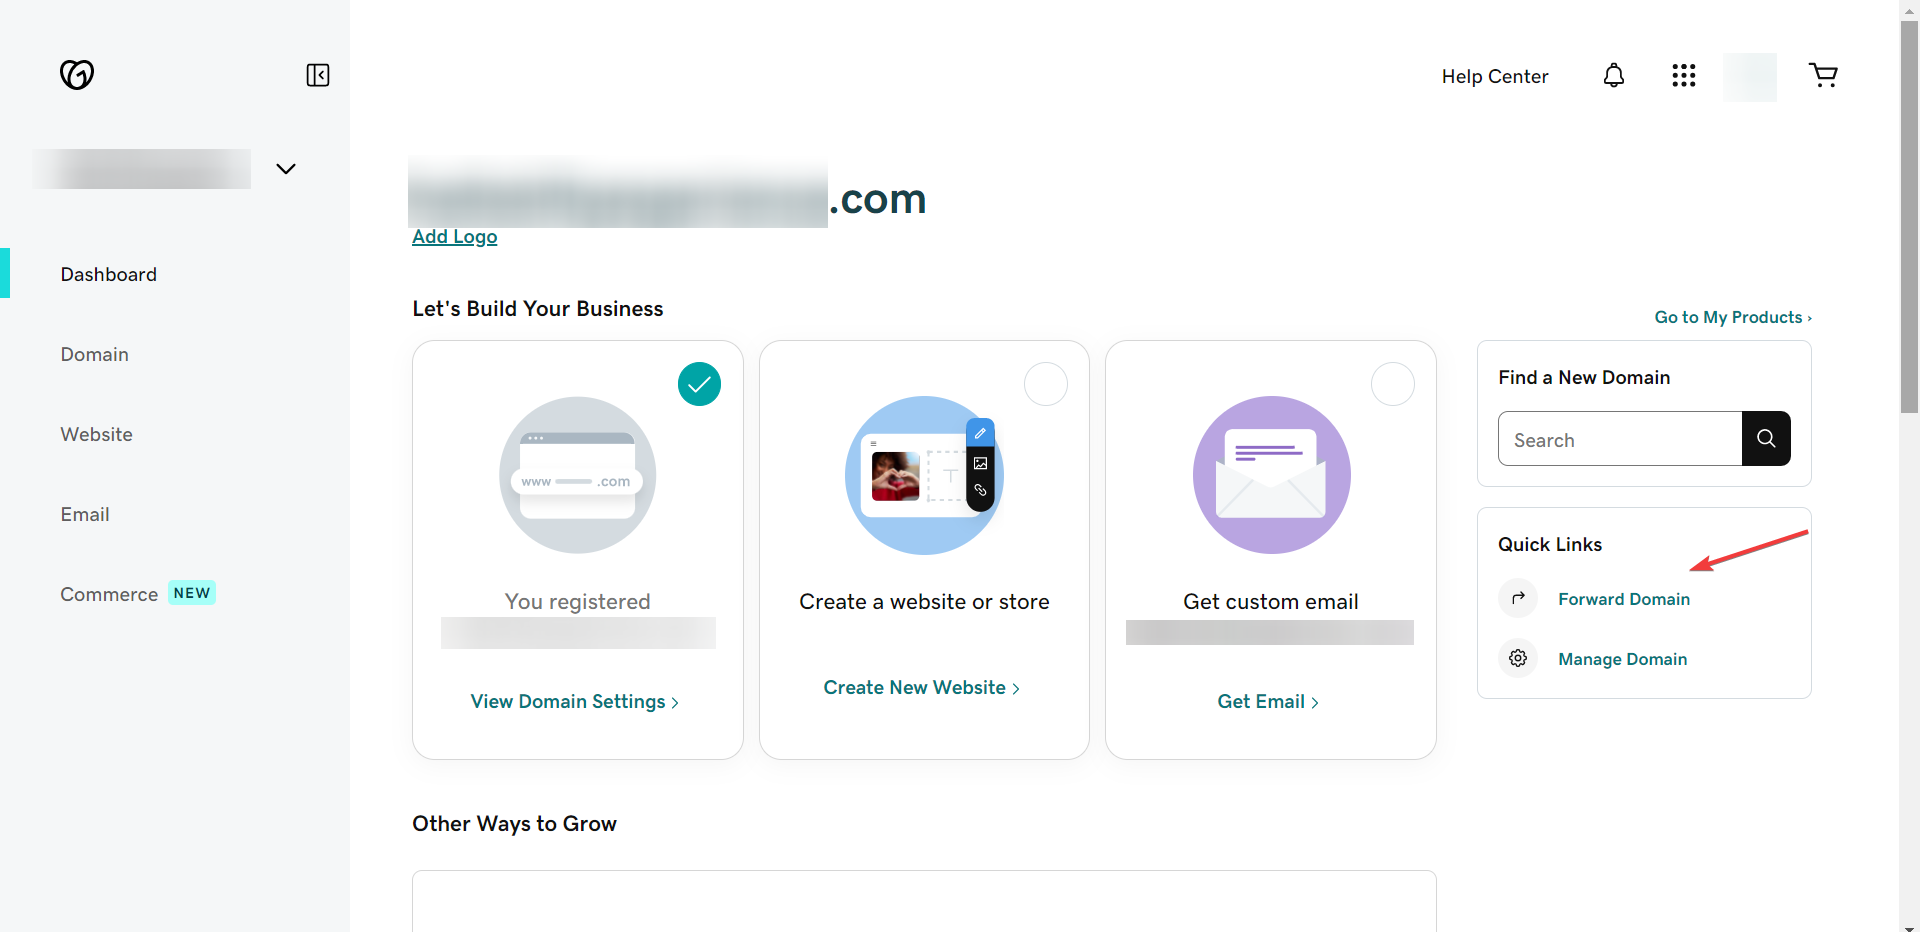
To create a wildcard in Godaddy to forward your domain to www.domain.com, follow the below steps:

1- Open your domain settings and click on Forward Domain.

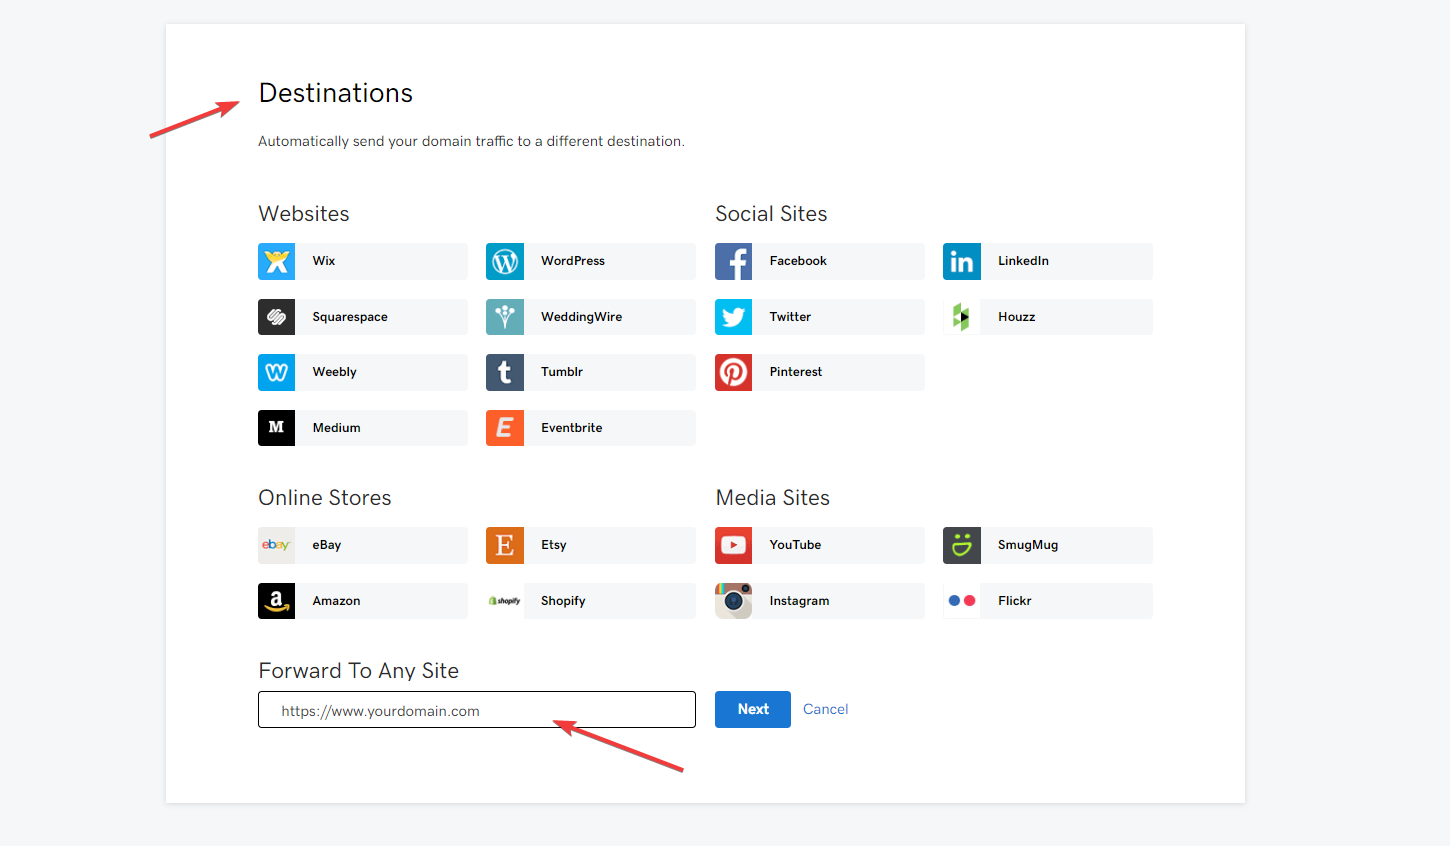
2- In Destinations, type in your site for example www.domain.com in the Forward to Any Site section, and click Next.

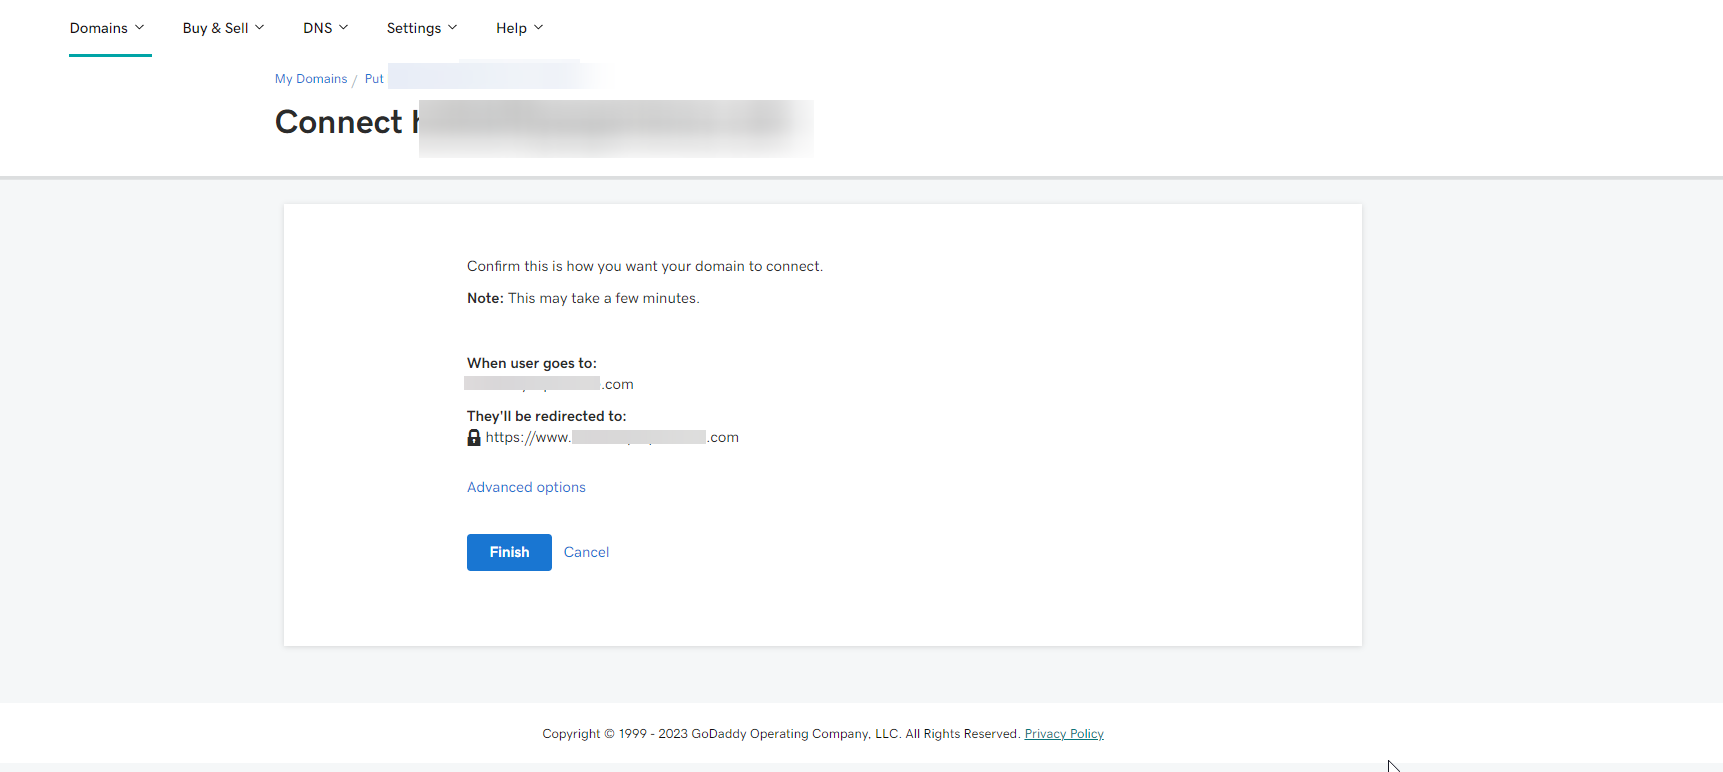
3- Finally, click on Finish.


Get Started

How to create an Audience for contacts who didn’t received Emails

Currently, there is no condition for unreceived emails when creating an audience. Please check below a workaround on how to create an Audience for Contacts that have not received a specific email.

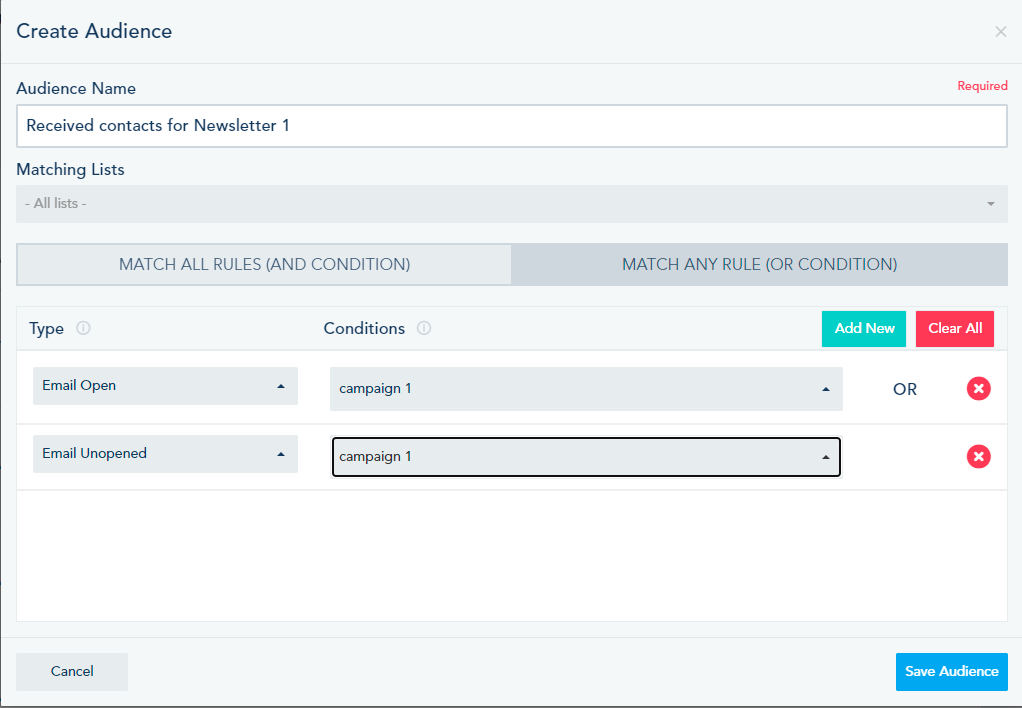
  • Create an audience of contacts that have received the email.

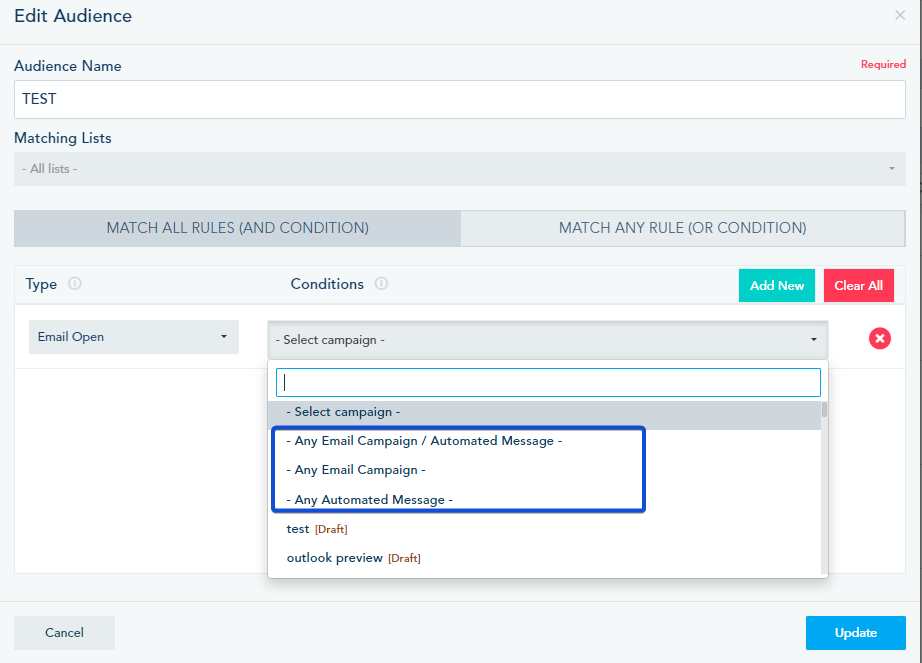
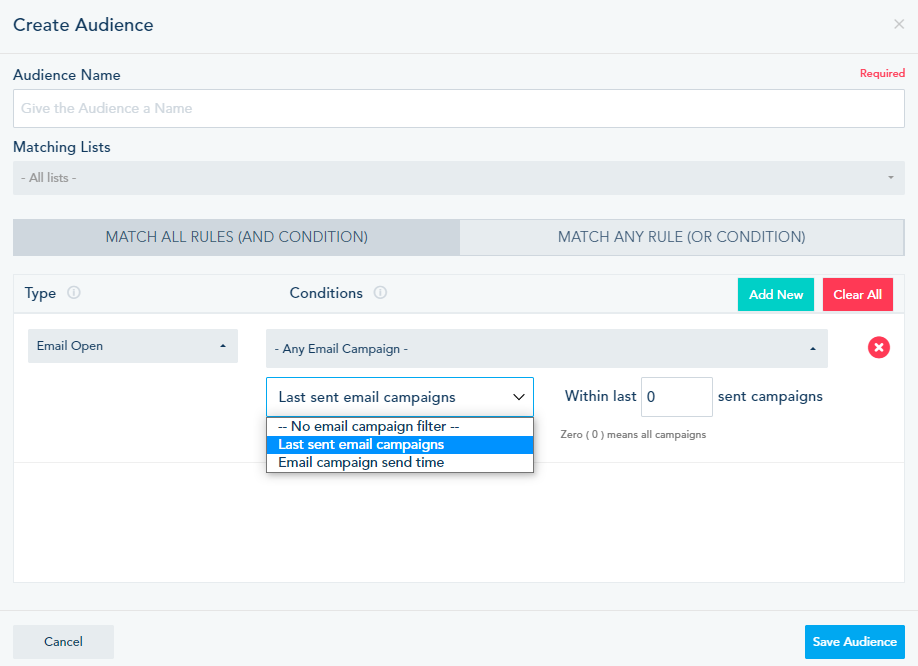
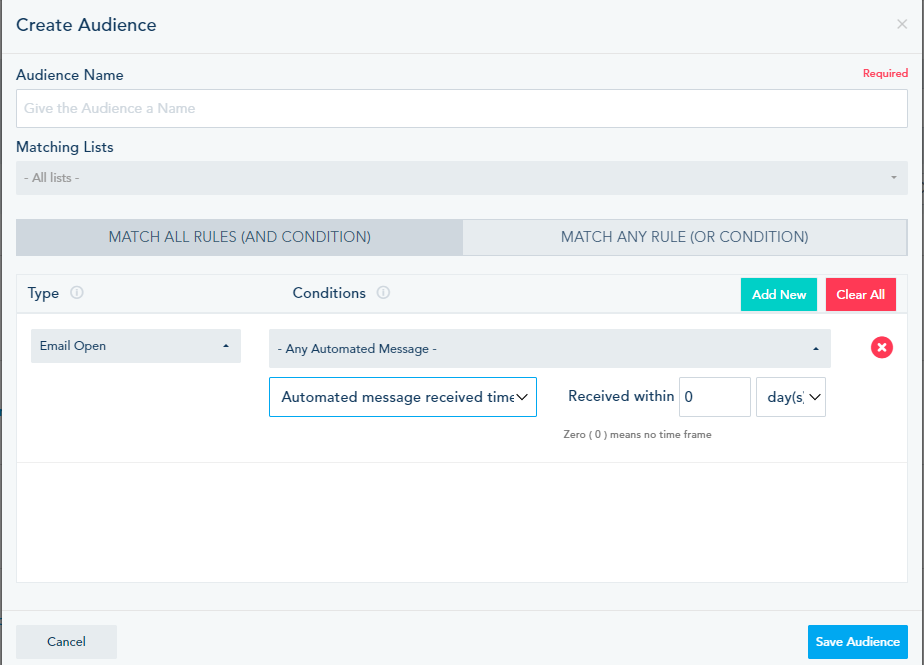
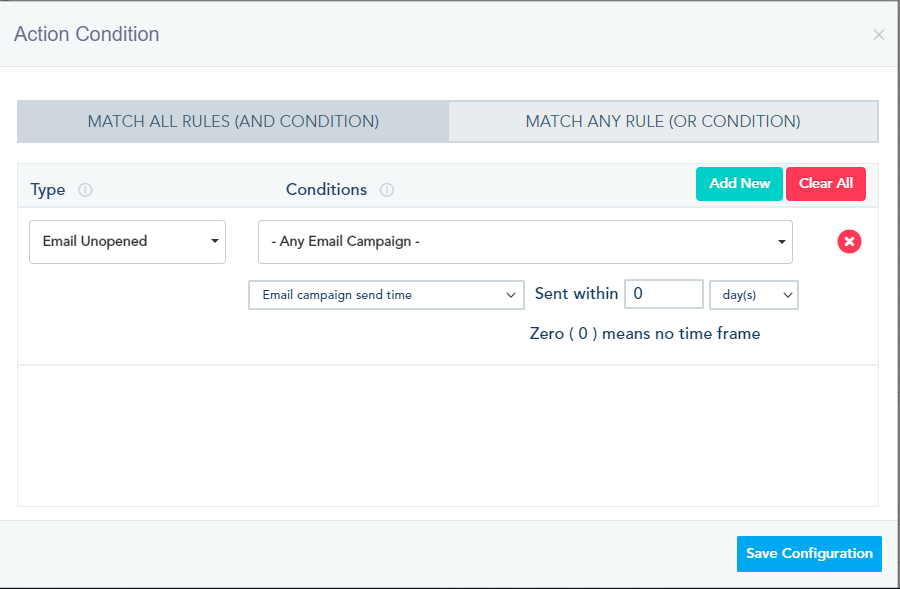
The audience will be created with the below conditions. Please note that you can specify a specific email campaign or All campaigns.

  • Add your received audience to a list.

Using Automation, you can add the created audience to a list.
From the Automation tab -> Your Automations – > Create Automation.

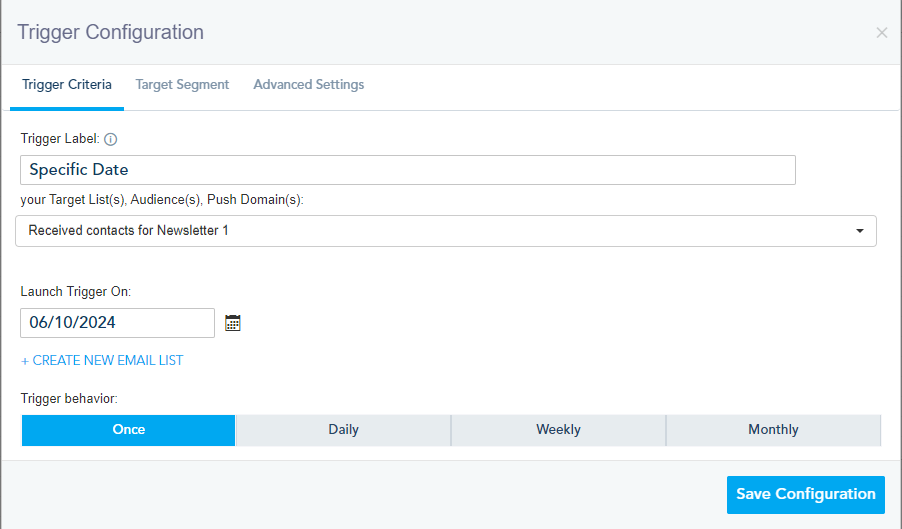
To create the automation, choose the Specific Date trigger and link it to Add to list Action.

In the trigger configuration, choose the audience you want to add to the list and a date to launch the automation.

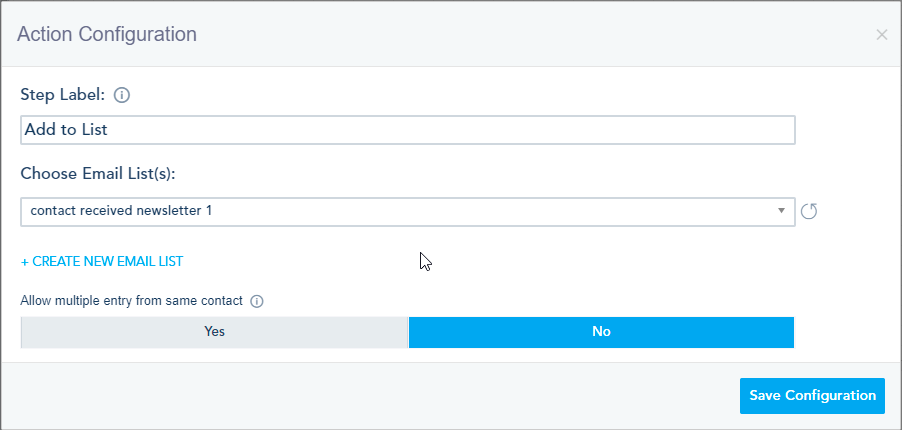
In the Action configuration, choose the list you want to add your audience to.

Save the automation and publish it.
After the automation is completed, the contacts will be added to the chosen list.

  • Create Audience for unreceived email.

To create this audience, use the Not on List condition and choose the list you have just created.

Get Started

How to save a block in new Email builder

When designing your email template, you can build your own blocks using components, such as images, videos, and call to action buttons, and save them to be used in other email templates.

This feature is only available in the New Email builder.

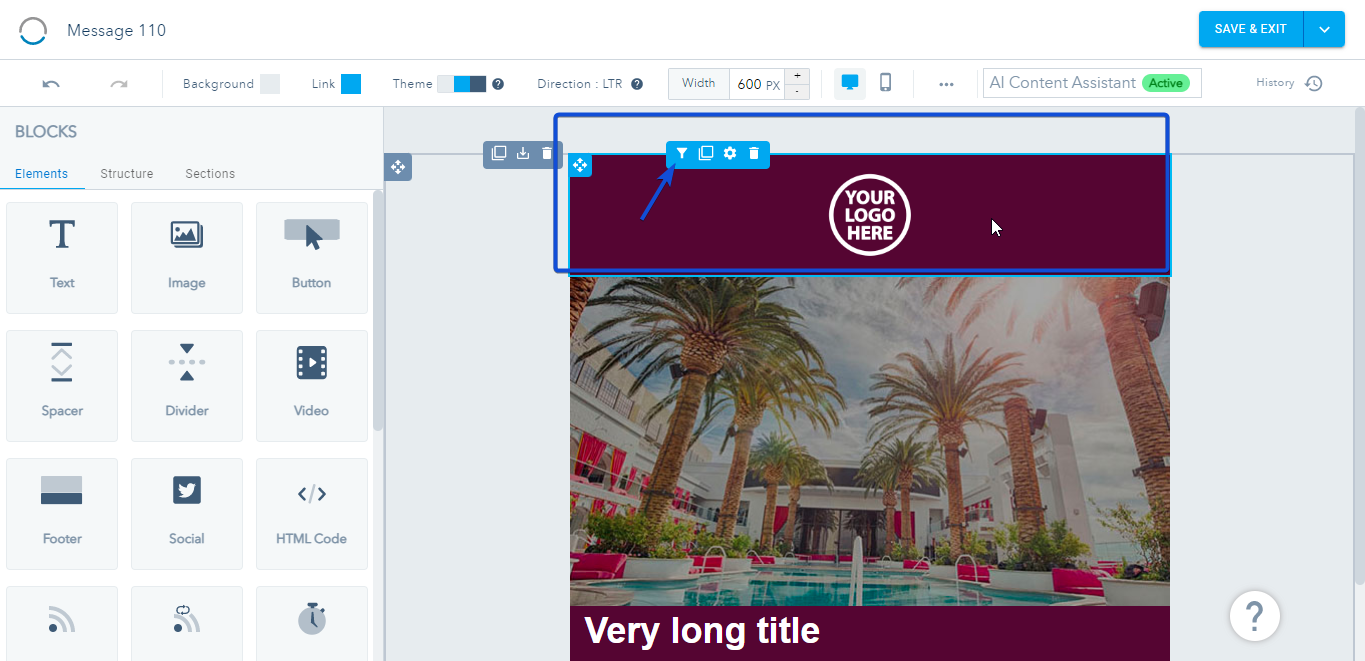
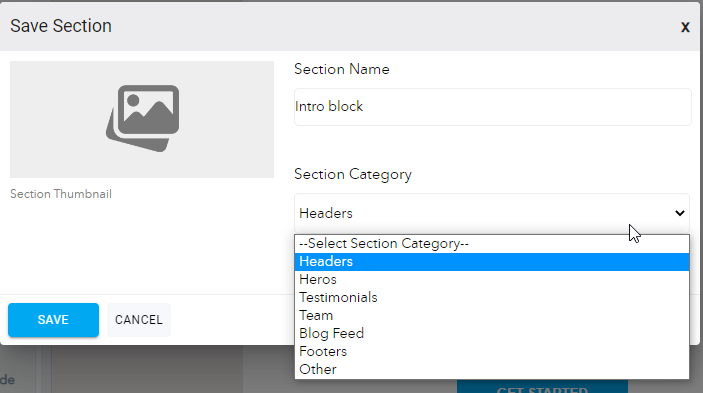
After creating and designing your block, Click on the save icon from the block top menu.

Give the section a name and select its category, then click on Save.

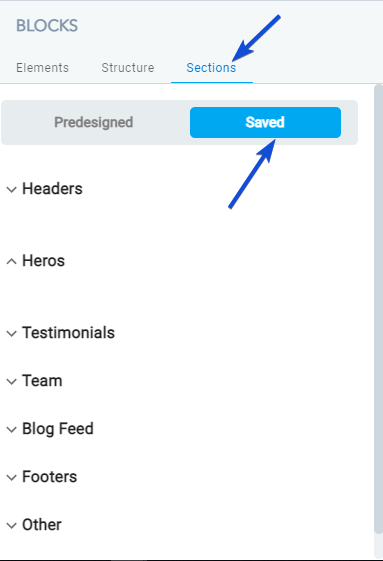
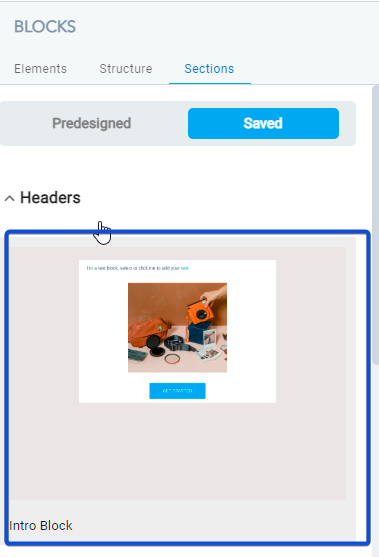
Once saved, you can find this block in the Sections -> Saved to use it again in other templates.

You can find your block, in the category you have chosen.


Get Started

How to copy and paste text inside the builder

When copying and pasting in the builder, you are always copying some inherited style and additional code and that will cause issues with your template.

The proper way to copy and paste content in the builder is shown below:

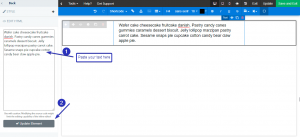
Add a Header or Paragraph component, paste your test in the Edit HTML section and click Update Element

In that way, only the text will be copied without any additional style.

Get Started

Reading analytics for site popups

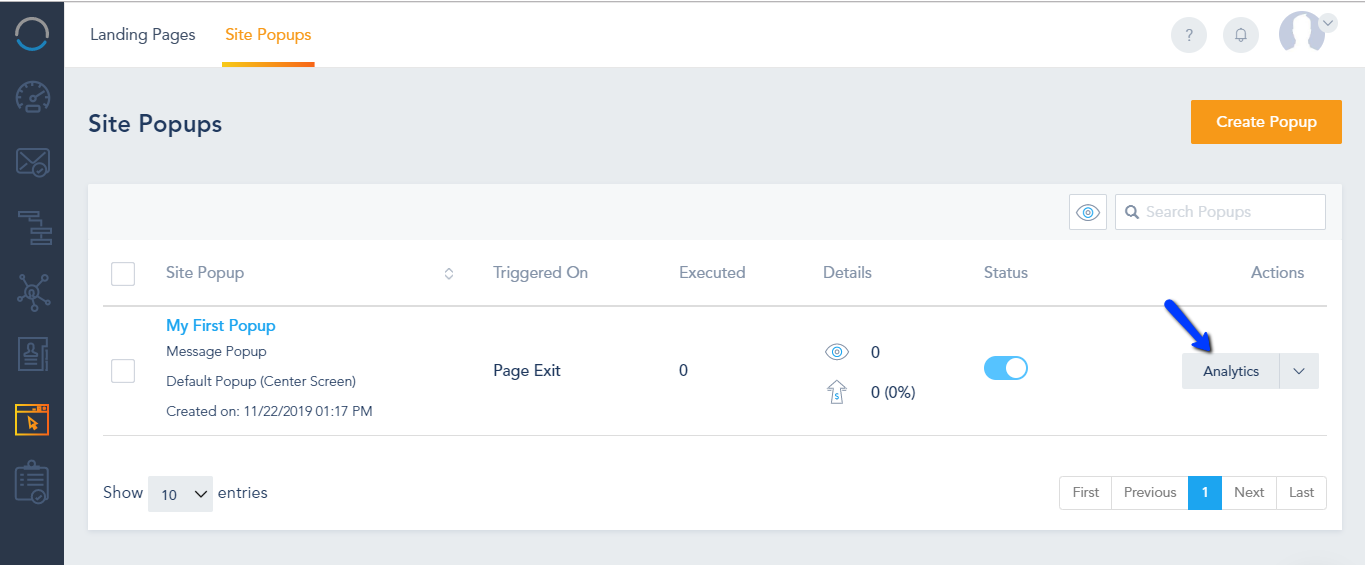
To access the Site Popups Analytics, click on Analytics.

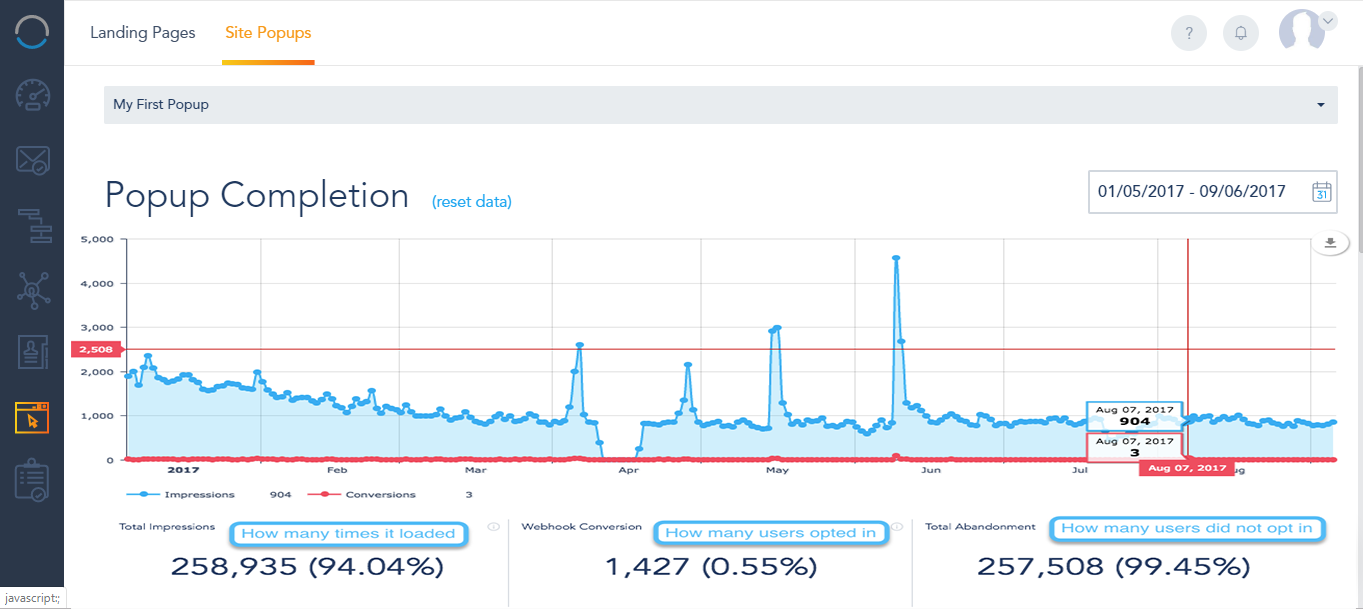
Inside the analytics section, you can see a data chart on how many times the Webhook executed, along with the conversion and abandonment rate. The date range is 30 days by default and can change to your desired time period.

Below the chart, you get a breakdown of the traffic that triggered this Site Popup by Visitors Type, Cookied Contacts vs Anonymous Visitors, along with the rate for each.

The referral pie chart breaks it down by General referral sources, Paid referrals and Social referrals.

Further down, you can switch between the different tabs to view the contacts who viewed the Site Popup, the IP address of the Anonymous Visitors, the Social Media events that triggered the Site Popup (you must be using the Social Media tools on your account), as well as the Geo Location and Devices breakdown. The New Contacts filter displays information about the contacts that filled out the form and completed the conversion.

Get Started

OttoKit Integration

By integrating VBOUT with OttoKit, you can automate processes and connect VBOUT with various web apps and WordPress plugins. This guide will walk you through the steps to connect OttoKit with VBOUT and start creating automated workflows.

Step 1: Login to OttoKit and Access the Apps Page

  1. Enter your login credentials to access your OttoKit account.
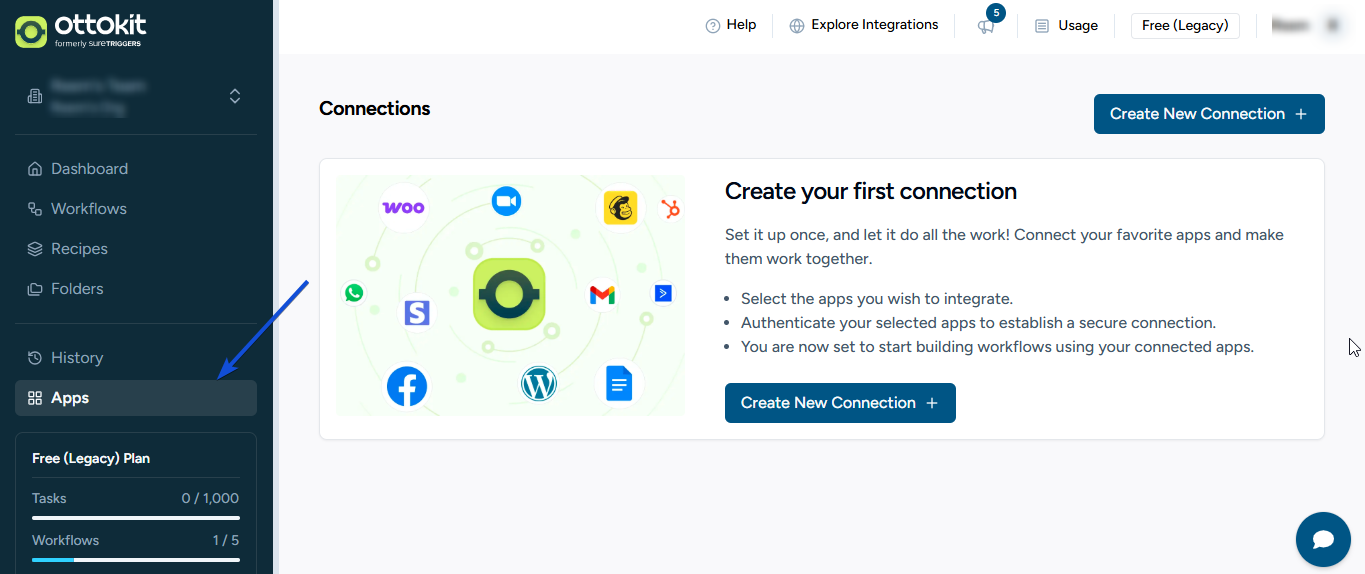
  2. Once logged in, locate and click on the “Apps” page in the navigation menu.

Step 2: Add a New Connection

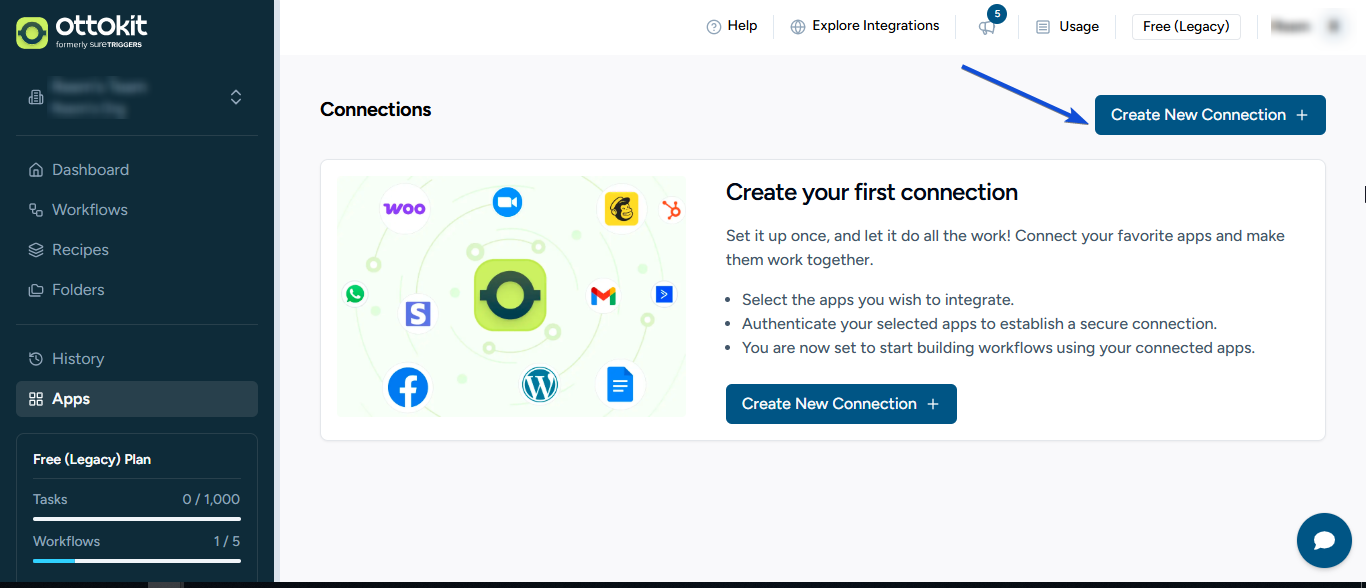
  1. On the Apps page, look for the “Add new Connection” option and click on it.

Step 3: Select VBOUT from the List of Apps

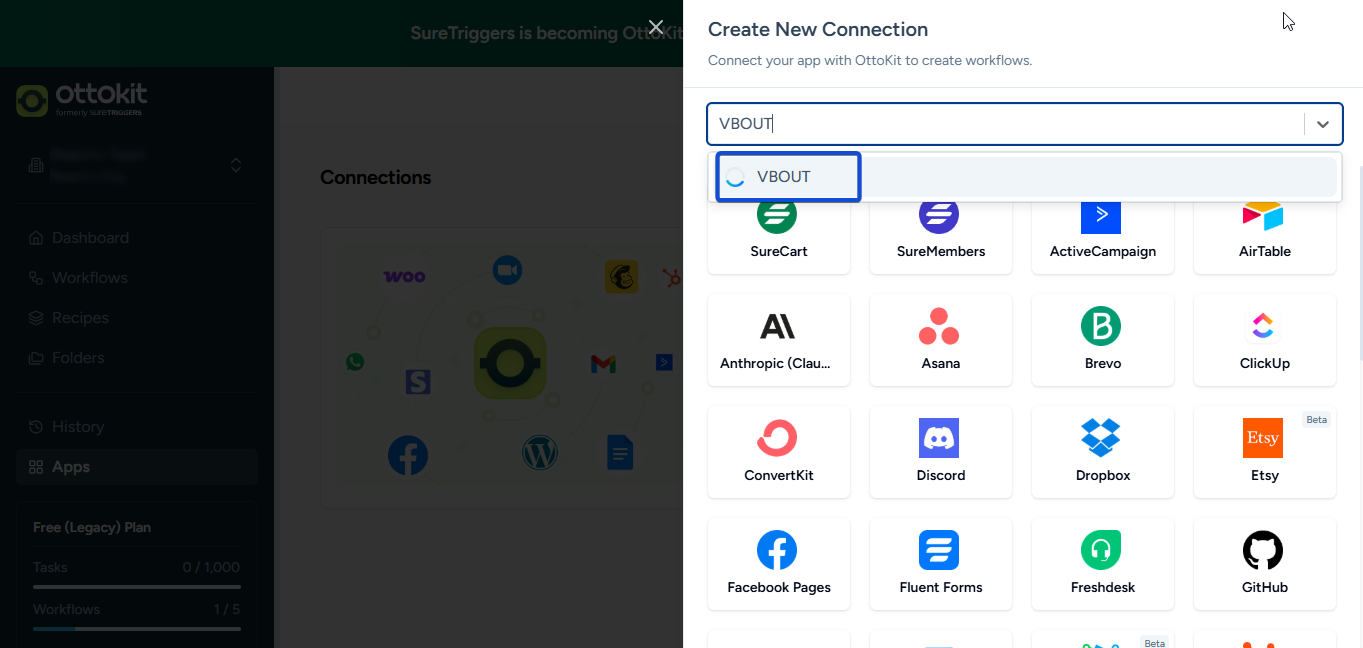
In the list of available apps, find and select “VBOUT” as your desired integration.

Step 4: Start your connection

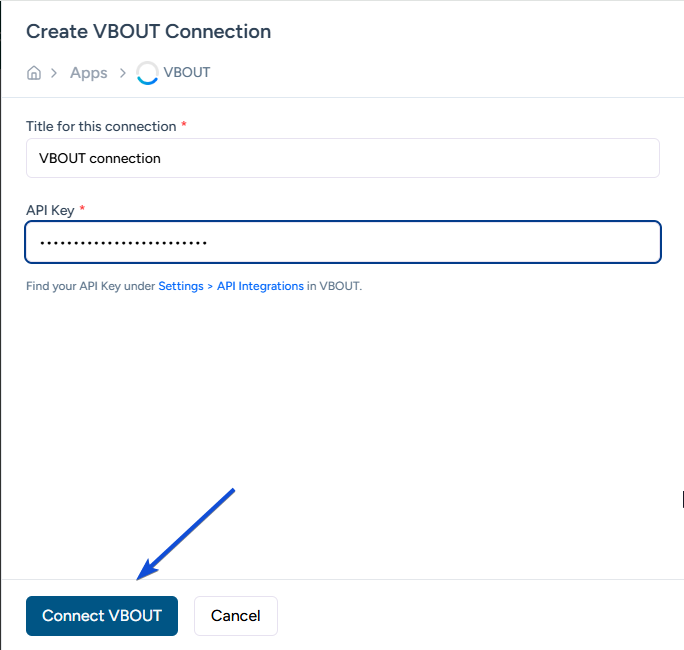
  1. Provide a name for your connection to easily identify it later.
  2. Retrieve your VBOUT API key by logging into your VBOUT account.
  3. In your VBOUT account, navigate to the “Settings” section and select “API integrations.”
  4. Locate your API key and copy it.
  5. Return to the OttoKit connection setup page and paste the API key into the designated field.

After adding the API key, click on the “Connect VBOUT” button to establish the connection between OttoKit and VBOUT.

Step 5: Start Creating VBOUT-Related Workflows

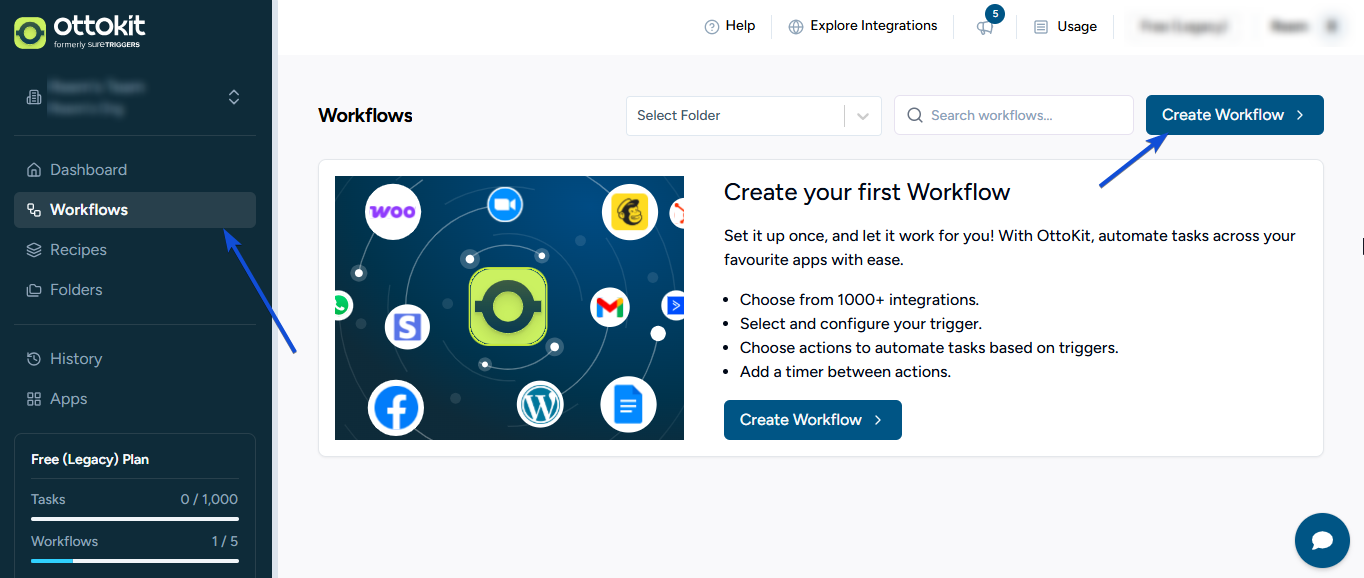
Access the Workflows page in OttoKit and select the option to create a new workflow.

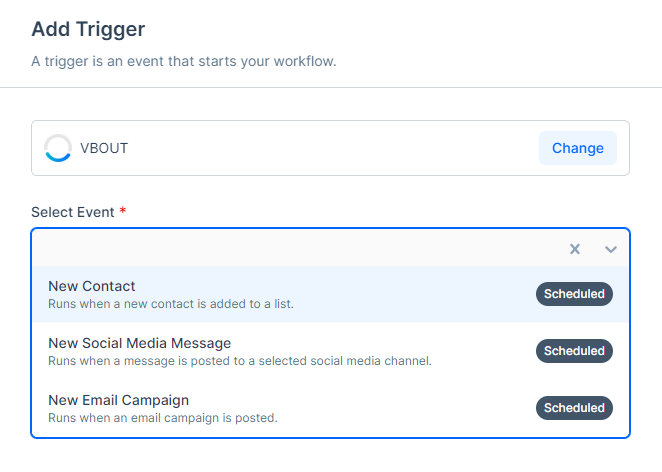
Within the workflow creation interface, you can choose VBOUT as a trigger or an action to connect with other apps.

Available Triggers to Use with VBOUT:

And the available actions are:


Get Started

Email Clipped

Email clients will automatically clip all emails with a message size larger than 102KB. This means that your recipients do not see all the content of your email, unless they click the link at the bottom.

To avoid your email from being clipped, make sure to follow the below recommendations:

  • Optimize your images: Make sure that the images used in the email have a small size.
  • Make sure your email does not contain any inherited code.
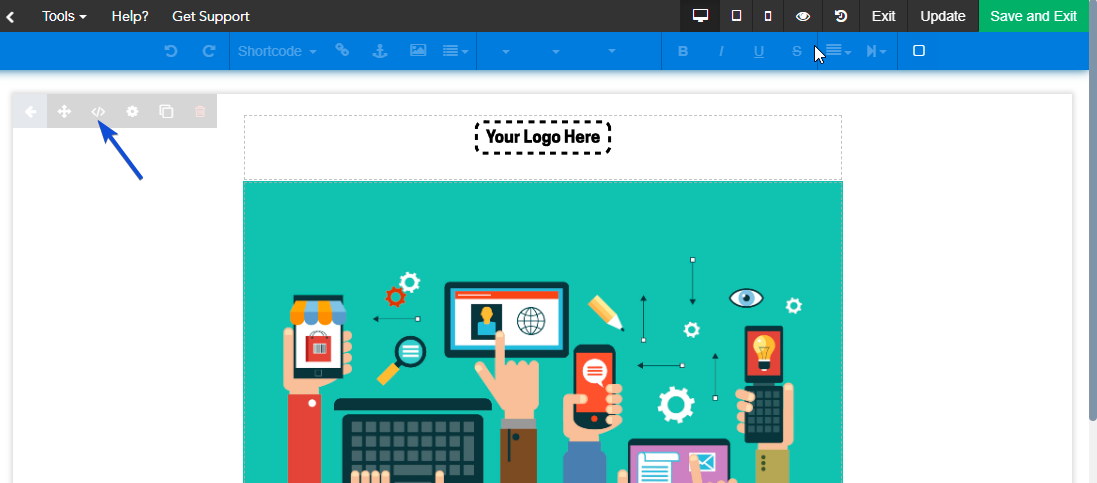
    In some cases, your browser extension may add some code to your email while building it. To check your email code, open your email block source code from the builder and make sure it does not contain thousands lines of code.


  • Make sure your email is not too long.

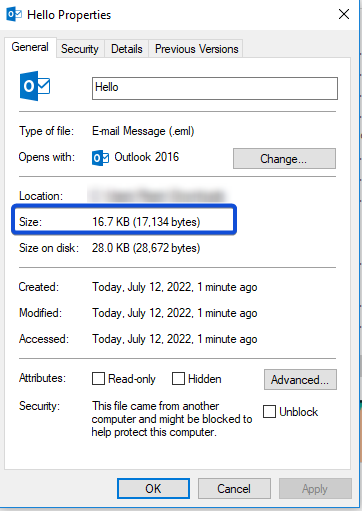
Finally, to check the exact size of your email, send it as a campaign and download the email.
Once downloaded you can check its size from the file properties.

Get Started

RSS Feed

The platform offers the possibility to send RSS feed by email once the content is changed. Please check the below steps to achieve that:

Get your RSS feed URL

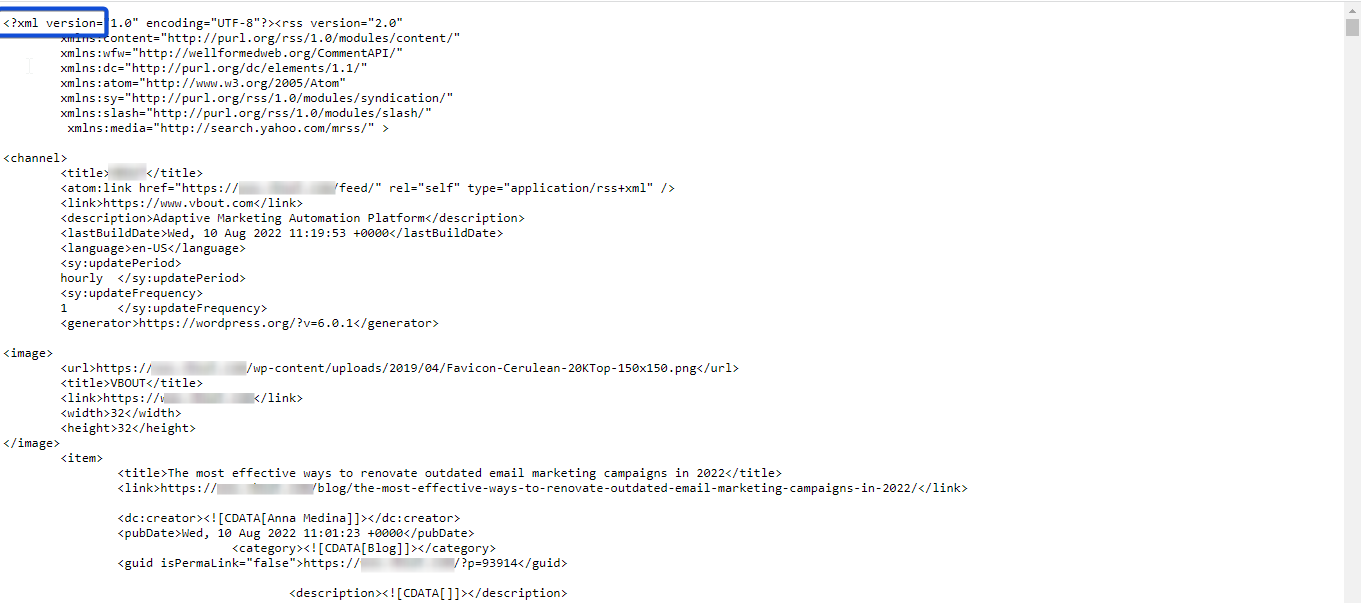
You can find your RSS feed URL by going to www.yoursite.com/feed make sure it is an XML file and has all your blog content.

Create an Email with RSS dynamic block

RSS feeds blocks are used to insert your feeds in your landing page or email template, and their content will change dynamically once your feeds are updated.

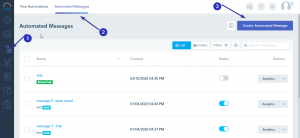
To create your email to be sent using automation, you need to create it in the Automated message section.

From the Automation tab -> Automated Messages – > Create Automated message.

Please check this for more information on how to create Automated messages.

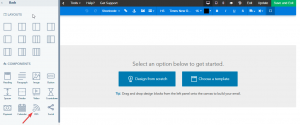
In the Email builder, add RSS Block

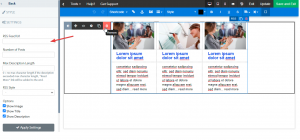
Inside the block settings, you can input the RSS feed URL and customize the number and the style of the posts then click Apply Settings.

Once your done, save your email and it will be ready to be used in the automation workflow.

Set up your automation using RSS Changed trigger

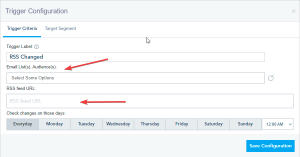
RSS trigger is used as a trigger in Automation. This trigger executes when RSS content is changed. You specify your target specific list(s) or audience(s) and your RSS feed URL.

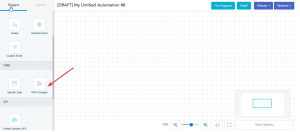
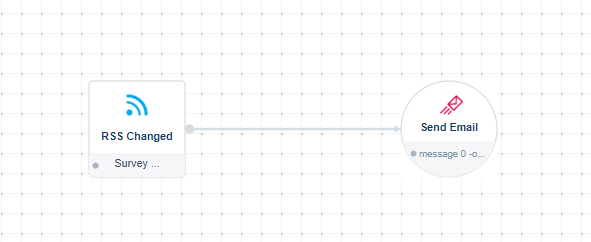
Go to Automation tab, create a new automation, from the trigger section, Drag and Drop the RSS Changed trigger.

Double click on the trigger, enter a name for the trigger, specify your target specific list(s) or audience(s) and insert your RSS feed URL. Also, you can choose a specific day and time to check the RSS feed update.


Once set, connect the trigger to Send Email action.

In the Send Email action, choose the automated message you have already created.

When you are done, save and publish your automation.

Get Started

Salesforce Integration – How to sync contacts tags

You can synchronize the platform with Salesforce or Salesforce with the platform through the integration:

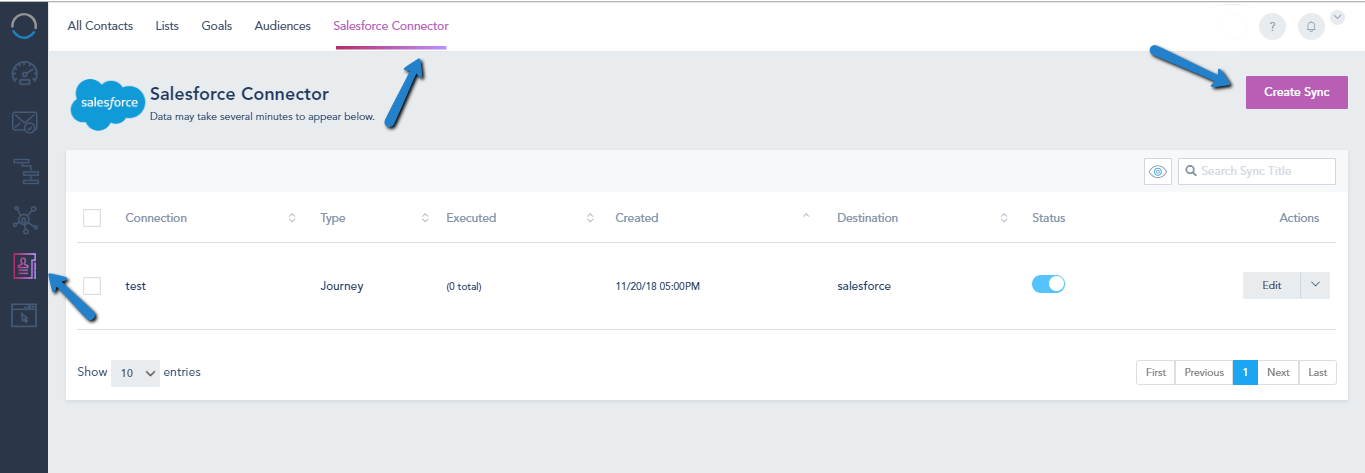
To access the integration tab for Salesforce, go to: Contacts > Salesforce Connector

Note: Salesforce is an Add-on that must be installed or part of your plan.

After going to Salesforce Connector, click Create Sync

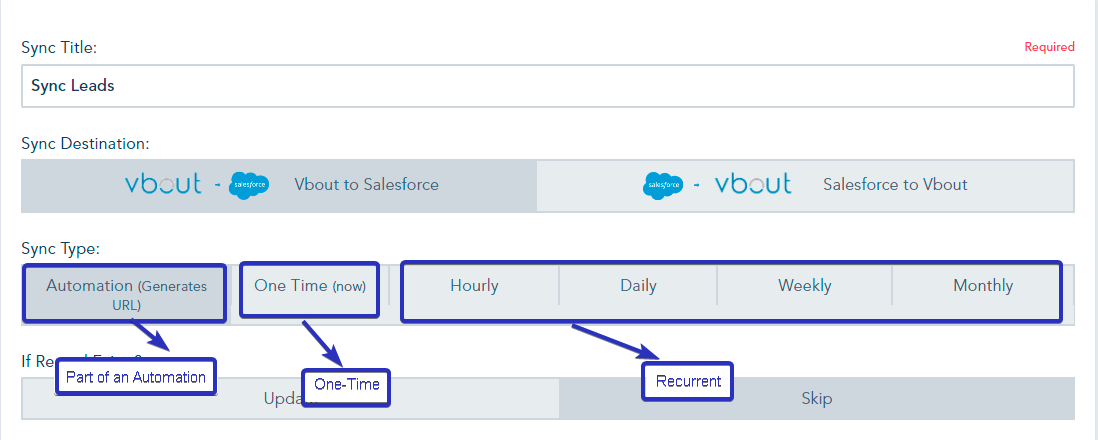
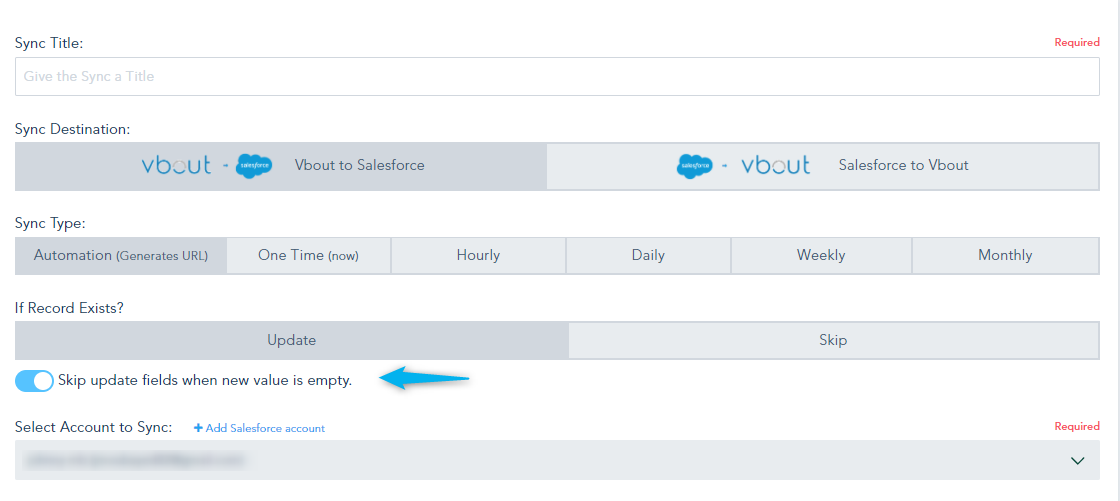
The sync is bi-directional and can be customized as a one-time, recurrent or part of an Automation at the contact level:

If you want to update an existing record, and not override an empty field, toggle this option:

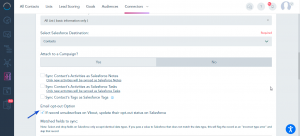
Afterward, Select Contact Email List to Sync and Salesforce Destination; you can now choose to Sync contact’s tags to Salesforce by clicking the checkbox:

Also, you have the option to sync unsubscribe contacts and update their opt-out status in SalesForce.

In order to sync contact tags make sure to allow tags in SalesForce.
Please check the Required editions and User permissions:

1- Required editions
Salesforce Classic (not available in all orgs)

2- User permissions needed to modify tag settings:
Customize Application

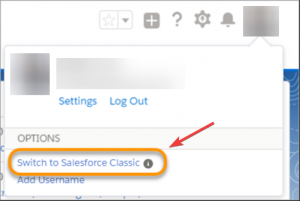
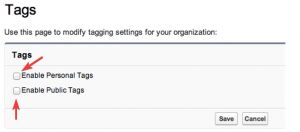
After switching to SalesForce classic you can now enable tags from the tag settings, To access your Tag settings, follow the steps below:

1- From Setup, enter Tag Settings in the Quick Find box, then select Tag Settings.
2- Select Enable Personal Tags and Enable Public Tags to allow users to add personal and public tags to records. Deselect both options to disable tags.


3- Specify which objects and page layouts display tags in a tag section at the top of record detail pages. The tag section is the only place where a user can add tags to a record.
For example, if you select only account page layouts, users in your org can only tag account records. If you select only account page layouts for personal tags and not public tags, users can tag account records only with personal tags.
4- Click Save.

Get Started

Tag Contacts when importing a CSV

When importing your database of contacts to a list, you will have the option to add the same tags to all the list users or Mass Import contact tags.

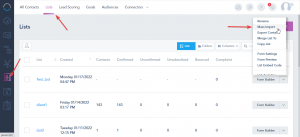
After creating your lists on your account, you have the option to import your database of contacts, to your lists, by using the Mass Import feature under the list Options. To access your mass import, follow the steps below:

1- Go to your Contacts and select Lists tab from the top.

2- Choose the list you’d like to import tags to and click on Mass Import from the drop-down option.

There are two ways to apply tags to contacts:

1- Apply default fields

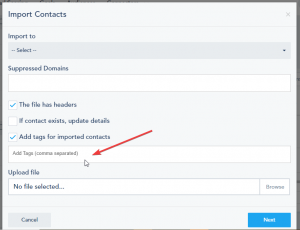
If you want to add the same tags to all the list contacts, select Add tags for imported contacts and add the desired tags separated by a comma.

2- Import unique Tags from the excel file:

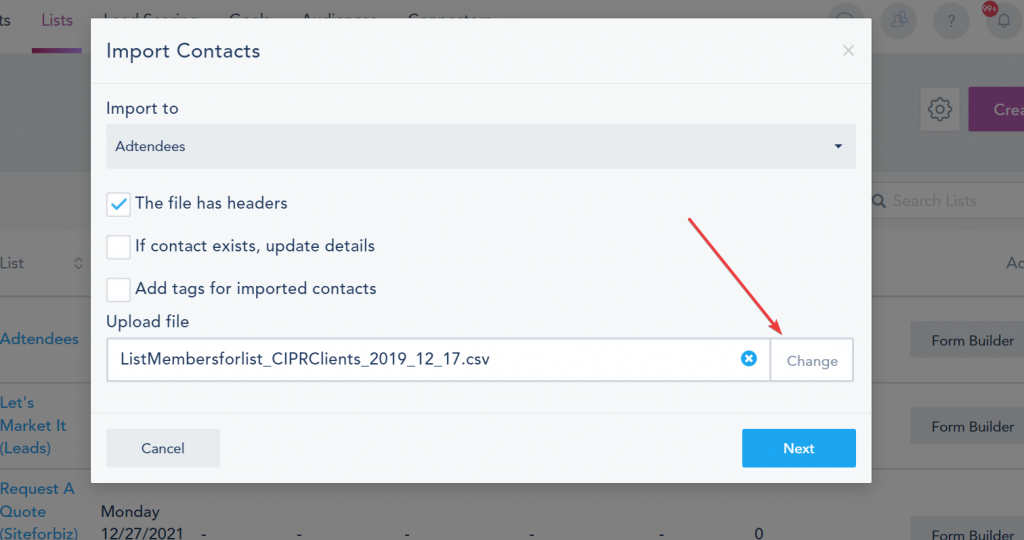
1 – Upload a ready .CSV file and proceed to the next step.

2 – Proceed to the next step where you can map the Excel file columns (Excel column names will appear above each field) to the corresponding fields you have created on your account under those list settings.

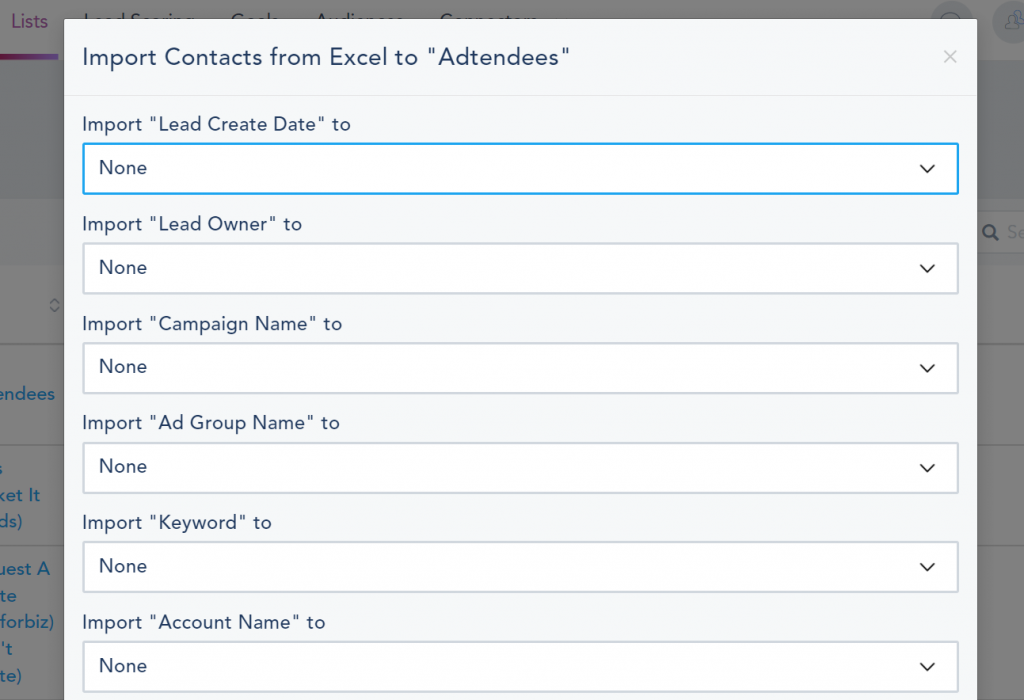
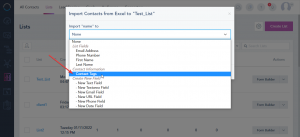
3 – To mass import tags to your contacts, choose the Contact Tags from the drop-down mapping and make sure the Excel tags column has comma-separated values if you are importing multiple tags to each contact.

Once you are ready, click on Import and the process will start.

An email summary of your import will be sent to the account admin email for all successful and failed imports.

Note: Random characters, badly formatted emails, and missing required fields might trigger errors in the upload process.


Get Started

How to enable Instagram Messages feed

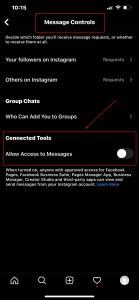
Instagram has a new privacy setting for “connected apps”, third-party tools and apps. Below is the process how to adjust your Instagram account settings and connect the inbox.

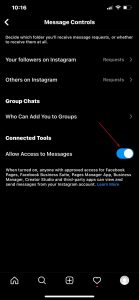
See screenshots of the process below. If permissions for your “connected apps” are not enabled, you will get an error code and the following details “The account owner has disabled access to Instagram direct messages” will be returned. This means we will not be able to pull in your direct messages until the permissions are resolved.

Go to the Instagram mobile app and follow the following steps to grant permissions:

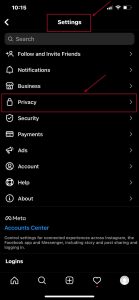
Click Settings, then, click Privacy.

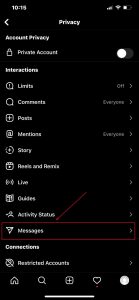
Click Messages.

Scroll down to Connected Tools.

Click the toggle to Allow access to Messages.

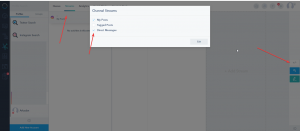
In order to activate the feature in your account:

Enable the Direct Message option inside the social media streams.

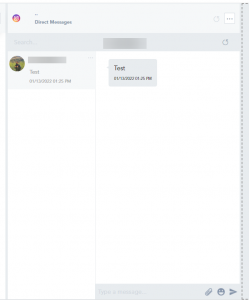
The feature is active.

Get Started

Integrately Integration

Integrately is an app that allows you to integrate third-party apps with your VBOUT account.

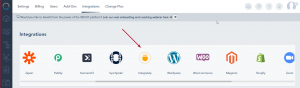
To connect Integrately, go to Integrations and click on Integrately:

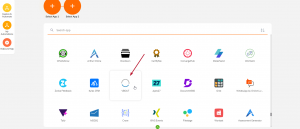
It will open Integrately where you should log in, search for VBOUT and click on it:

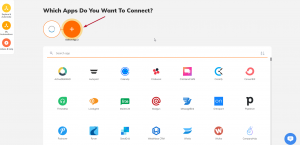
Select which apps you want to connect VBOUT with.

You will be able to create workflows:

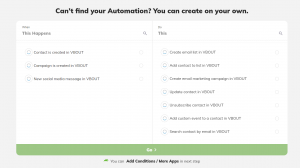
Setup the trigger and the action you want and click Go.

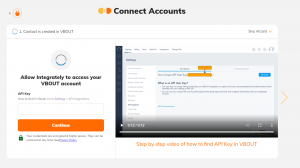
Once you add the API key and click on Continue, you will be able to use Integrately with your VBOUT account:

Below is a list of VBOUT triggers and actions available in Integrately

Triggers:

  • Contact is created in VBOUT
  • Campaign is created in VBOUT
  • New social media message in VBOUT
  • Tag is added to contact in VBOUT
  • Contact is updated in VBOUT

Actions:

  • Create email list in VBOUT
  • Add contact to list in VBOUT
  • Create email campaign in VBOUT
  • Update contact in VBOUT
  • Unsubscribe contact in VBOUT
  • Add custom event to a contact in VBOUT
  • Search contact by email in VBOUT
  • Add tag to contact in VBOUT

Get Started

How to create Folders

You can store and organize your data tables (Lists, Audiences, Goals, Lead Scores, Landing Pages, Site Messages, Automations, Automation Messages, Email Campaigns, Email Templates and Reports) by grouping them into a folder.

Creating a folder

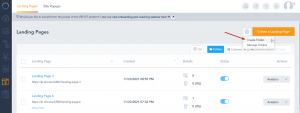
From the top right, you can click on the gear icon and choose Create Folder

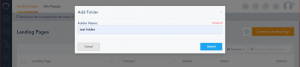
Type the desired name for the folder and press Submit. Folders are shared across different features on the platform but only display the content of the data table you are on.

Note: The created folder will not be displayed in the Folders View until it contains at least one asset.

Renaming a folder

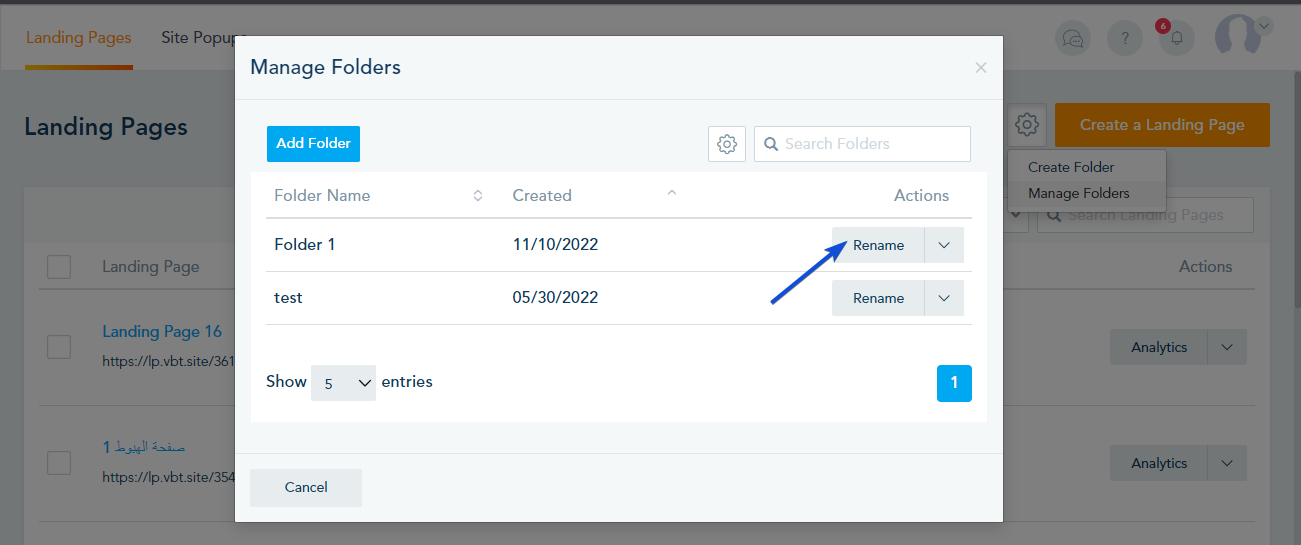
To rename your folder, click on Manage Folder from the gear icon and click on Rename.

Deleting a folder

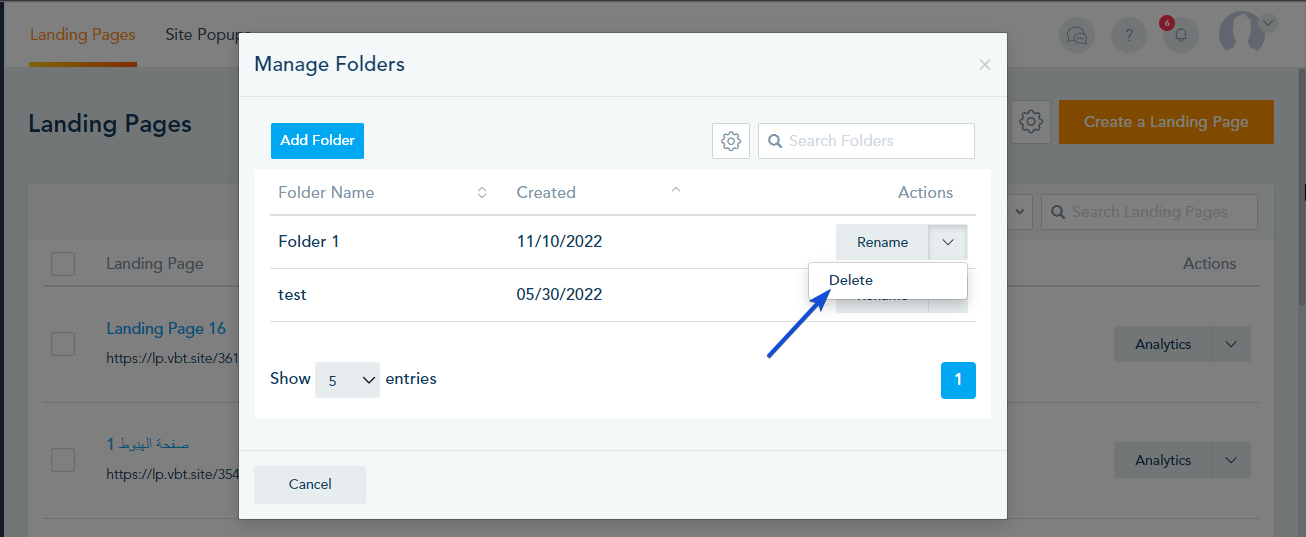
To delete a folder, you can click on Manage Folders from the gear icon. Note that deleting a folder with assets will move those assets to the feature’ default data table.

After you confirm deletion all the assets inside the folder will be extracted to its features root.

Folder settings

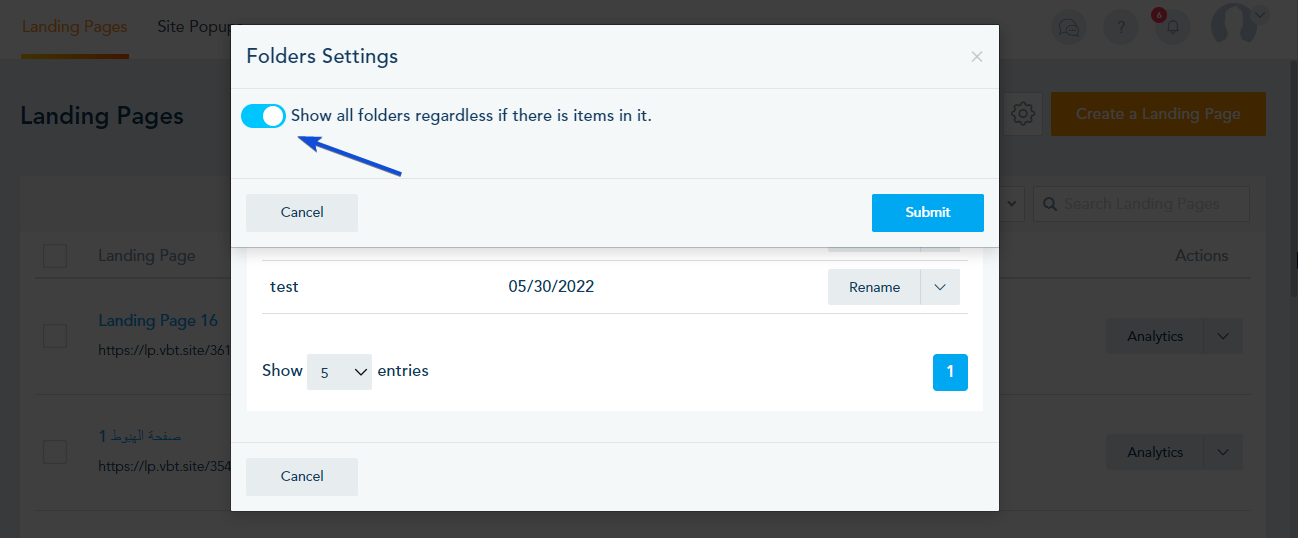
To access your folder settings, you can click on Manage Folders from the gear icon and then click on the gear icon in the next window. The Folder settings provide you with the option to show folder with no assets.

You need to enable the option in order to show folder with no assets and click on Confirm.

Adding assets to a folder

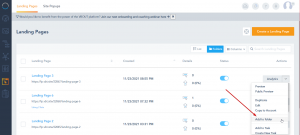
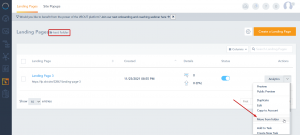
From the dropdown, choose Add to Folder to add an asset to a folder that already exists.

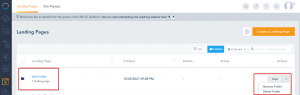
The folder will then appear on your data table and you can click view to see the assets that are inside that folder. You can also Rename or Delete the folder from the dropdown.


Moving assets from a folder

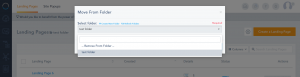
Navigate your way inside the folder, click on the dropdown option of an asset and choose Move from Folder. Follow the prompt to choose the new destination for that asset.

Select the destination folder.

Adding assets as bulk to a folder

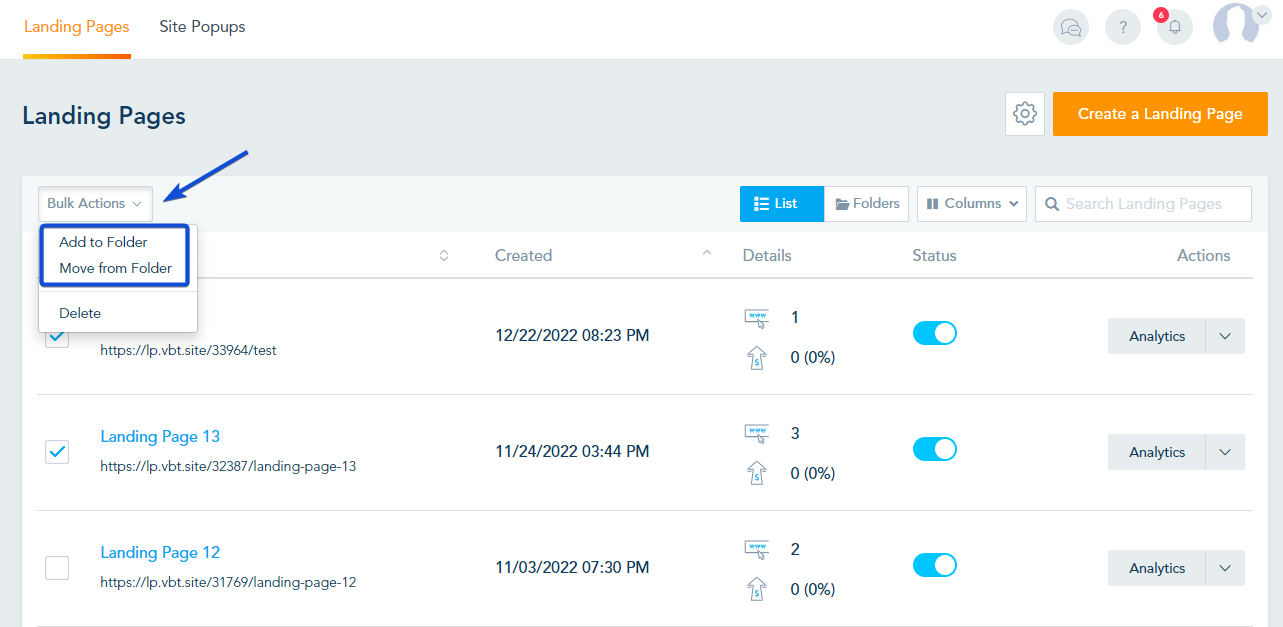
Select your assets, click on  Bulk Actions drop-down and  choose Add to Folder/ Move from Folder.

Get Started

Syncspider Integration

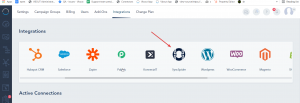
To install Syncspider’s Integration, go to Integrations, and click on Syncspider:

When you click on Syncspider, a new tab will be opened where you should log in or start your free trial:

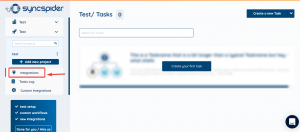
First, log in to your SyncSpider account, and click on the option Integrations located on the left side of the screen, as shown below:

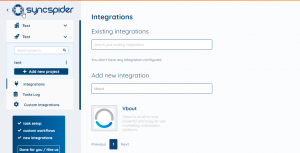
Select VBOUT application from the list of integrations, or use the search bar to find it.

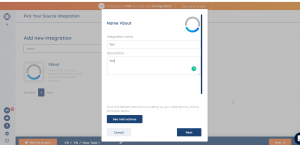
After selecting Vbout, enter the integration name and description (optional) then click on the Next button.

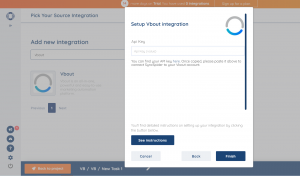
Sign in to connect Syncspider with your VBOUT account by pasting your API key:

You will be able to create workflows:

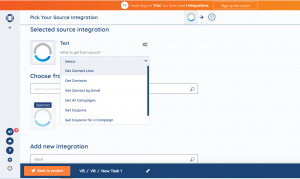
Choose the trigger.

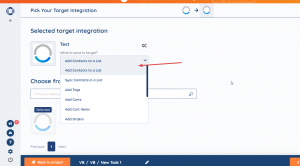
Once you set up the trigger, set up the action:

After choosing the action, click Save & Send Test Request or Save.

Below is a list of VBOUT Get and Send actions available in SyncSpider:

Get Actions:

  • Get Contact Lists
  • Get Contacts
  • Get Contact by Email
  • Get All Campaigns
  • Get Coupons
  • Get Coupons for a Campaign

Send Actions:

  • Create Contacts to a List
  • Sync Contacts in a List
  • Add Tags
  • Add Carts
  • Add Cart Items
  • Add Orders
  • Add Activities
  • Add Product Search
  • Add Product View
  • Add Category View
  • Add/Update Customers

Get Started

Twilio Phone Call Configurations

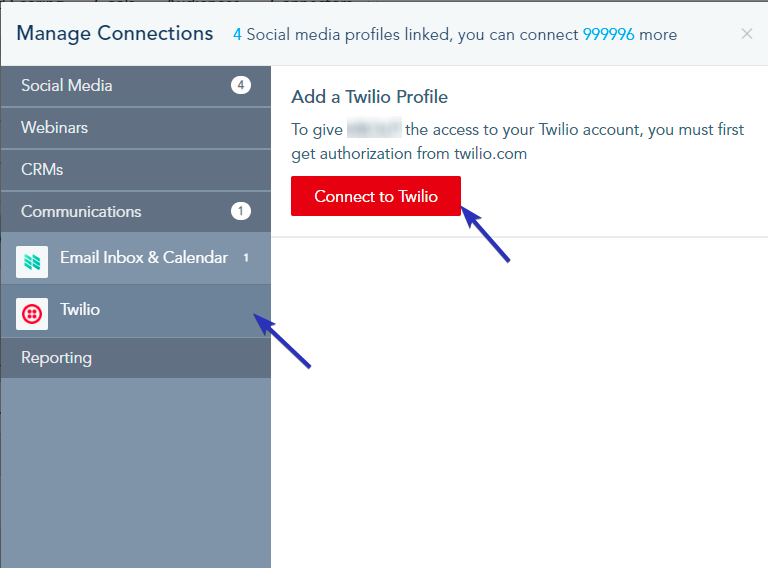
In order to connect your Twilio account, go to the Connection Center, and choose Connect to Twilio.


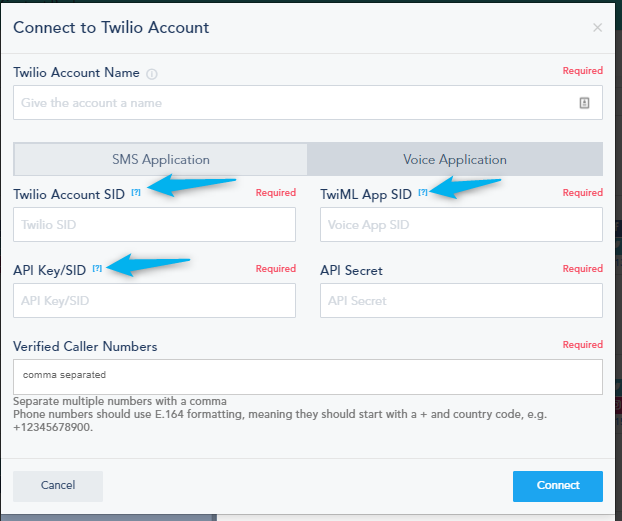
To complete the Twilio connection, you need to add the required keys. Please follow these steps to find your keys in Twilio:

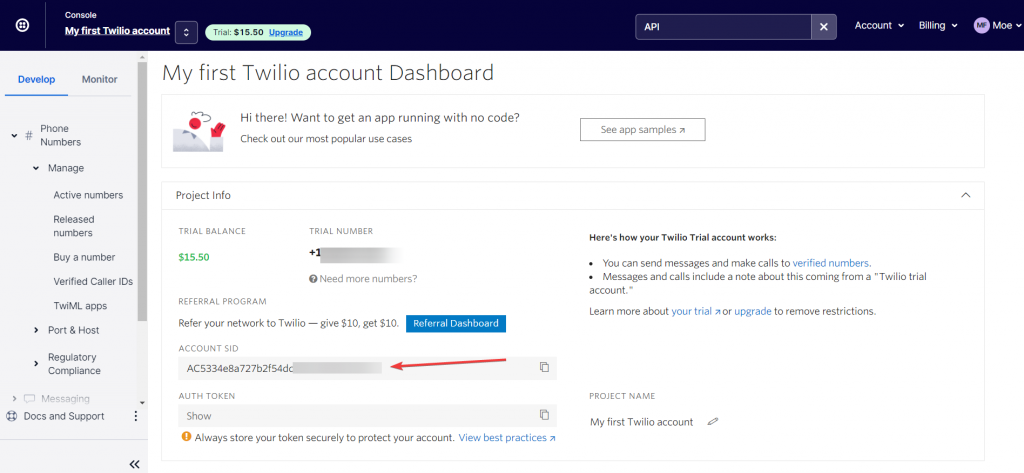
1-Twilio Account SID:

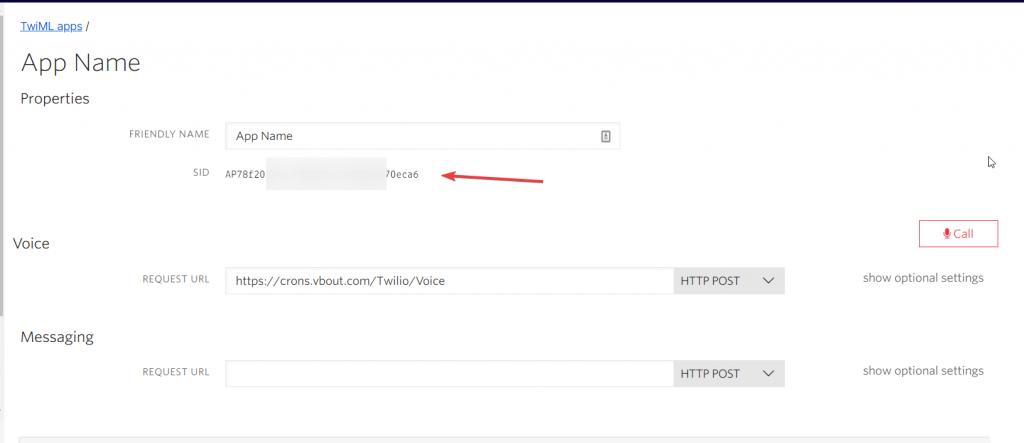
2-TwiML APP SID:

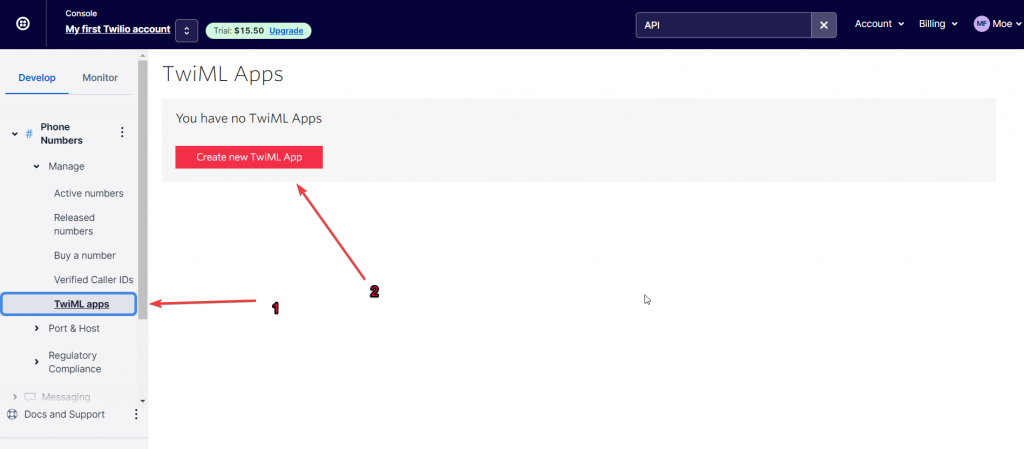
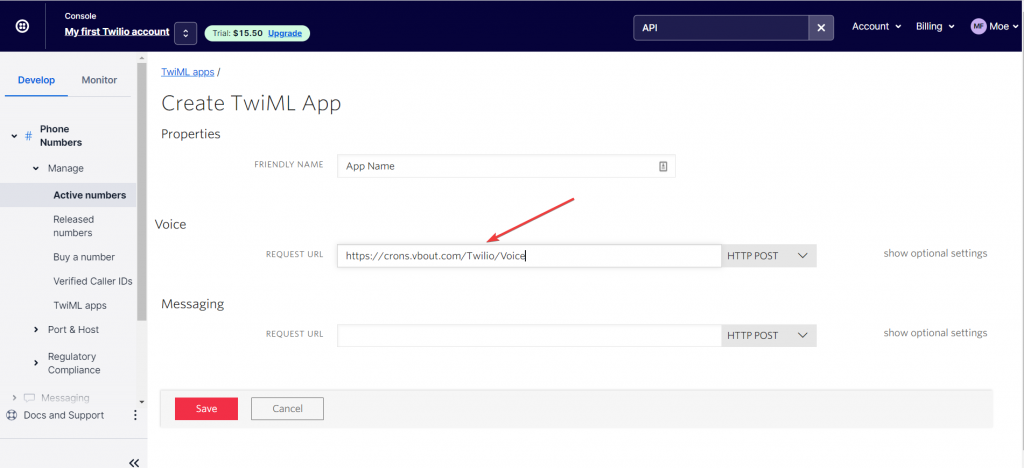
Create a new TwiML App.

Give the app a name and paste the webhook URL(https://crons.vbout.com/Twilio/Voice).

After saving changes the TwiML APP SID will show.

3-API Key/SID & API Secret

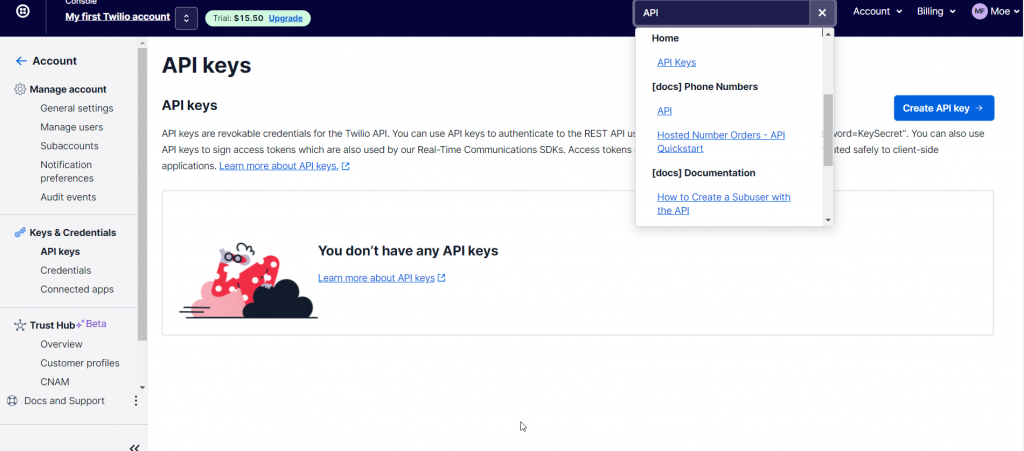
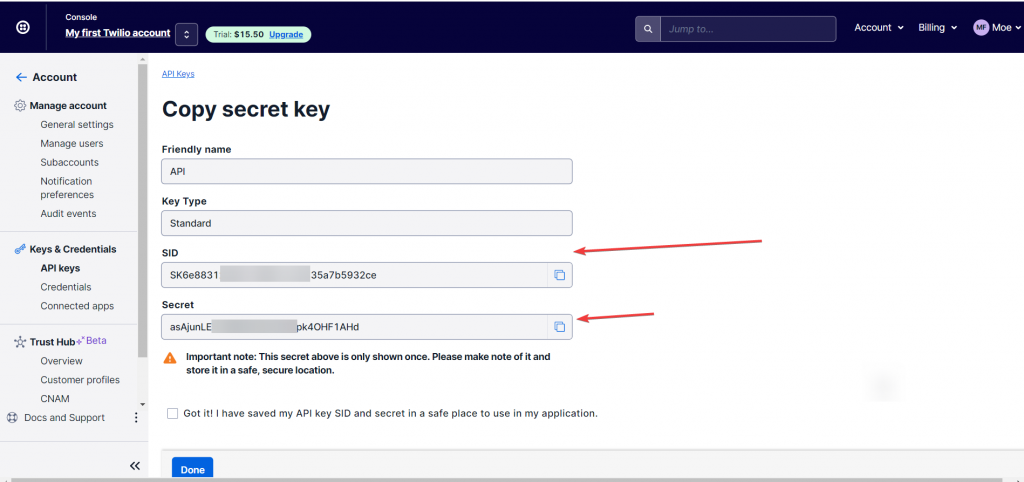
Search for API keys and create a new API key.

Make sure to save the API Secret in a safe place in order to use it later.

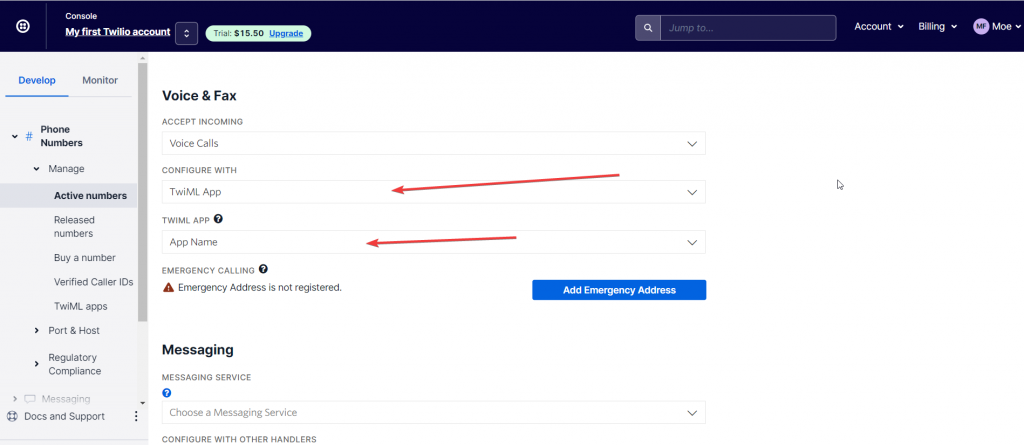
One last step before switching back to VBOUT is to assign the TwiML APP to the active phone number.

Get Started

InvoiceBerry integration using Zapier

You can sync your data in InvoiceBerry to your VBOUT account using Zapier by following the below steps:

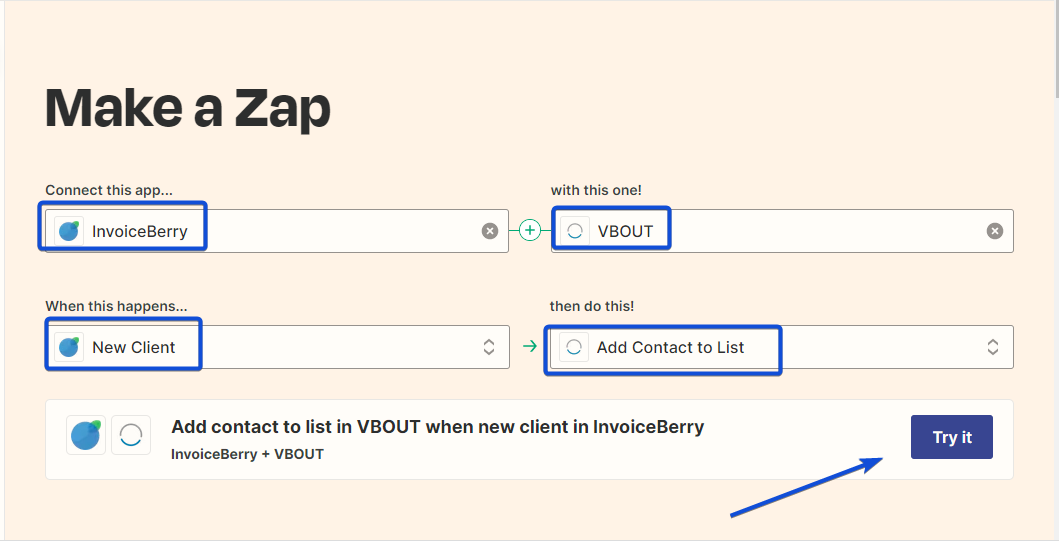
In Zapier, start creating your Zap by choosing to connect InvoiceBerry to VBOUT.

As a trigger, you can choose when a New Client is added in InvoiceBerry, to Add this Contact to a List in VBOUT.

Finally, create the Zap.

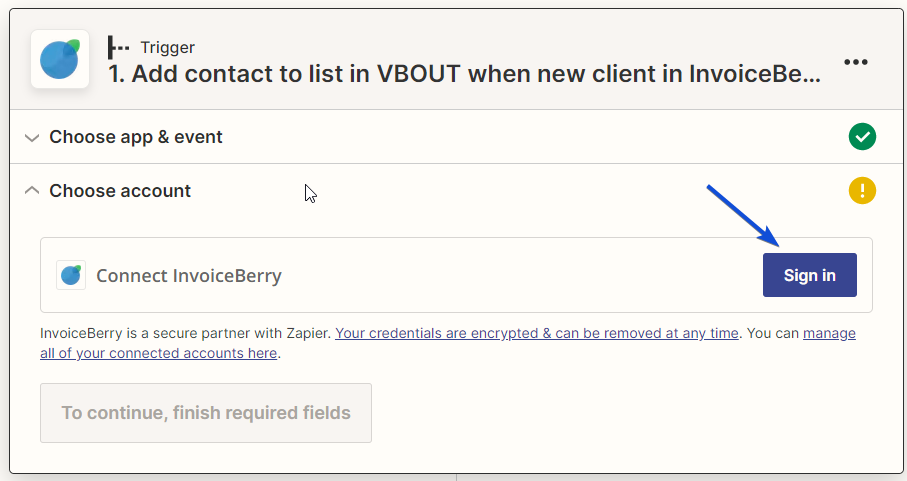
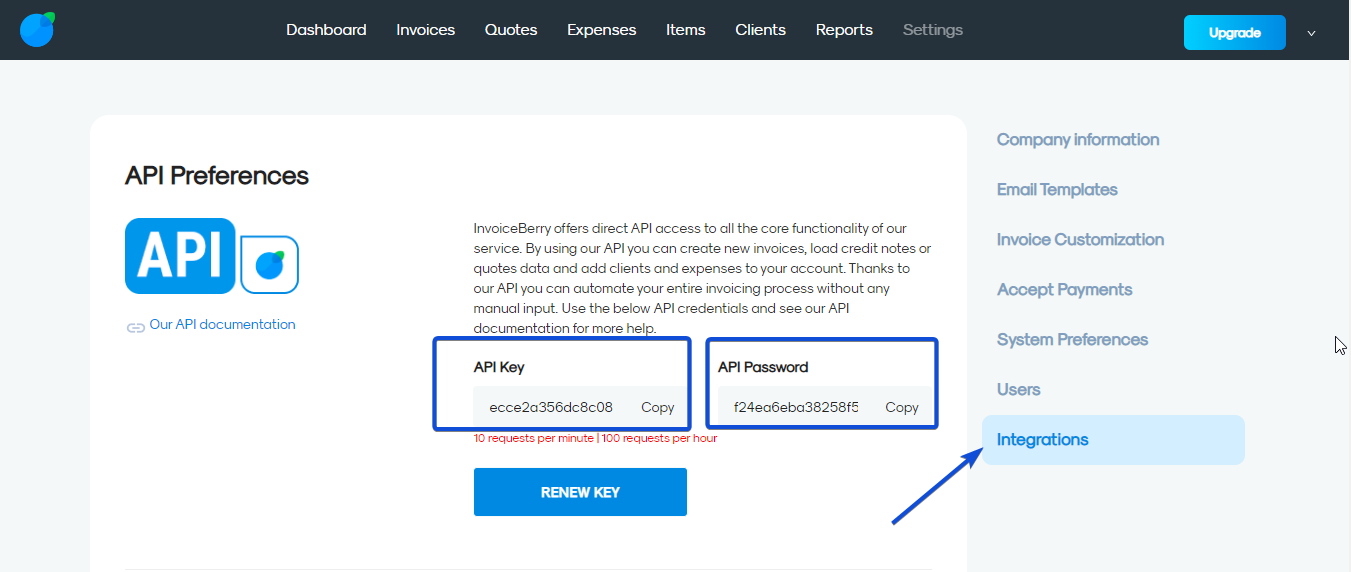
In the trigger setup, you need to connect your InvoiceBerry account by adding the API key and password.

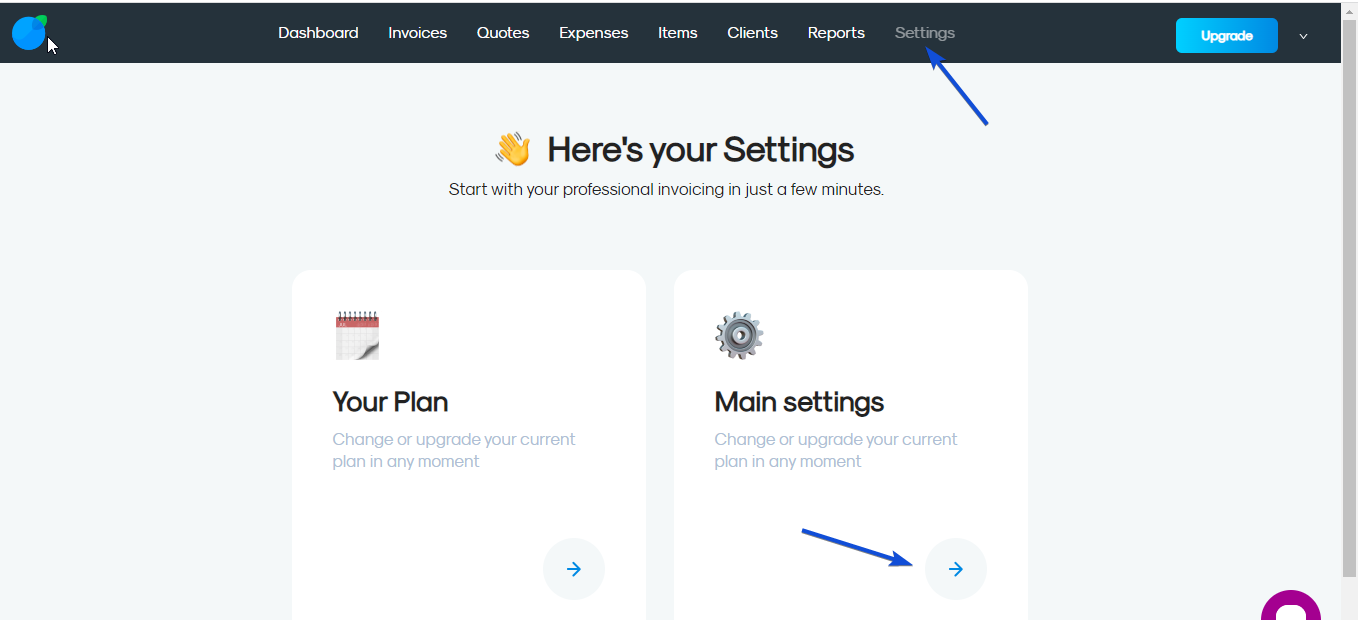
You can find your API key and Password in InvoiceBerry by going to Settings -> Main settings.

From the Integrations tab, copy your API key and password and paste them in Zapier

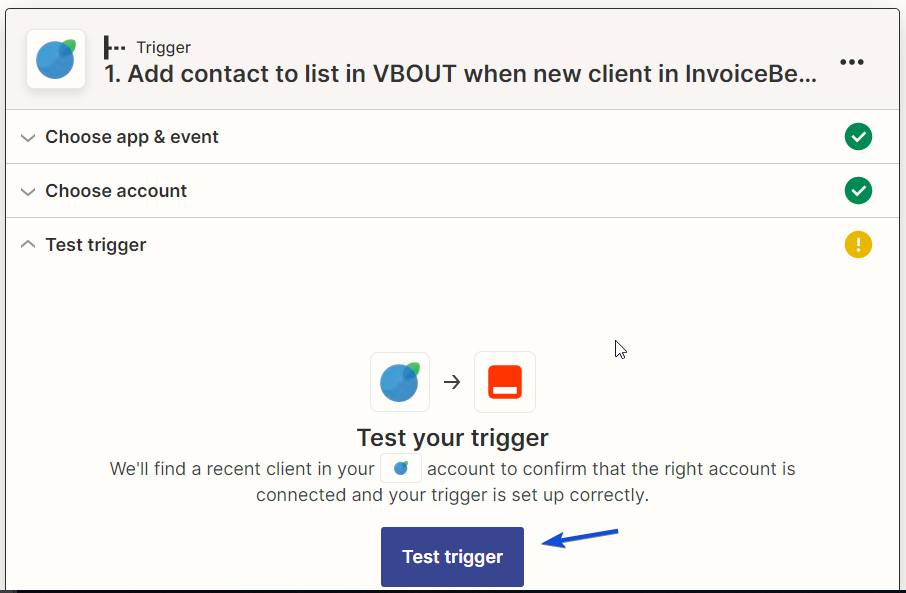
Once done, you are ready to test your trigger.

When the test is successful, data from InvoiceBerry is displayed.

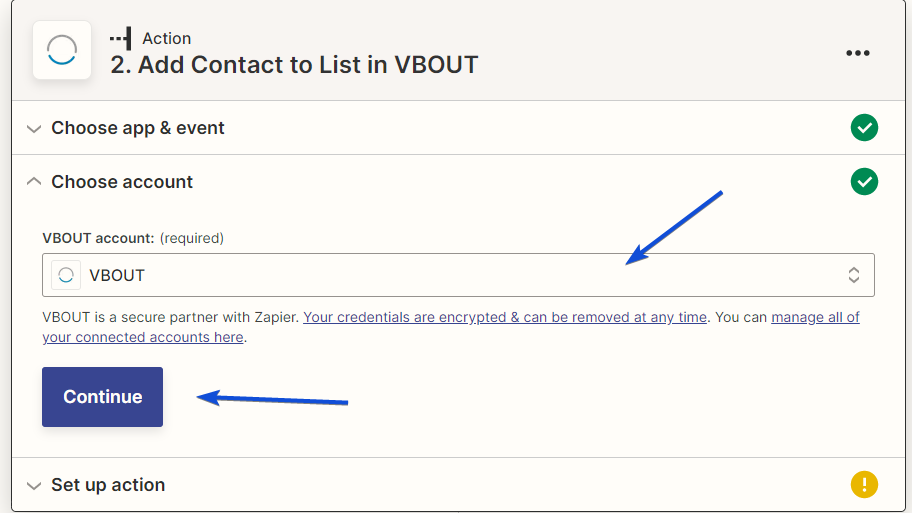
Next, you need to set up your VBOUT action.

To connect your VBOUT account, you can find your API key from Settings -> API integration.

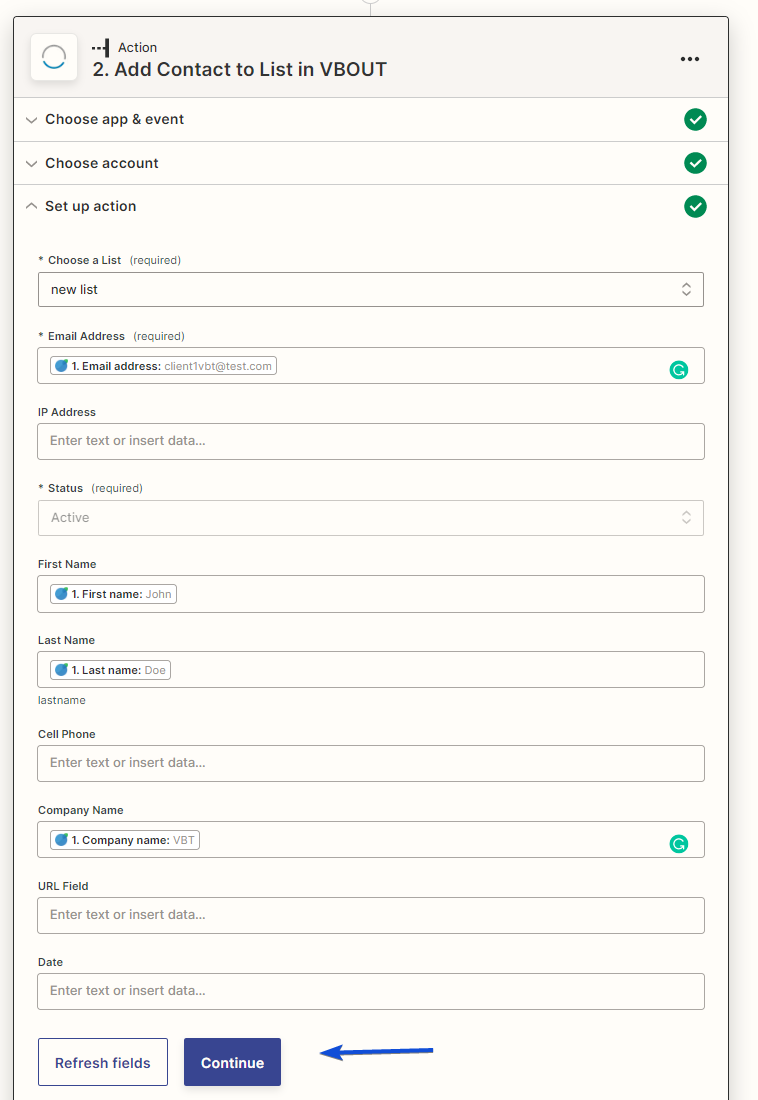
Once connected, choose a list in VBOUT and map your fields.

Then, test your action.

When the test is completed successfully, your contact should be added to your VBOUT list.

Finally, publish your Zap.

Get Started

How to get your emails out of promotional inbox

You need to know that there is no guarantee whatsoever that your emails will be removed from the promotional tab, but below you can find some tips based on best practices:

1- When people opt-in to your list, send them a welcome email and ask them to kindly remove you from the spam or promotional tab to the main inbox.

2- Try a basic simple HTML format instead of a fully designed HTML email.

3- Rename your Unsubscribe and Preferences labels from the footer of your email for example you can use “Please remove” or “Click here to opt-out”.

4- Use proper segmentation between those who open and engage with your email and those who don’t, you should probably send them emails less frequently or suppress them from your list.


Get Started

Smart Quiz Builder integration

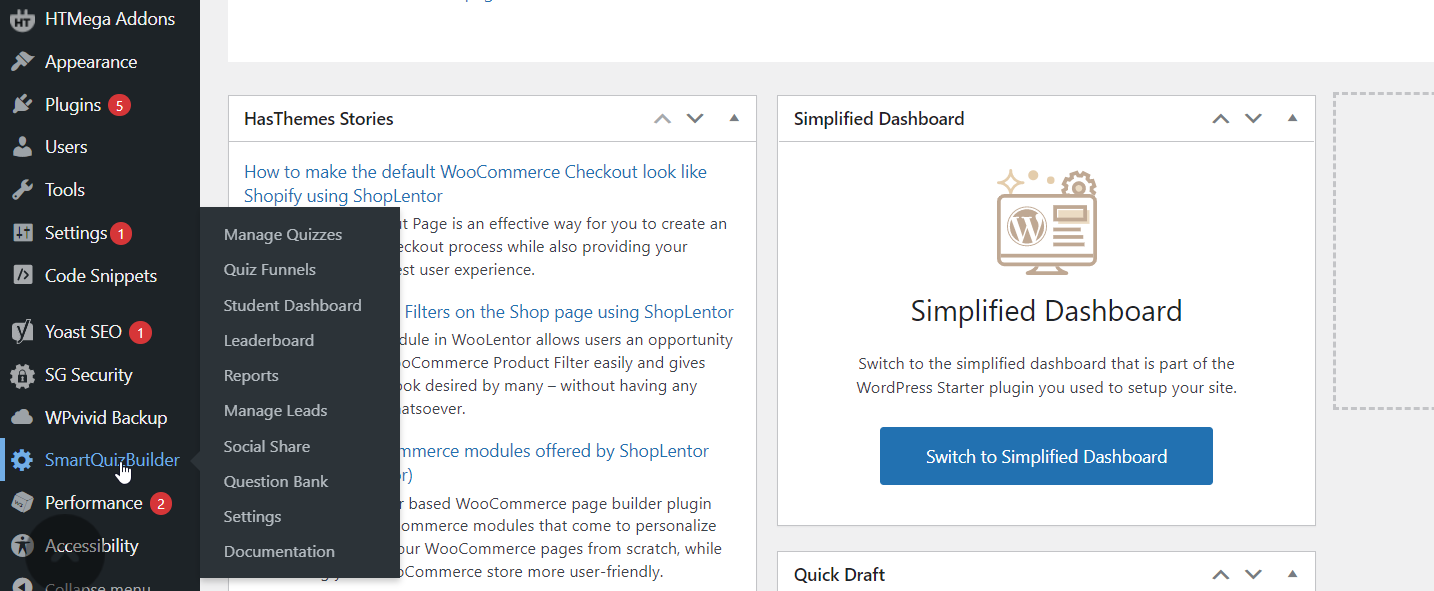
The first step to create a quiz using the Smart Quiz Builder is to install its plugin.

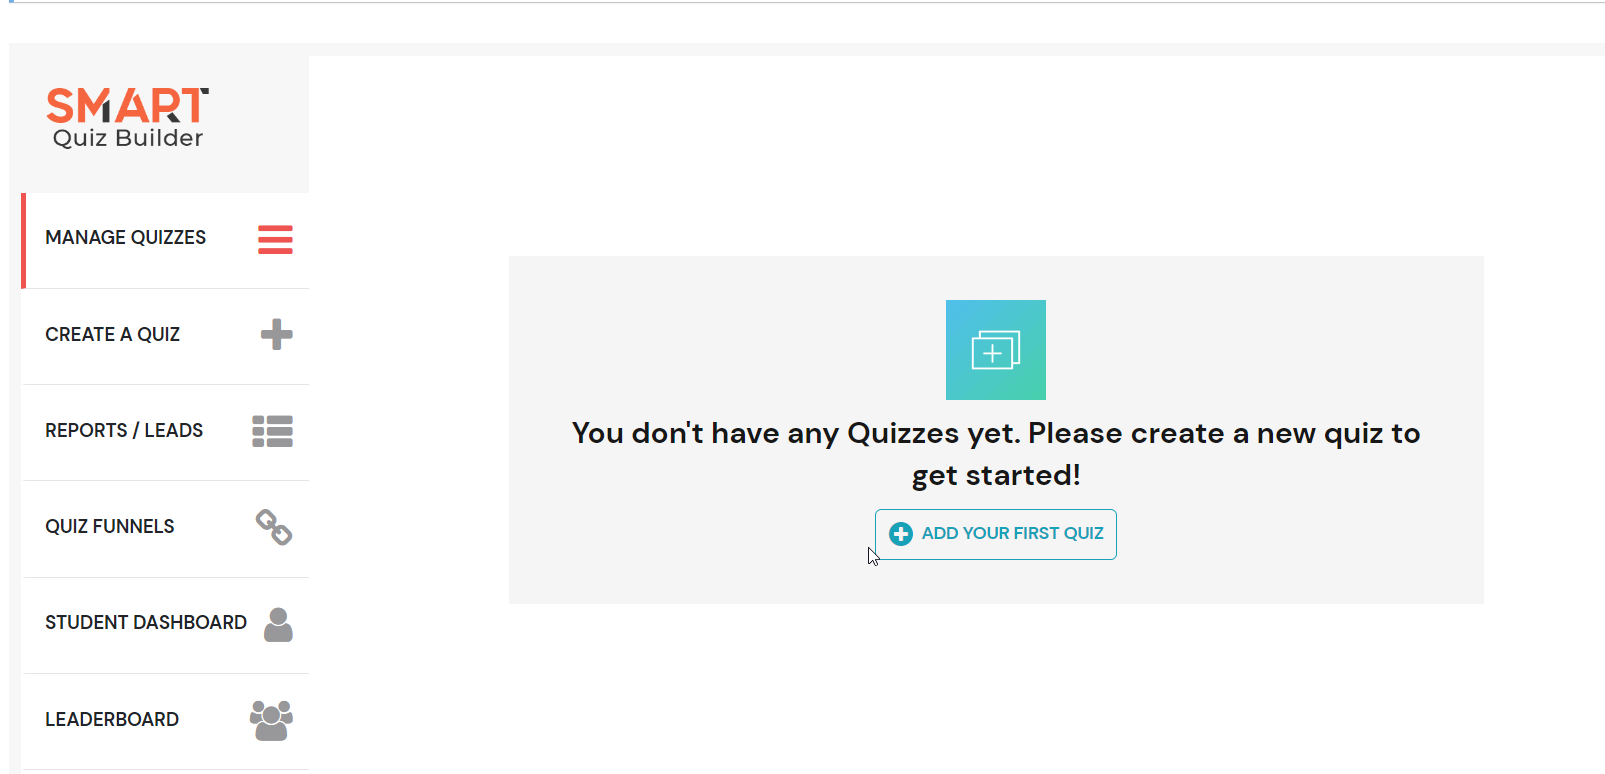
Once you have the plugin installed, click on Manage Quizzes.

Next, click on Create a Quiz

You need to choose how you will build your quiz: Create from Scratch or Use a Pre-build Quiz Template or Import Quiz.

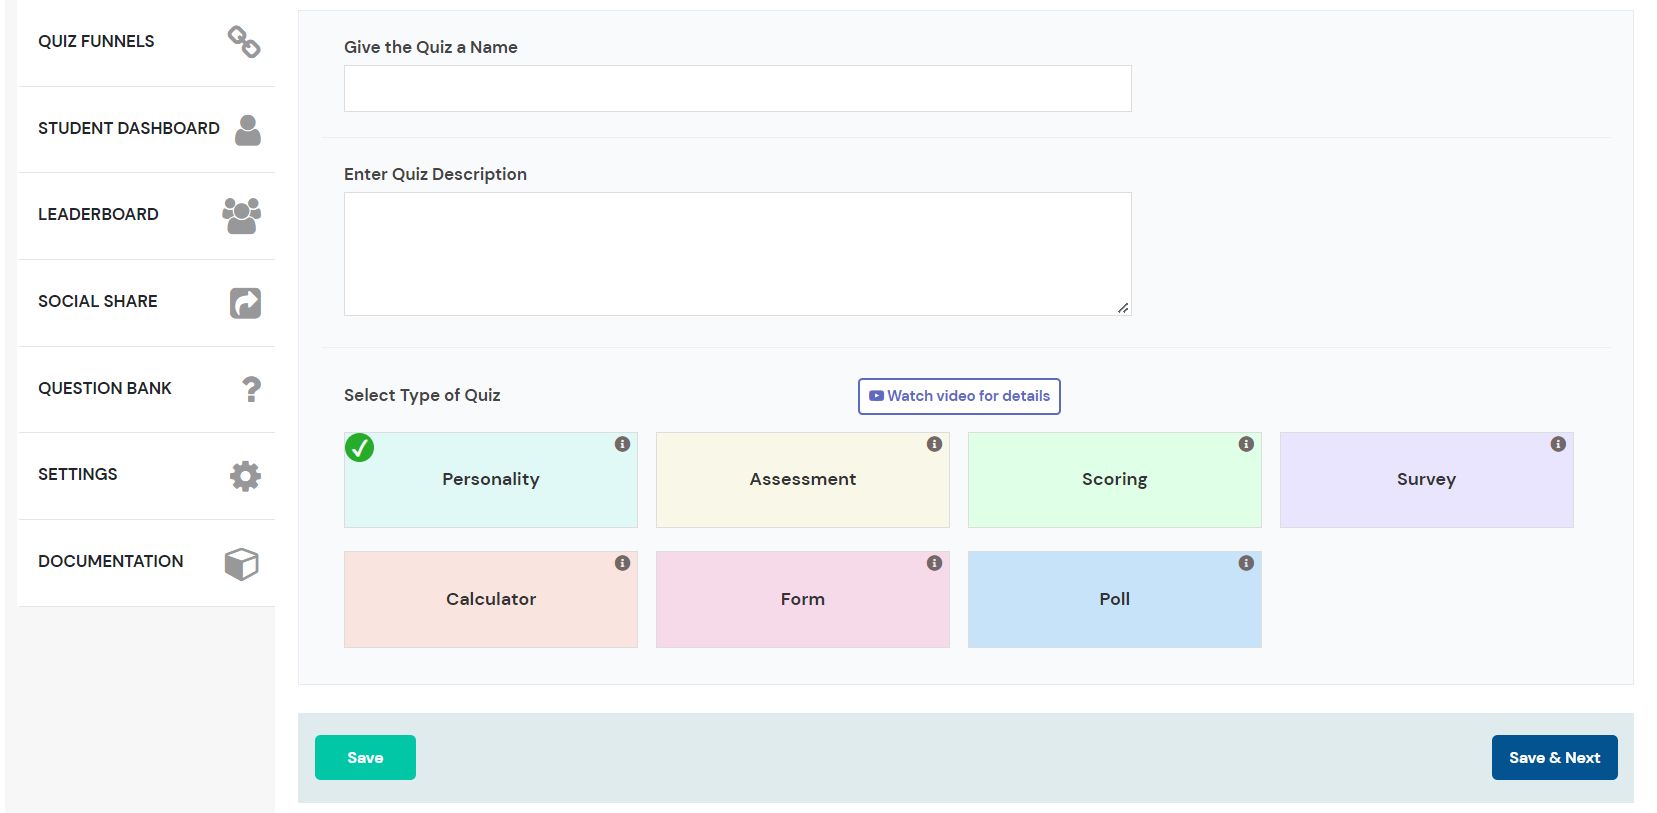
Enter your quiz basic settings: give it a name, a description and a type.

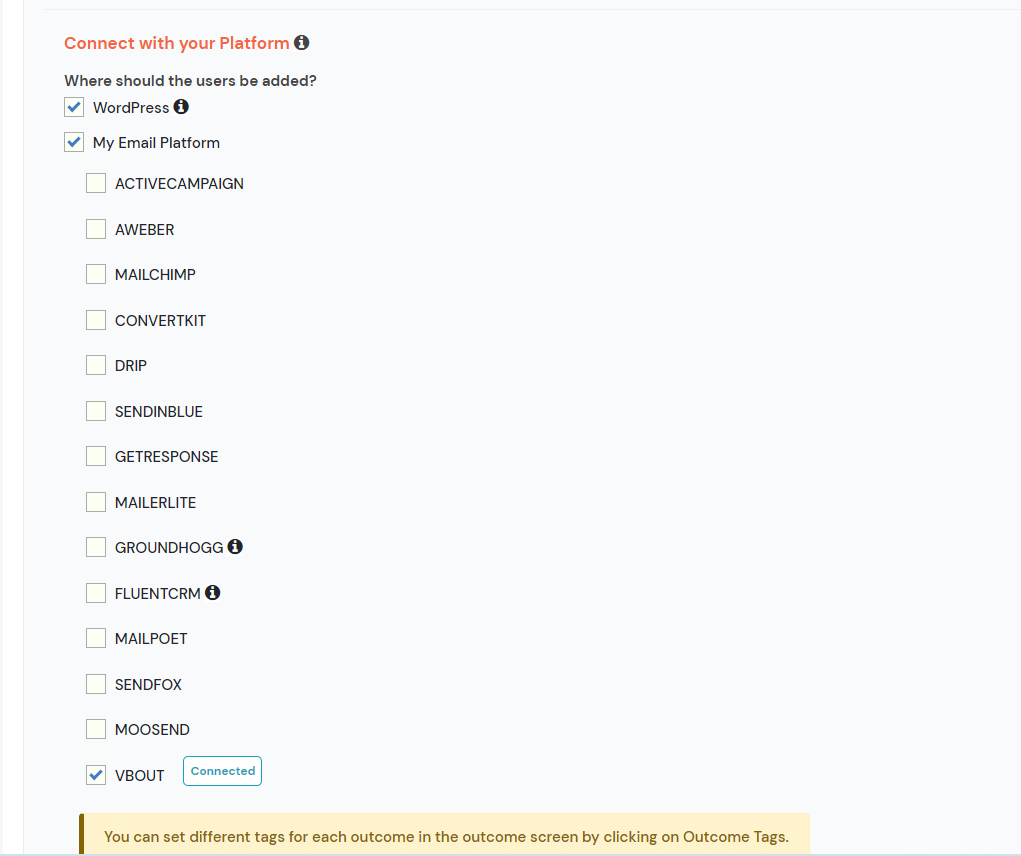
Then, choose to connect with VBOUT, you need to add your API Key.

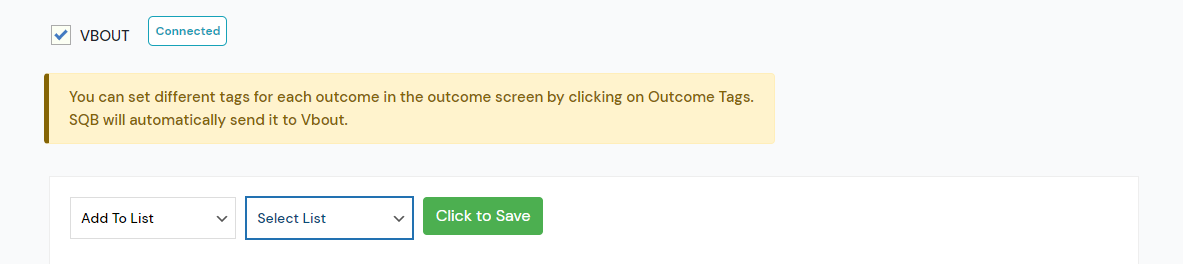
Once connected, choose a list from your lists in VBOUT to sync the quiz data.

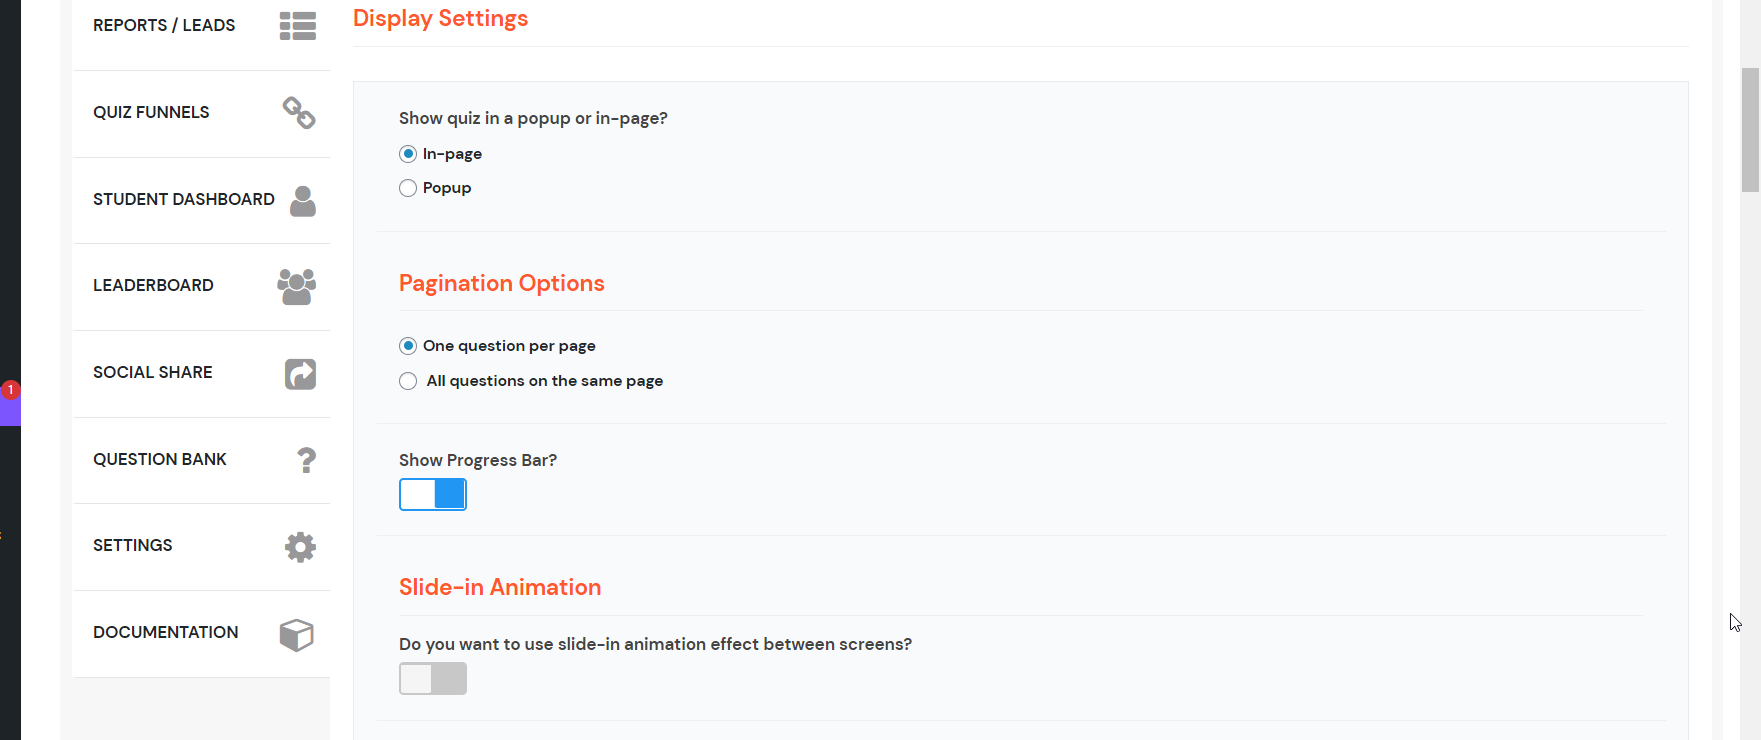
Change the quiz Display settings.

Also, you can customize the design of the quiz.

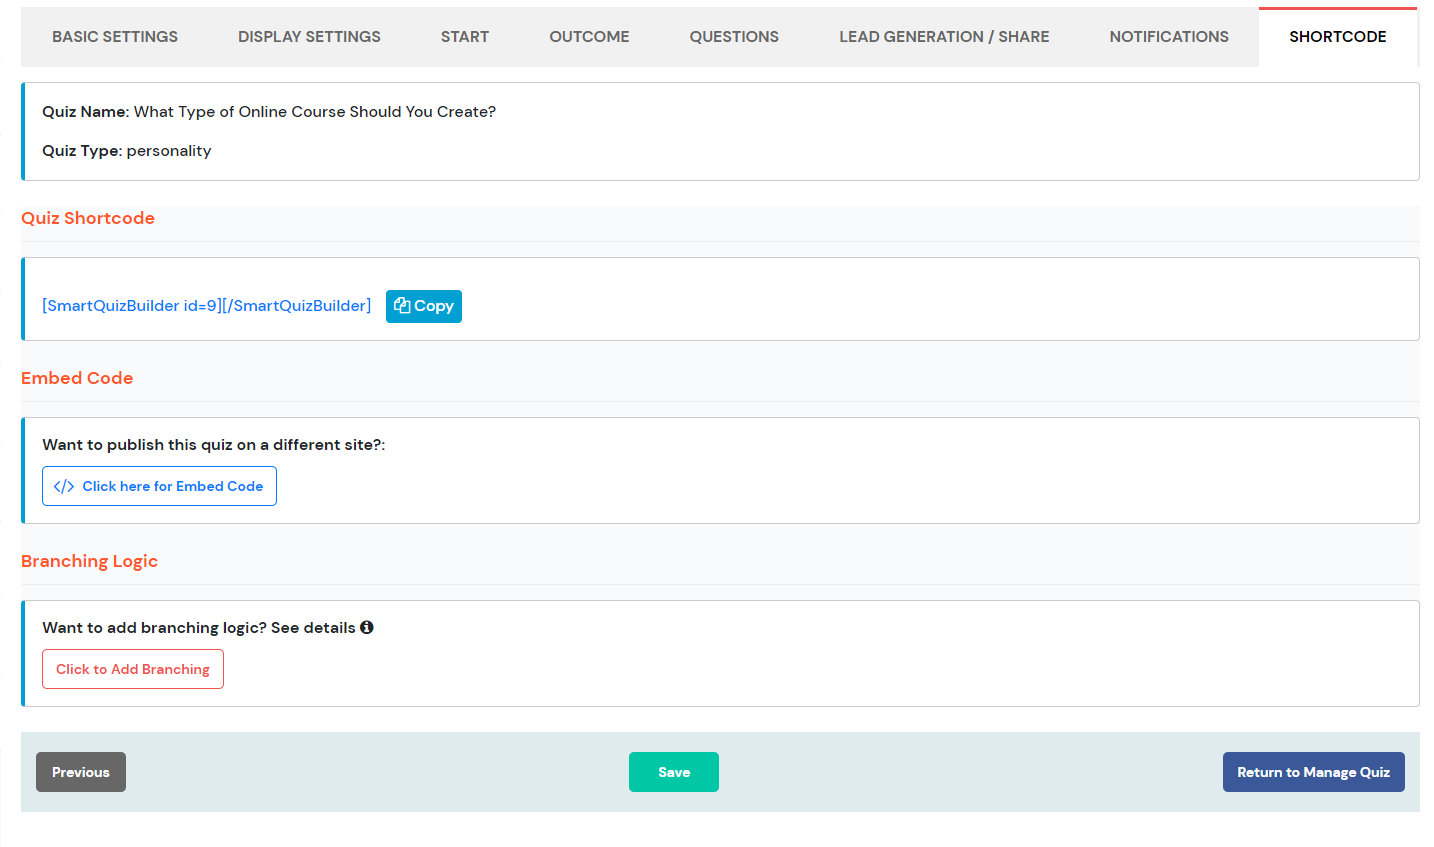
Finally, copy the Quiz Shortcode and paste it on any page on your Website.

Get Started

Round Robin

If you have connected multiple calendar accounts, you can select and use several calendars when creating your booking page.

Connect Your Calendar Accounts

Before creating a booking page, ensure that all your calendar accounts are connected.

Creating a booking page

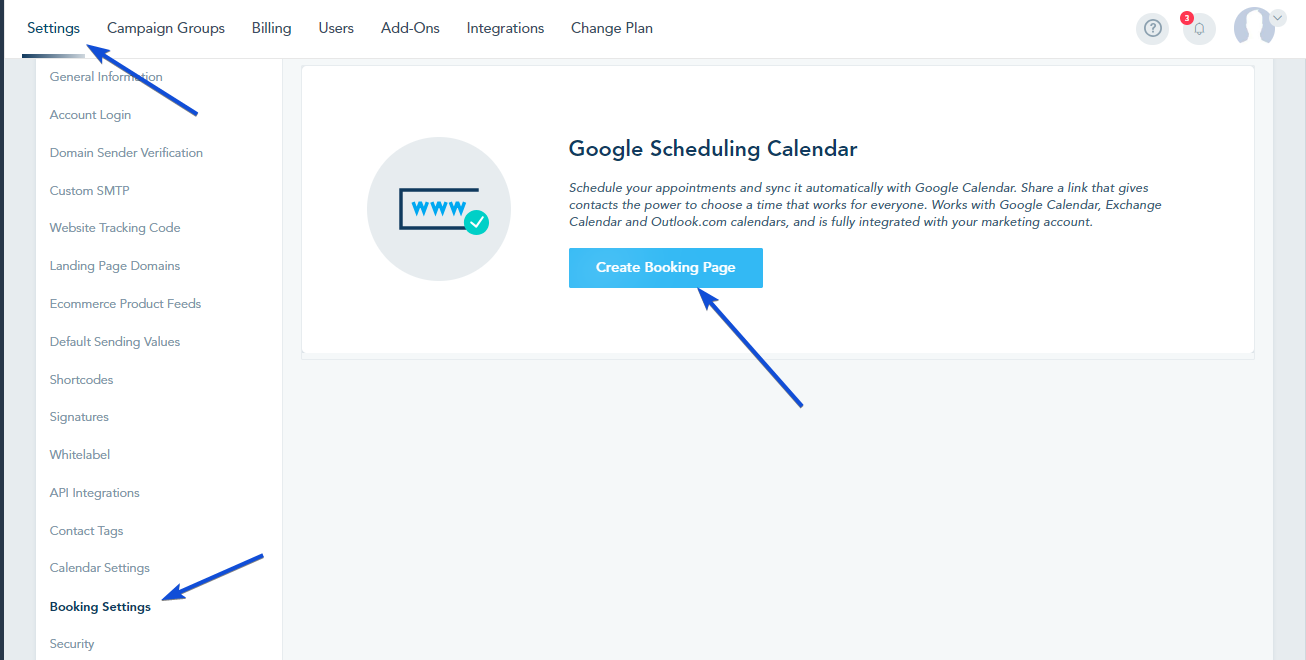
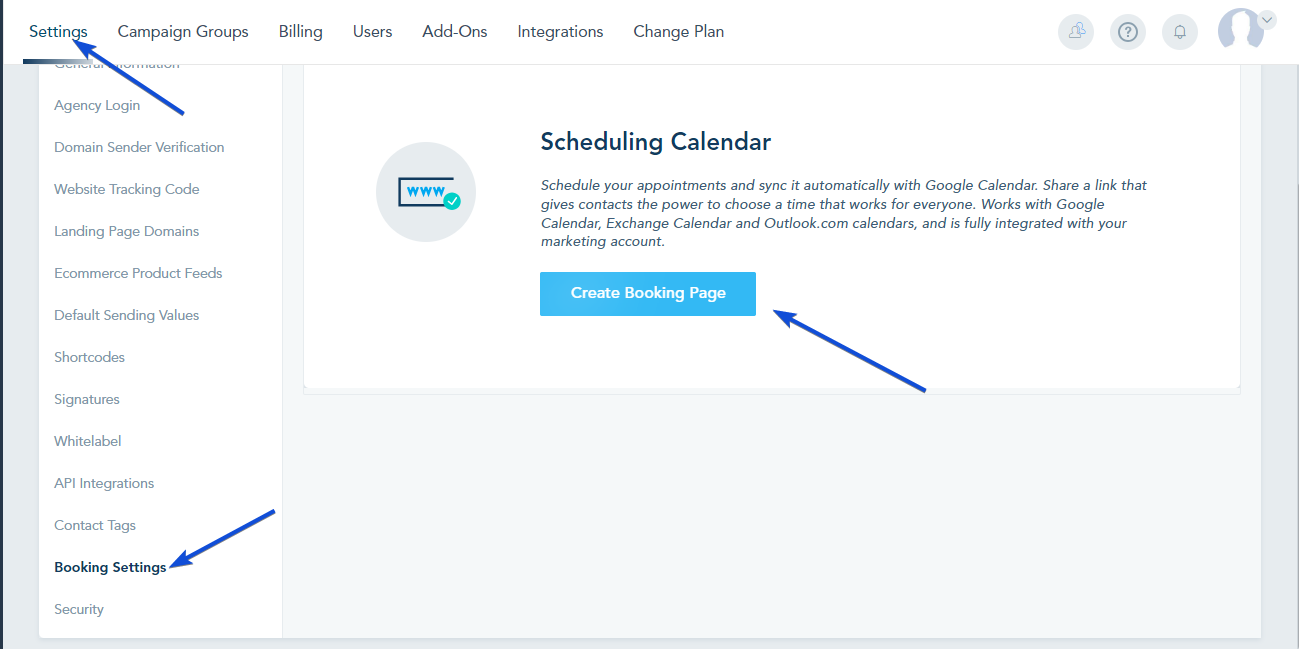
Go to Settings -> Booking Settings -> Create Booking Page.

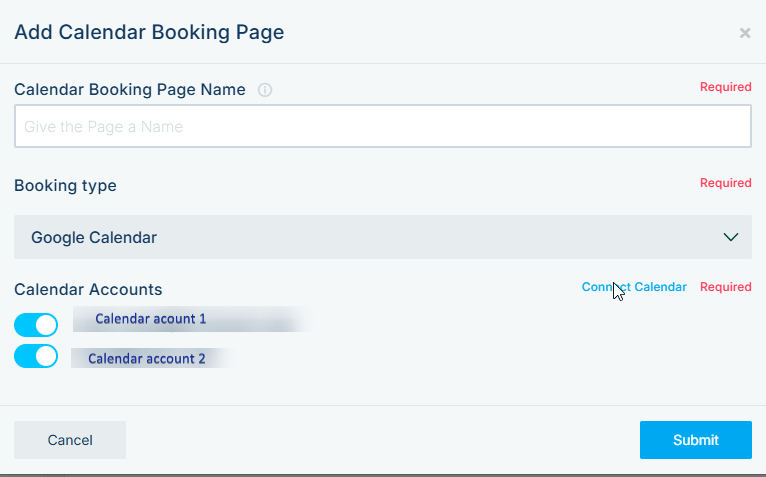
Select:

  • Booking Type
  • Calendar Accounts you want to use
  • Enter a name for your booking page.
  • Click Submit to open the booking settings.

Once you click Submit, the settings will open.

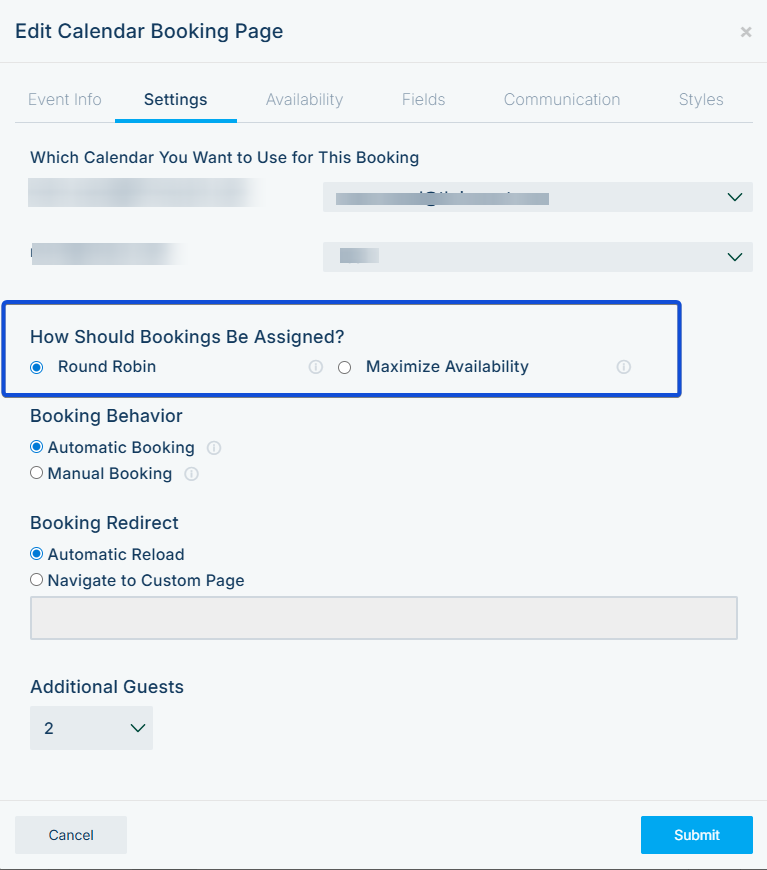
In the Settings tab, choose how bookings should be distributed across your selected calendars:

Assignment Options

  • Round Robin
    Each connected calendar receives an equal number of bookings.
  • Maximize Availability
    Meetings are booked based on availability, meaning some calendars may receive more bookings than others.

Once you have completed your calendar settings, click on Submit to save your settings.

Check this link for more details on how to create your booking page.

Get Started

WiserNotify integration

In order to sync your contacts in VBOUT to WiserNotify,  please follow the below steps:

In WiserNotify platform:

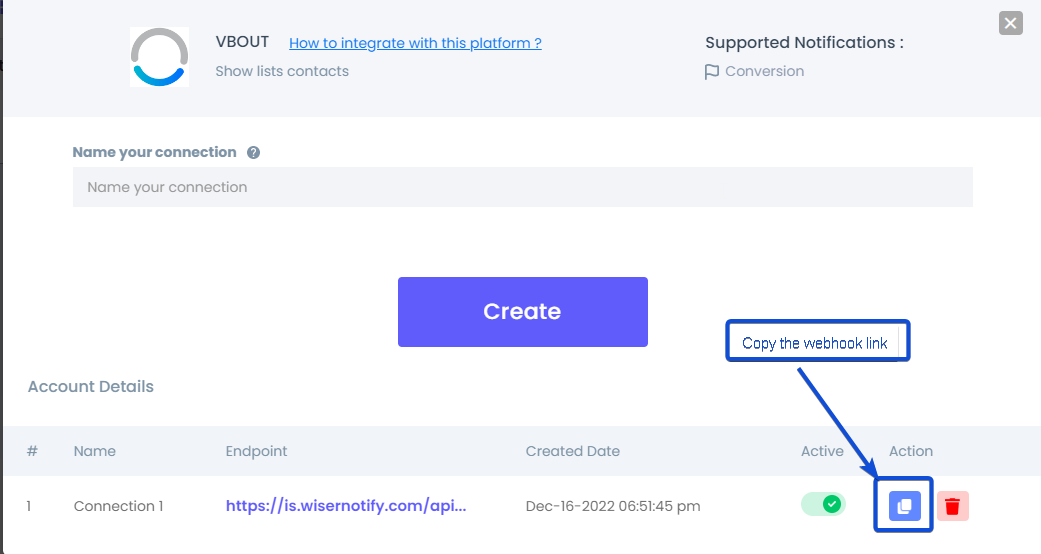
Go to Integration tab, search for VBOUT app and click on Connect.

Give your connection a name and click on Create.

Once the connection is created, copy the Webhook link.

In your VBOUT account:

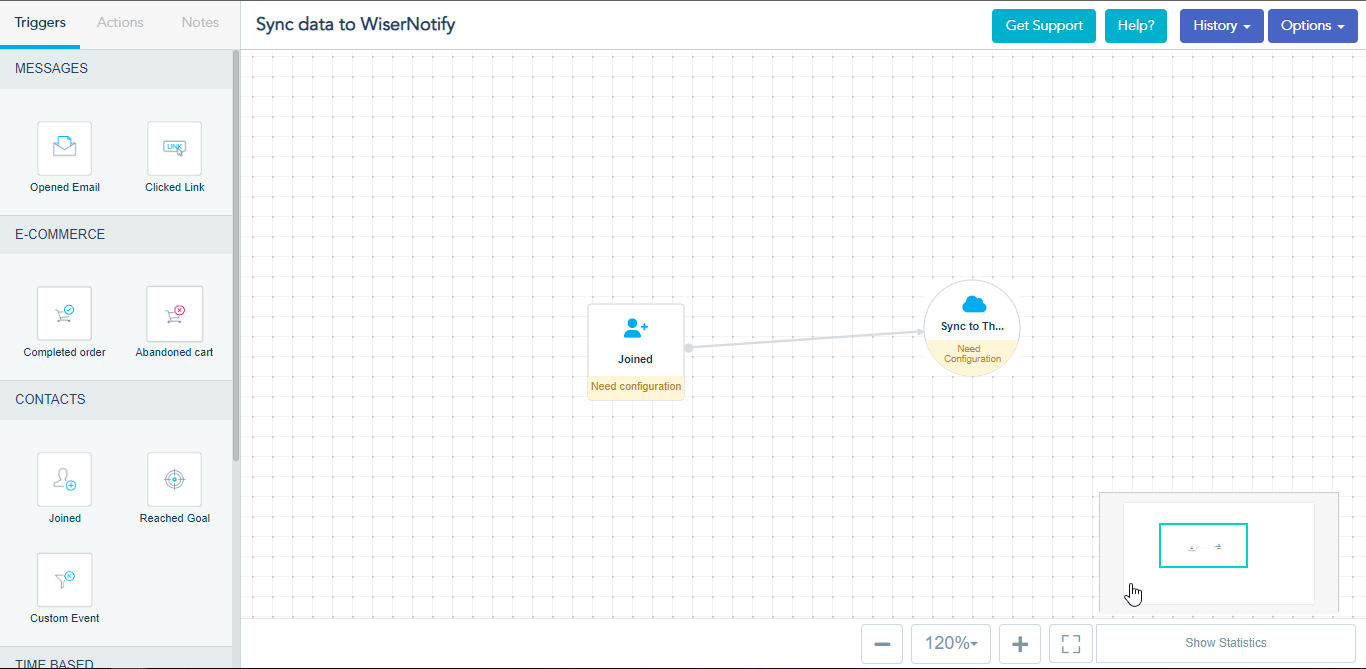
Create an automation by going to the Automation tab -> Your Automations – > Create Automation.

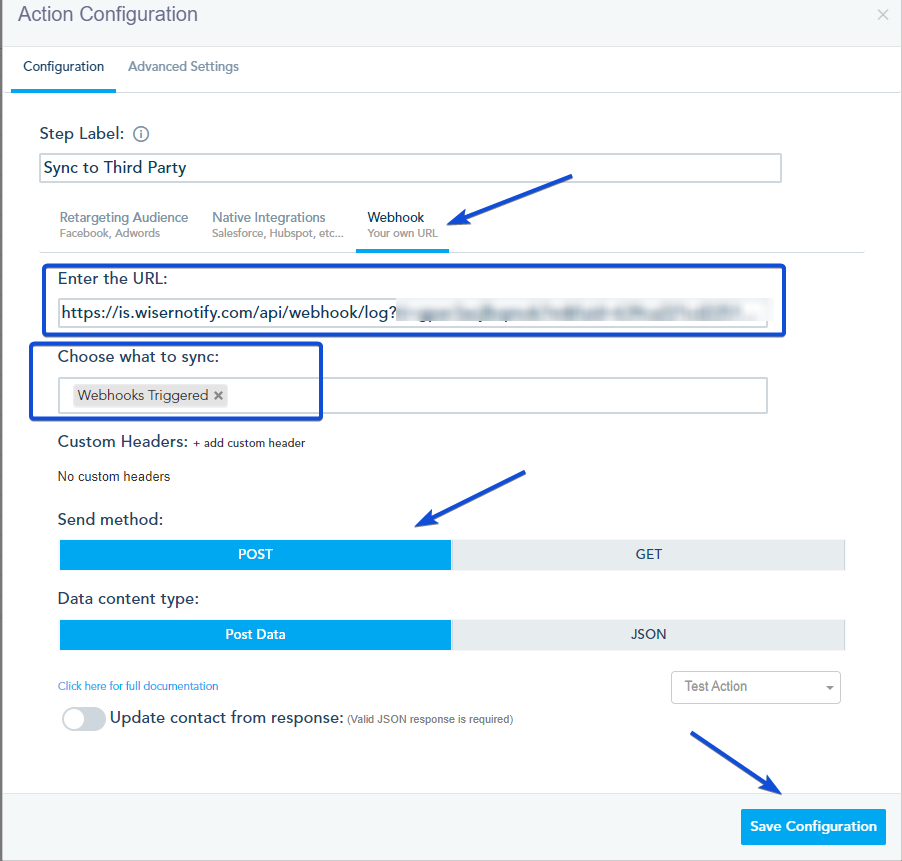
Choose the Joined trigger and link it to Sync to third-party Action.

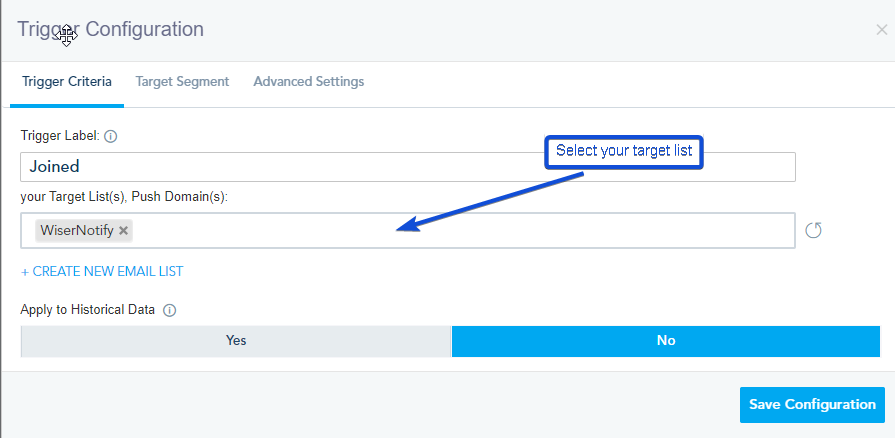
In the trigger configuration, choose your target list.

In the Action configuration:

  • Choose the Webhook option.
  • In “enter the URL”, paste the WiserNotify webhook link.
  • In “choose what to sync”, select Webhooks Triggered.
  • Choose Post as send method.

And finally, click on Save Configuration.

Save and publish the automation.

After the automation is completed, you can check your result in the WiserNotify dashboard.

Get Started

Email Subject Line Analyzer

A tool that analyzes email subject characteristics and suggests best practices to lets you get a higher open rate.

Characteristics

Case type

  • Can be any of these types: Title, Sentence, Lower, Upper, Unknown.
  • Subject line with Title case performs best where major words are capitalized, and most minor words are lowercase (ex: Get an All-in-one, Powerful and Easy-to-use Marketing Automation Platform).
  • The worst type is the Upper case where all letters are capitalized.

Words count

  • Subject word count includes emoji that is represented as 1 word and without considering shortcode.
  • Subject lines with a word count of around 5 words perform best.
  • The worst word count is 15 and higher.

Characters count

  • Subject characters count includes emoji counted as 2 characters and without considering shortcode.
  • Subject lines with a character count of around 20 perform best.
  • The worst characters’ count is 50 and higher.

Good words

  • These are words that increase your chance to get your email opened.
  • Subjects with 1-3 good words perform best.
  • Subjects with no good words might decrease your email open rate.
  • Examples of good words: top stories, important, thanks, better, great deals, remember, congratulations, event, update, last chance, promotional, new, holiday, on sale now, special, celebrate, soon, exclusive, available, bulletin.

Bad words

  • These are words that decrease your chance to get your email opened.
  • Subjects with no bad words perform best.
  • Subjects with a bad word count higher than 3 perform worst.
  • Examples of bad words: unlimited, shopper, 100% free, new customers only, what’s keeping you? risk-free, you have been selected, great offer, registration, strong buy, brochure, invitation, special promotion, newsletter, attend.

Has emoji

  • Subjects with at least 1 emoji might increase your chance to get your email opened since most marketers don’t use emojis in their subject.

Has number

  • Subjects with at least 1 number might increase your chance to get your email opened.

Emotional Trigger words

  • These are words that usually emotionally trigger recipient attention and action.
  • Subjects with at least 1 emotional trigger word might increase your chance to get your email opened.
  • Examples of emotional Trigger words: deadline, offer, attractive, best-selling, wonderful, limited, download, affordable, empower, chance, reward, revealing, tremendous, thrilled.

Has shortcode

  • When a recipient sees his name within the subject line of your email, usually pay more attention to what you’ve got to say and that might increase your chance to get your email opened.

Examples

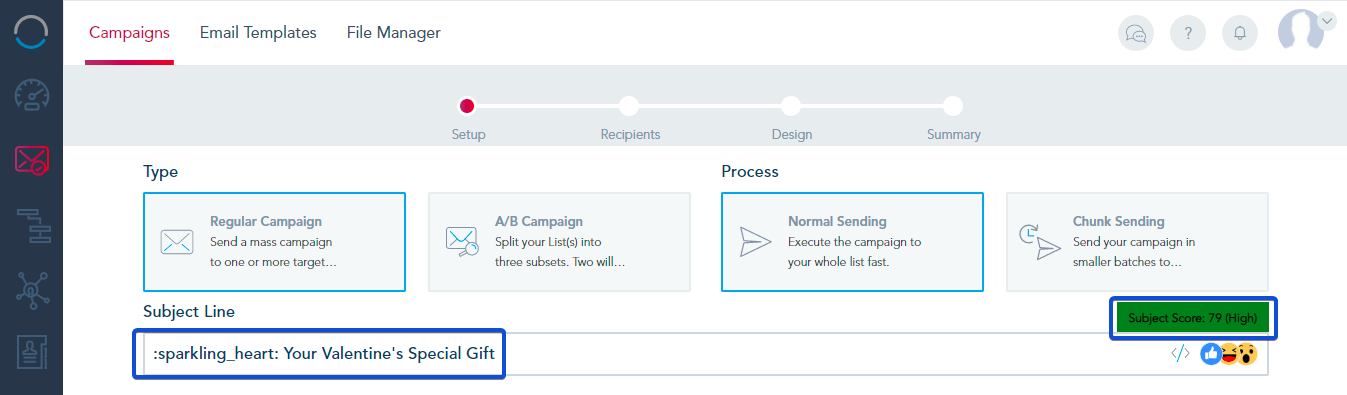
Subject #1

  • Case Type: Title
  • Words Count: 5
  • Characters Count: 32
  • Good Words Count: 2 (your, special)
  • Bad Words Count: 0
  • Has Emoji: Yes
  • Has Number: No
  • Has Shortcode: No
  • Has Trigger Words: 2 (gift, special)

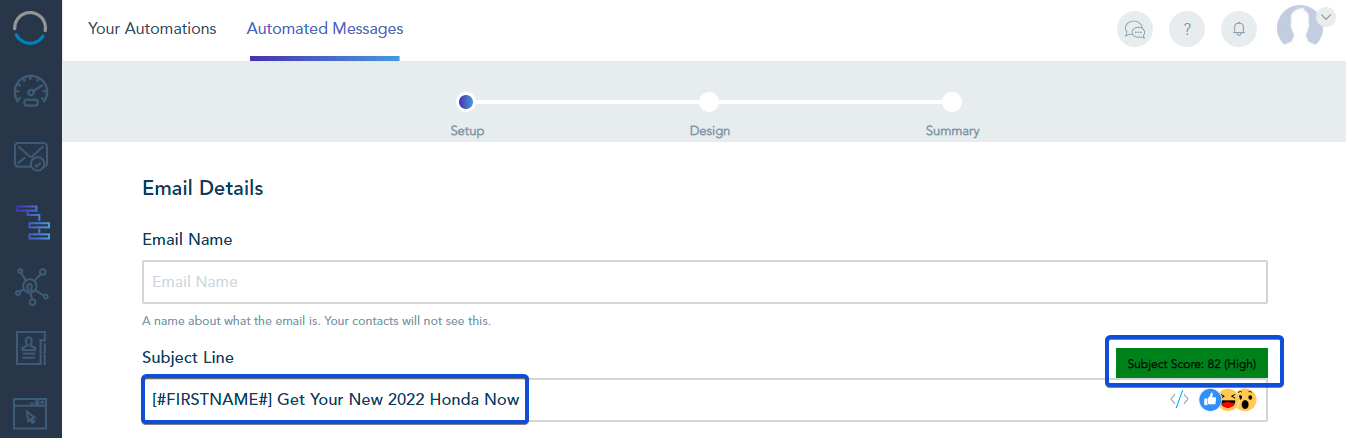
Subject #2

  • Case Type: Title
  • Words Count: 6
  • Characters Count: 28
  • Good Words Count: 2 (your, new)
  • Bad Words Count: 0
  • Has Emoji: No
  • Has Number: Yes
  • Has Shortcode: Yes
  • Has Trigger Words: 2 (new, now)

Get Started

How to use email Predictive Sending in Automation

Predictive sending is a sending process that will send emails at the time the recipients are more likely to open their emails.

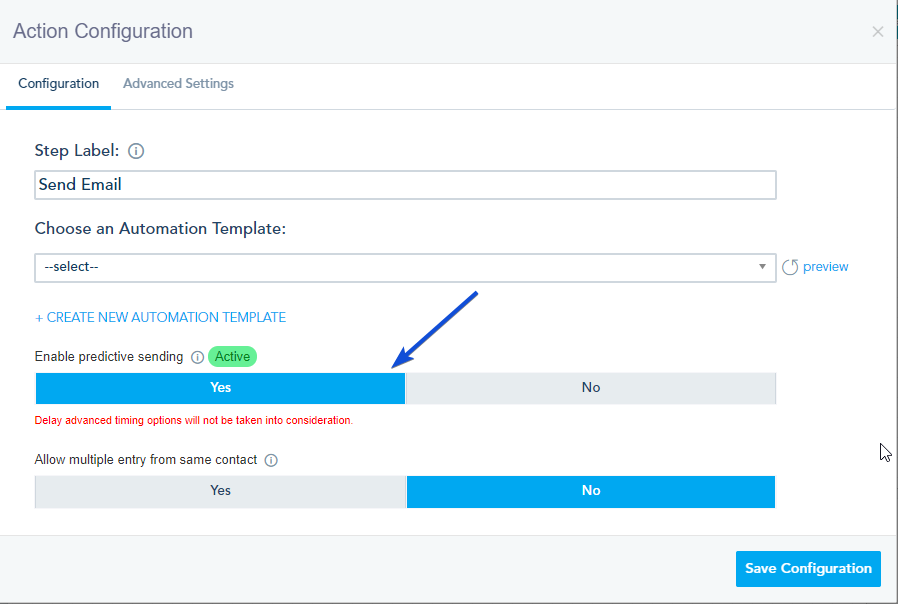
To use Predictive sending in your automation workflow, you need to enable it in each Send Email action you are adding.

The predictive sending time will be based on three factors:

  1. Contact: Check based on previous emails in case they are known contacts so in this case, we have the best sending day(s)/time(s) and the email will be sent based on it.
  2. Business Type: Check if the client business type is known, so in this case, we have the best sending day(s)/time(s) and the email will be sent based on it.
  3. Fallback: in case contact & business type are unknown,  the fallback concept is used where it contains the best sending day(s)/time(s) based on market research.

Please note that when activating Predictive sending, the delay advanced timing will not be taken into consideration when sending the email.

Get Started

How to create a Survey using Forms

To create a survey in the platform, you can create a form and use custom fields.

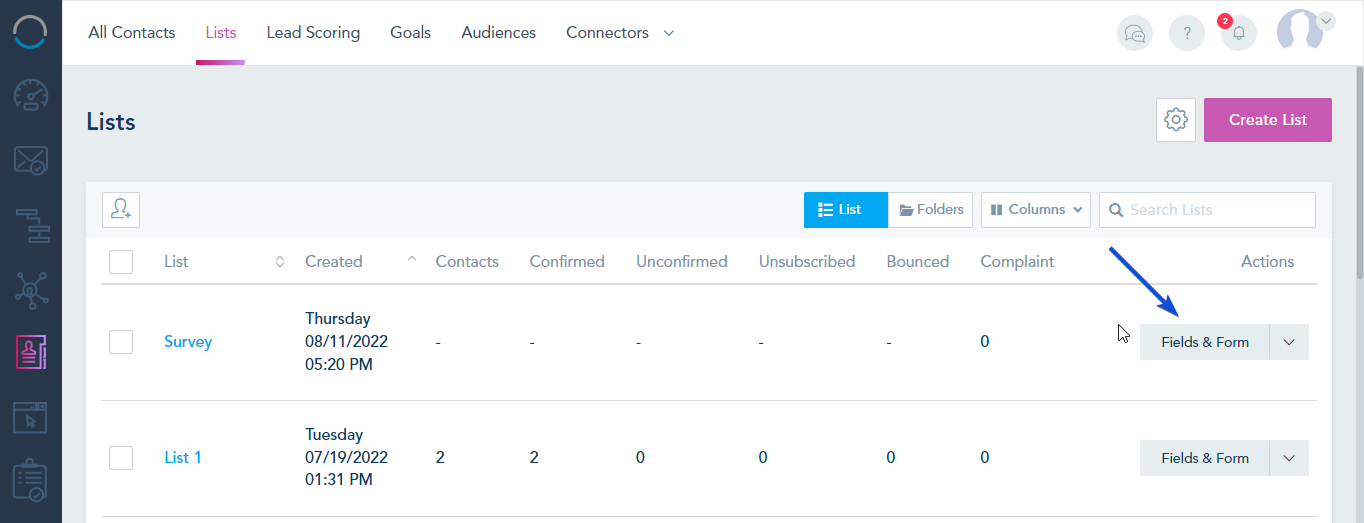
Go to Contacts -> Lists -> Create List.

After creating the list, go to Fields & Form to edit the form fields.

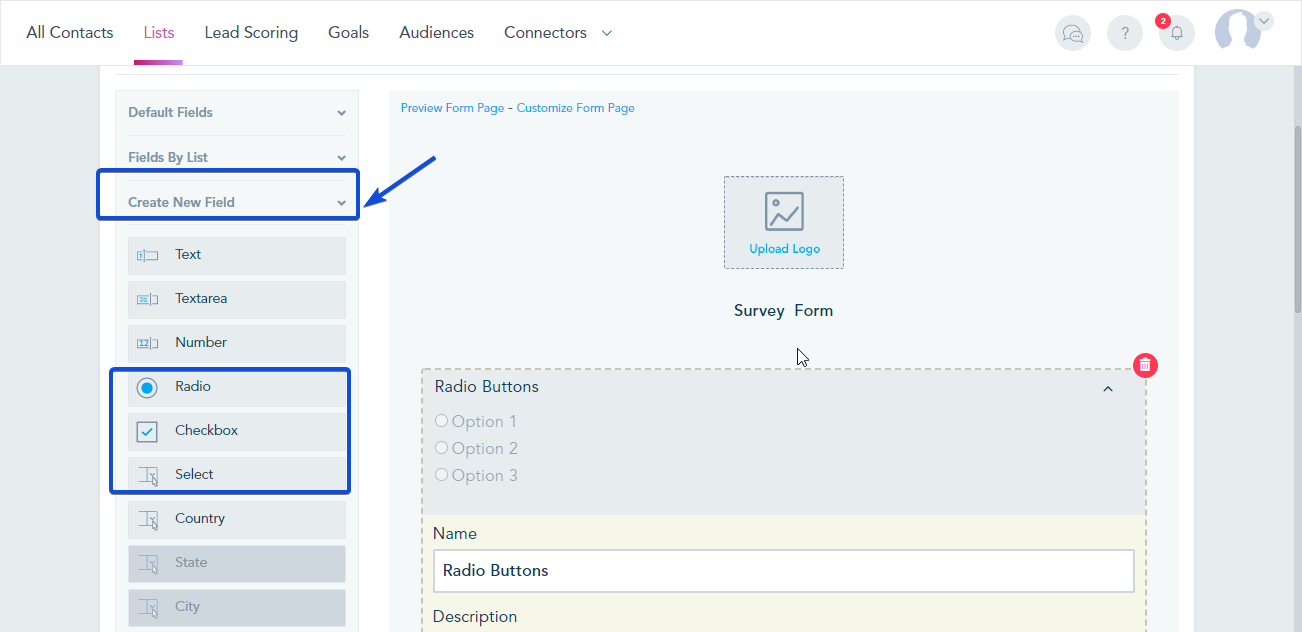
In your Form builder, create new custom fields (checkbox, radio, or select).

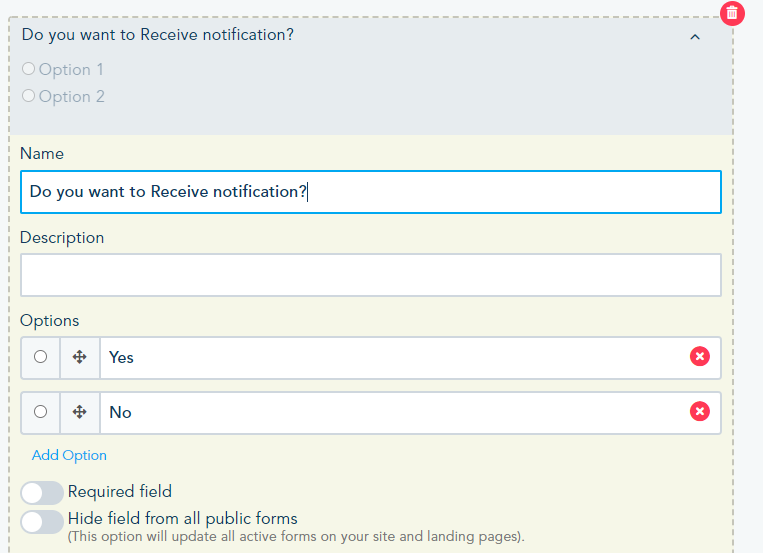
The survey question can be added in the Name Field section and the answers will be added in the options section.

In case you want the contact to choose only one answer, you can use the Radio field (For example True or False).

The Checkbox can be used in case multiple answers are allowed to be chosen.

In case, you have a long list of choices, you can use the Select field.

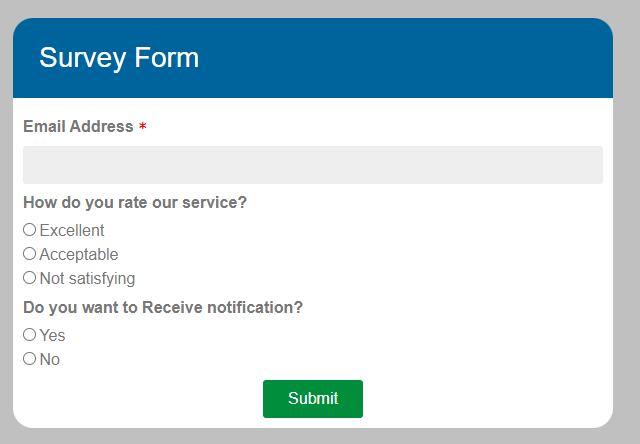
An example of the Survey/form preview:

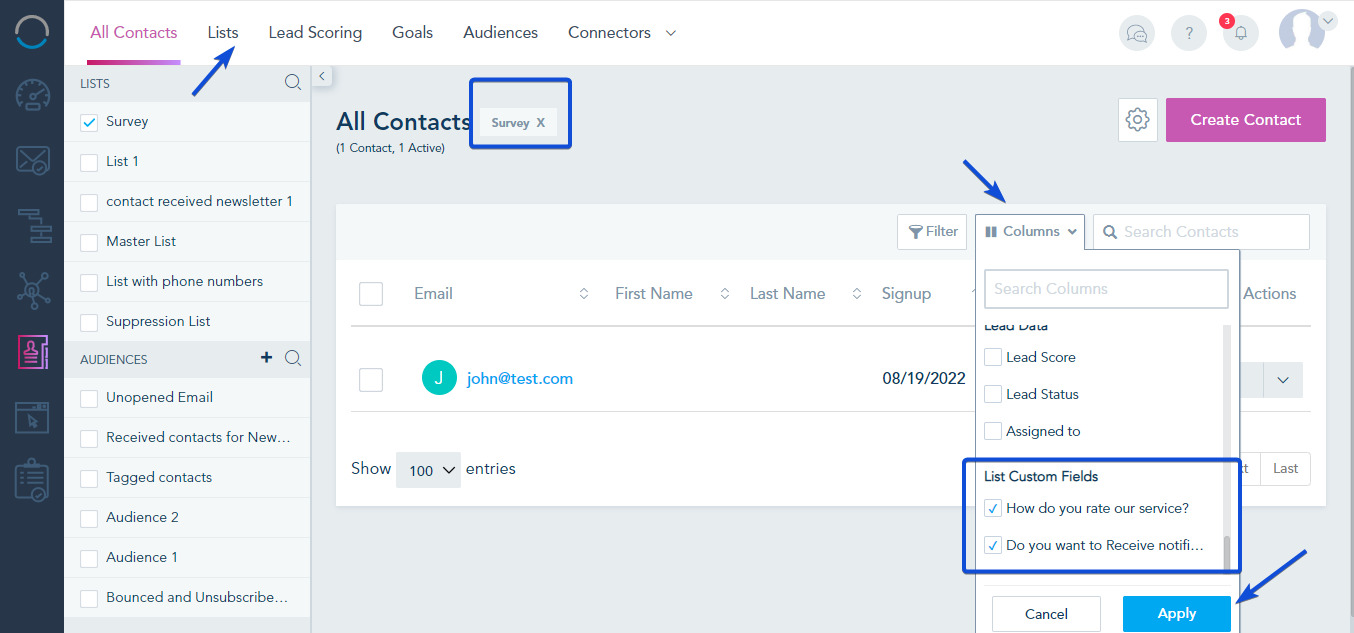
You can check the survey answers, by going  to Contacts -> Lists and opening your designated list.

From the Columns menu, you need to select the custom fields in order to display the contacts’ answers.

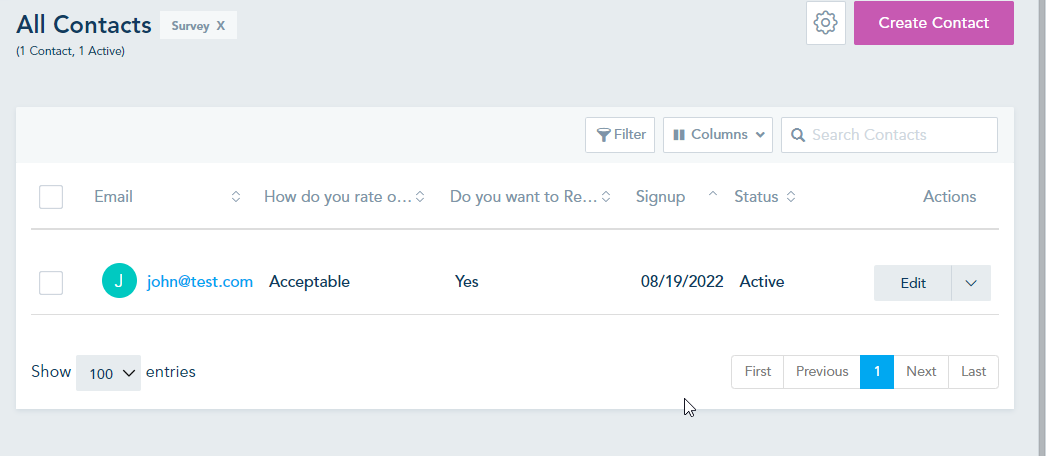
Once selected, you can check your contacts survey answers.

Get Started

How to remove Bounced and Unsubscribed Contacts

Please note that the platform already handles the suppression of bounced and unsubscribed contacts, so you don’t need to worry about removing them from your account. In fact we recommend keeping those contacts in your account to avoid re-opt-in the contacts in case they are uploaded again in your account.

To remove your bounced and unsubscribed contacts from the current list, please follow the below steps:

  1. Create an audience of bounced and unsubscribed contacts:
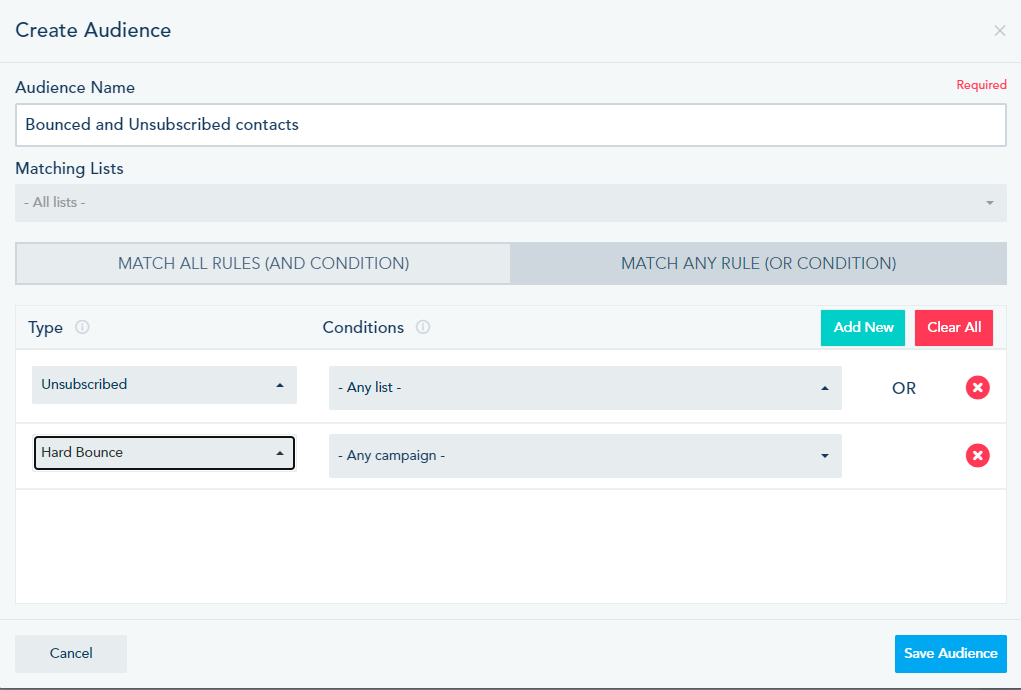
    From the Contacts tab -> Audiences – > Create Audience.Create a new audience, give it a name, choose All lists in the Matching Lists and add the condition for Unsubscribed and Hard bounce as displayed below.
    Note: Please make sure to choose Match any rule (OR) between the two conditions.
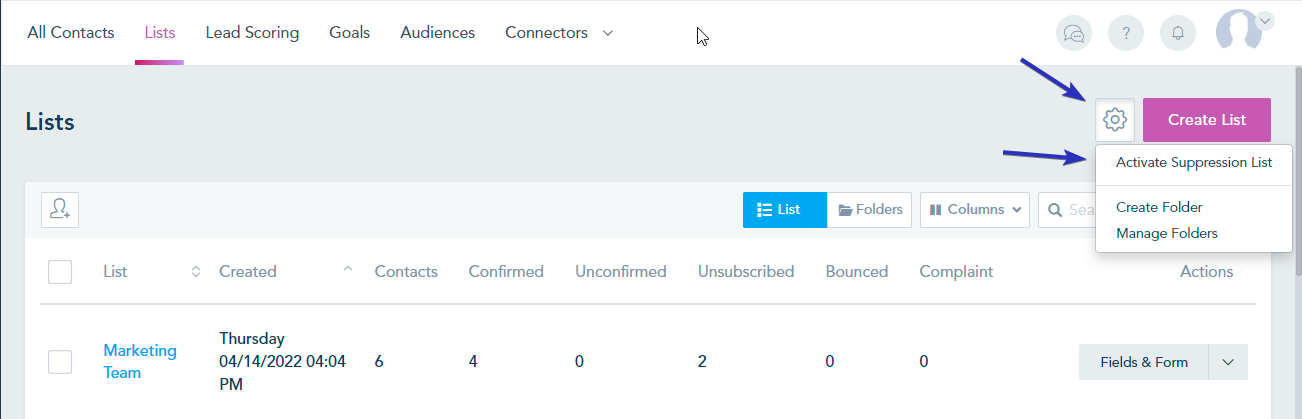
  2. Activate Suppression List:  in case you have not activated your suppression list.
    Go to Contacts -> Lists -> Activate Suppression List.
  3. Create an Automation to remove the contacts:
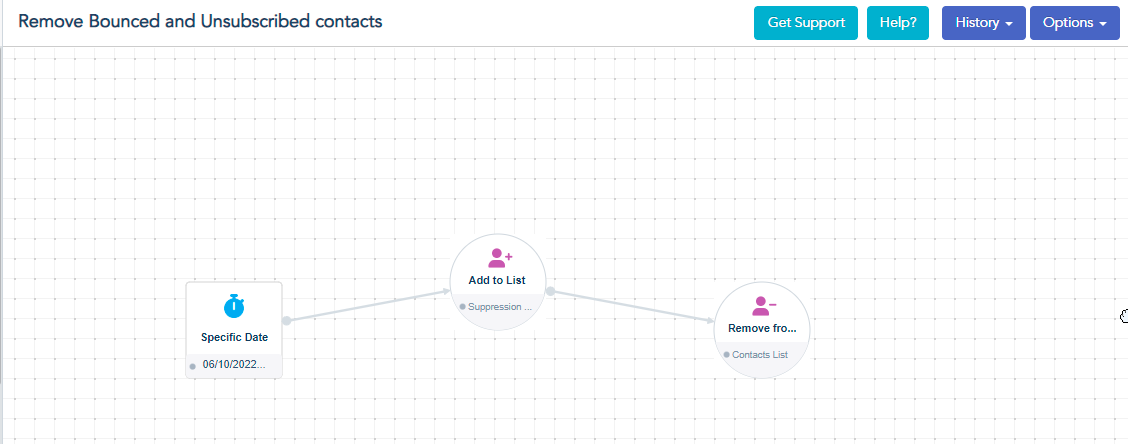
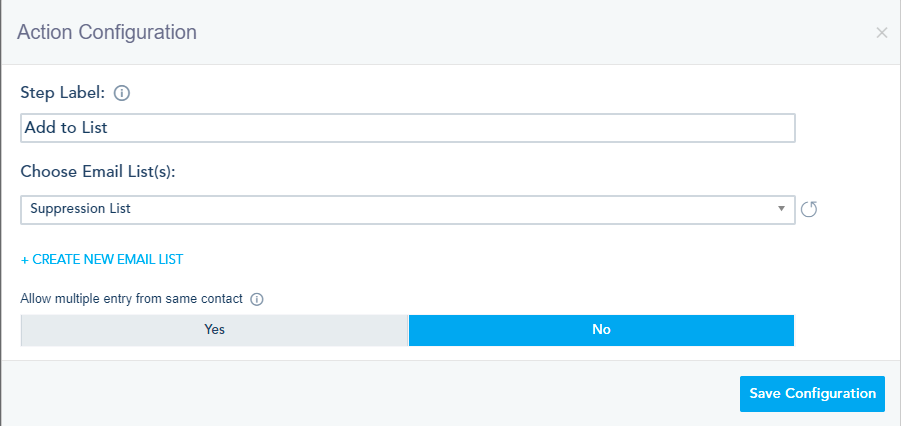
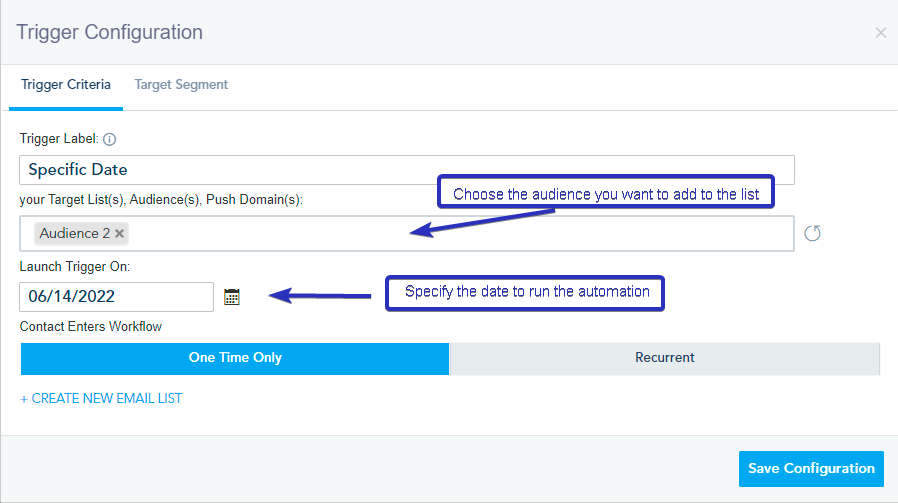
    From the Automation tab -> Your Automations – > Create Automation.To create the automation, choose the Specific Date trigger and setup your automation as per below:In the trigger configuration, choose the audience created, a date to launch the automation and choose to run it recurrently on a daily basis.In the Add to list Action Configuration, choose Suppression List.

    In the Remove From List Action configuration, choose the list to remove the contacts from.

    Save the automation and publish it.
    After the automation is completed, the contacts will be removed from the chosen list.


Get Started

How to add an Audience to a List

You can add your audience to a list using Automation.
From the Automation tab -> Your Automations – > Create Automation.

To create the automation, choose the Specific Date trigger and link it to Add to list Action.

In the trigger configuration, choose the audience you want to add to the list and a date to launch the automation.

In the Action configuration, choose the list you want to add your audience to.

Save the automation and publish it.
After the automation is completed, the contacts will be added to the chosen list.

Get Started

API APPs management

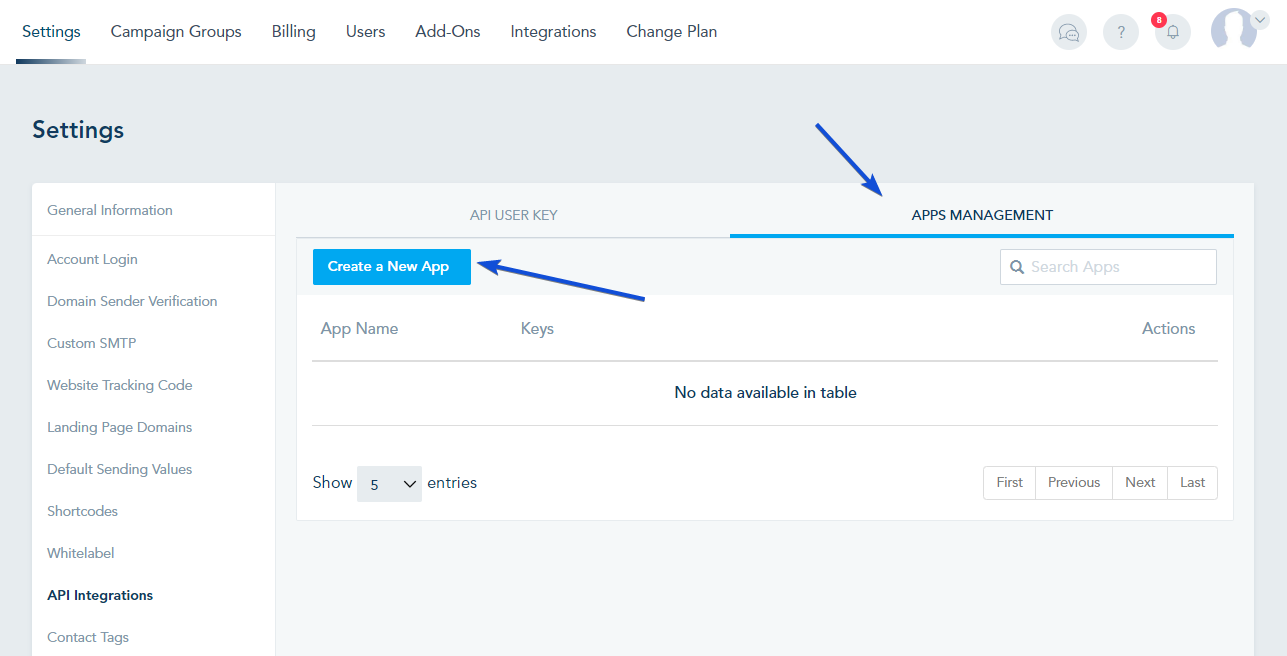
The platform offers the possibility to integrate with apps requiring Authentication token and secret key. To find, those keys while logged in to your dashboard:

  1. Head to your profile icon in the top right, and click on it, then select Settings from the drop down menu.
  2. Select API Integrations from the left sidebar.
  3. Go to APPS MANAGEMENT tab. Click on Create a new App.

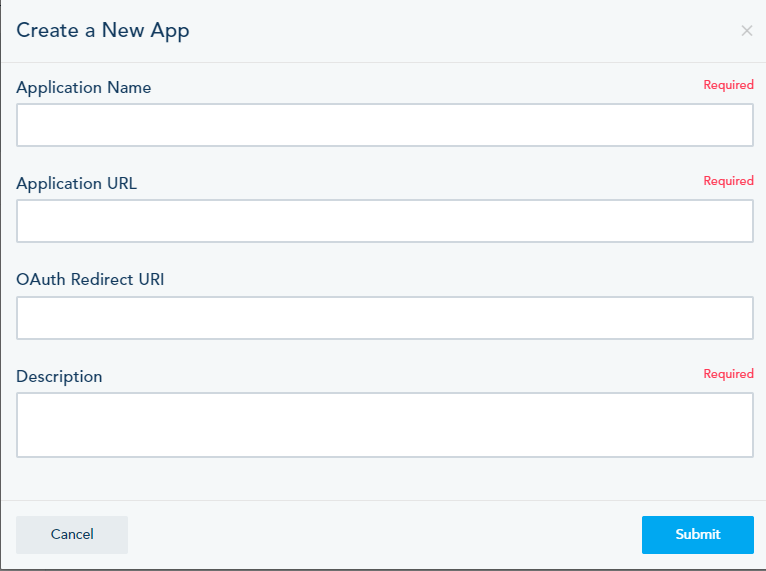
Enter the information required, the application name, URL, the Auth redirect URL and a description.

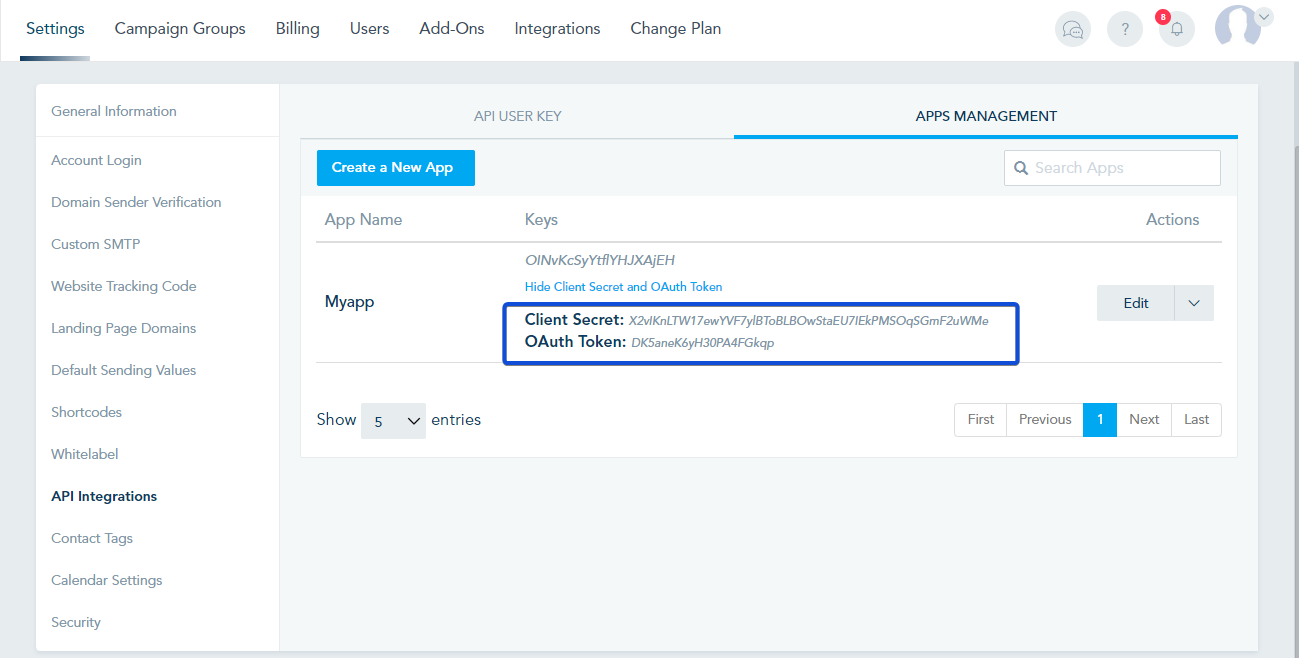
Click on Submit and the keys required for your app will be provided.

Get Started

How to create Custom Shortcodes

Custom Shortcodes feature helps you control content, for landing pages, emails and sms, at scale and from one simple view.

Instead of changing content on many assets, like landing pages, emails, Web Push and SMS, you can apply your text edits once directly on the Custom Shortcode and the system will update the content system wide.
One example use is changing a company tag line on several landing pages and email headers. With Custom Shortcodes you only need to change the content once.

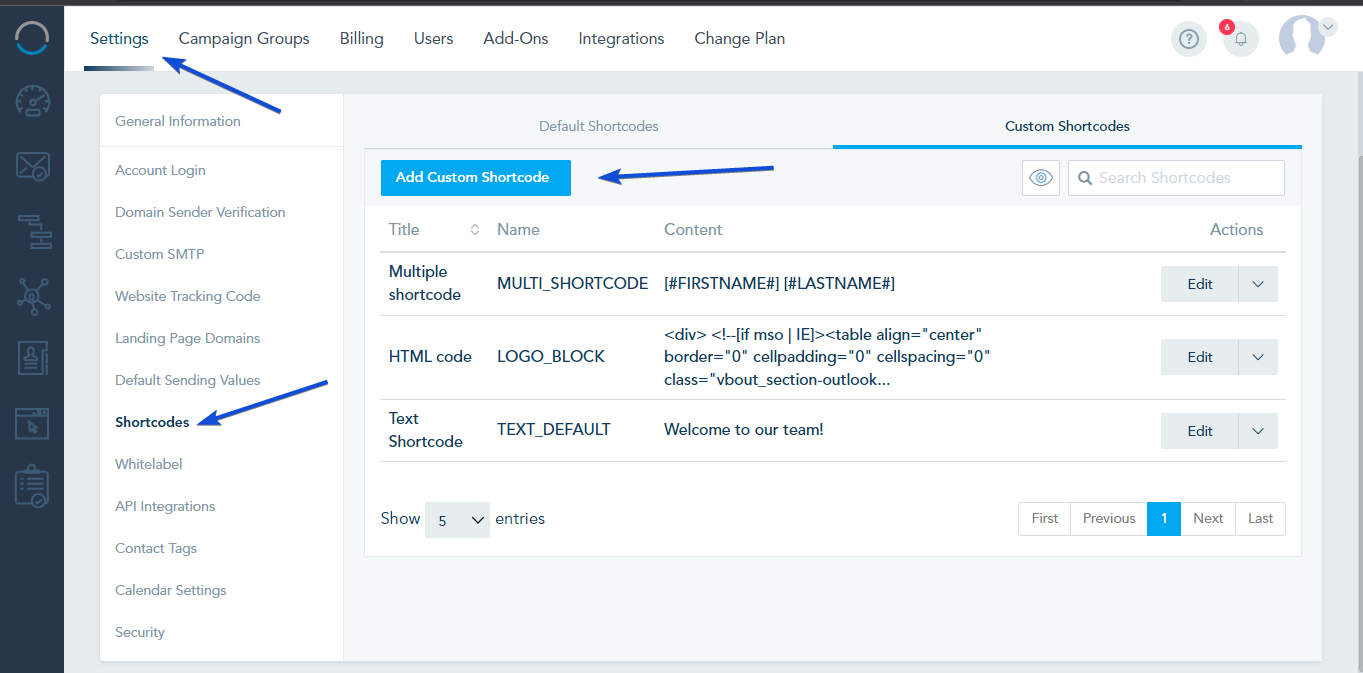
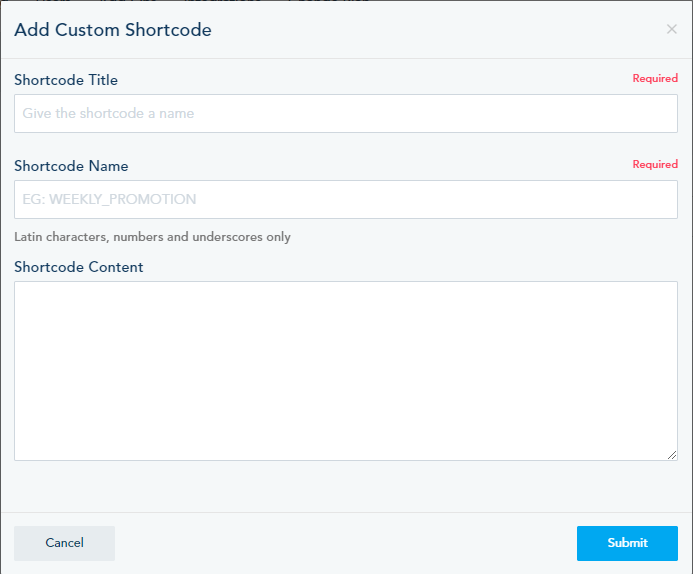
To create a custom Shortcode, go to  Settings -> Shortcodes -> Custom Shortcodes and click on Add Custom Shortcode.

Give your Shortcode a title, a name to be used and specify its content.

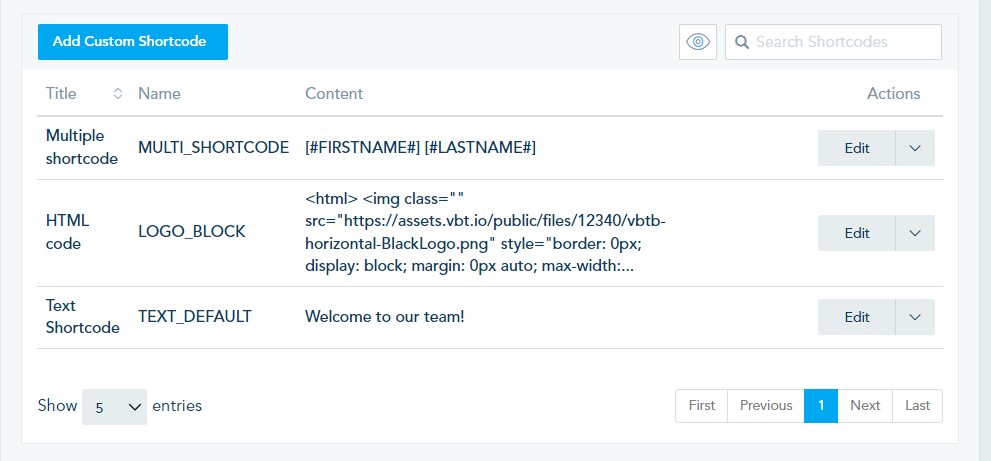
The Custom Shortcode can be a simple text, an HTML code, a text with multiple shortcodes.

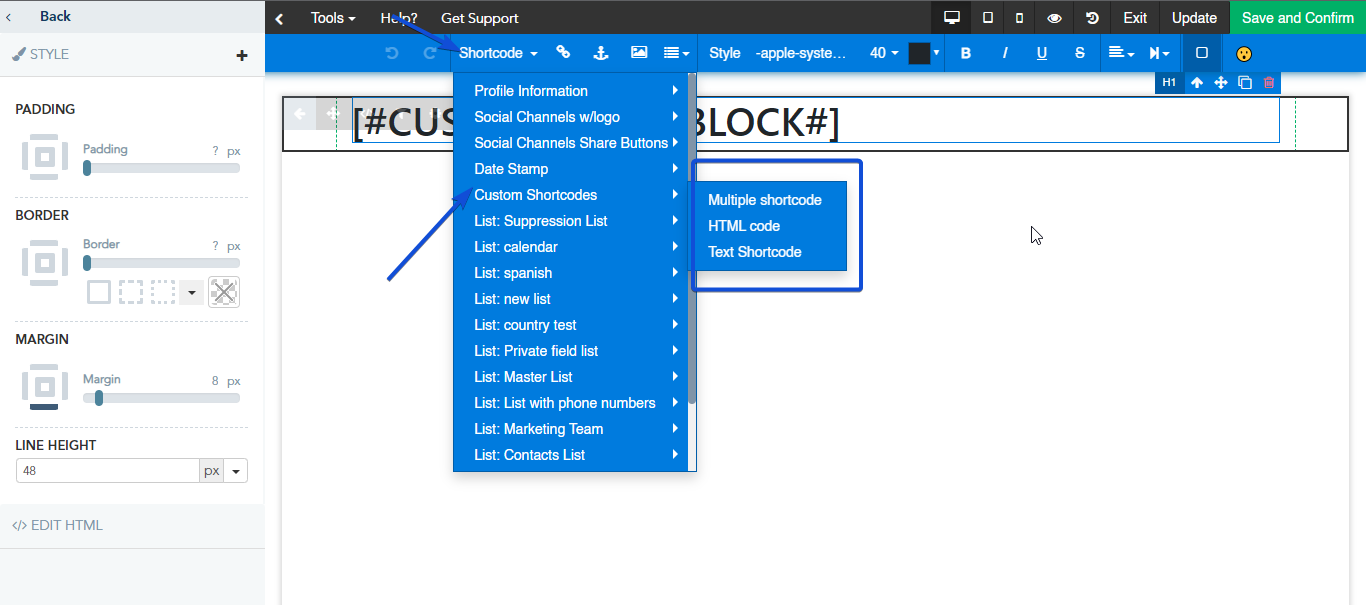
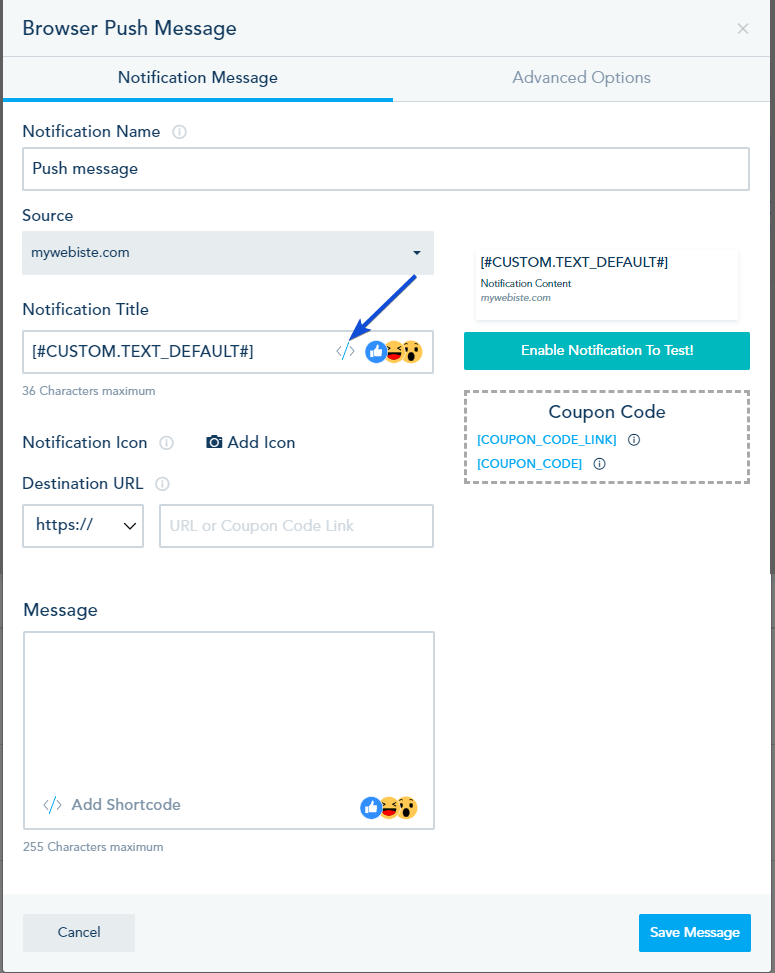
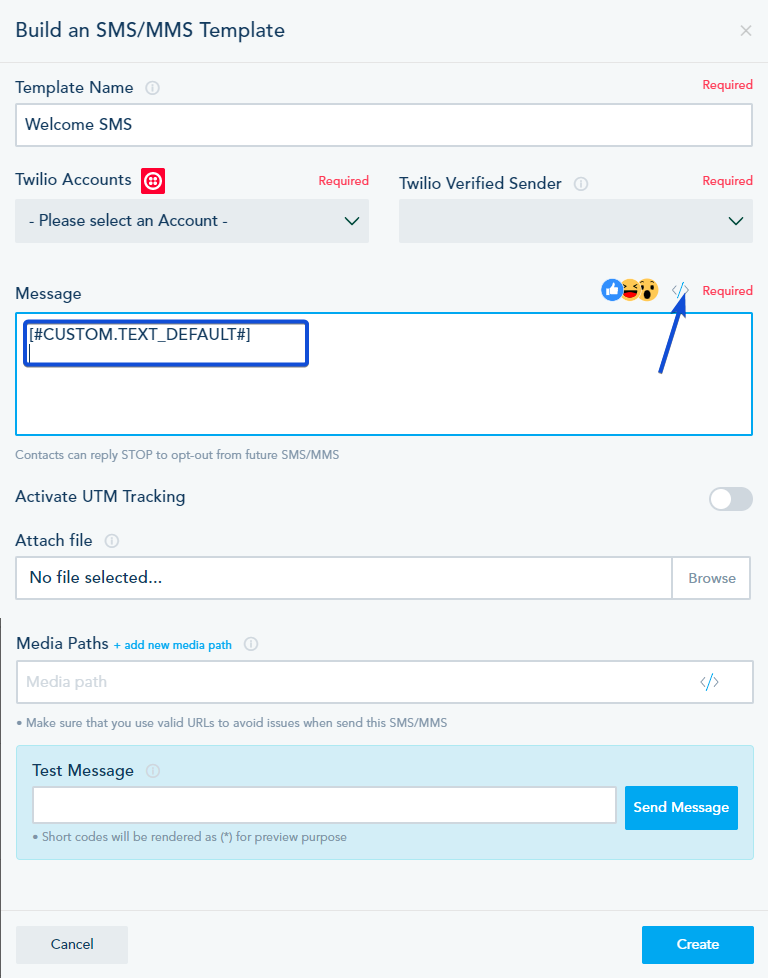
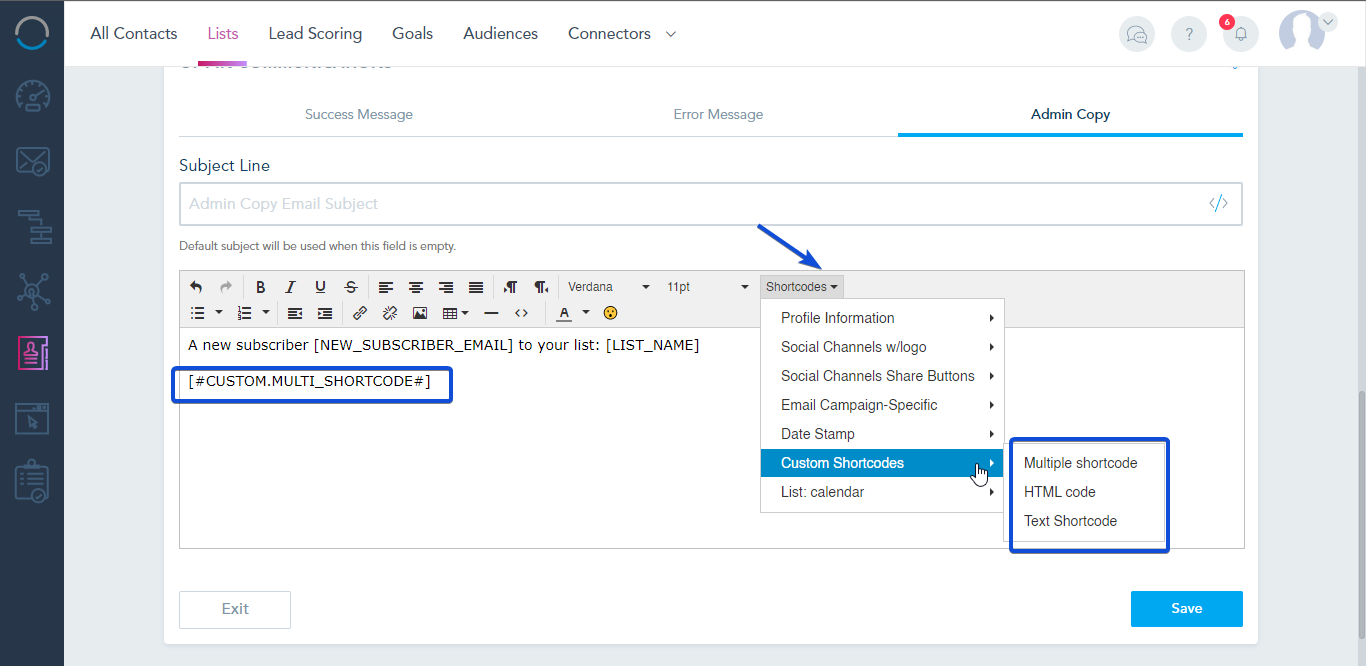
Once created, you can use the custom Shortcodes in your landing page, email, SMS, Browser Push message, and list settings.

Examples of using these custom Shortcode:

In Landing page/ Email template:

In Browser Push Message:

In SMS template:

In List Settings:


Get Started

Understanding available reporting widgets


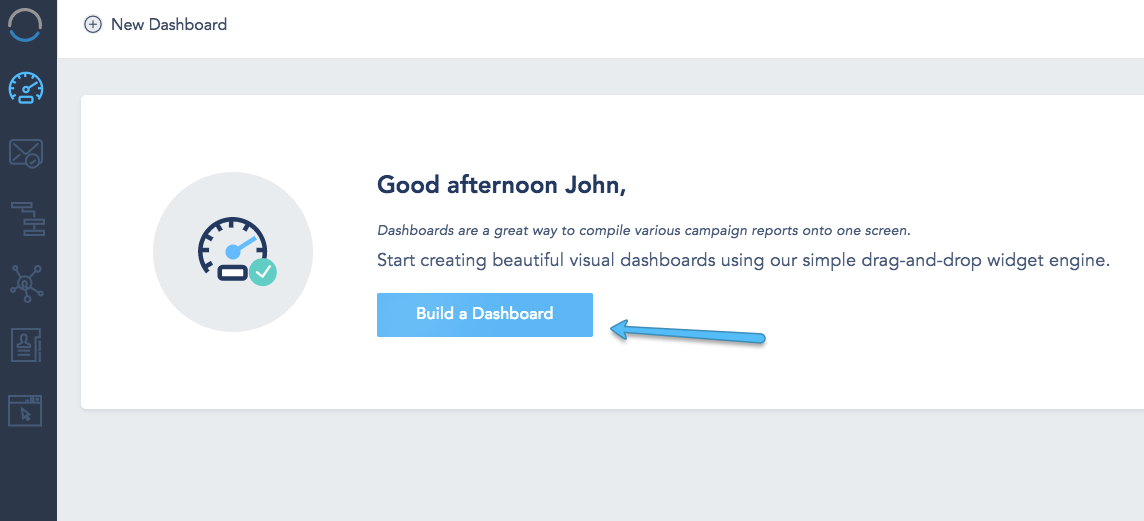
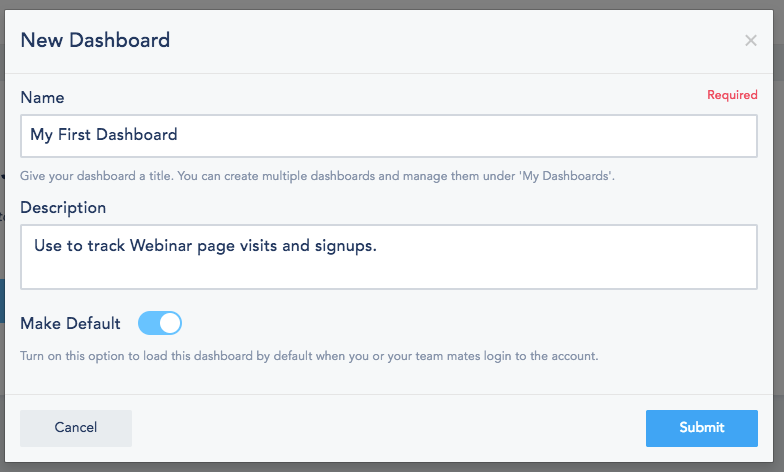
To create your first dashboard:

  1. Click on Build a Dashboard.
  2. Give your Dashboard a name and description then choose if you wish to make it the default dashboard to load once you login to your account.
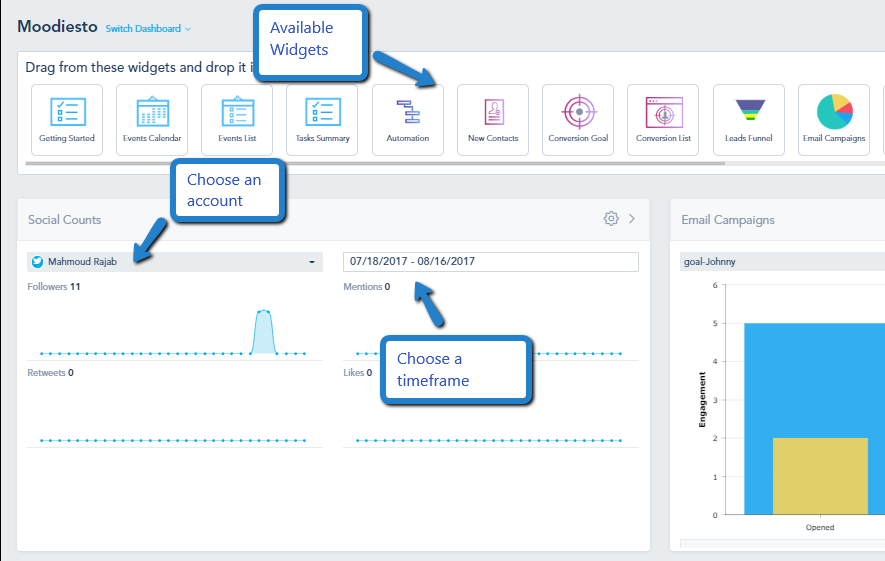
  3. Drag any report widget from the list and drop it in the area underneath. Each widget will have its own custom settings that you can configure once you drop the report into the dashboard. Use the date picker to specify the range for which to show the report. Presets like today and last week will auto update each time your login.

Below is a list of the widgets available on the platform:

  1. Getting Started: Checklist of things to get you started with the platform.
  2. Custom HTML: Add a custom embed HTML widget.
  3. Video Training: Express onboarding and training videos to help you get the best out of your account.
  4. Events Calendar: List of all scheduled or posted events, email marketing, and social media. You can configure it to show by profile.
  5. Events List: Just like the calendar but in an event format.
  6. Tasks Summary: A list of tasks with the assignee, task board, stage, due date, within a stage, teammate and timeframe of your choice.
  7. Automation: You can filter this by workflow to view performance results.
  8. New Contacts: List of the most recent contacts who joined your list(s). You can choose one or more lists.
  9. Lists Summary: A summary of your lists with the number Active, Unsubscribed, and Bounced contacts.
  10. Lists History: A graph that shows you how many contacts joined the list in reference to the time range that you specify.
  11. Lists Growth: A graph that shows you the variation of contacts joining the list in reference to the time range that you specify.
  12. Conversion Goal: Gives you data on a specific conversion goal created within the platform.
  13. Conversion List: Table list of all your Goals along with their summary.
  14. Leads Funnel: Your lead scoring funnel, which needs to be installed on your account and active with all stages.
  15. Email Campaigns: Performance of your email campaign, Email open and CTR.
  16. Social Insights: Quick snapshot data on a specific social media profile, for a given time frame.
  17. Social Feed: One feed from one of your social media channels, ex: Twitter Messages.
  18. Social Followers: Side by side followers line chart from multiple social media profiles, ex: Facebook vs Twitter vs Instagram.
  19. Social Content: Content from a specific social account during a specific date.
  20. Hashtag stream: Choose a hashtag you added from your social media suite.
  21. Ad Accounts: Pulls a report from your Facebook ads and AdWords accounts.
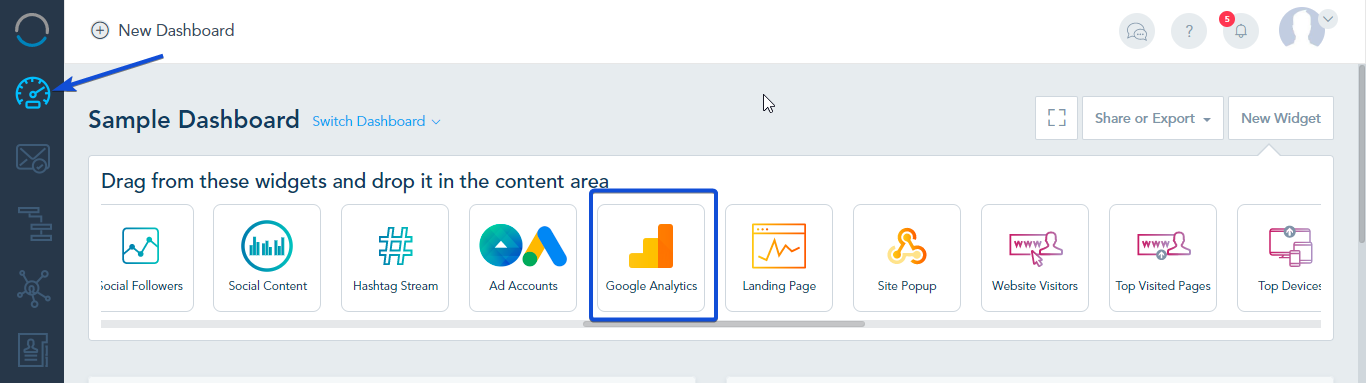
  22. Google Analytics: Pulls a report from your Google Analytics account, which you need to connect to your dashboard. 8 Widgets currently supported.
  23. Landing Page: Performance report of a specific landing page, visits vs conversion.
  24. Site Popup: Performance of one of your Webhooks, impressions vs conversion. ex: homepage popup performance.
  25. Website Visitors: Breakdown of your site visitors, Anonymous vs Contacts.
  26. Top Visited Pages: List of the pages that are visited the most.
  27. Top Devices: Visit breakdown per device.
  28. Top Referring Countries: List of top referrals countries tracked by the VBOUT platform.
  29. Referral Sources: List of top referrals tracked by the platform.
  30. Social Sources: List of top social media referral channels tracked by the platform.
  31. Paid Referral: List of top paid ad channels tracked by the platform. Must use UTMs in your marketing campaigns for this to work.
  32. Browser Push: Analytics from a specific Browser Push.
  33. Browser Push Templates: Analytics for a Browser Push Template.
  34. Scheduled Bookings Calendar: Monthly view showing the scheduled bookings.
  35. Scheduled Bookings List: List of scheduled bookings.
  36. Store Sales: Choose a store integrated into your account and monitor its sales
  37. Top Buyers: The top buyers from your store.
  38. New Orders: New orders in your stores.
  39. Sales by Country: Sales divided geographically.
  40. Retention: A graph showing new customers and retained customers
  41. Checkout Funnel: A funnel of the steps that the client followed before reaching checkout.
  42. Product Search: The products searched in your store.
  43. Revenue by Campaign: List of revenue by campaign.
  44. Revenue by Automation: List of revenue by automation.
  45. Revenue by Channel: Total revenue by channel.
  46. Chatbot Stats: Analytics and stats for your Chatbot
  47. Conversation Starters: Chart showing the number of users initiated a conversation
  48. Conversations List: List of Chatbot conversations
  49. Unanswered Questions: List of unanswered questions by your chatbot.
  50. Chatbot Leads: List of new leads generated from Chatbot.

Get Started

API and Connectors

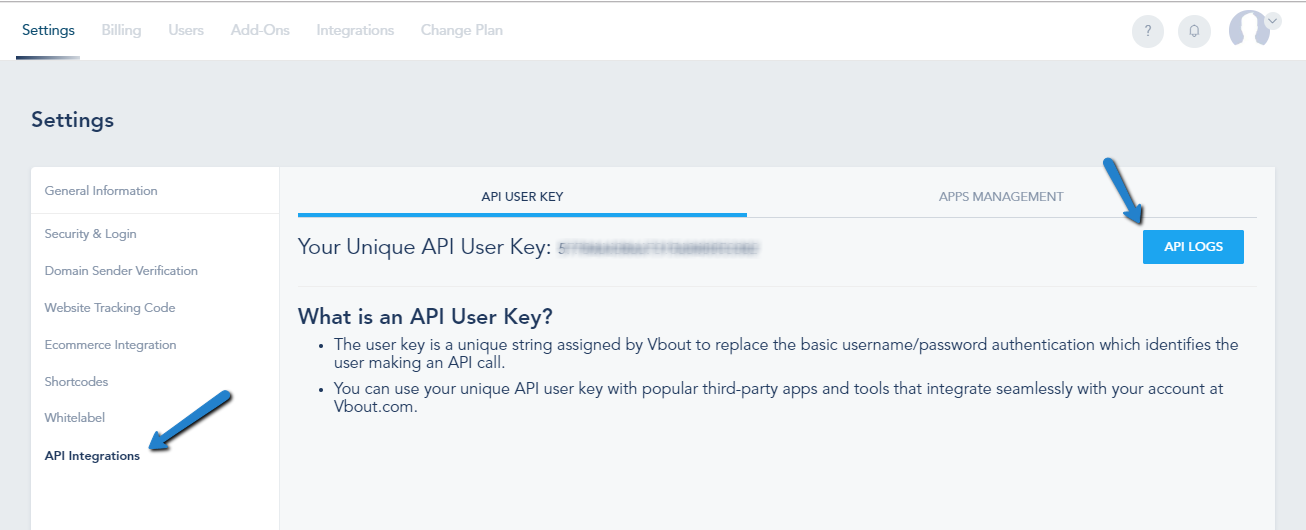
The platform offers a variety of API tools for you to integrate your app with us. To find your API key, while logged in to your dashboard:

  1. Head to your profile icon in the top right, and click on it, then select Settings from the drop down menu.
  2. Select API Integrations from the left sidebar.
  3. You will be able to see your API User Key displayed by default. You can copy it and paste it on whatever app you are trying to connect.
  4. If you would like to look at the latest API logs, you can do that by clicking on API Logs to the right.

To check out our open API documentation, you can click here.

Get Started

How to connect your Booking Calendar with Zoom Meeting

You can connect your calendar bookings (Google/Outlook), enabling individuals to schedule meetings and automatically create Zoom meetings.

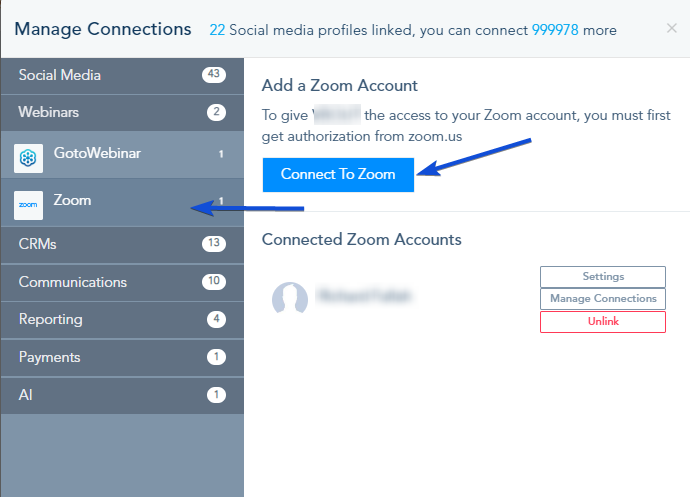
Connecting your Zoom account

• Navigate to the Connection Center.
• Select Webinars and then choose Zoom to connect your Zoom account.

Creating a booking page

• Navigate to Settings and go to Booking Settings.
• Click on Create Booking Page.

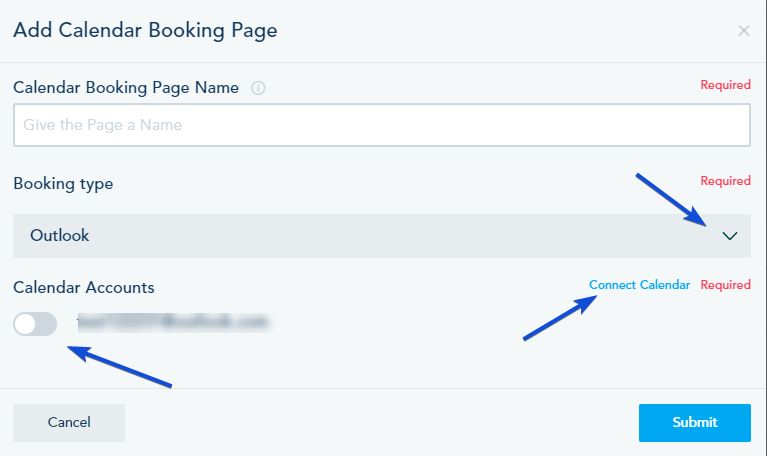
• Add a name to you booking page and choose the booking type.

• If your calendar account is already connected, choose your account. Otherwise, click on Connect Calendar to link your calendar account.
• Once connected, Click on Submit to proceed.

Fill out the required details in the Event Info section.

In Event location, select “Zoom Meeting” option and choose either a connected Zoom account or connect a new one if necessary.

Continue your booking settings, once done, Click Submit to save your settings.

For further details on booking settings, refer to this link.

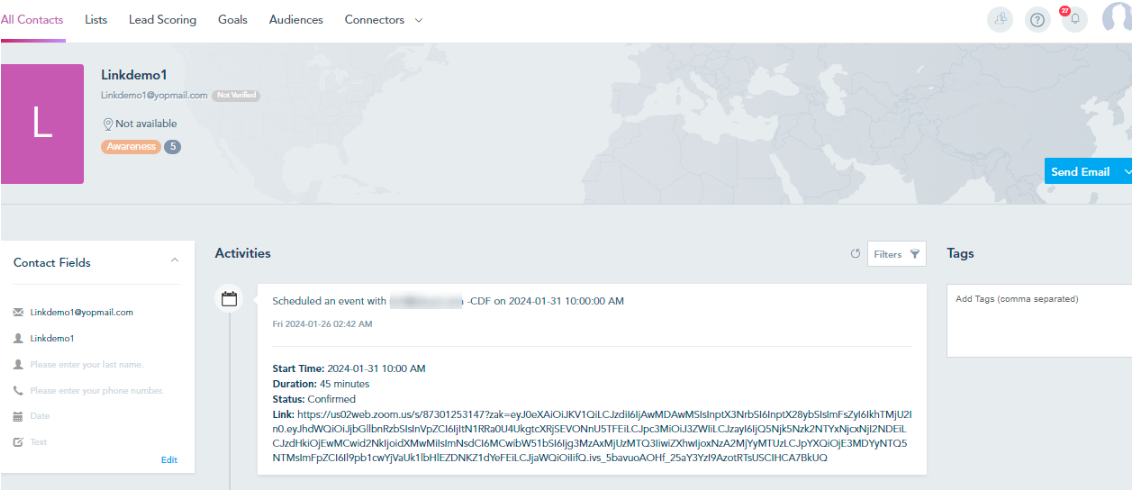
When someone schedules a meeting in your calendar, a Zoom Meeting will be automatically generated with a unique URL.

The scheduled booking will be displayed in the lead profile for your reference.

Get Started

How to submit a sitemap for your landing page

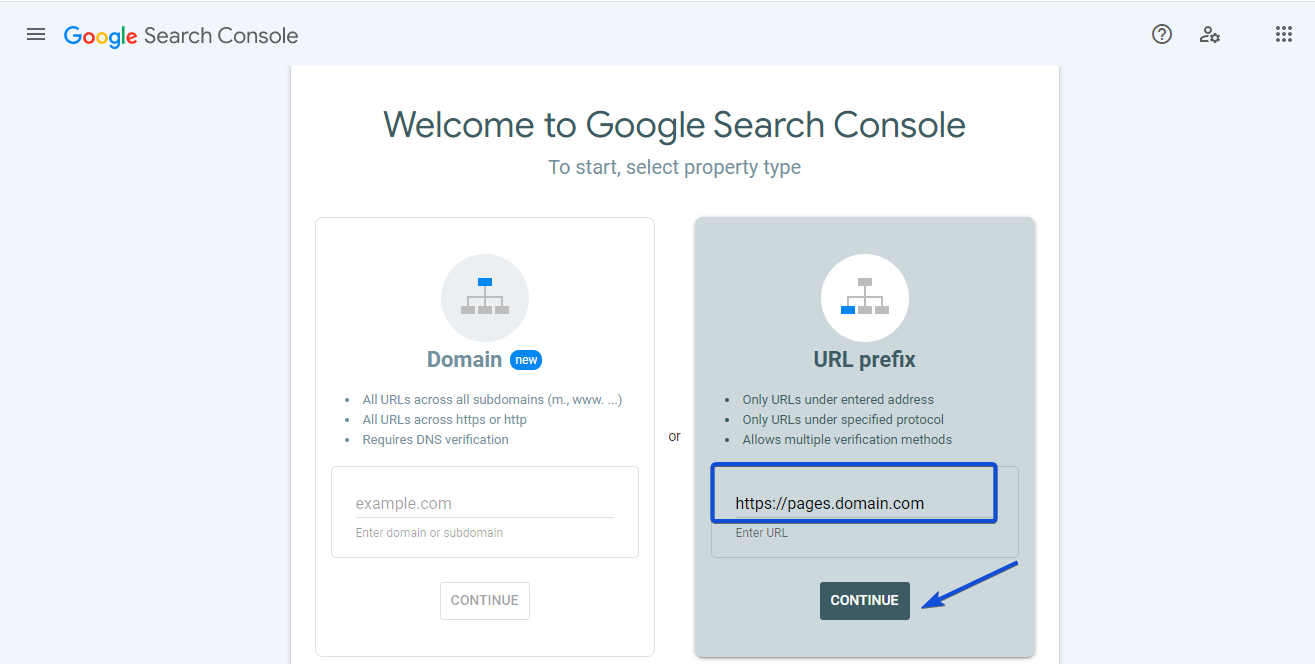
In order to submit a sitemap for your Landing page in Google Search, please follow the below steps:

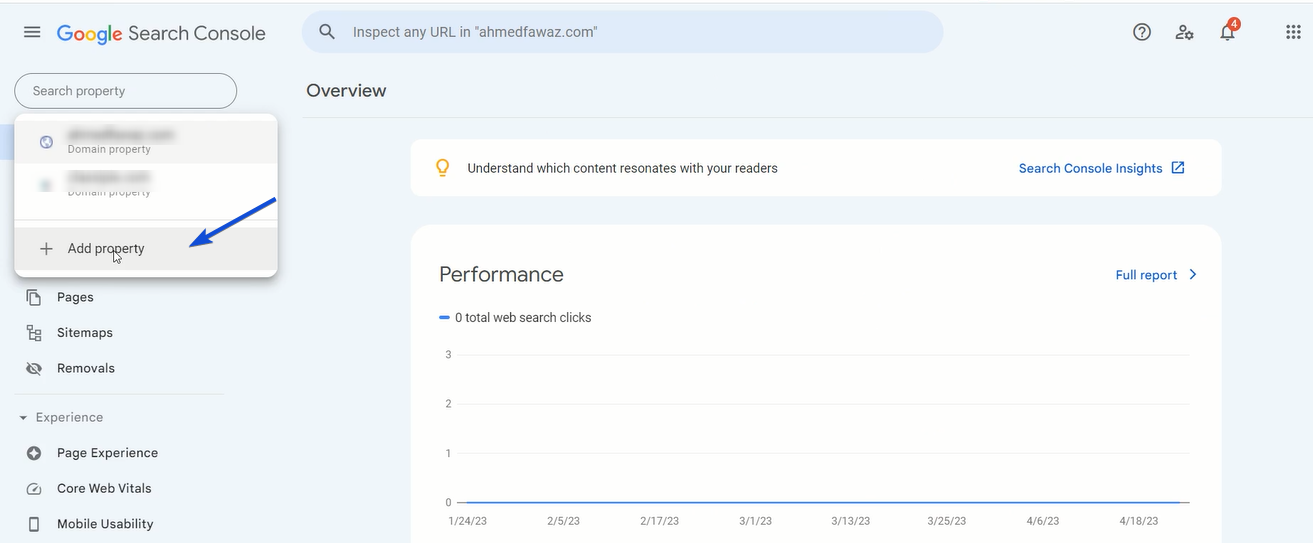
1- In Google Search Console, add a property.

Add the subdomain URL of your landing page in the URL prefix for example: “https://pages.domain.com” and select Continue.

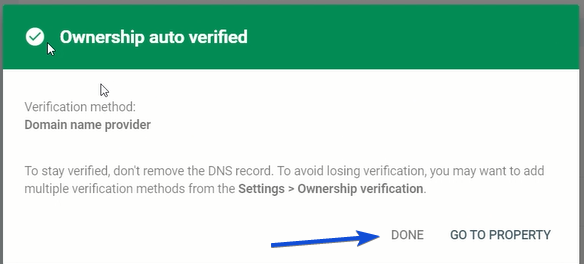
After the ownership is verified, click on Done.

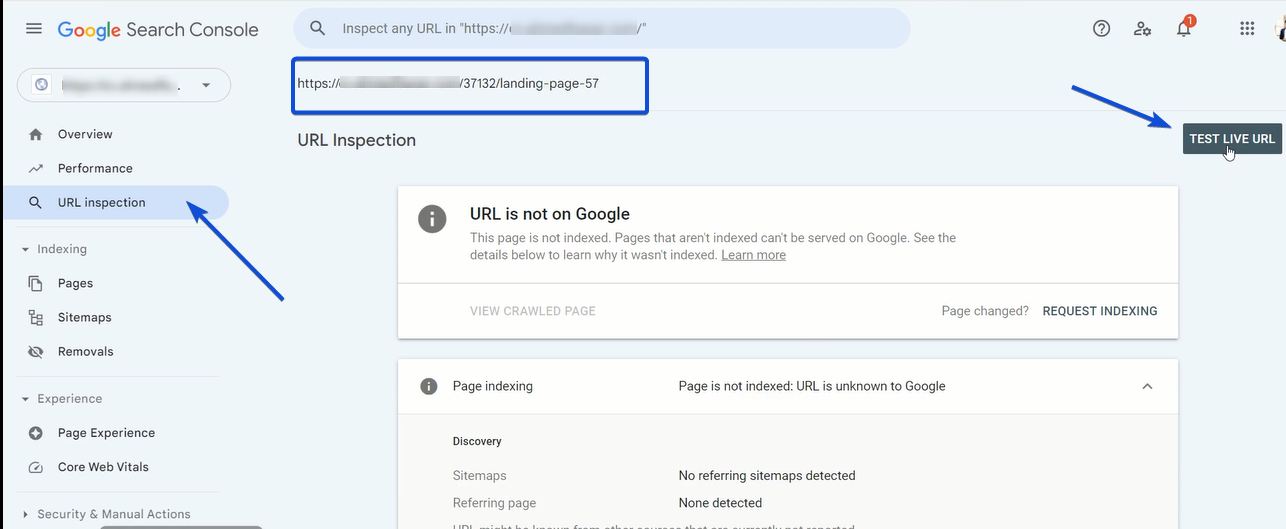
2- Switched to the subdomain page in Google search Console, go to URL inspection, add the landing page URL and click on Test Live URL.

Once, the page is verified and available on Google, click on Request Indexing.

3- After submitting the request, you need to wait for an email from Google and your page will be available in Google Search.

Get Started

Restricted Content Policy

We work with various industries and businesses who utilize the platform at different capacity. While we do not discriminate against one type of business versus another, some have higher than average abuse complaints, which can have an impact on other customers using the platform.

To protect our customers, we reserve the right to block or restrict your use of the platform if you serve any of the following industries:

  • Multi-level marketing or affiliate marketing
  • Work from home and make money online type of promotions
  • Cryptocurrency (ex: ICOs or trading)
  • Pharmaceutical products
  • Certain fundraising campaigns
  • Gambling services or products
  • Political groups or affiliations that promote hate and violence
  • Pornographic content or membership sites
  • Dating sites
  • Complex financial services offering

The list above does not cover all industries but is a general refence to the types of business that trigger high abuse complaints.

If you are not sure your industry is permitted to use the platform, feel free to reach our support.

How to send Sendspark Personalized Video SMS

Sending dynamic videos lets you personalize videos at scale. You can embed videos in your SMS using merge tags. These merge tags let you automatically change content for each of your recipients — so you can personalize videos with the first name, company name, or job title of each person.

You are able to send dynamic videos to your contacts using Sendspark integration with VBOUT.

Follow the steps below to Send Personalized Videos:

1. Create your video in Sendspark

You can record, upload, or request a video in your Sendspark account on sendspark.com

2. Use merge tags in the video page or thumbnail text

These merge tags will automatically update for each recipient. If the recipient’s information is unknown, they will see a fallback. You can either customize the video with a personalized title/message or you can add a personalized thumbnail.

3. Click on Share Video

4. Copy VBOUT code

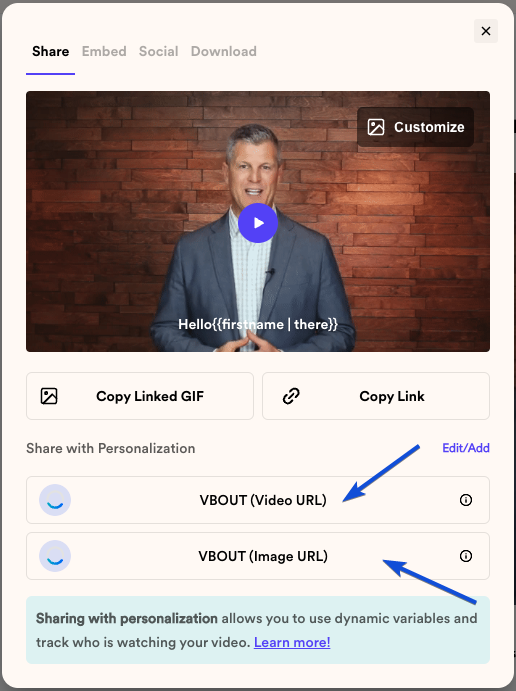
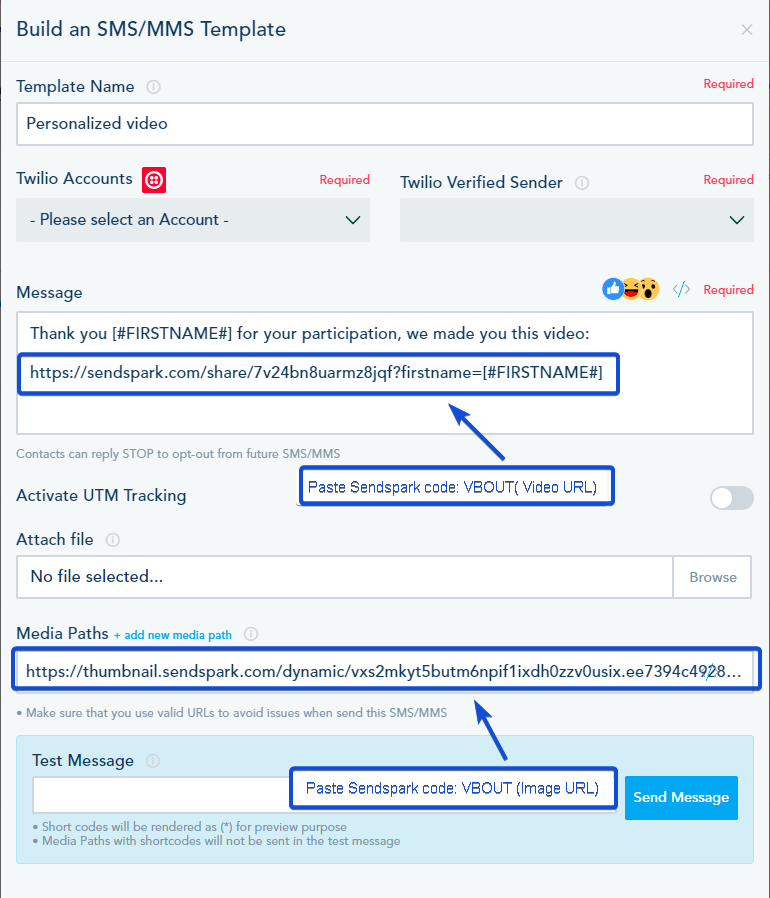
To share this video on VBOUT, you’ll need to use 2 buttons from the Sendspark share modal: VBOUT (Image URL) and VBOUT (Video URL)

Note, if you don’t see them on the share modal, you can modify the shortcuts you see (Click on Edit/Add).

Once you click on a button, a code will be copied.

5. Paste in the code in Your SMS template

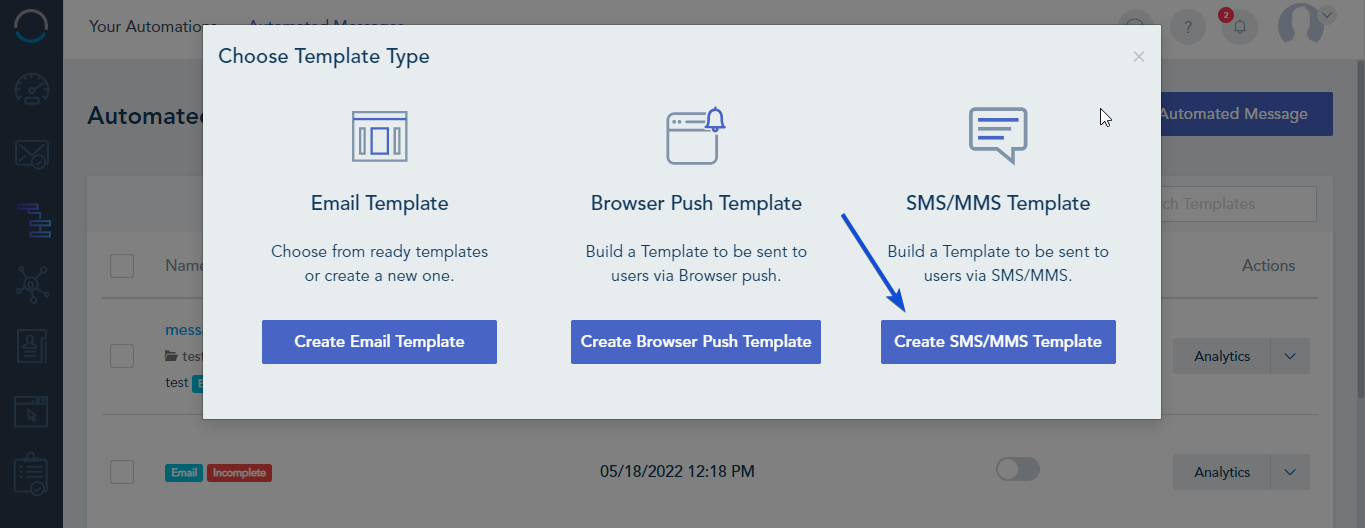
Go to Automation -> Automated Messages -> Create Automated Message, choose to Create SMS/MMS Template.

In the Media path, paste the code you have copied from Sendspark “VBOUT (image URL)” button. This will be the video thumbnail.

In the Message Area,  paste the code you have copied from Sendspark “VBOUT (Video URL)” button.

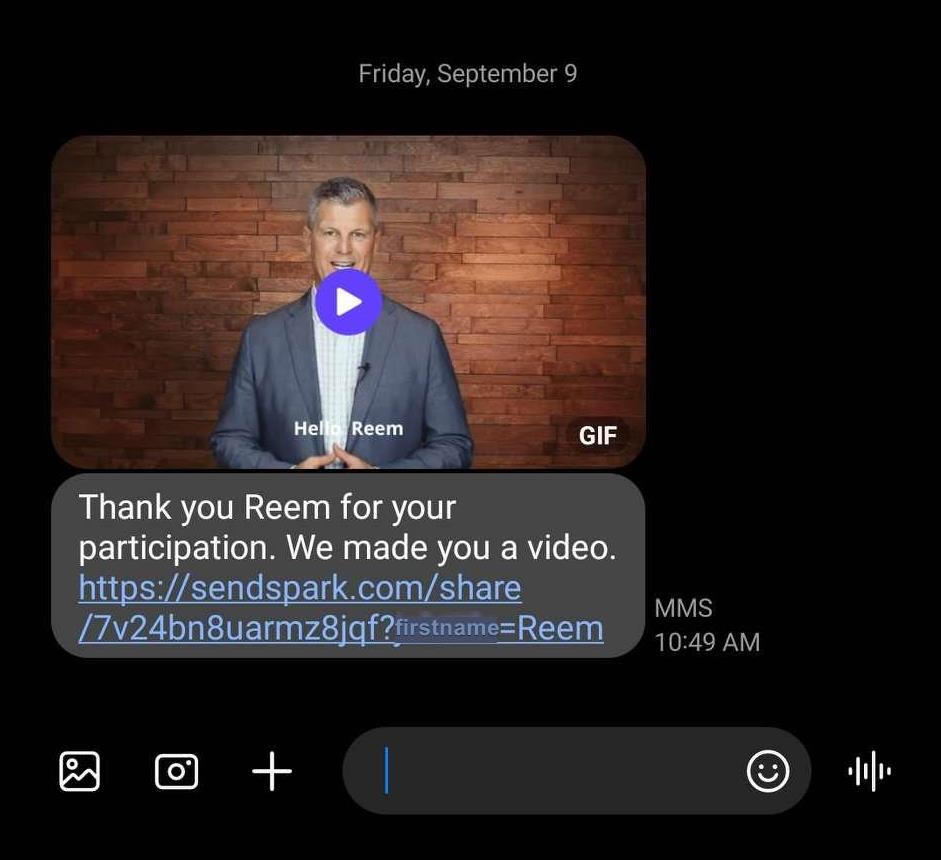
In this way, your contact will receive an SMS with a personalized video.


Get Started

How to attach a file to your Email or Landing page

In some cases, you need to attach a file to a landing page or to an Email Campaign, in order to do so please follow the below guidelines.

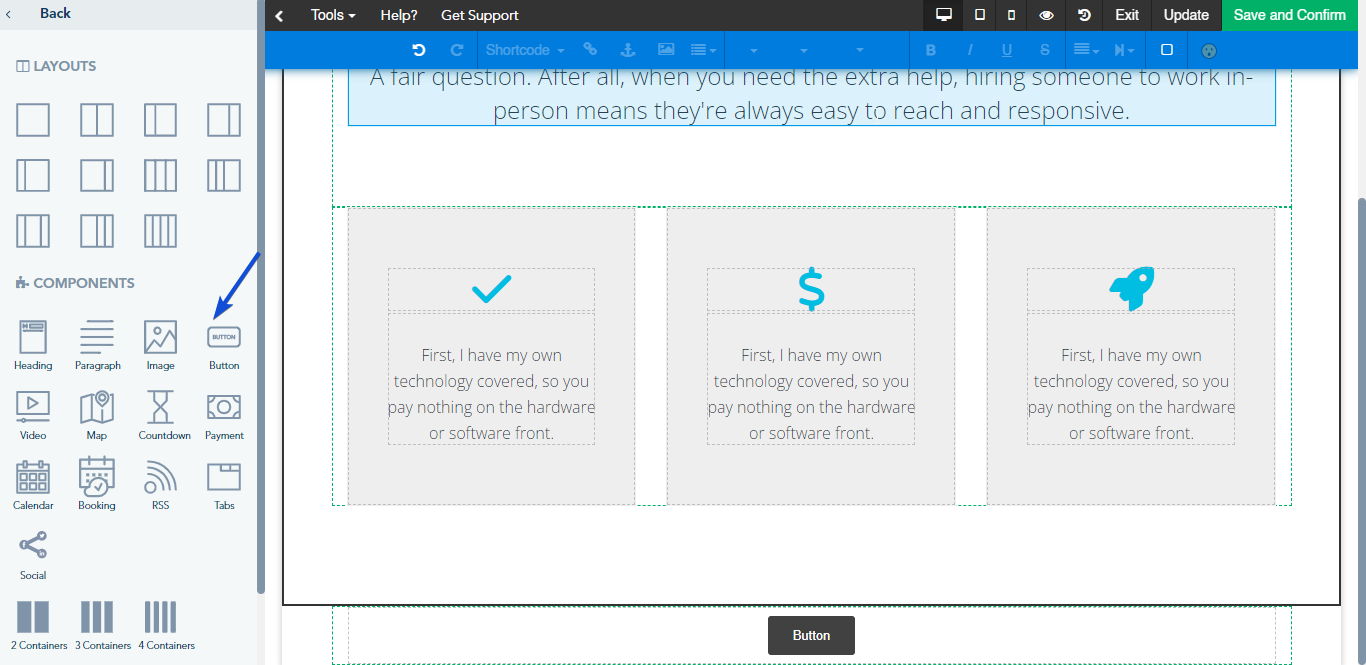
In Email or landing page builder,  add a Button element from Design Element section or choose a block with a button from the Predesigned blocks.

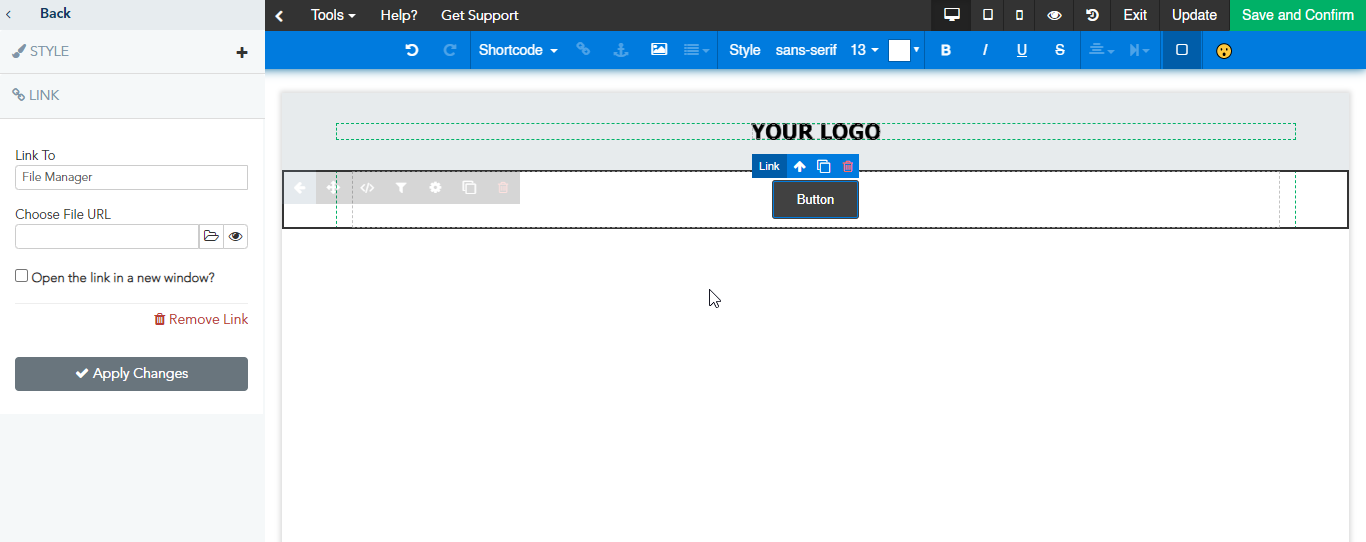
Click on the button, in the setting menu on the left choose Link -> Link to, and select File Manager.

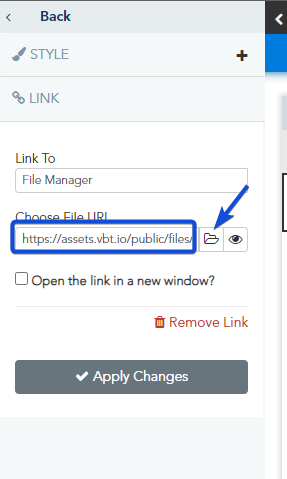
Upload your file into the File Manager, then select the file from the File manager or copy its URL in the Choose File URL section.

And finally, click on Apply Changes.

Once you are done, save your Email template or landing page.

In this case, whenever a contact clicks on the button, he will be redirected to a page to download your file.

Get Started

Adding Contacts to your account

You can add contacts to your  account using any of the following methods:

  1. Mass upload using a Spreadsheet (Preferably .csv or .xls)
  2. Using the Form API with the website tracking code
  3. Using the Native API from our sample library
  4. Native integrations: SalesForce – Hubspot – Zoho – Insightly
  5. Using Zapier or any other third party tool.

Get Started

E-commerce conversion

The platform automatically tracks conversions for any campaigns and automated messages (Email, SMS, and Browser Push) sent to your contacts. This allows you to analyze the performance of your marketing channels across your account.

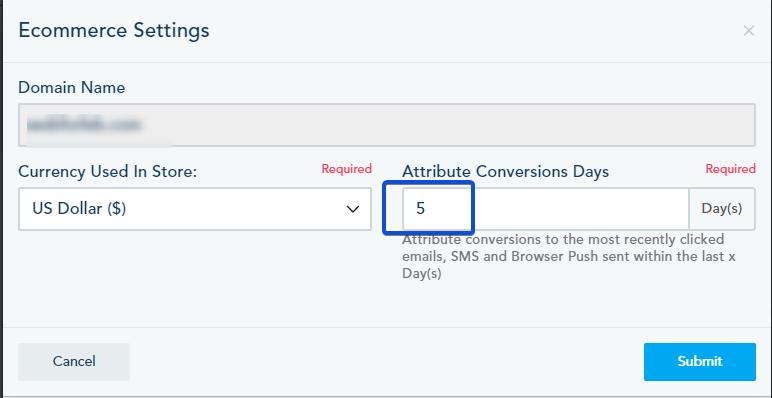
A conversion occurs when a recipient clicks a link to your website and then takes another action (such as placing an order) within the conversion period. The conversion period is 5 days by default, but this setting can be adjusted.

For example, if someone clicks on a link in your weekly newsletter and then makes a purchase later that day or within the conversion period, a conversion will be recorded for that email.

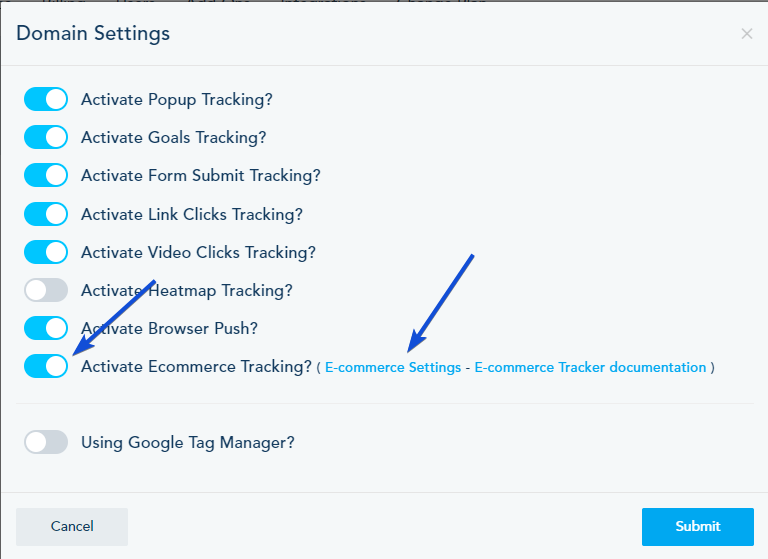
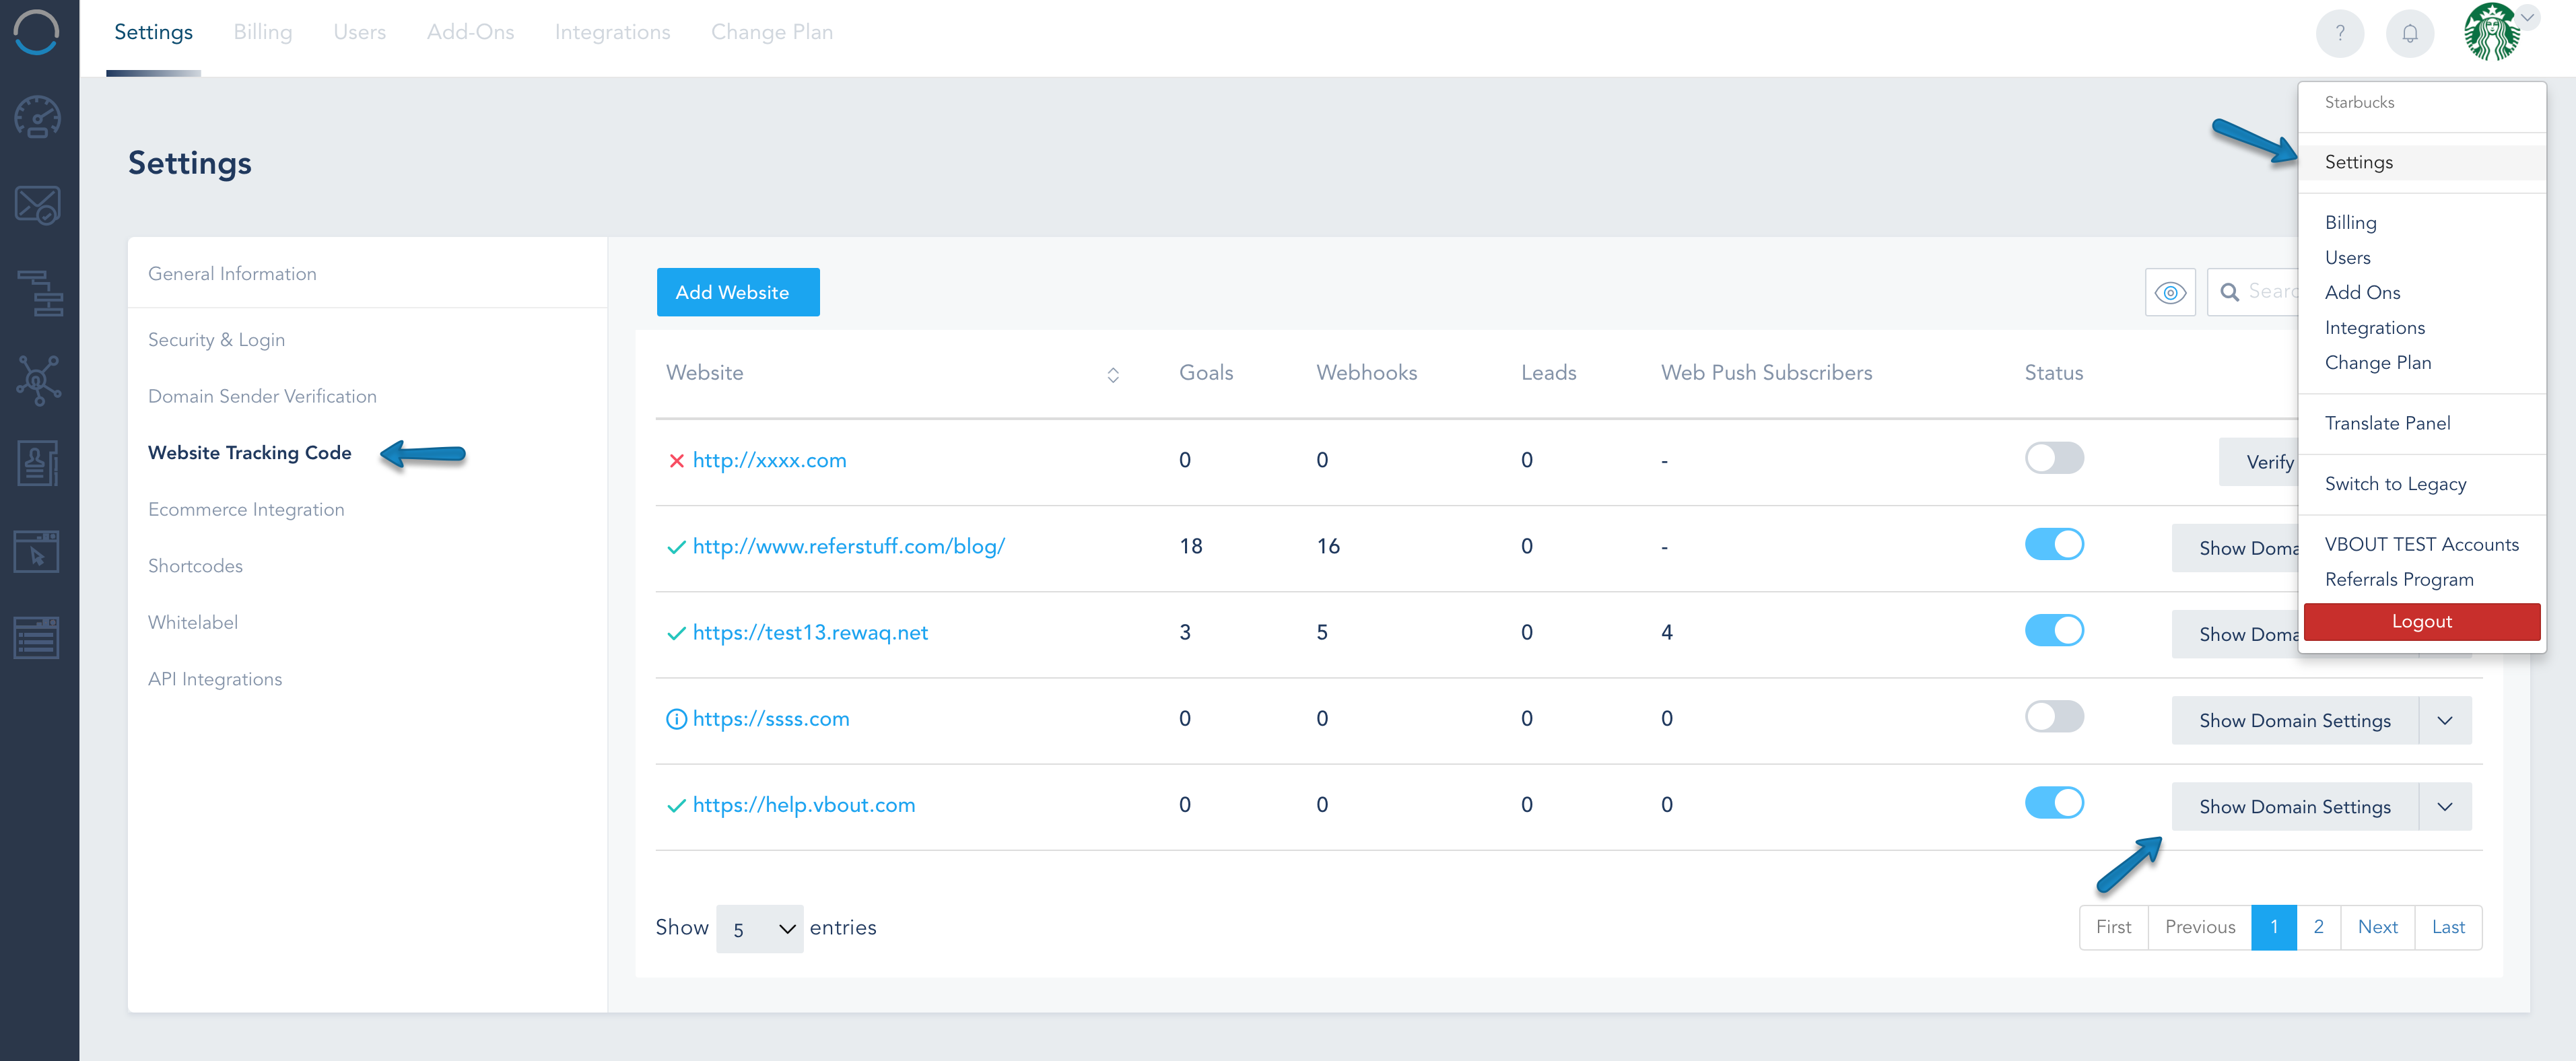
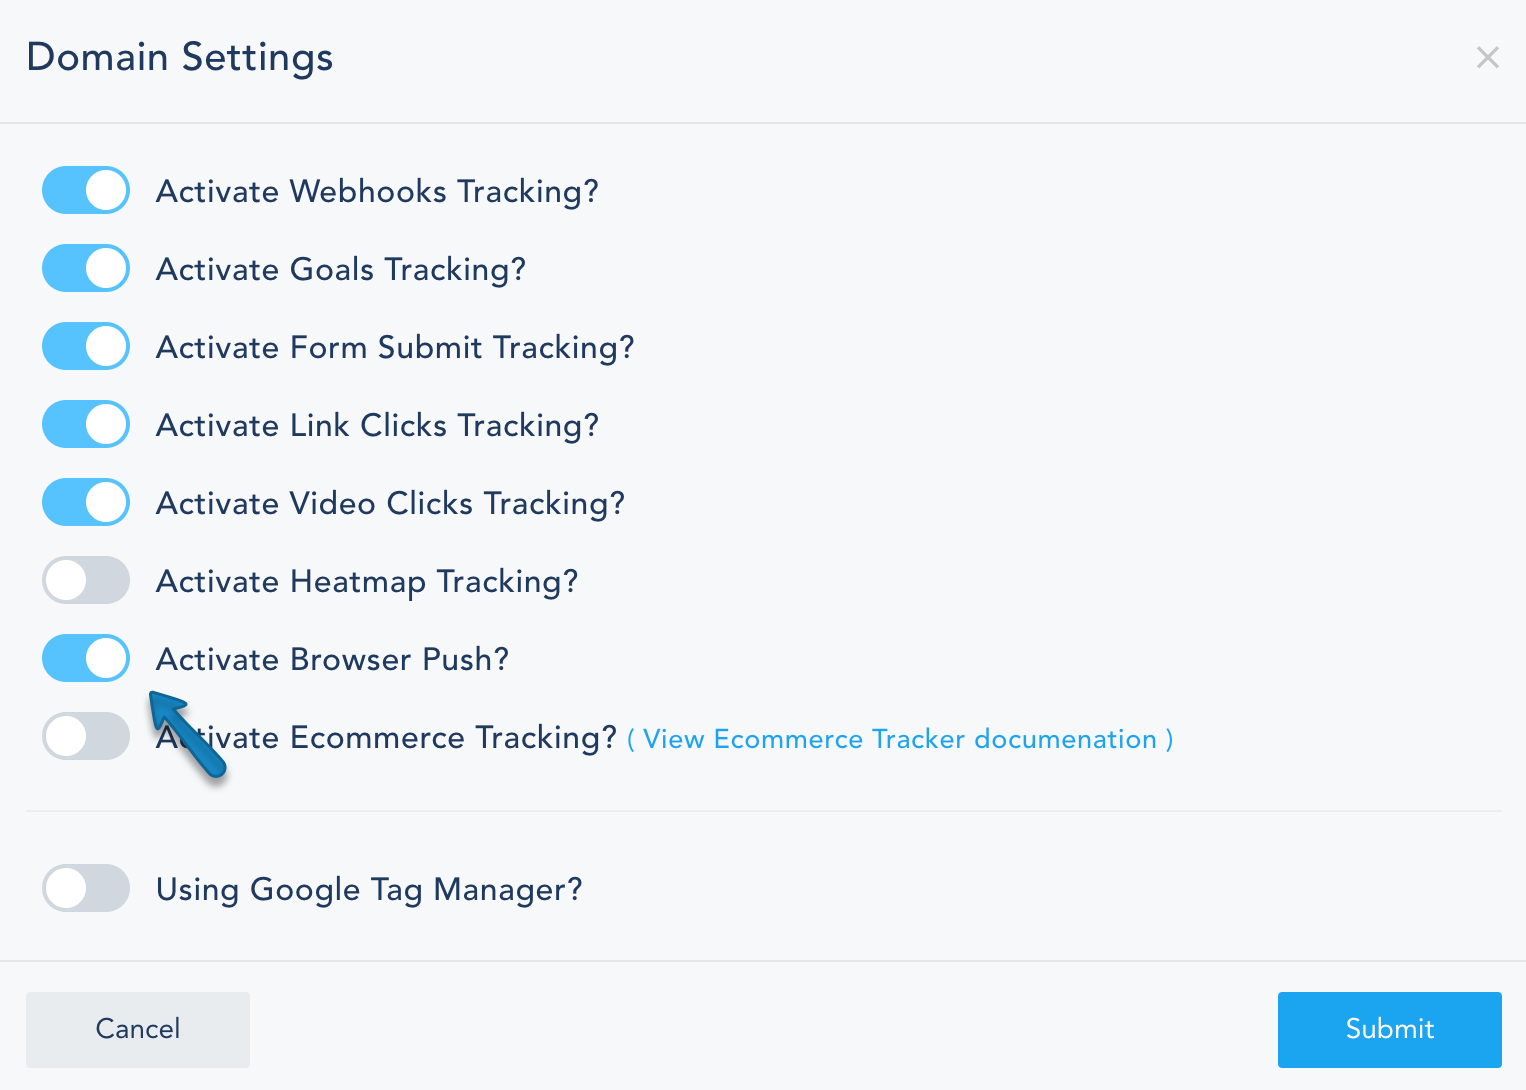
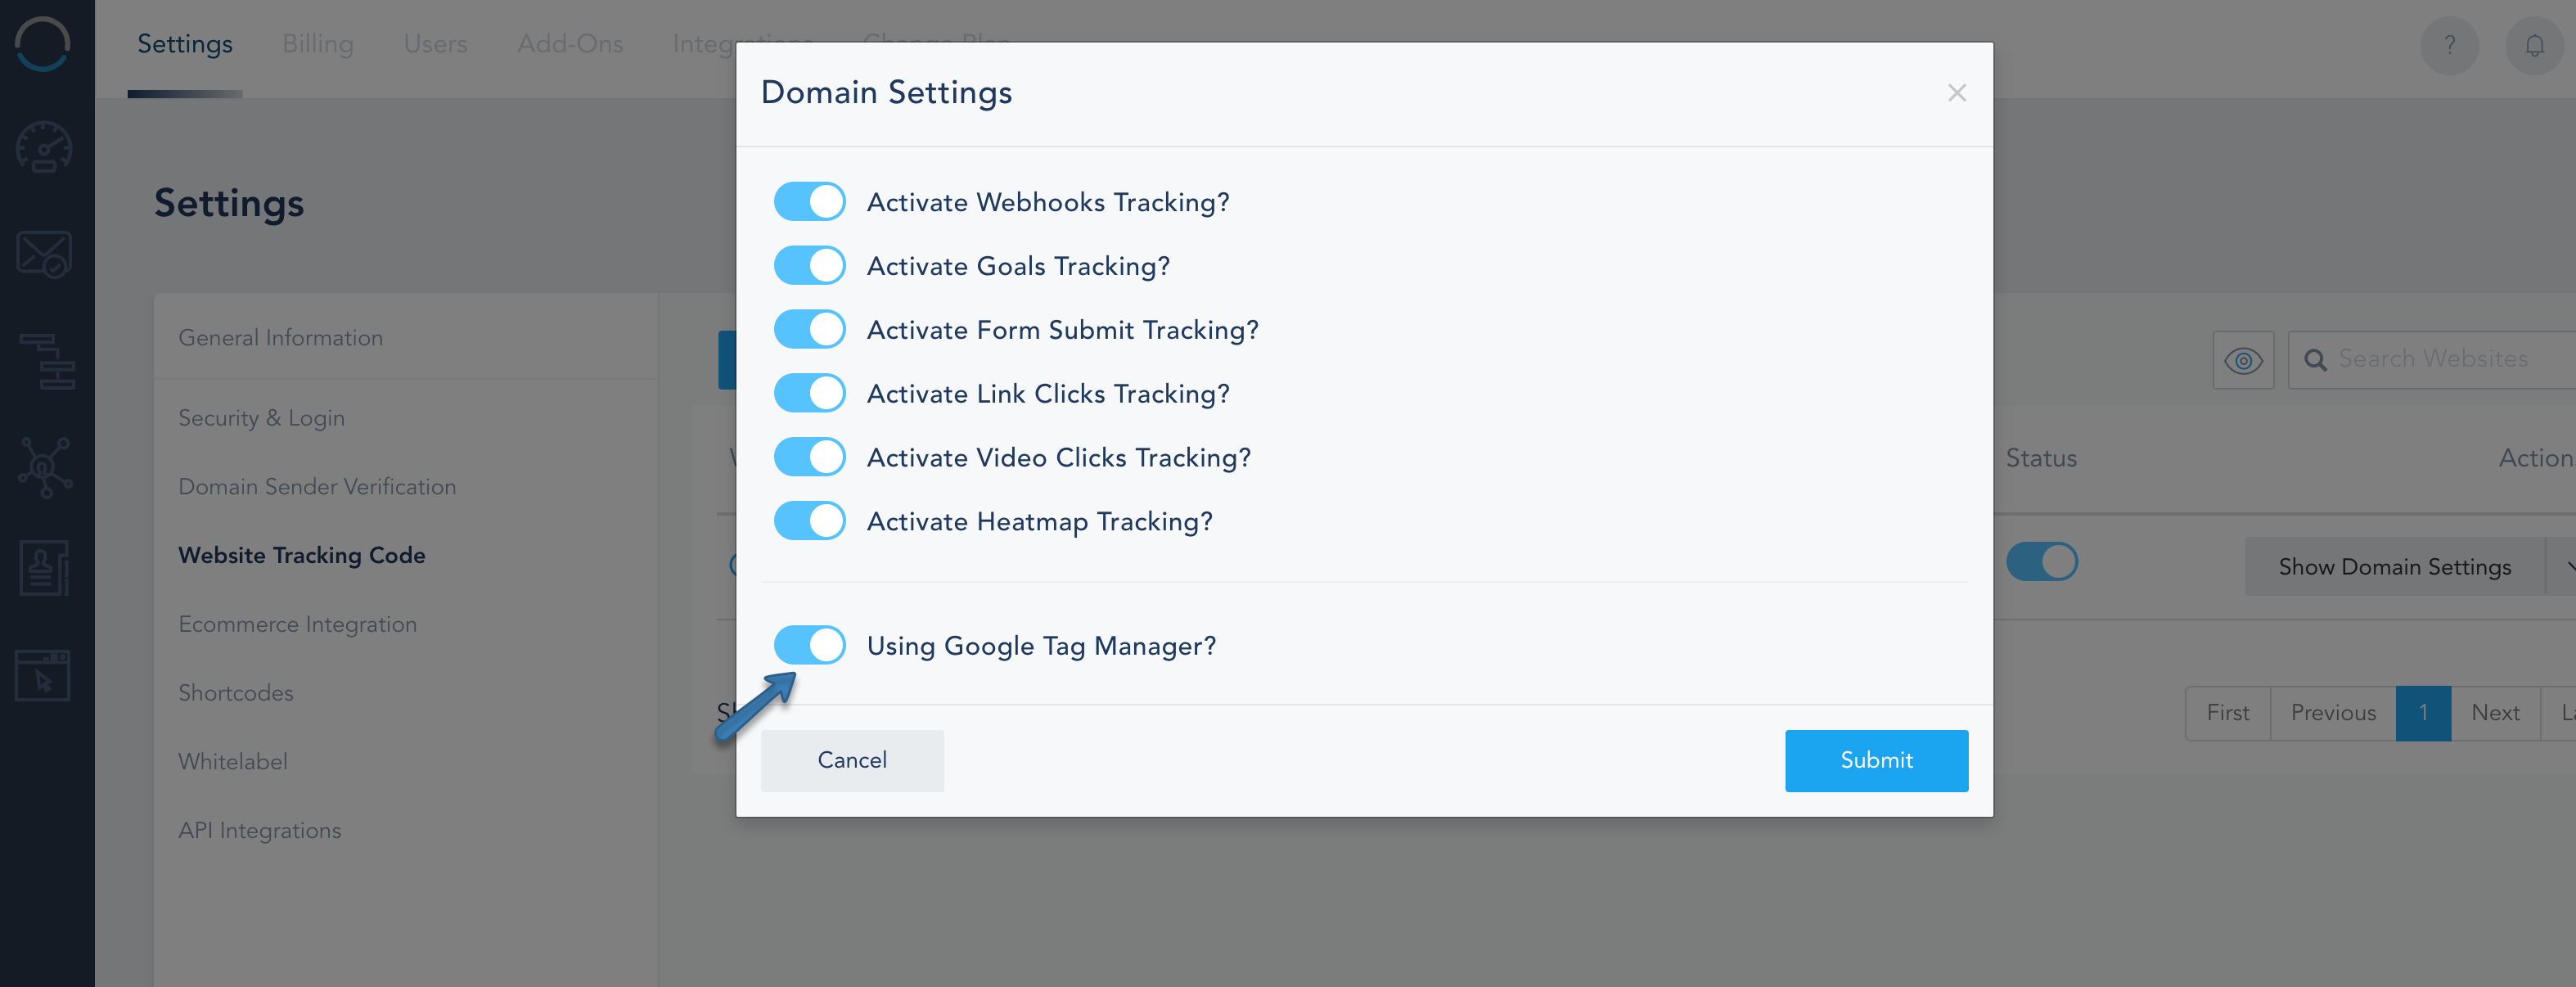
To activate this conversion, you need to add the tracking code to your website and turn on Activate Ecommerce Tracking in the Domain Settings. Please check this link for more information on how to add your tracking code.


You can adjust the conversion period by going to 
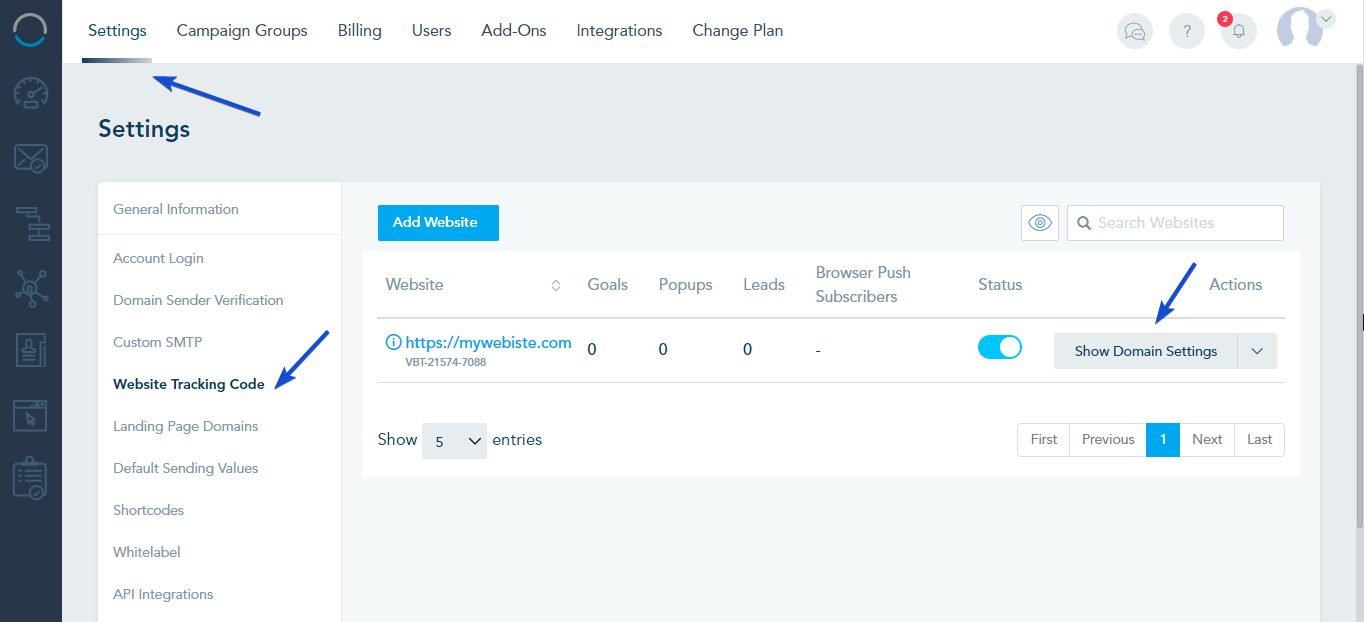
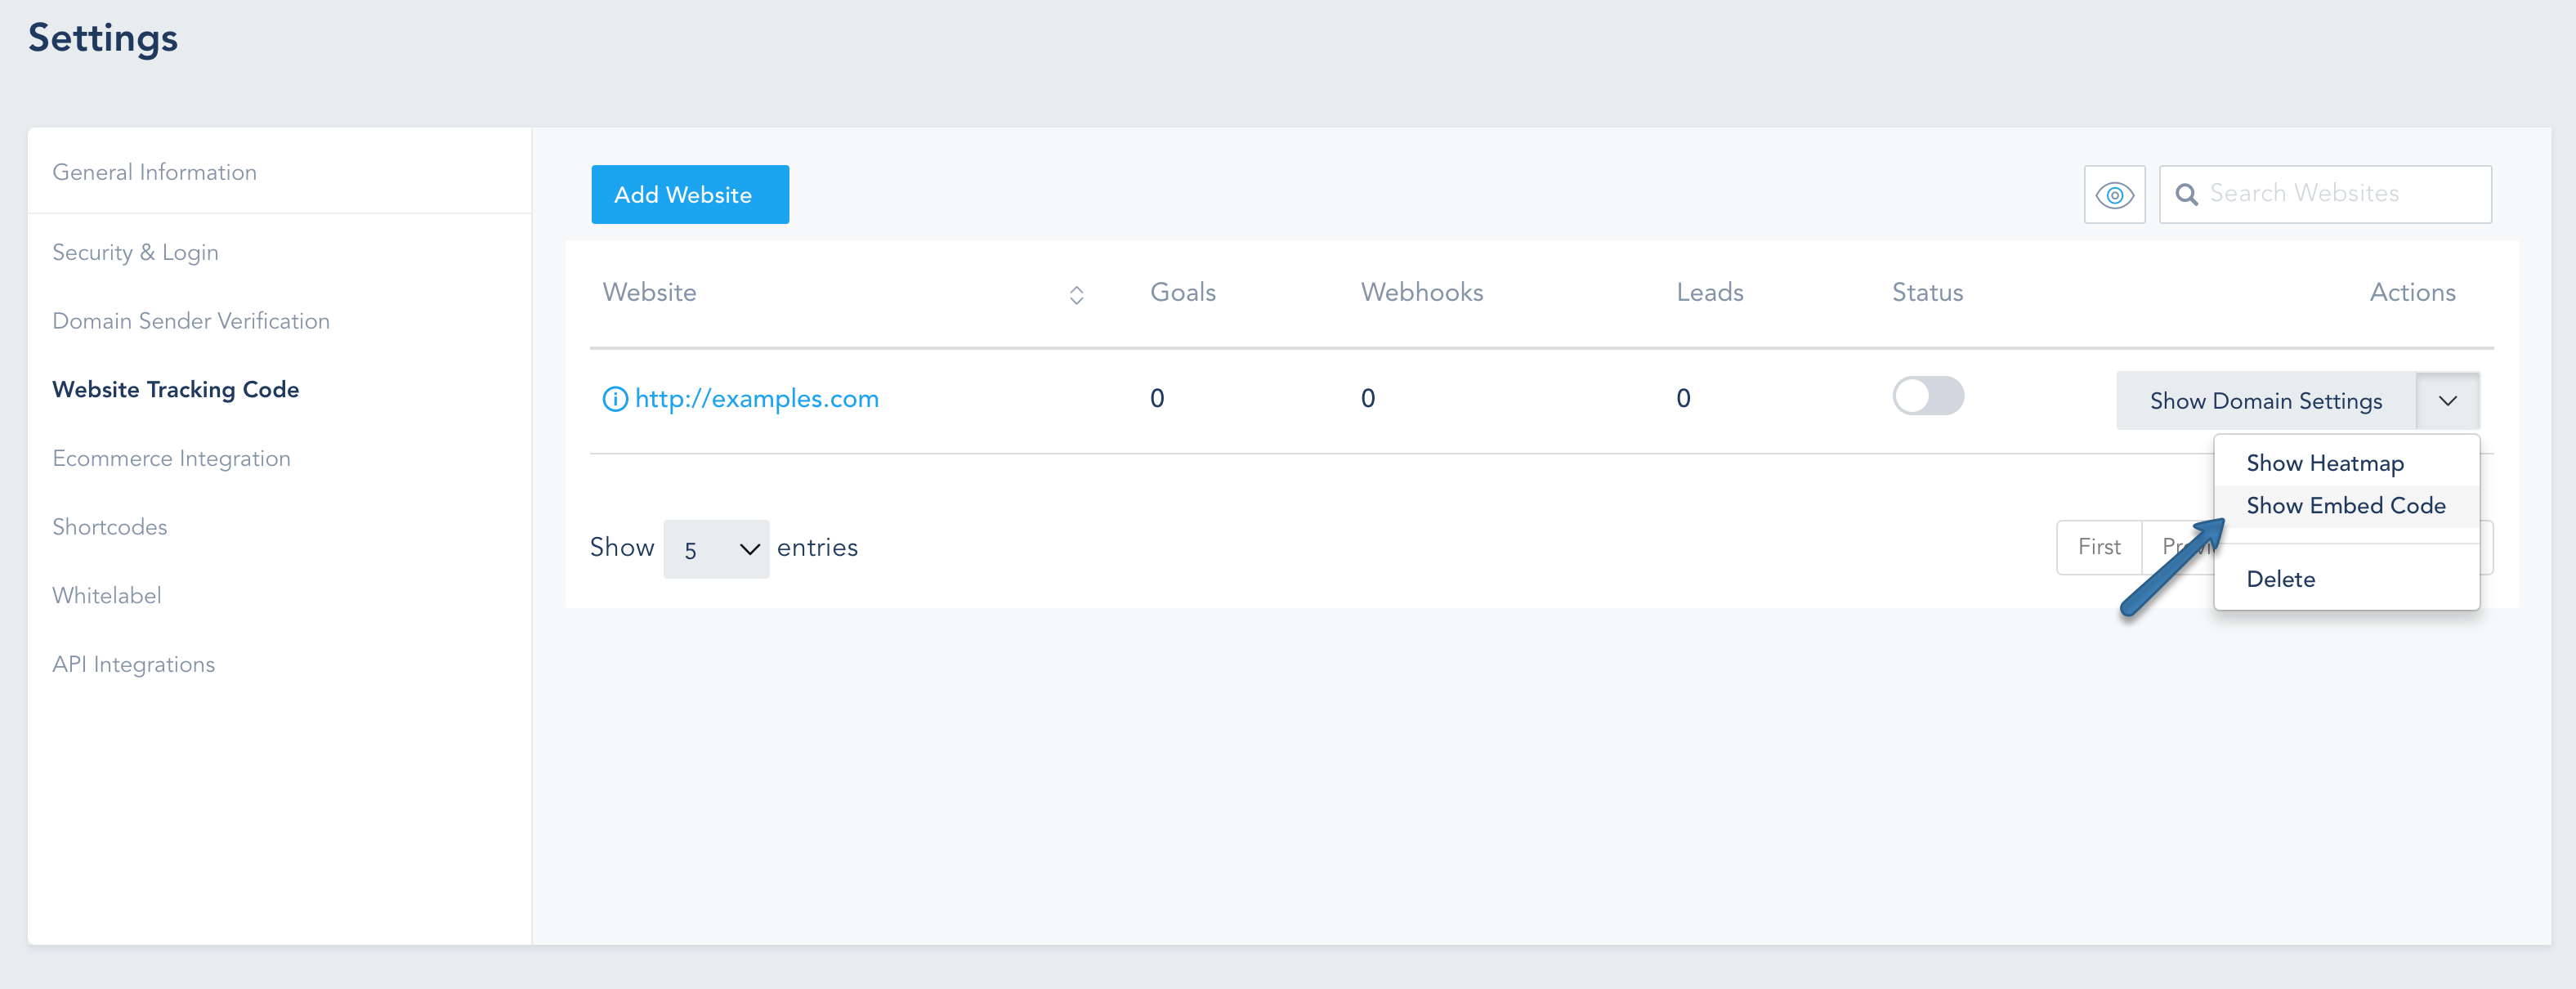
Settings ->Website Tracking Code and clicking on Show Domain Settings for the website you want to track conversion.

In the Domain Settings, Turn on the Active Ecommerce Tracking. In e-commerce settings  you can specify the number of days to attribute the conversion.

Important note to take into consideration when using e-commerce conversion tracking:

  • By default, the conversion period is set to five days
  • Conversions are tracked if someone clicks on a link in an email, SMS, or Browser push.
  • Conversion will be counted for the last link clicked. For example, if the contact receives 2 emails, clicks on the link in both emails, and then places an order within the conversion period, the conversion will be counted for the last email.
  • The conversion period begins when the link is clicked. Only follow-up actions that occur within the conversion period get counted. For example, if your conversion period is 5 days, and someone places an order 6 days after clicking the link, the conversion won’t be attributed to the email.

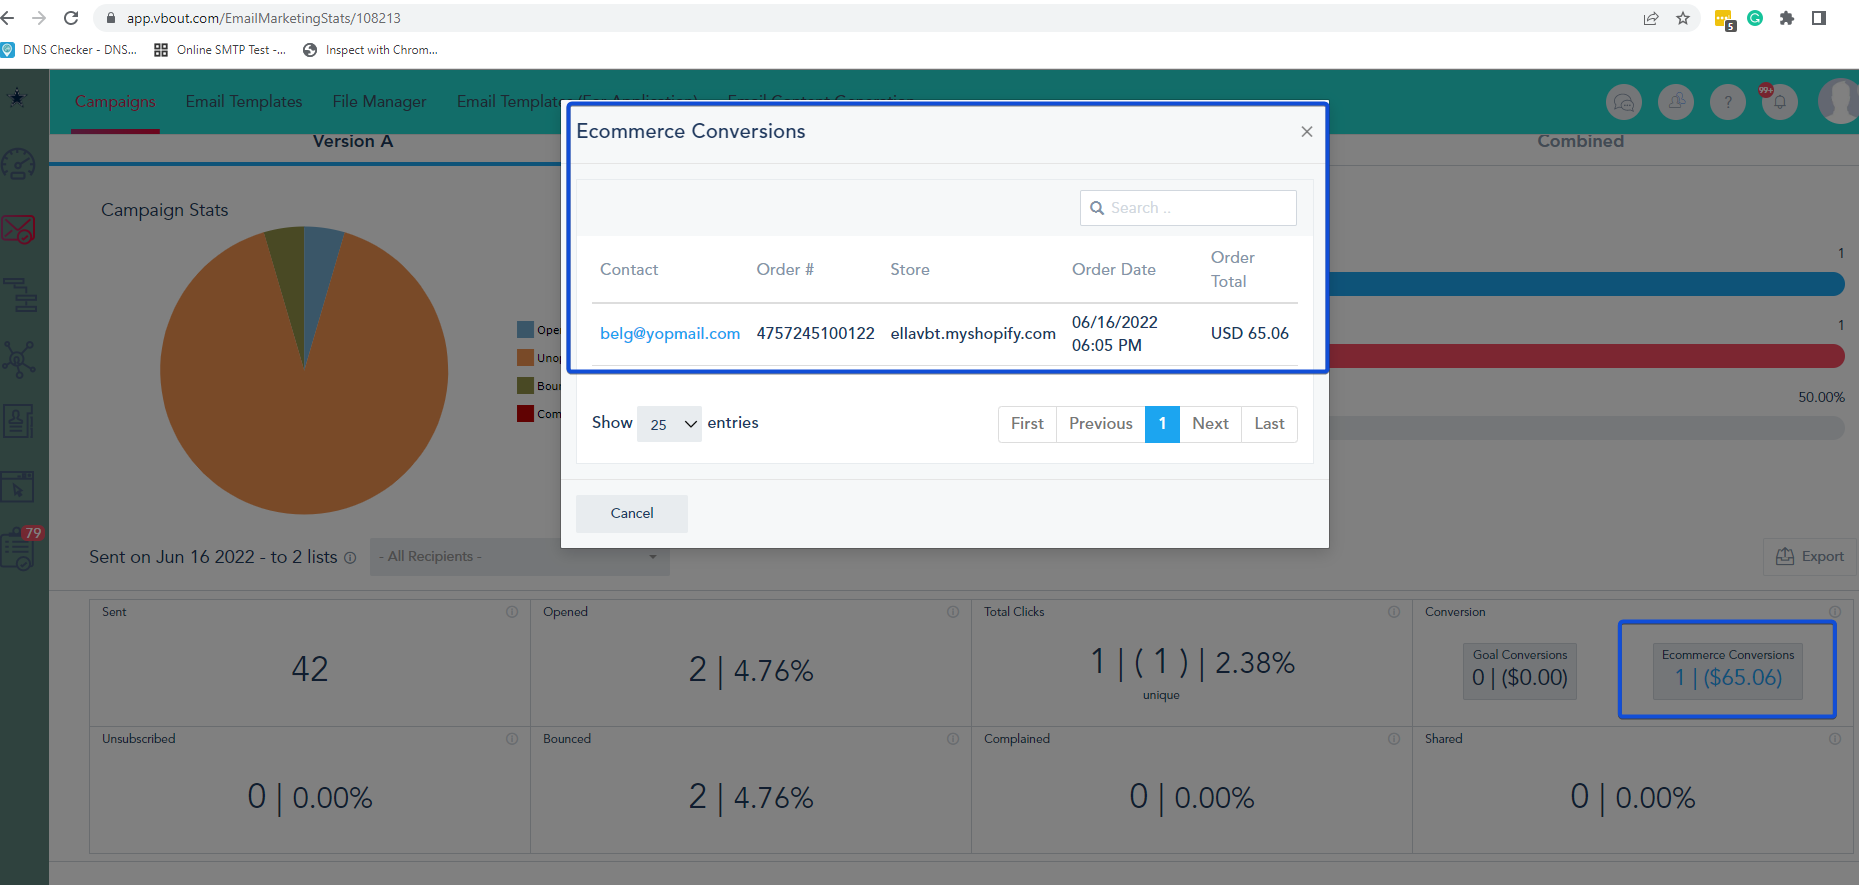
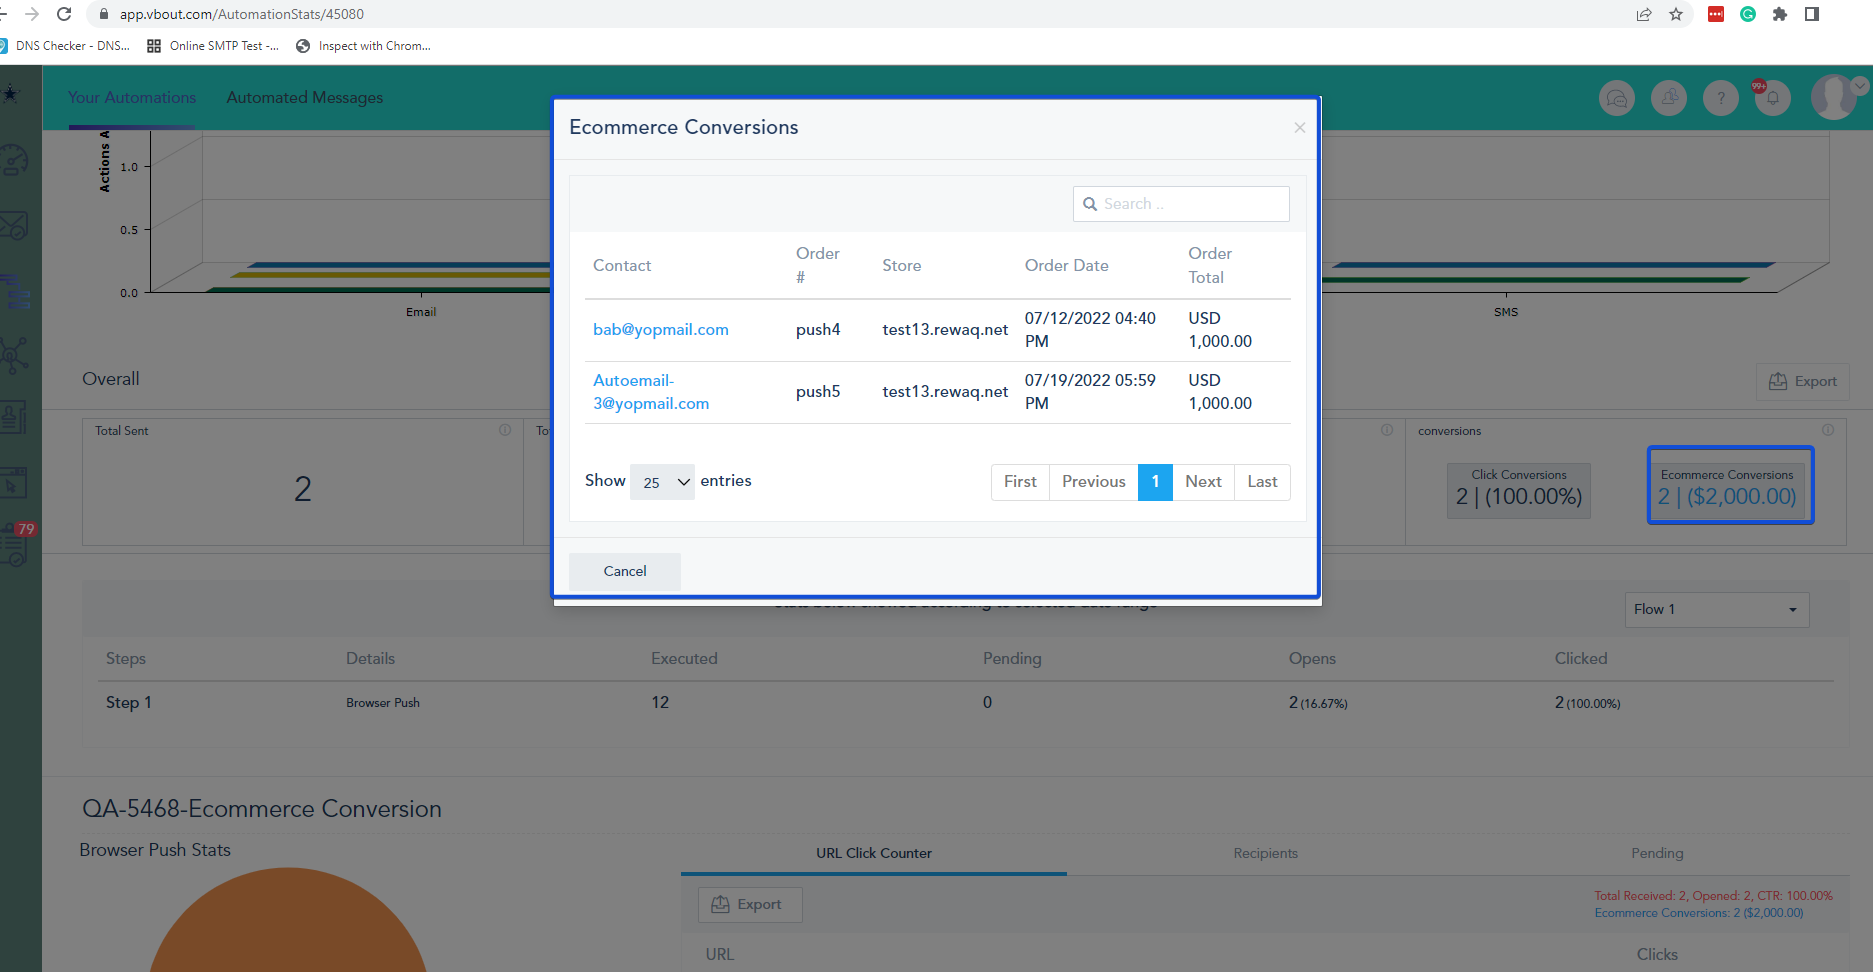
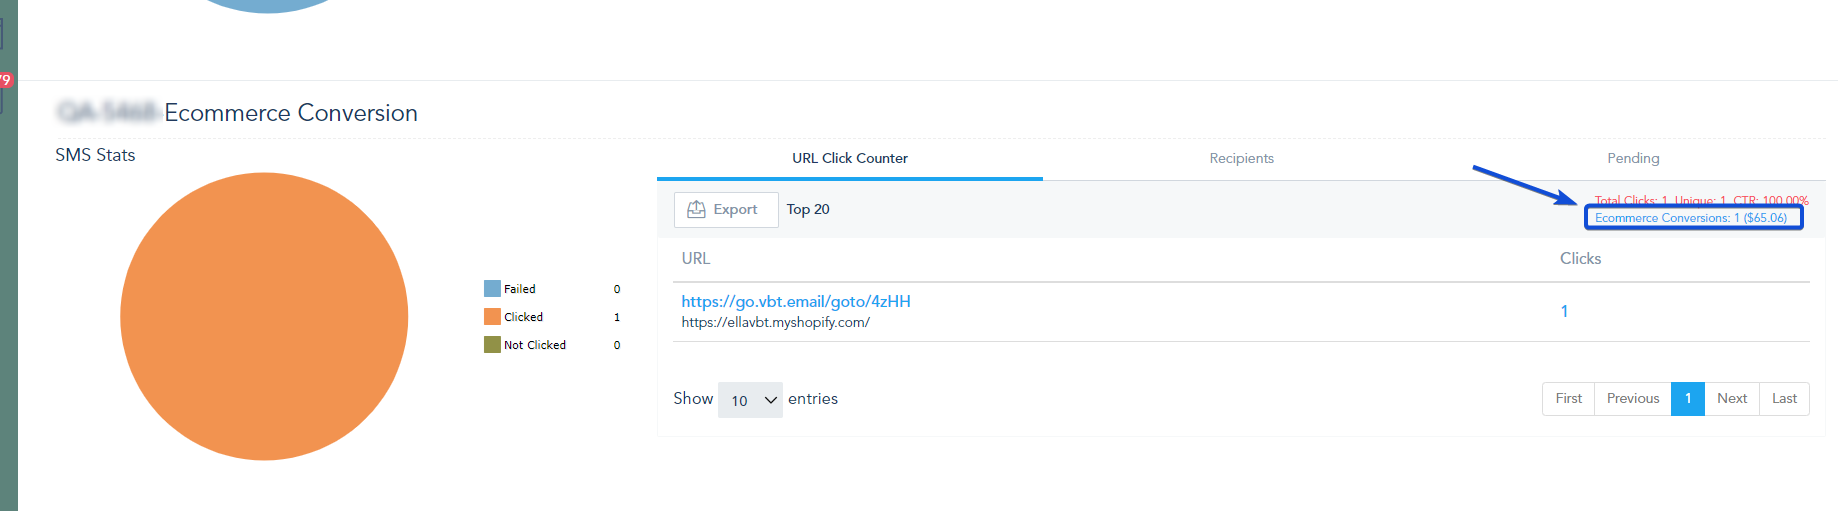
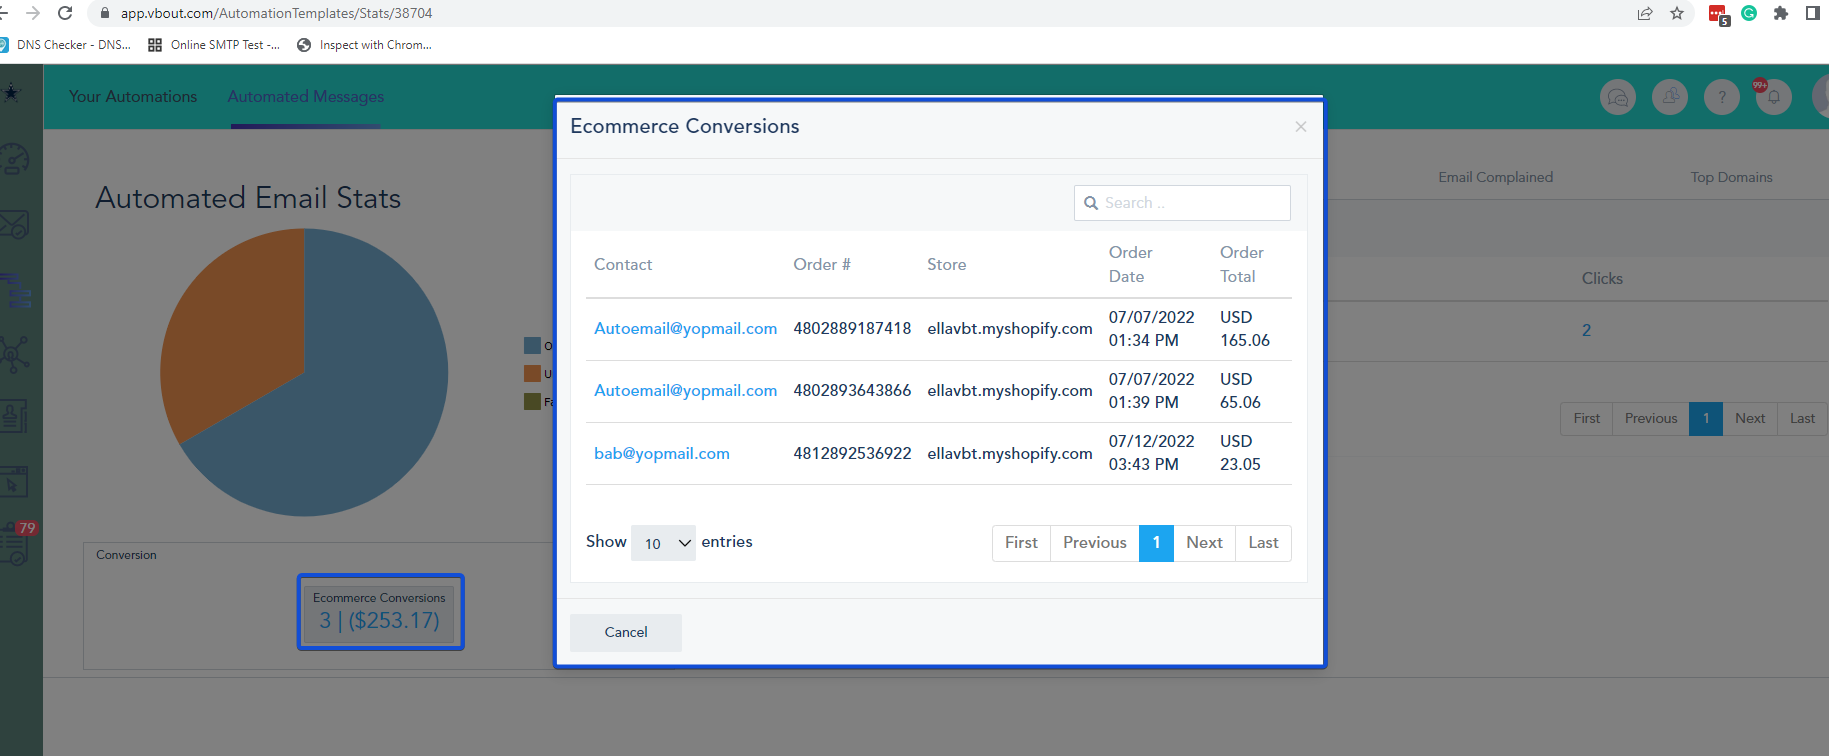
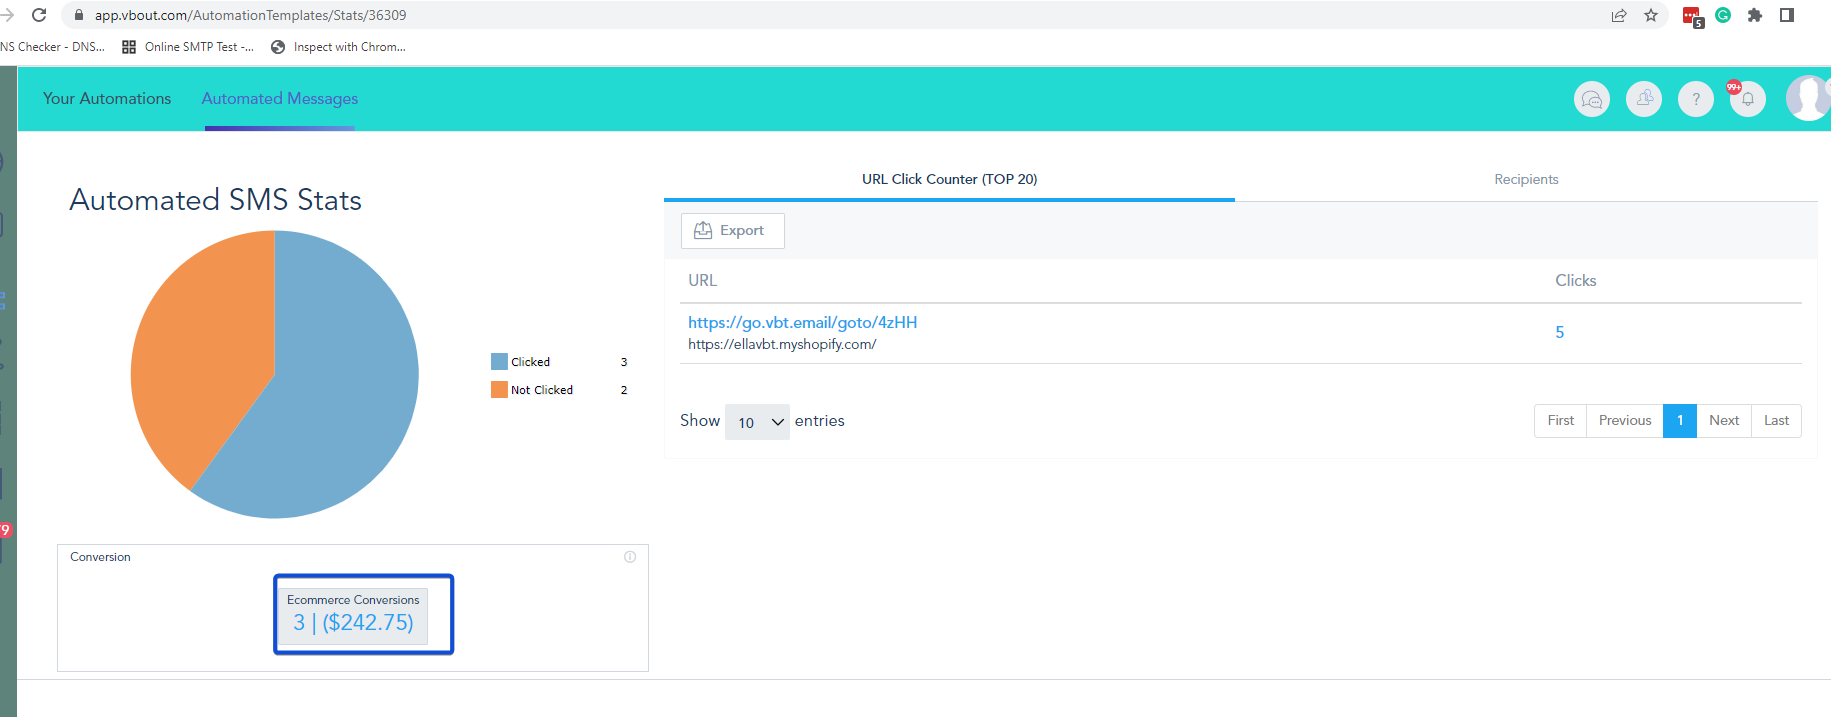
You can check the conversion in the Campaign, Automation and Automated Message Analytics. The conversion will reflect the number of orders and the total amount collected.

In Campaign Analytics

In Automation Analytics

In Automated Email Analytics

In Automated SMS Analytics

In Browser Push Analytics

In Reporting Widgets

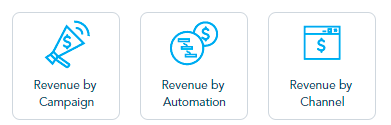
You can check the revenue conversion for each campaign, automation, or by channel in the Revenue by Campaign, Revenue by Automation, and Revenue by Channel widget on your dashboard.

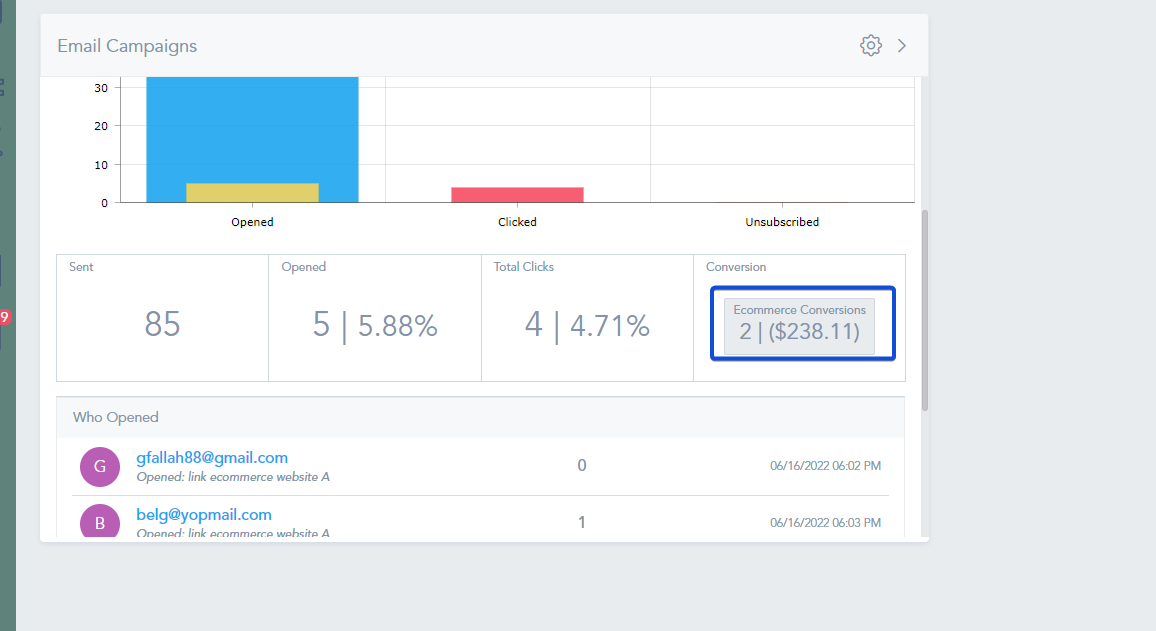
Also, you can see the e-commerce conversion for your email campaign, in the Email Campaigns widget on your dashboard

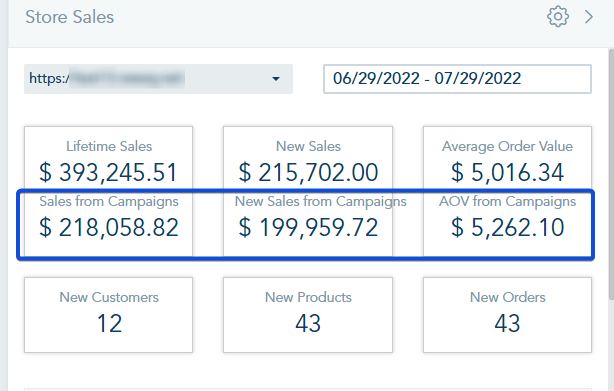
In the Stores Sales widget, you can check the Sales and Average Order Value converted from your Campaigns.

Get Started

How to activate your Referral Program

The affiliate program allows you to become a marketing technology partner and build new revenue opportunities. Since this program is long-term, you will add significant value to your audience.

To join the  affiliate program, create a referral partner type account here and activate your referral link from your referral page.

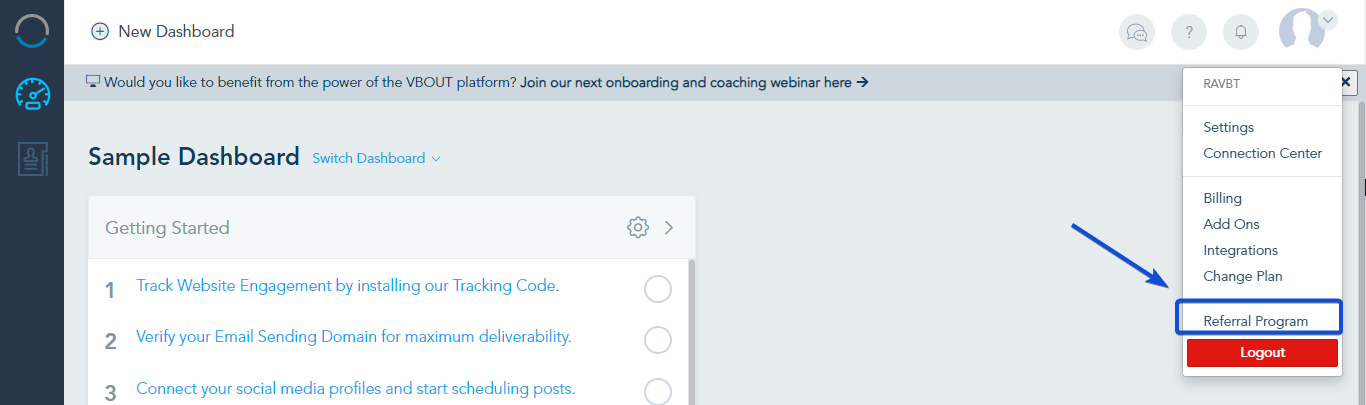
Once, you sign up to your referral account, you will be redirected to your dashboard. To access the Referral program, open the menu next to your profile and go to Referral Program.

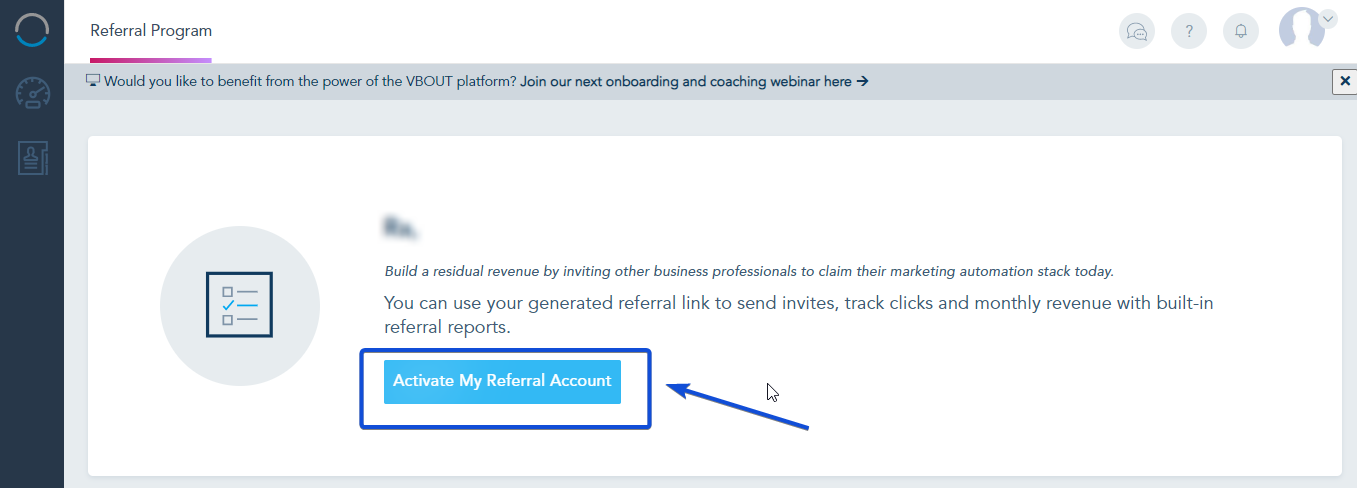
You will prompt to activate your Referral program, click on Activate My Referral Account.

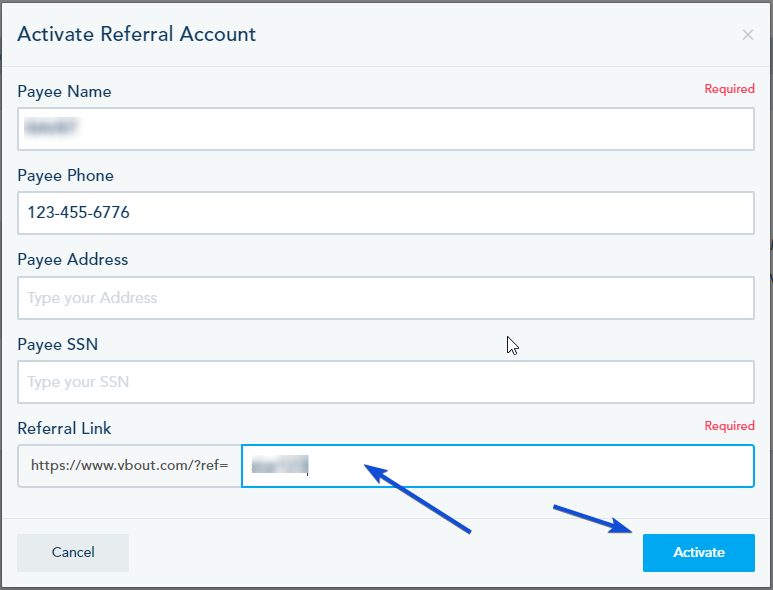
Fill in the required information, and choose your unique referral ID. This ID should be unique, you will be notified if this ID already exists.

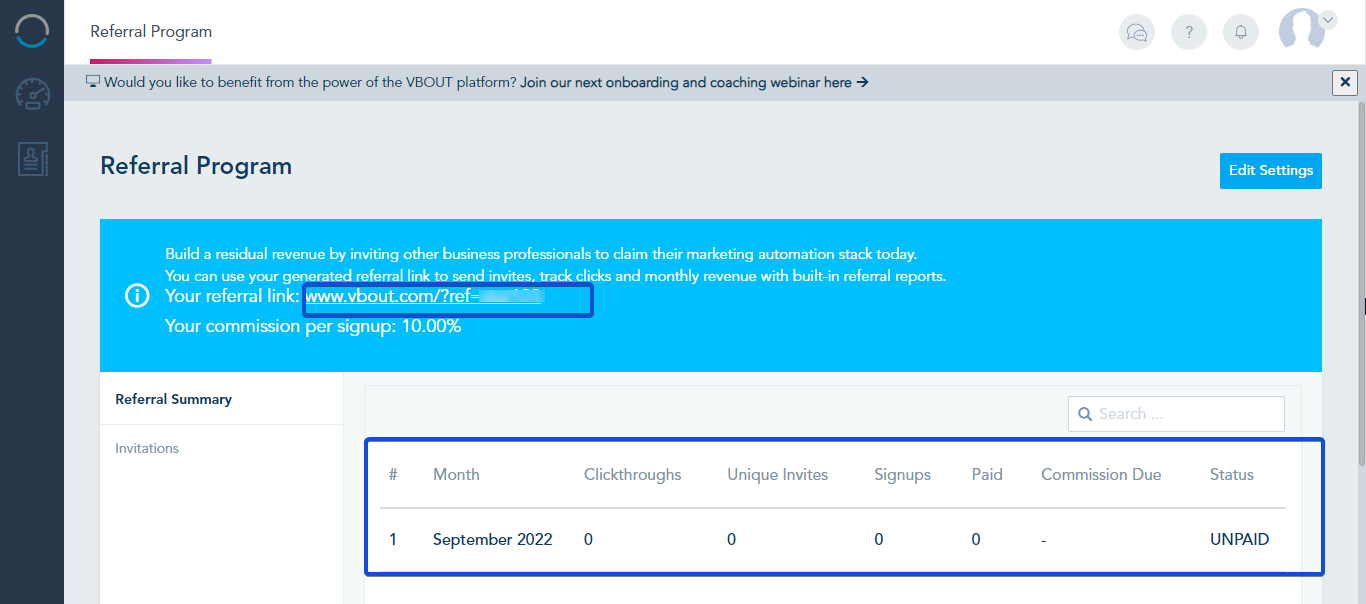
Once done, your account will be approved for 10% commission and you will have your own ID link to share.

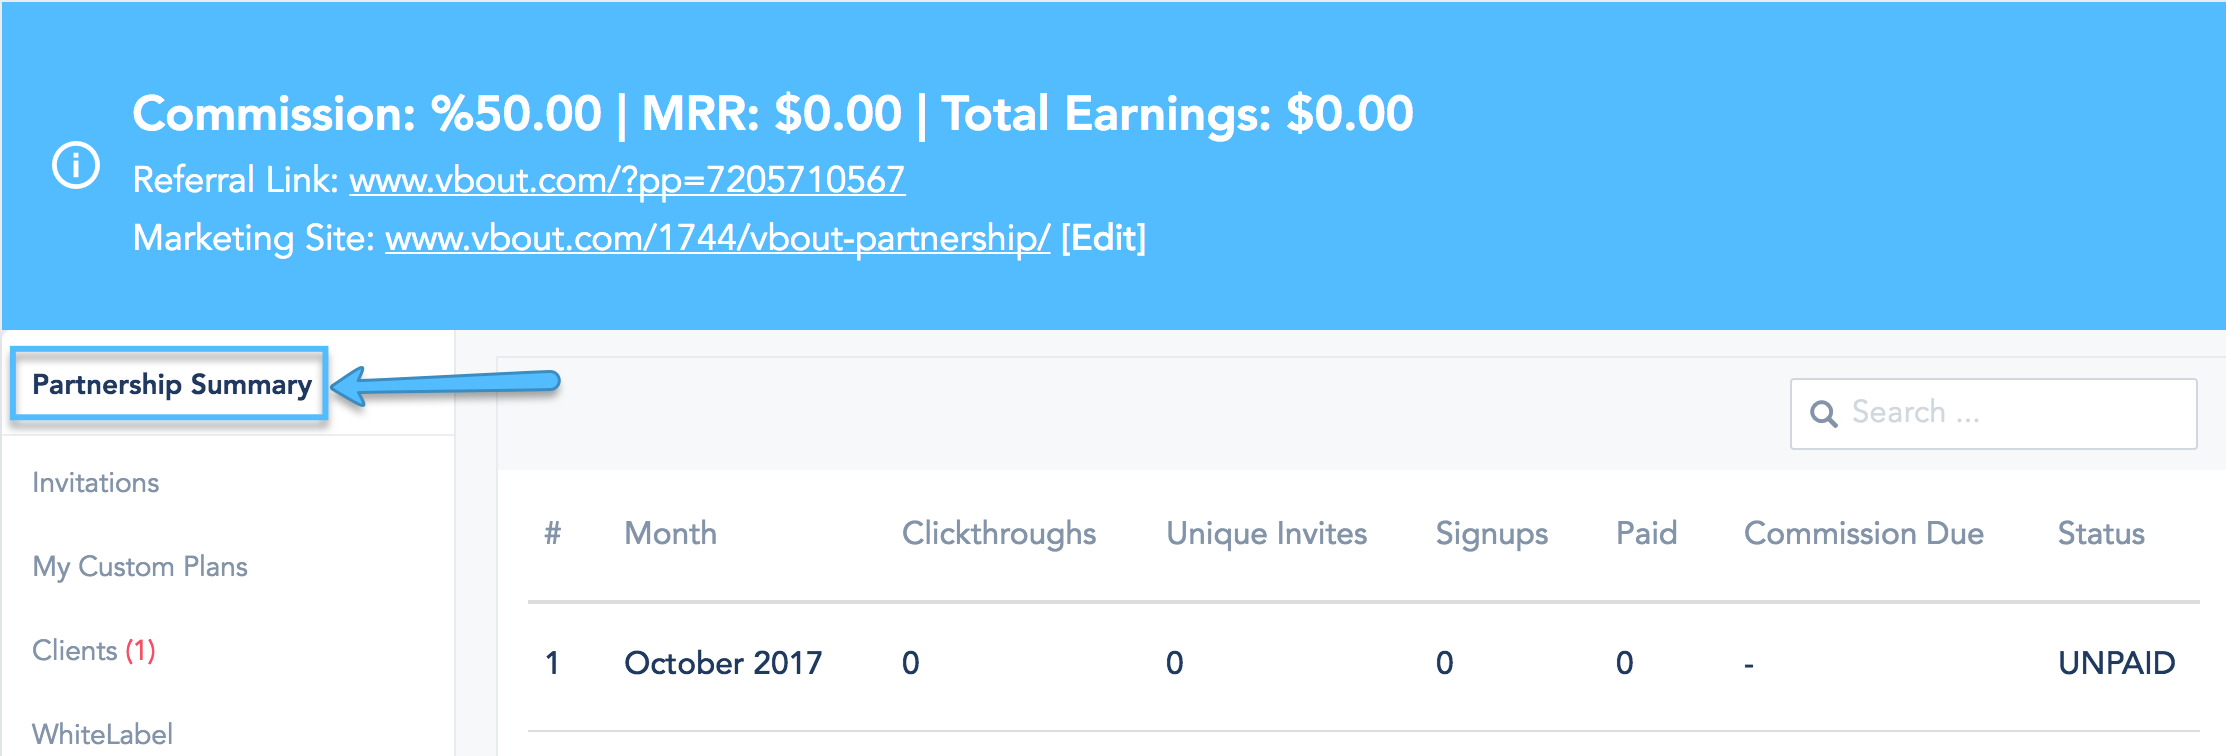
You will have a breakdown of all the clickthroughs that came from the link you’ve shared, the unique invites you’ve sent,  the conversion signup from those clicks, as well as the commission due for that month. The status indicates if the commission was PAID or still UNPAID.

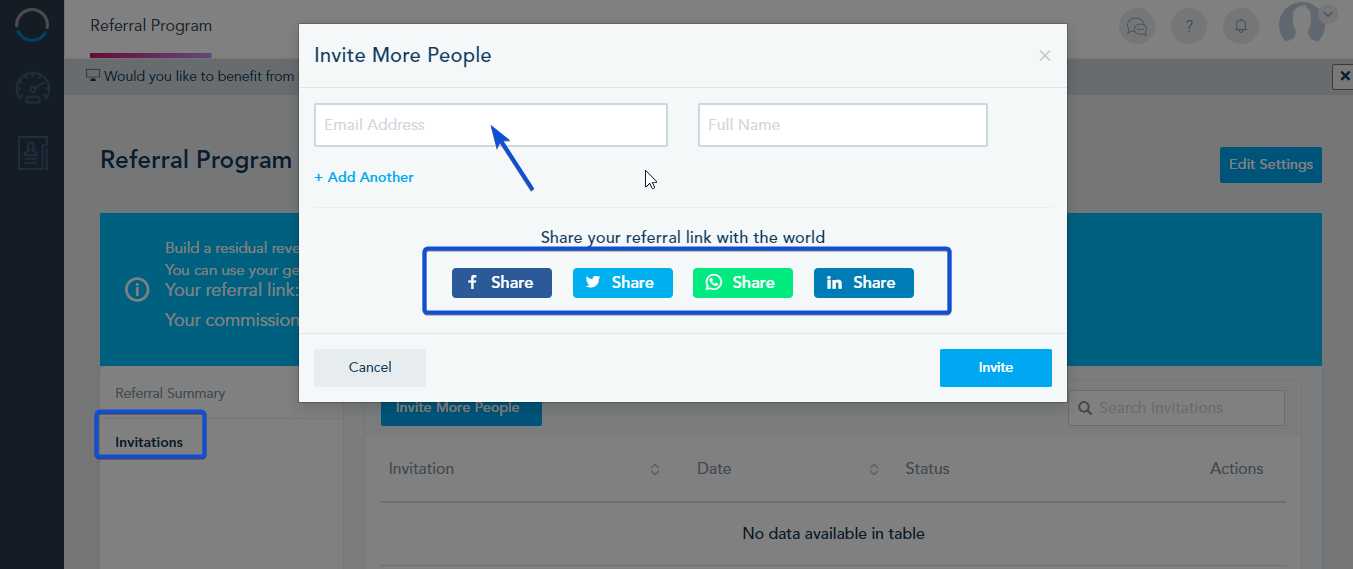
Also, you have the option to send Invitations to specific Email addresses or over your Social Media profile. Go to Invitation, specify the email address to share this link or share over social media.

How to create Audiences based on Tags

You can segment your lists based on specific tags using Audiences.

To create au audience, go to Contacts tab -> Audiences – > Create Audience.

You will be prompted to give your audience a name, choose the lists you want to target and add the “Tag Name” condition.
You have the option to add multiple tags by adding an additional “Tag Name ” condition to match. The contact needs either to match all the specified conditions (using AND) or one of them (using OR).

Once done, click on Save Audience.

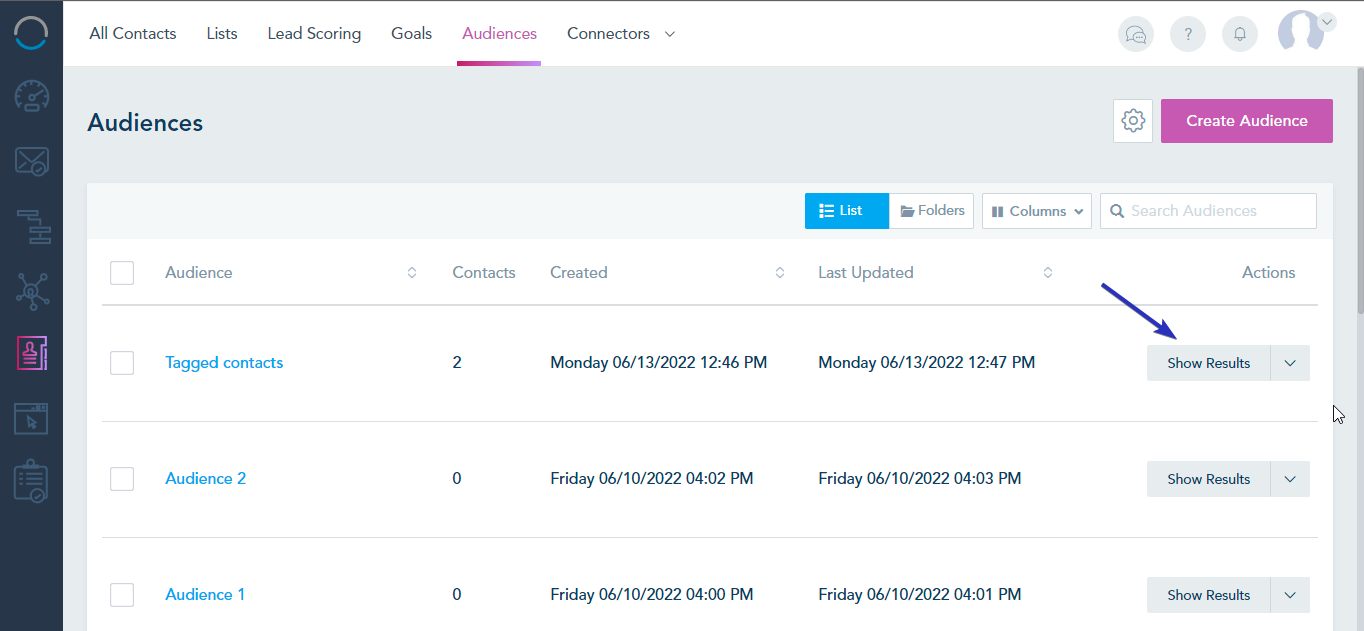
The Audience will start processing. To view the Audience result, click on the Show Results option of your audience.


Get Started

How to manage subaccounts social calendar from your agency

You can manage your subaccounts social media calendar and create posts from your agency partner portal

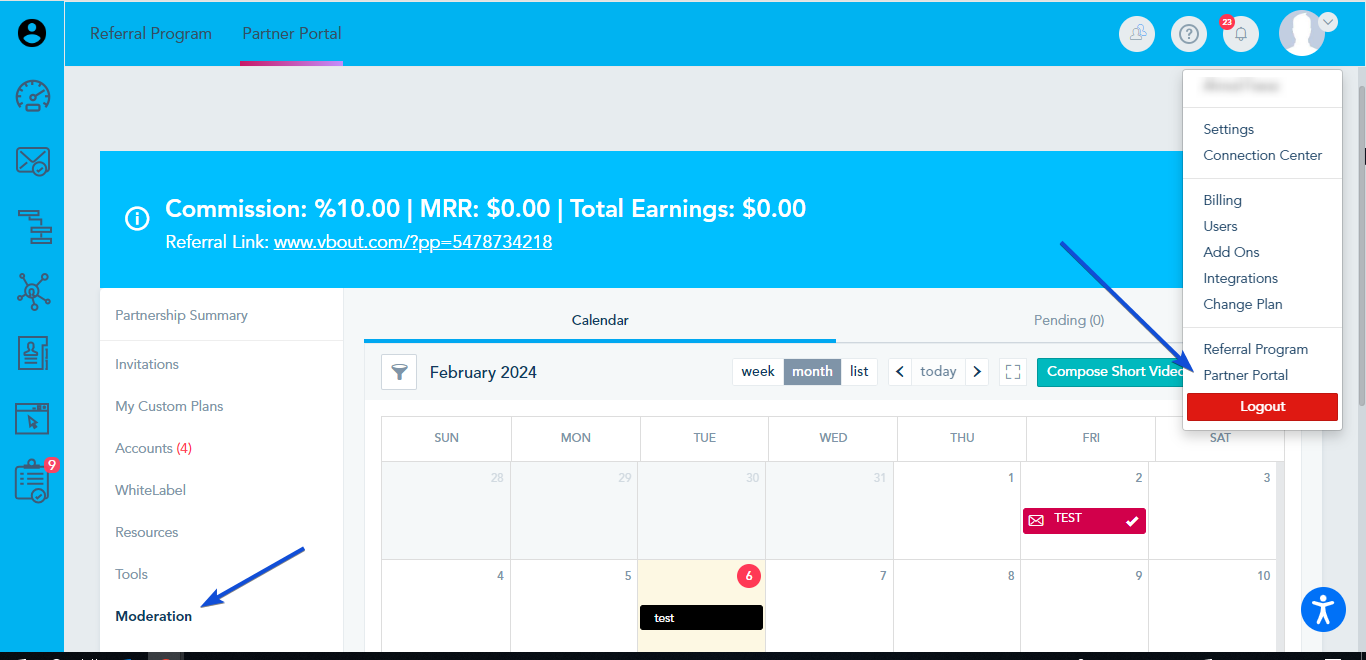
  • Navigate to the menu drop-down and select Partner Portal.
  • Choose Moderation from the options.

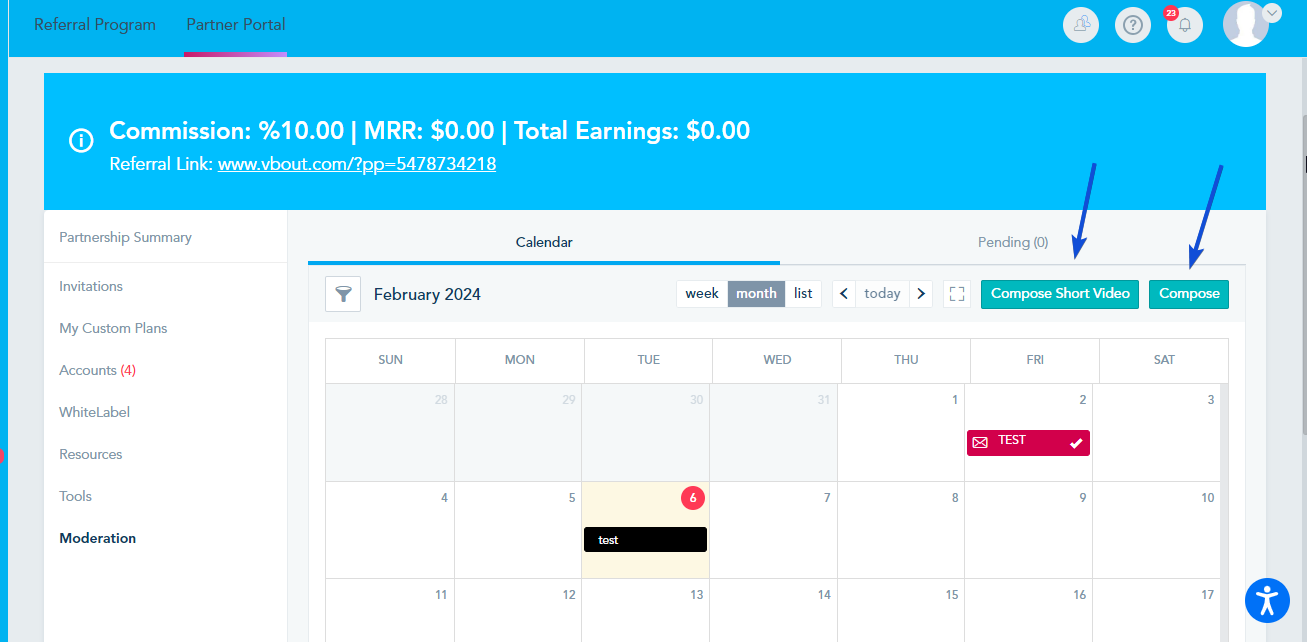
You can locate the Social Calendar. This calendar displays all scheduled posts for your subaccounts.

Click on either Compose or Compose Short Video to begin creating a new post.

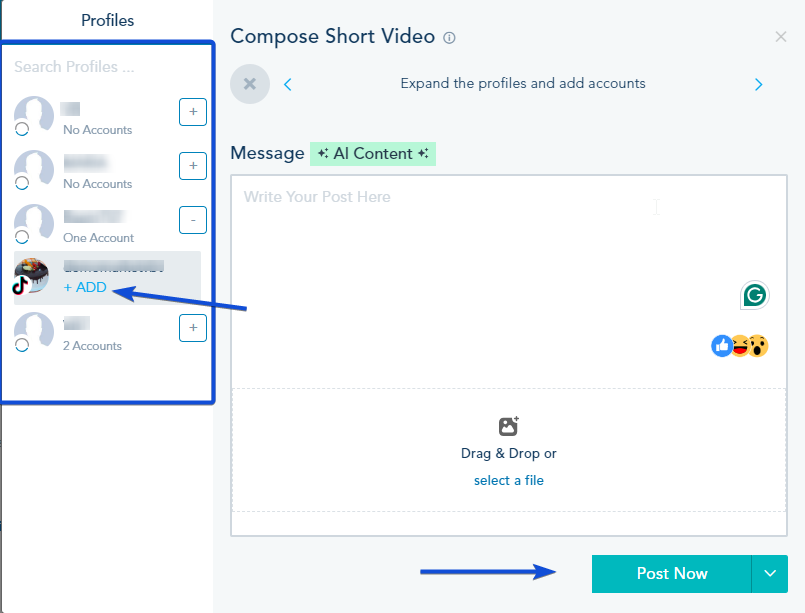
  • You’ll be prompted to select the social profiles associated with your subaccounts for posting.
  • Add text and media content to your post as desired.
  • Decide whether to publish your post immediately or schedule it for a later date.

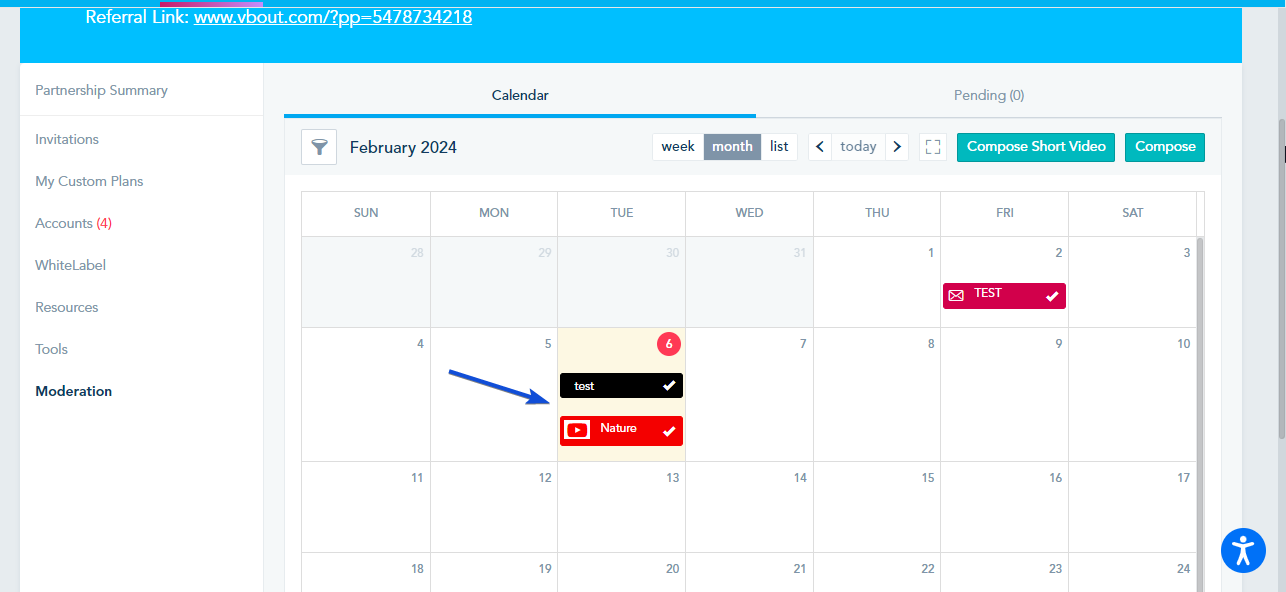
Once your post is either published or scheduled, you can review it within your Social Calendar.

Get Started

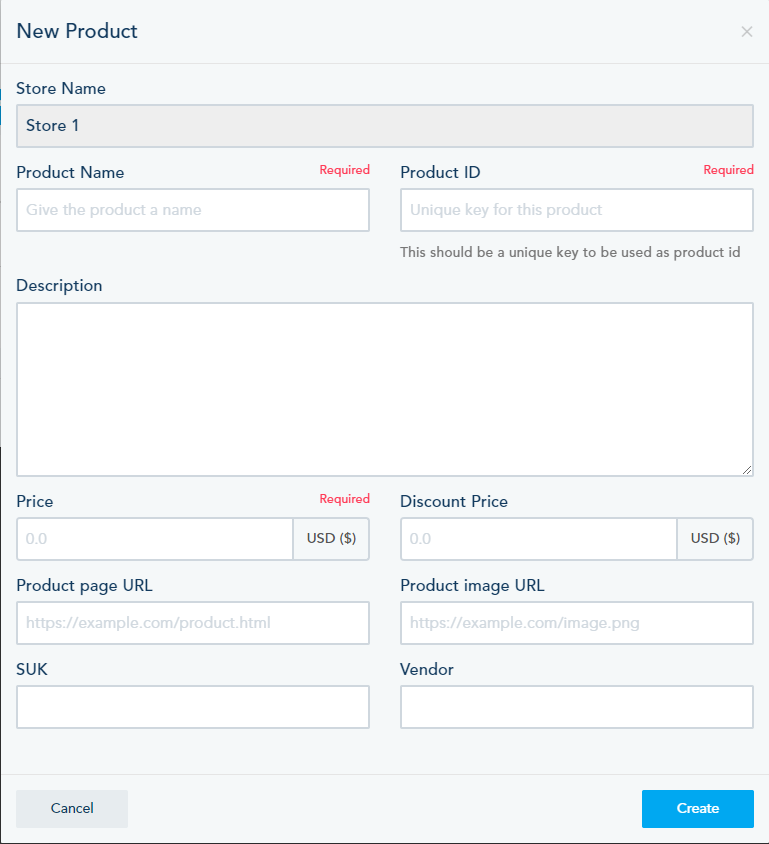
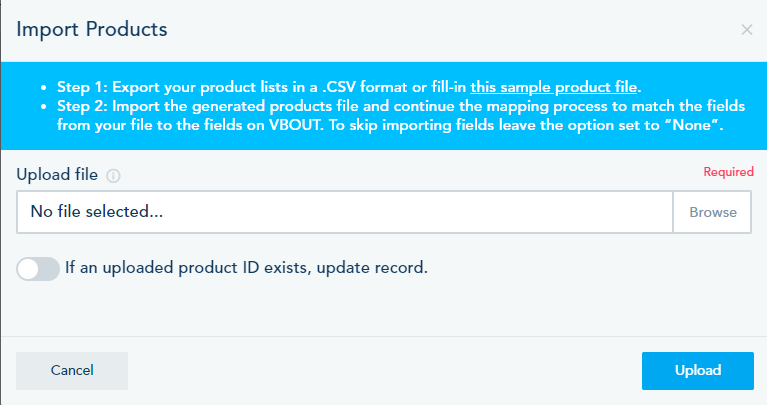
How to import your products feed to the platform

You can import your product feeds to the platform by following the below steps:

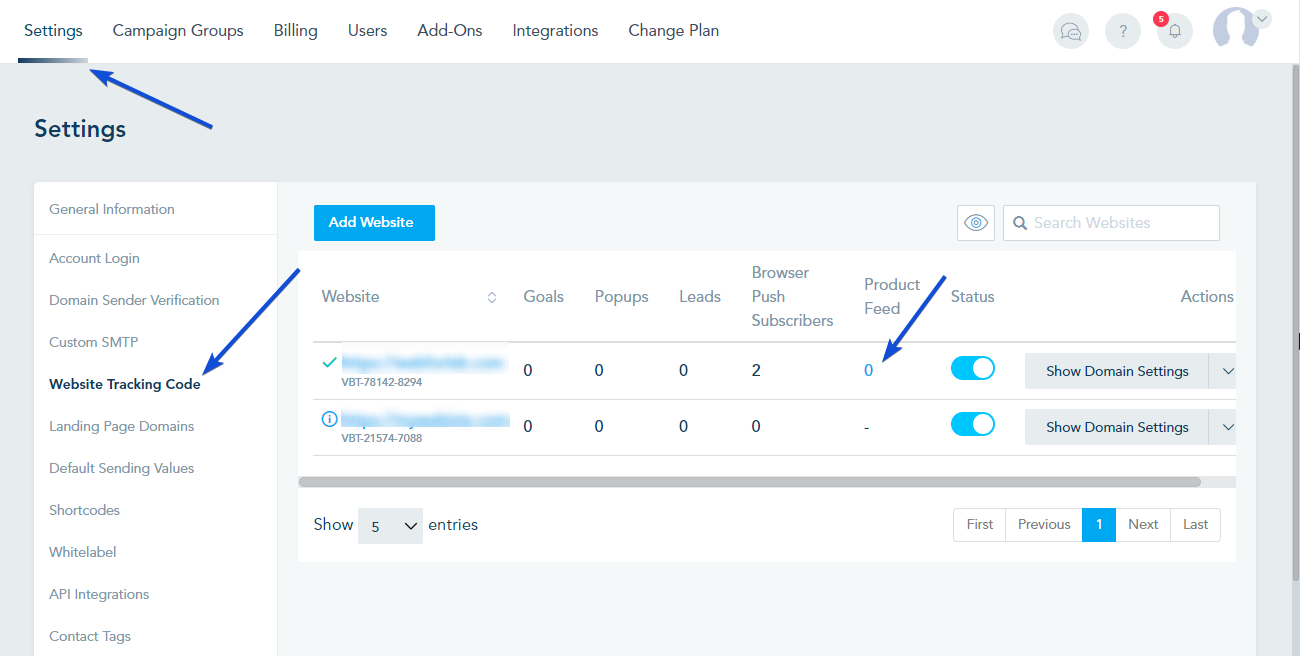
Go to Settings – > Website Tracking code, and click on the number below the Product Feed column.

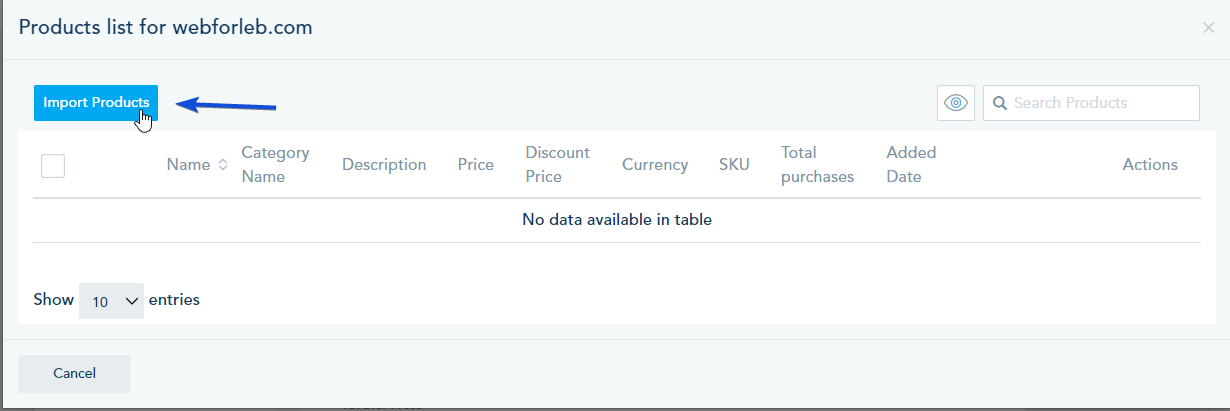
Click on Import Products in the new window.

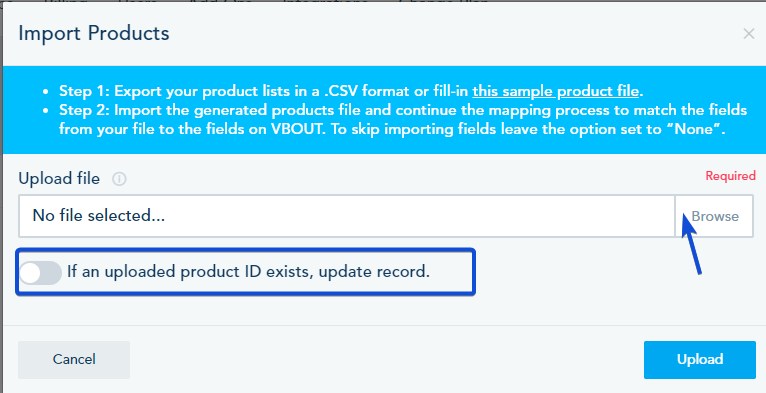
Upload the CSV file that you have exported from your shop or you can fill in the sample product feed file available.

To update the existing product feed, turn on If an uploaded product ID exists, update record.

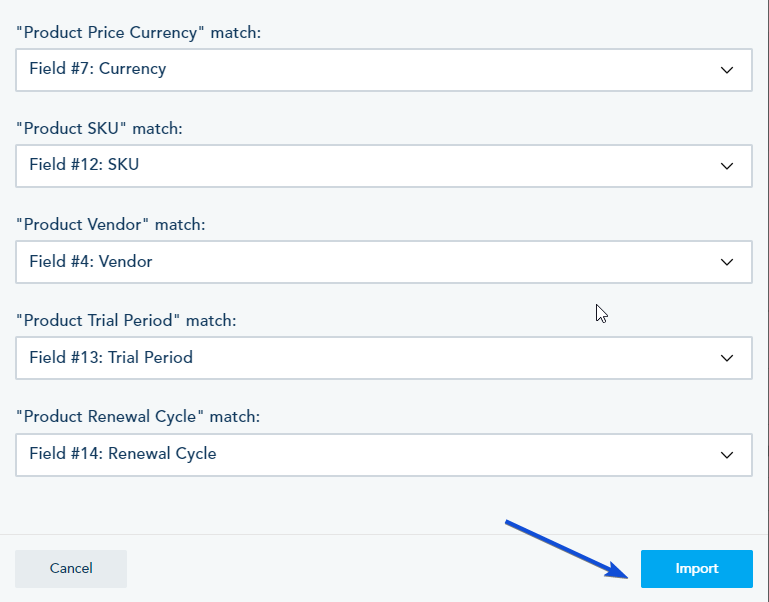
Next, map the product feed fields columns to the available fields in the platform.

Once done, click on Import.


When the import process is done, you will receive an email confirmation with the summary of the import.


Get Started

How to personalize your SMS message

You have the option to personalize your SMS message on the platform using Shortcode.

  • Personalizing the body text Message

First, create your SMS template by going  to Automation -> Automated Messages -> Create Automated Messages.

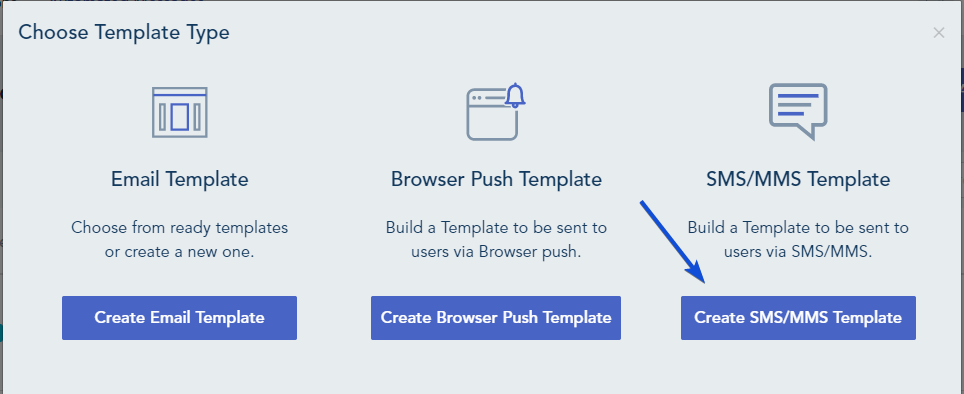
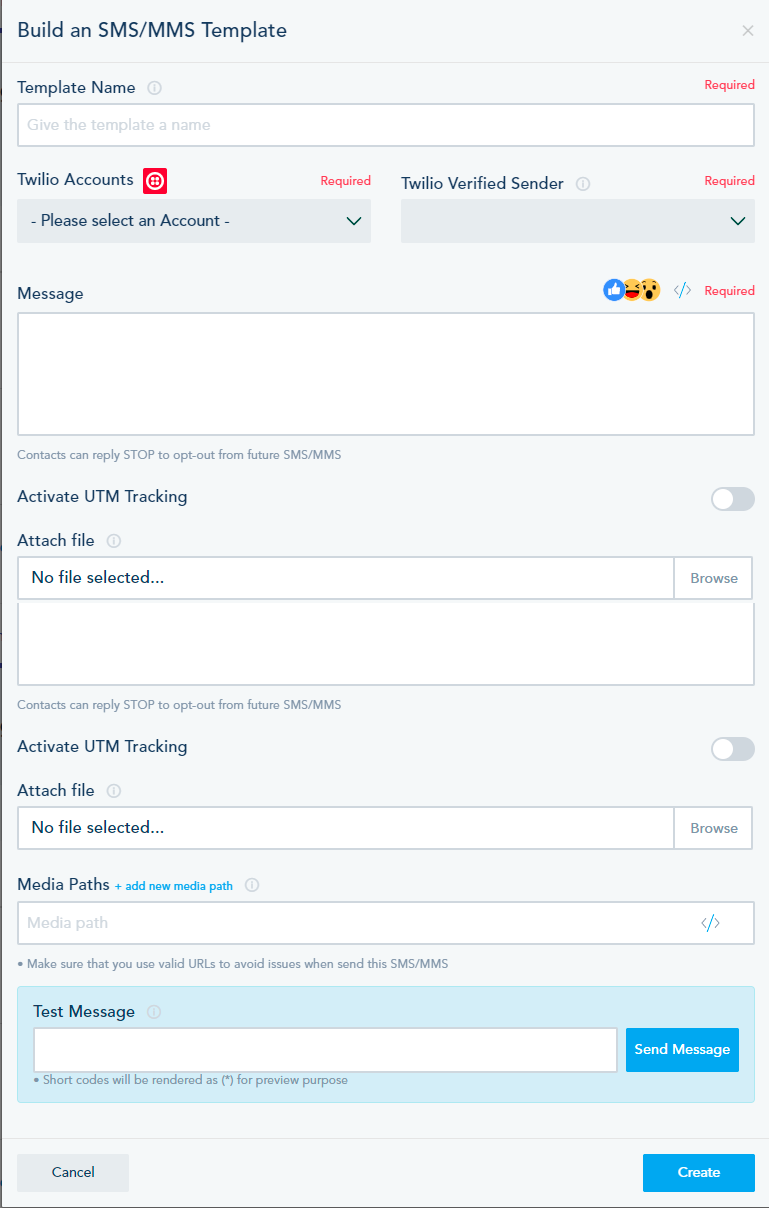
Choose Create SMS/MMS Template.

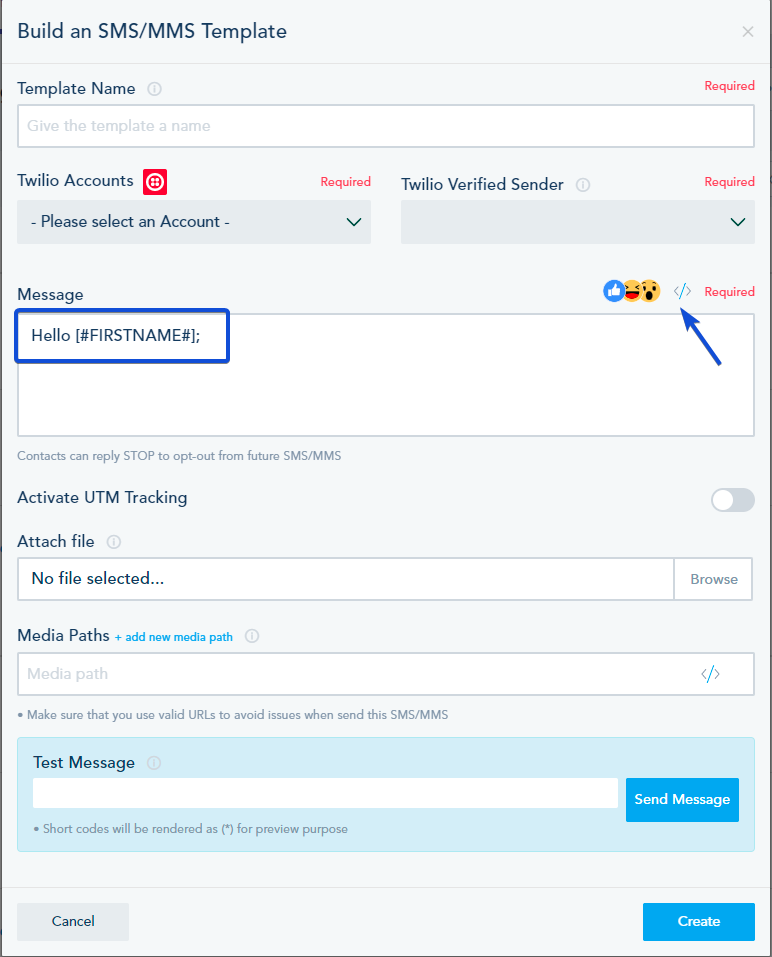
You can personalize your text message by adding Shortcode, for example: starting your text with: “Hello [#FIRSTNAME#]”.

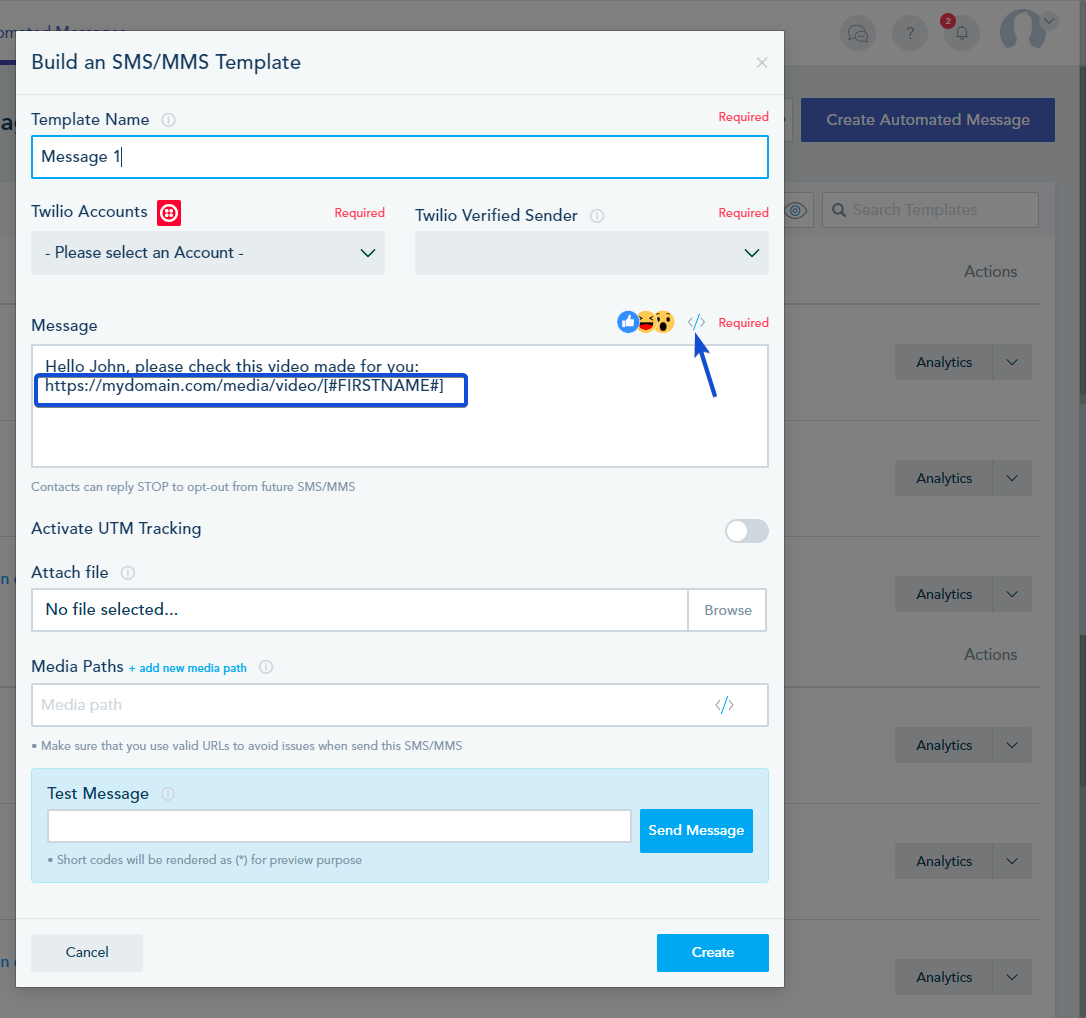
  • Personalize Links inside the text message

Inside your text message, you can add your personalized links using Shortcode.

  • Personalize the media path of text message

You can personalize your media paths by using Shortcode.

Get Started

How to create your own Product Feed

You have the ability to generate your own product feed, market your products, and receive payments through the payment form. This functionality empowers you to establish your own online store (product feed) without requiring integration with platforms like Shopify or WooCommerce.

To achieve this, follow the below steps:

Step 1: Create your Product feed

  • Navigate to the Settings -> E-commerce Product Feeds -> Add Product Feed
  • Give your Product Feed a name and choose your currency.

Step 2: Add your Products

Once your Product feed is created, proceed with the following actions:
Click on “Products” located next to your Product Feed.

You have two options: you can either create a new product or import existing ones.

To add a new product:

  1. Click on “Add Product.”
  2. Fill in the product details, ensuring that you include Product name, Product ID, and Price.
  3. Click on “Create” once you’ve filled in the information.

To import products:

  1. Click on “Import Products.”
  2. Follow the provided instructions to upload your file.

Step 3: Create your Payment form

  • In the Form builder, locate the “Create New Field” section.
  • Select “Payment” from the options.
  • Click on “Products” to add the product payment field.
  • After adding the “Payment Product” field, you will be prompted to select your e-commerce store.
  • Choose the Product Feed you previously created.
  • You can then begin by clicking on “Add Product” to select an existing product or “Add New Product” to your Product feed.

For more details on how to create a payment form, you can check this link.

Once a contact completes a payment form, the payment will show in the lead profile as a completed order.

In the order details, you can see your product feed as the store name.

Get Started

A/B testing

To turn on A/B testing for your campaign, click on the A/B Campaign option during the first step of the campaign wizard (Setup).

Once you select A/B campaign, you will need to provide additional campaign related details like the Test Variable. It can be the Subject Line, Content, From Email or From Name. Once you select your variable, you need to provide a value for each version for this variable. For example, if you choose your Test Variable to be Subject Line, then you need to provide a subject line for Version A and a subject line for Version B. The split setting will ask you to configure how many emails will be sent to your target lists by splitting the total recipients into three groups. Subset A will get the first variation of your campaign, Subset B will get the second variation. Subset C will receive the winning version of both subsets.

If you chose the different content test, you will be prompted to insert both campaign content from the template builder screen.

Get Started

Using ChatGPT plugin commands within the platform dashboard

Within the platform, you have the capability to utilize ChatGPT commands for executing a range of actions.

To achieve this functionality, please follow the below steps:

Step 1: Connecting your OpenAI Account

  1. Connect your own OpenAI account by navigating to the Connection Center and clicking on “Connect to OpenAI.”
  2.  Provide a name for your OpenAI account and enter your API key.
  3. Optionally, select this account as your default AI account.

Step 2: Using Commands

Now that you have connected your OpenAI , you can start using commands to perform various actions by going to the help icon -> AI Powered Support

Here is a list of supported actions and examples of how to use them:

Contact Management:

  • Get Contact By Email: Retrieve contact information by specifying the email address.
  • Get Contact: Retrieve contact information using the contact ID
  • Add Contact: Create a new contact by providing the necessary details
  • Edit Contact: Update an existing contact’s details.
  • Delete Contact: Remove a contact from your VBOUT account.
  • Move Contact: Transfer a contact from one list to another.
  • Add Activity: Add an activity to a contact’s timeline.
  • Get Contacts By Phone Number: Retrieve contacts based on their phone number.
  • Add Tag: Assign a tag to a contact.
  • Remove Tag: Remove a tag from a contact.
  • Get Contacts In List: Retrieve contacts within a specific list.
  • Get Contact Timeline Activities: Retrieve a contact’s timeline activities.

List Management:

  • Get List: Retrieve information about a specific list.
  • Add List: Create a new list.
  • Delete List: Remove a list from your VBOUT account.
  • Edit List: Update the details of an existing list
  • Get Lists: Retrieve a list of all existing lists.

Campaign Automation:

  • Get Campaign: Retrieve information about a specific campaign.
  • Campaign Stats: Obtain performance insights for a campaign.
  • Add Campaign: Create a new campaign. You can specify a template name to attach it to your campaign.
  • Edit Campaign: Update an existing campaign’s details.
  • Delete Campaign: Remove a campaign from your VBOUT account.
  • Get Campaigns: Retrieve a list of all existing campaigns.

Social Media Management:

  • Get Channels: Retrieve a list of available social media channels.
  • Get Calendar: Retrieve your social media publishing calendar.
  • Get Stats: Retrieve engagement metrics for a specific social media post.
  • Get Post: Retrieve information about a specific social media post.
  • Add Post: Create a new social media post.
  • Edit Post: Update an existing social media post.
  • Delete Post: Remove a social media post.

Custom Shortcode:

  • Get Custom Shortcodes: Retrieve a list of custom shortcodes.
  • Add Custom Shortcode: Create a new custom shortcode.
  • Edit Custom Shortcode: Update an existing custom shortcode.
  • Delete Custom Shortcode: Remove a custom shortcode.

An example of editing a contact using ChatGPT:


Get Started


Managing social media groups

You can group social media profiles for an easier publishing and stream management. This is useful when managing large amount of profiles for different brands or you have many team members assigned different groups of profiles.

You can create a group from the Compose dialog under Social Media > Queue:

add-group

add-group-screen-2

After creating the group, you will have the option to edit or delete it from the plus sign next to the group name.

Once a group is created, you can choose a group to populate all the profiles inside of it for posting:

You have the ability to filter the calendar by group(s):

filter-calendar

To manage multiple social media feeds from different profiles you can click on the Social Media > Streams and choose groups from the left panel. You will see all the active Feeds from each profile side by side with a horizontal scroll. Feel free to drag and arrange feeds in the order you’d like to see them:

Group-Streams

To manage which feeds to show, click on the right column +/- option and choose from the popup:

In your dashboard, Social Followers widget report can also be customized by group:

Get Started

How to enable Site Popup on Landing page

To enable Site Popup on your Landing page, please follow the below steps:

  1. Setup your Landing Page Domain:
    Create a CNAME record pointing it to for example “pages.”in your DNS record, then add this domain name in Landing Page Domains section in the platform for example “pages.domain.com”.

    Go to your Landing Page -> Domain Settings and choose your verified domain.

  2. Add Website Tracking Code:
    In the Website Tracking Code section, add the same domain “pages.domain.com” and copy the embed code.
    Please note that no need to verify the domain but make sure to turn on the status.
  3. Add the Tracking Code on your Landing Page:
    Go to your landing page, Tools -> Settings -> Tracking. Turn on the third party tracking and paste the embed code.
  4. Set up the Popup:
    Go to Site Popup, create your popup and choose your domain “pages.domain.com” in the Page URL section.

Now, you can test your Popup by accessing your landing page URL.

Get Started

Social Media Collaboration

The built-in Pipeline Manager is a tool that facilitates collaboration within your team when creating and moderating social media posts.

When you create a social media post, you can assign it to your teammates for review and approval.

This can be accomplished by either creating a new task or assigning it to an existing task after composing your post.

Navigate to Social, and select Compose or Compose Short Video.

Choose one of the following options: Create New Task or Add To Task if it already exists. When you make a selection, you will be prompted to specify the posting scheduled date and time.

You can assign the task to the relevant team member.

The created task will be visible under the Pipeline Manager page, where you can access task details.

Click on the edit icon to either Approve, Disapprove or edit the content of the post.

If the post is approved, it will be scheduled in your social media calendar.

Get Started

Email testing – sending draft emails

In order to test your email templates, you can send draft emails to yourself or your teammates using two ways:

  1. If you are inside the email builder, you can click on Tools→Send Test Email. Next you can input as many email addresses as you want as long as they are separated by a comma.


  2. If you are inside the campaign wizard, once you get to the final step (Summary). You can send test emails as well using the provided email field in the bottom.

Note: In case you have used Shortcodes in your email, these one will not show in your test email.

Get Started

Reading analytics for email campaigns

To read your campaign stats,  go to Email -> Campaigns and click on Analytics for this specific campaign.

You will see the campaign overall analytics from Open Rate, CTRs, Unsubscribes, Bounces, Conversions  and email engagement.

Additional campaign data are available to be viewed if you scroll down to the Campaign Breakdown:

  1. Use the filter to view who opened your campaign.
  2. View bounced, unsubscribed or complained emails.
  3. View campaign links that were clicked with total and unique click count.
  4. You can also view subscribers who clicked.
  5. View open locations, devices used and email clients.

You can always download this data by clicking on Export.


Get Started

Native HubSpot CRM connector

You can connect one or multiple HubSpot accounts into your dashboard and start creating sync instances for the following objects:

  • Contacts
  • Deals
  • Companies

You can access the integration tab from under the Contacts > Connectors > HubSpot Connector (Add-On must be installed or part of your plan)


The sync is bi-directional and can be customized as a one-time, recurrent or part of an automation at the contact level:

You can customize the sync data as well as your mapping criteria:

You can add different buckets of data and save your instance.


Here are some examples of how data will look like on HubSpot.

  • Campaigns open, Links clicked and Pages visited:
  • Lead status and Lead score
  • Goals reached
  • Automation triggered

Get Started

How to create an email drip

In order to start your email drip setup, you need to prepare your email series first.

So start by creating your automated messages:
From the Automation tab -> Automated Messages – > Create Automated message.

Please check this for more information on how to create Automated messages.

Then, you can start building your Email drip workflow.
From the Automation tab -> Your Automations – > Create Automation.

Your automation should start with a trigger, you can use the Joined List, meaning whenever a lead signs up to your list or fill a form, the lead will enter the email drip.

Example 1 for Email drip:
When someone signs up to the list, an email is sent after 1 minute. Email 2 will be sent after 1 day, and so on. You can add as many delays and “Send Email” action as you like.
In the Send Email action, you select the automated messages you have already created. And as for delay, you can modify the delay time based on your needs.

Example 2 for Email drip:
In this scenario, we will add a condition to check if the lead has opened the first email or not.
After someone signs up for the list, an email is sent after 1 minute.
Based on the condition, checking if the lead has opened the email after 1 day or not, you can create two different email sequences as shown below.
Please note that we need always to set a delay before the condition.

To add a condition, you need to click on the setting icon on the arrow joining the 2 items and specify the condition.

In that way, you can create your own customized workflow for an email drip.

Get Started

Native Zoho CRM connector

You can connect one or multiple Zoho accounts into your dashboard and start creating sync instances for the following objects:

  • Contacts
  • Deals
  • Companies

You can access the integration tab from under the Contacts > Zoho Connector (Add-on must be installed or part of your plan)

The sync is bi-directional and can be customized as a one-time, recurrent or part of an automation at the contact level:

You can customize the sync data as well as your mapping criteria:

You can add different buckets of data and save your instance.

Get Destination URL (if you’re using the Automation sync) by going to your List of Zoho Syncs select the drop-down and click on the “Get Destination URL” option.


Here are some examples of how data will look like on Zoho


  • Lead score and Lead status
  • Links clicked and Pages Visited
  • Campaigns open
  • Goal Reached and Automation Triggered

Get Started

Using the form API integration

Sync your website’s Native form with Lists using the Form API. Below are step by step instructions on the setup.

  • Create a list with all the necessary fields you would like to synchronize using the Fields & Form Builder.
  • Get the API code of that list. To get API code click the Embed Code Button
  • Go to the API Integration section of the popup and copy the code.
  • Get the IDs of the fields from your native website form.
  • Change the IDs of these fields and add them to the native website tracking code. Below is a code snippet example of the final embed code:
  • <script type="text/javascript">
    
    
    var _vbset = _vbset || [];
    _vbset.push(['_account', 'VBT-34685-1036']);
    _vbset.push(['_domain', 'http://honyabooks.com']);
    _vbset.push(['__vbvar__', ['_listID', '10612']]);
    _vbset.push(['__vbvar__', ['_firstname', 'custom-74066']]);
    _vbset.push(['__vbvar__', ['_lastname', 'custom-74067']]);
    _vbset.push(['__vbvar__', ['_phone', 'custom-74069']]);
    _vbset.push(['__vbvar__', ['_field-74070', 'custom-74070']]);
    _vbset.push(['__vbvar__', ['_email', 'custom-74068']]);
  • (function() {
    var vbt = document.createElement('script'); vbt.type = 'text/javascript'; vbt.async = true;
    vbt.src = ('https:' == document.location.protocol ? 'https://' : 'http://') + 'www.vbt.io/tracker?_account='+_vbset[0][1]+'&_domain='+_vbset[1][1];var s = document.getElementsByTagName('script')[0]; s.parentNode.insertBefore(vbt, s);
    })();
    
    
    </script>


Get Started

Browser Push setup

Browser Push is a great way to turn website visitors into subscribers, without providing identifiable data beyond their browser ID. This also lets you offer existing email subscribers, new ways to receive messages from you, in real time, without opening their inbox.

Below is a step-by-step guide to activate and setup Browser Push feature on your account

SETUP AND INSTALLATION:

  • Make sure that this feature is part of your plan or installed from your Add-on section on your account.
  • Under your Settings page, click on Website Tracking Code to add your website and properly install the tracking code on the footer of your site. More information on Website Tracking can be found here. Note that your domain must be over https for browser push to work properly.
  • Once you add and verify your website, click on Show Domain Settings from the right drown option to activate the Browser Push listener within your tracker
  • The screen below gives you the flexibility to configure the tracking end points you want to activate

  • A new option will be available to setup and install your Browser Push
  • Below is a tab breakdown of your Browser Push Settings
Opt-in SettingsOpt-in DesignNotification DefaultsIntegration
Here you can make the prompt to opt-in smarter by adding some delays, segmenting them to activate on your cookied contacts, anonymous or both, as well as a re-opt-in option and target pages to show this prompt. The biggest mistake marketers make is to blindly trigger the default Browser Push prompt, which does not give visitors enough time to build a relationship with you.


In Popup Design, you can customize the main permission prompt, asking visitors if they wish to opt-in to your Browser Push list. Note that this is different from the default browser permission behavior which normally offers no delay or customization options. The prompt from the Popup Design will give visitors the option to Allow or Decline the browser push option.

Here you can put the Title of your Notification and see a live preview of your changes.

In Integration, you need to download the SDK file and upload it to your root folder on your website. Keep in mind that you need HTTPS on your site so you can use Browser Push notifications.

You can download and save the SDK file by Right-click -> Save as in this link.

  • Once you finish the setup above, visit your website to test the installation. If the message below did not show, that means that there is something wrong with the installation.

BROWSER PUSH ANALYTICS:

  • When a visitor clicks on Allow, they will automatically be added to your Browser Push Subscribers. You can view them by clicking on Browser Push Analytics.
  • Browser Push Analytics displays a detailed report on your subscribers. Toggle between the tabs to view records in the Active tab, with meta-details on the device, total messages sent, Clicks and date of signup. If the subscriber was a cookied contact with an email on a list, the platform will automatically merge the record, otherwise you will see an anonymous IP as a subscriber. Click on the Email/IP to access to the full user profile with detailed activities.
  • You can also include an automated report on your Browser Push, by domain, under your Dashboard Reports.
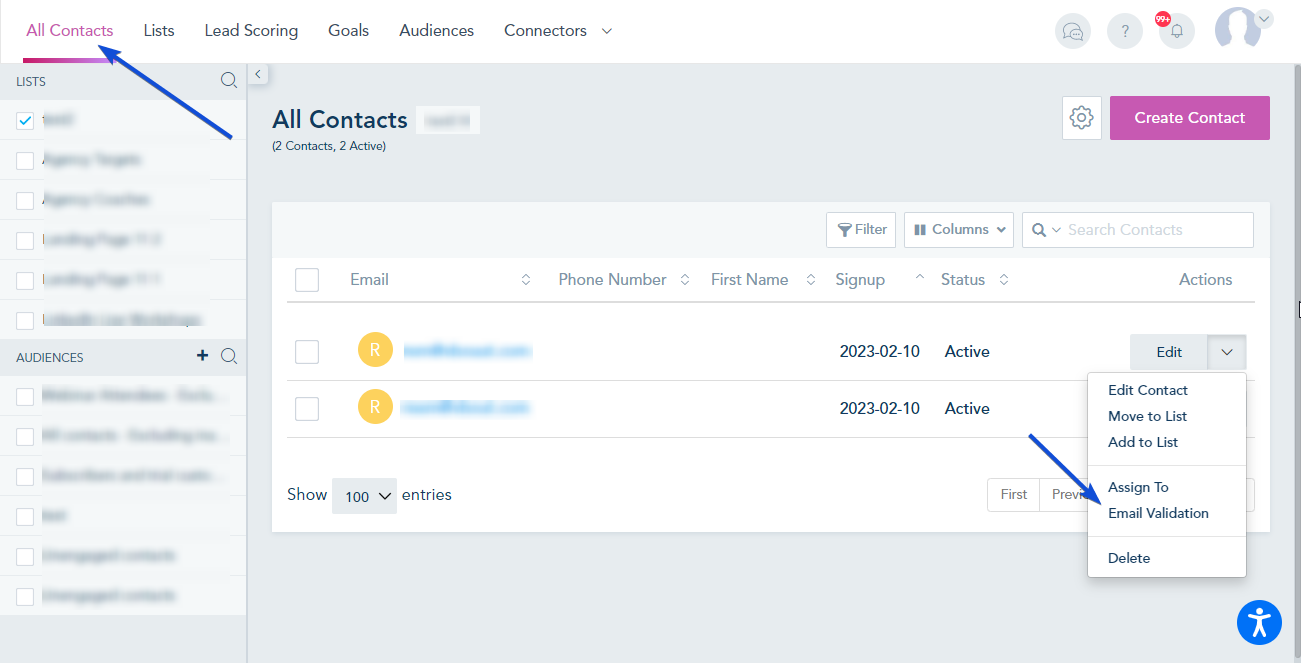
  • You can check the full analytics on each automated Browser Push message added to a workflow. You can access them under the Analytics portion of your Automated Messages.

BROWSER PUSH STATUS AND ACTIVITY:

  • On the contact’s page, the Browser Push status of the subscriber will be changed to active
  • You can create browser push message by going to Automated Messages, click on Create Automated Message > Create Browser Push Template.
  • The prompt to configure the browser push includes two tabs.  In the Notification Message you have to select the Notification Name, Source (target Domain), Notification Title and the Notification Icon. Default will be loaded from your configuration page for convenience but can be modified. Lastly, configure your Destination URL and finally the Message. You can test the message by clicking on Try it now or click on Save Message.

  • Advanced Options tab is only available for Chrome/Windows users. You can include a cover Image, as well as add one or two call to action buttons with a custom link for each button. With this option, the user will have a total of 3 destination links between the default URL and the 2 call to action URLs
  • Once you send the browser push message, the users should receive the Browser Push Notification.
WindowsAndroid
  • Finally, all Browser Push Engagement will be logged in the activities of the user with complete details on Device, Status, Send Date (when the message was queued to be delivered to the recipient’s browser), Delivery Date (when the recipient actually opened the browser and the system was able to deliver it), Click Date and the Click Type (which URL the recipient clicked on)


You can check this article to see how you can add a Browser Push to your Workflows.

Get Started

Adding browser push to your workflows

To use Browser Push in a Workflow we should:

  1. Create a Browser Push Template
  2. Create a workflow using Browser Push Trigger
  • Go to Automated Messages, click on Create Automated Message > Create Browser Push Template.


  • Insert your Browser Push Message info and click Save Message.


  • Go to Automation and click on Create Automation.
    Check this article in case you don’t know how to create automation.


  • Drag and drop any Trigger, then the Browser Push Action.
    As an example, we will use Joined List Action, a Delay and Browser Push. Choose a List, put any Delay and double click on the Browser Push to choose the template we’ve created earlier and click on Save Configuration.


  • Now we have the Automation ready with the Browser Push Action.


  • You can see full analytics on each automated Browser Push message added to a workflow. You can access them under the Analytics portion of your Automated Messages.

Get Started

How to replace the Support Chat by your own

While customizing your agency dashboard, you have the choice to either disable the platform Support chat box or replace it by your own for all your sub-accounts.

Go to Settings -> Whitelabel, and select Branding.

First,  you need the Activate White Label to be toggled on:

Then, you can choose to disable the default support chatbox.

Once you toggle this option, you will be able to add your custom support chat script.


Get Started

Twilio SMS

Twilio SMS is one of the integrations the platform offers. To connect your Twilio account, follow these steps:

Go to the Connection Center, and choose Connect to Twilio.

To complete the Twilio connection, you need to add the required keys. Please follow these steps to find your keys in Twilio:

  • Twilio Account SID and Auth Token:

  • Twilio Verified number:
    Note: Make sure to use the same format shown in the active numbers of your Twilio account


You have successfully connected your Twilio account.

Afterward, you go to Automation, select a Trigger and choose the Action: Twilio SMS

You can choose a template from the drop-down list

Or you can choose to CREATE NEW SMS TEMPLATE, where you will be taken to the following page:

Twilio SMS Status

Every Twilio SMS or MMS message request has a status value which describes the current state of the message. Here are the most common message statuses, and their meanings.

Outbound Message Status Progression

When sending outbound messages with the REST API, this is a typical sequence of status values:

Queued Twilio has received your request to create the message. All new messages sent from a specific Twilio phone number are created with a status of queued.
Accepted Twilio has received your request to create the message from a Messaging Service. Twilio is determining the optimal ‘From’ number from your service.
Sending Twilio is forwarding your message request to one of our Super Network partners.
Sent Twilio has received a confirmation from our Super Network partner advising they have accepted the message.

Twilio Opt-out Message

Recipients can reply with the word STOP to opt-out from Twilio messages. In this case the contact will be automatically tagged with “Twilio-Message-stop”.

Note: According to Twilio Policy, if you plan to use Twilio to send any text messages from 10DLC phone numbers, you’ll need to register your messaging use case (known as a Campaign) in Twilio Console or with Twilio APIs. Messages from unregistered numbers are subject to filtering and higher unregistered fees, and may ultimately be blocked by telecommunications carriers. For more details, please check this Twilio.

Get Started

How to launch an SMS Campaign

In some cases, you may have a list of contacts with only phone numbers and no email addresses, that you wish to upload into the platform to launch an SMS campaign.

Since the Email address is crucial in running automation, please check the following steps to launch this campaign:

  • Create a List
    To create your list, click on the Contacts option from the left sidebar, select the Lists tab from the top, and click on the Create List button:Next, Go to Fields & Form to edit your List fields. Once done Save the List.
  • Edit your CSV file
    To fill the Email address column in the CSV file, create the following formula: CONCATENATE(phone number cell, “@domain.com”). The result will be for example “111222333@domain.com”.Then, drag down the cell to apply the formula to the remaining contacts.

    Now your file is ready to be imported.

  • Upload your CSV file into the List
    From the Lists page, open the menu next to your List and choose Mass Import.Choose the CSV file you have edited and map the fields.
    For more details on Mass import check this.
  • Create an Automation to send SMS messages
    Go to Automation -> Your Automations -> Create Automation.Option 1: Use the Join Trigger
    In your automation, choose the Joined trigger and link it to Twilio SMS action.

    In the trigger configuration, choose the List you have created.

    Option 2: Using the Specific date Trigger:
    In your automation, choose the Specific trigger and link it to Twilio SMS action.

    In the trigger configuration, choose the List you have created, the date to trigger and for one Time only.

    In the action configuration, you can choose a template from the drop-down list or you can choose to CREATE NEW SMS TEMPLATE, where you will be taken to the following page:

    Once you are done, Save and Publish your automation.

Get Started

Add your site tracking code to Google Tag Manager

You can add your Site Tracking Code in your Google Tag Manager by following the instructions below.

Open your GTM account and choose the website you want to set up the Tracking Code on.

Click on Add a New Tag.


Choose a name for the tag and click on Tag Configuration.


Choose Custom HTML.


Go to your account, and Toggle “Using Google Tag Manager?” on, then click on Submit.


After that, click on Show Embed Code.

And copy the Site Tracking Code.


Then go back to GTM and Paste your Site Tracking Code.


Click on Triggering.


Select All Pages.


Now click on Save.


Then Submit, Publish and Continue.


Now to make sure that the tracker is working, you can open your website, go to inspect element, then network, and search “tracker”.
You will find our tracker in the results.

Get Started

Access token authentication error

Social media platforms serve as the cornerstone of online communication, facilitating connections, sharing, and engagement on a global scale. However, the ecosystem of social media extends beyond the platforms themselves, encompassing a myriad of third-party services like VBOUT, which enhance functionality and streamline marketing efforts.
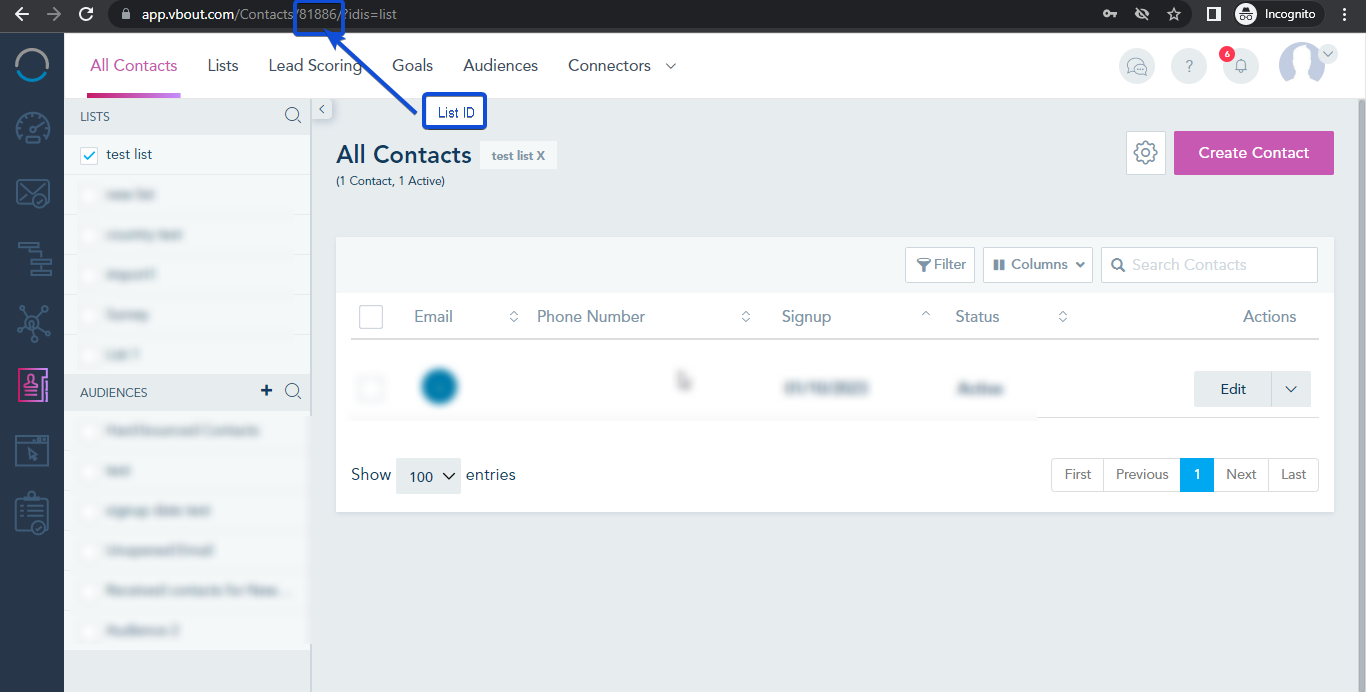
Access tokens serve as the digital keys that grant third-party services like VBOUT access to users’ social media accounts. These tokens establish a secure connection, allowing seamless integration and functionality across platforms. However, the transient nature of access tokens poses a challenge. When tokens expire or become invalid, users are prompted to reconnect their social accounts to the external service, generating a fresh token in the process.
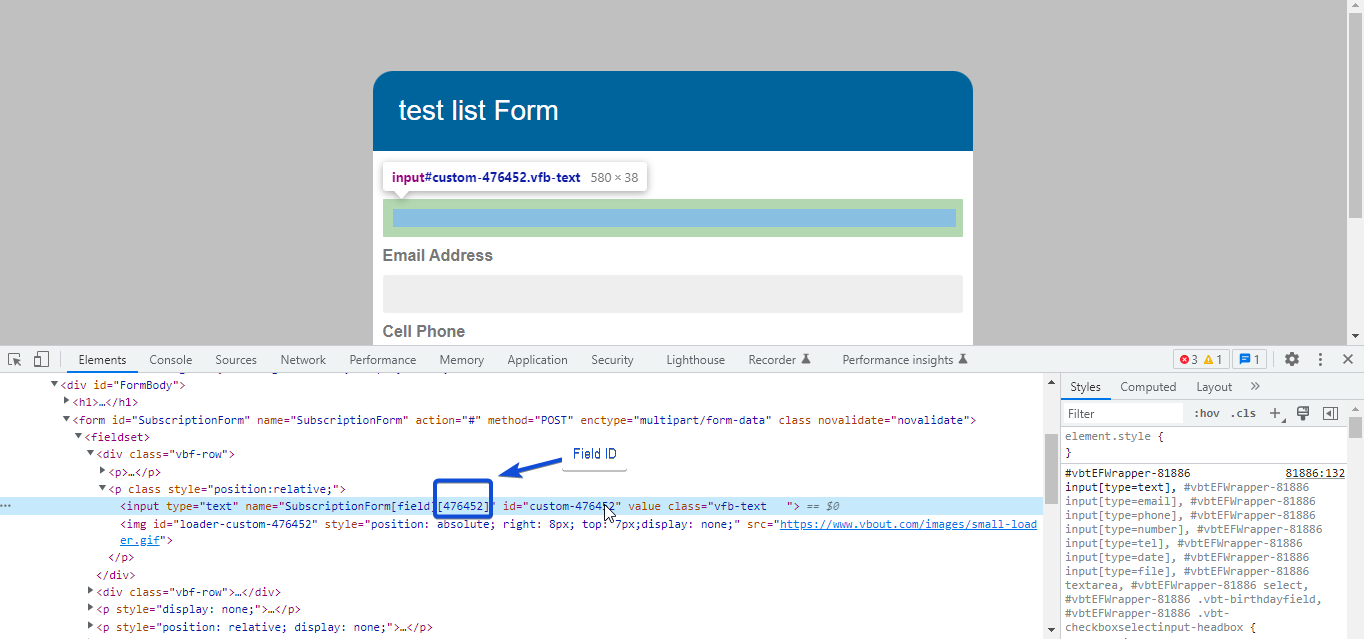
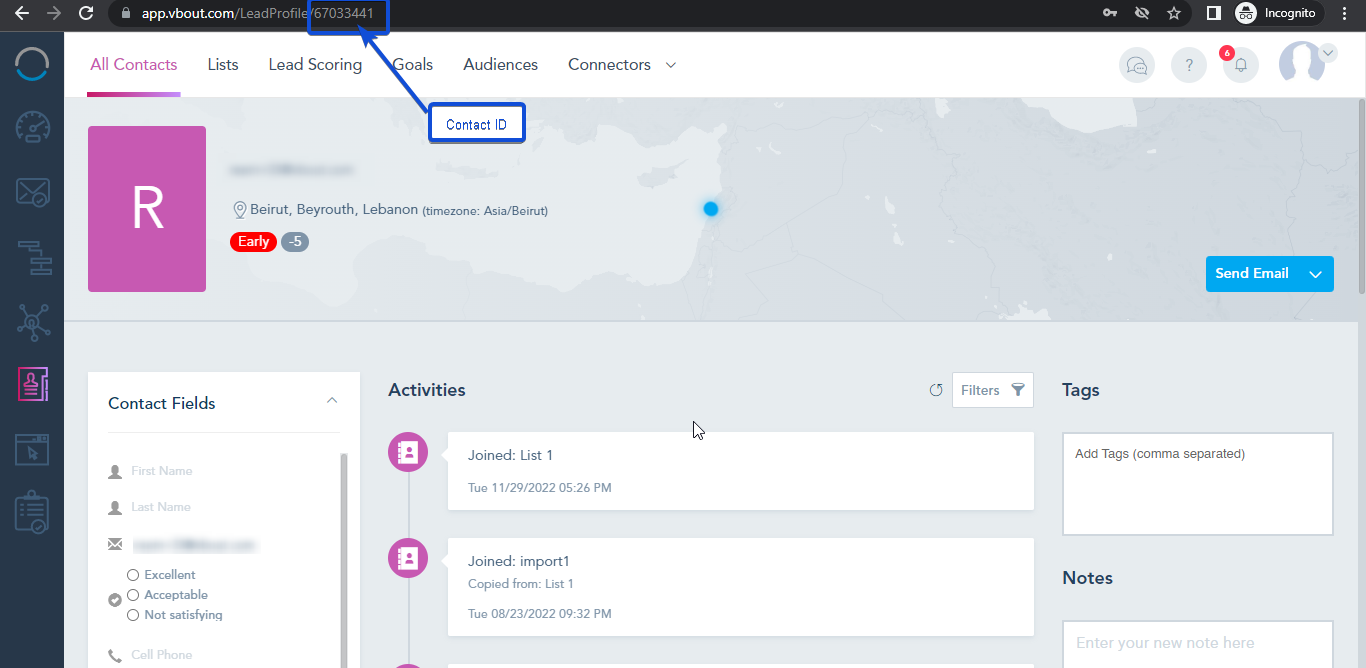
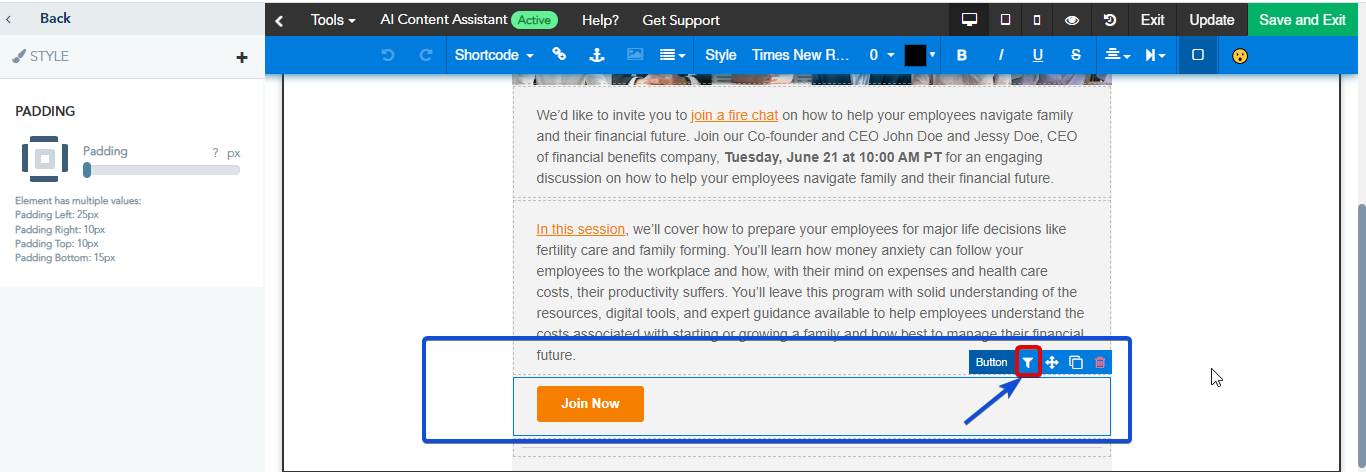
Social networks enforce stringent security measures to protect users’ accounts and data from unauthorized access and malicious activity. These measures include employing advanced algorithms to detect suspicious actions and promptly invalidating access tokens associated with compromised accounts.
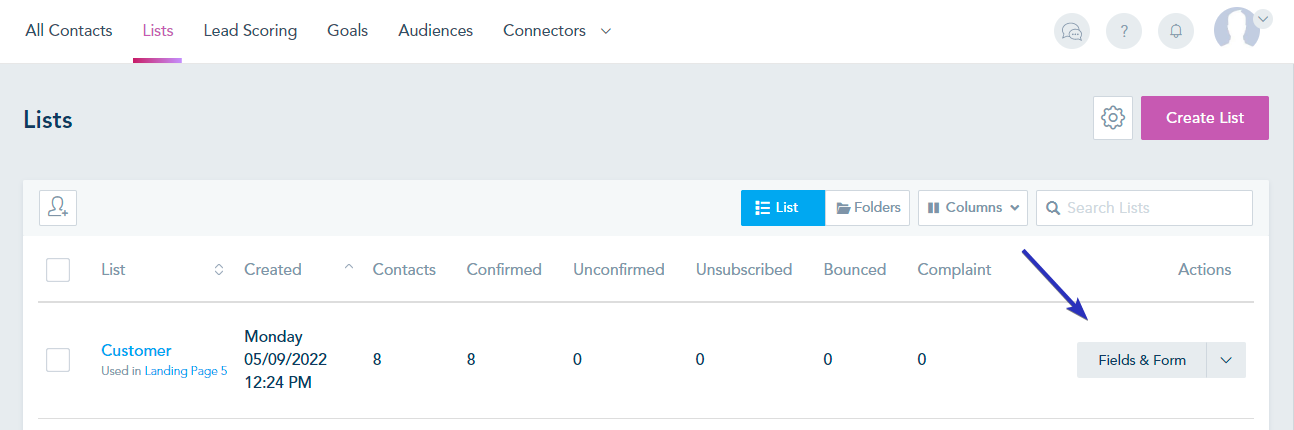
VBOUT, like other external partners of social networks, operates within the framework of these security measures, often surpassing the standards experienced within the social network itself. While token expirations and disconnections may present short-term inconveniences, they are essential for maintaining the trust and security of users’ accounts and data.

If you notice a red alert on any of your connected profiles, the chances are there is an Access Token Authentication error.


To re-establish the connection, Go to your Connection Center.

Locate the account with the authentication problem and click on Manage Connections to reconnect. You will need to go over the same Authentication steps as you have done when first connecting the account:

If the issue persists after clicking on Manage Connections, you can Unlink the account then try connecting again.

Token expiration can occur due to the following reasons:

  1. Manual changes to account settings
  2. Security measures
  3. Token lifespans
1. Manual changes to account settings

The functionality of platforms like VBOUT hinges on the settings maintained within individual social networks. Any manual changes made to these settings can prompt disconnection from external services. Common alterations include modifying usernames or passwords, revoking access permissions granted to third-party apps like VBOUT, or losing admin status for pages or groups linked to the account. These changes, while seemingly innocuous, can disrupt the seamless integration between social accounts and external services, requiring users to reestablish connections and generate fresh access tokens.
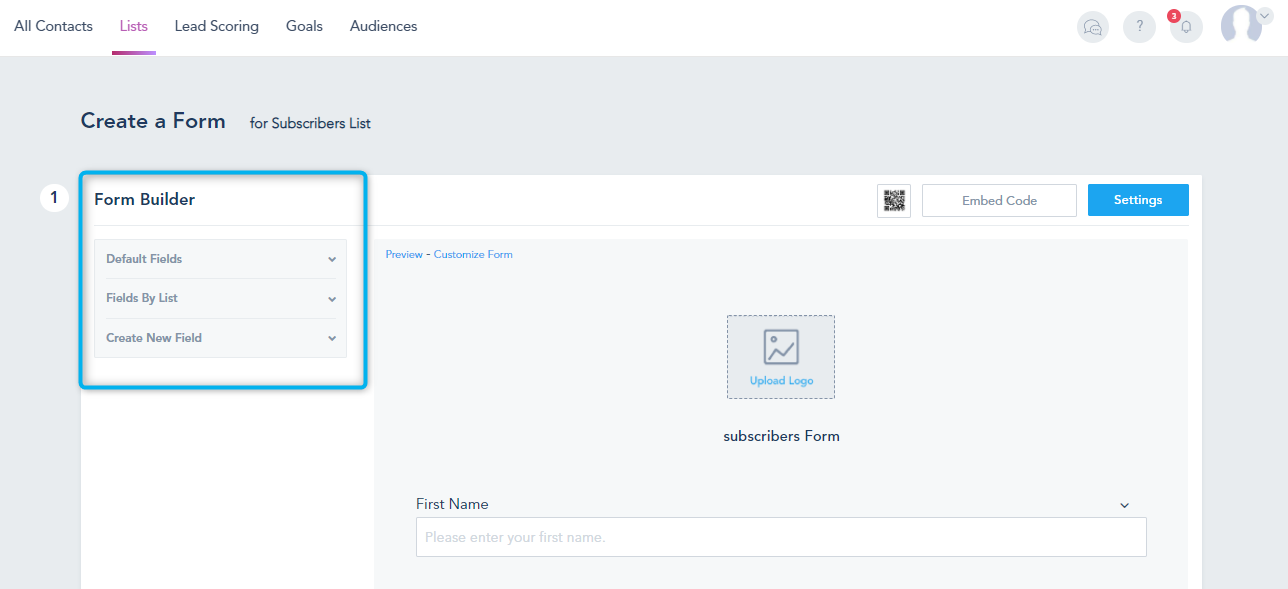
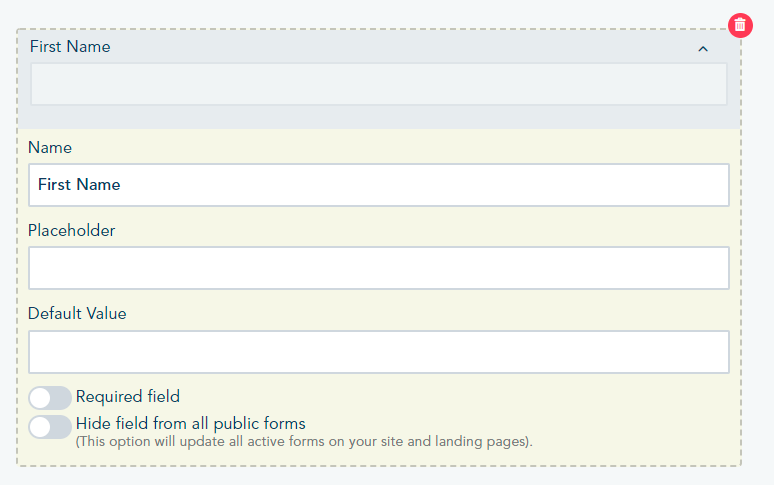
2. Security measures

Social networks prioritize user security by implementing stringent protocols to safeguard accounts from unauthorized access and malicious activity. However, these security measures can inadvertently lead to token expiration for third-party services. Behaviors such as using alias usernames, logging in from different IP addresses, or publishing content flagged for copyright violations can trigger disconnection from platforms like VBOUT.

3. Token Lifespan

Tokens issued by social networks come with predefined expiration dates, designed to mitigate the risk of perpetual access to user information. Token lifespan aligns with each social network’s authentication policy, necessitating periodic renewal to maintain access to external services. As tokens approach their expiration dates, users may experience disconnection from third-party platforms like VBOUT, prompting the generation of new tokens to restore functionality.

Get Started

Exporting your dashboard reports


If you want to share your Dashboard Reports via email or export them or view them in browser, click on Share or Export button in your dashboard view. You will have the following options:

  1. Viewing your dashboard via a public URL which you can share with colleagues or clients. The URL has a private token that can be renewed to revoke access for the old URL. To preview the publicly accessible version of the report you can click on the View in Browser icon.
  2. Sharing the current Dashboard in PDF format or PNG format. To do this, you can click on the Export to dropdown which will present you with 3 actions to choose from. You can choose Direct Download which might take up to few minutes to reproduce the export file, Via Email which typically sends the report as attachment in the email, or Recurring Emails which allows you to schedule the sending of the report in a Daily, Weekly or Monthly manner.
  3. Managing your scheduled reports for different dashboards. First click on Scheduled Reports –> New Report. Second, select the desired Dashboard, configure the report email (subject line, body, recipients and frequency of sending) then click on Save.

Get Started

Social media analytics: Native profiles, Facebook business ad reports, Google Adwords

Social Analytics give you insights on your growth, engagement and demographics. To access Social Analytics click on Social Media > Analytics from the top menu. On your left panel you can toggle between the accounts to access the analytics for each channel.

  • Facebook analytics pulls information such as page likes, impressions, engagement and stories. Other details such as demographic breakdown and geo-location are also displayed for the chosen time range.
  • X analytics displays the follower’s growth for a particular time range as well as the number of mentions, likes, and reposts. Note that due to X’s limited API most of the data should be accumulated moving forward from the day you connect your profile to your dashboard.
  • Linkedin analytics shows the number of company page followers, clicks, engagement, likes, shares, and impressions for the chosen time range as well as geo-location of the followers.
  • Instagram analytics shows the number of your account’s followers, impressions, reach, and profile views.
  • Pinterest analytics pulls a summary of your account’s followers, followings, board, and performance of the pins.
  • Google analytics pulls real-time data from your Google Analytics account for a chosen website. You can switch between websites to change the report.

Social Clicks

To view the CTR of your posts scheduled through your account you must use the URL link tracker when composing your posts. Social Clicks are accessible under the Analytics tab for each account as well as an aggregate of all posts under Social Media > Social Clicks tab on the top. Below is a quick summary of the Clicks report:

  1. Select your social account from the left sidebar.
  2. A list of the URLs used will be displayed.
  3. You can sort the URLs by the latest or by the number of clicks.

Get Started

Triggering Automations Based on Task Stage Changes

You can create an automation workflow that triggers when a contact’s task moves from one stage to another.

To set this up, go to Automation and use the Task Stage Updated trigger.

In the trigger configuration, make sure to select the specific list where the contacts are assigned.

The workflow will run when the task stage is updated for contacts already associated with the selected list.

The automation will trigger when the task stage changes through any of the following actions:

  • Editing the task stage from the Table view
  • Changing the stage directly within the task
  • Closing a task
  • Reopening a task
  • Deleting a Task Board and moving its tasks to another board or stage

Note: The automation is only triggered for contacts already assigned to the task before the stage change. It will not trigger if new contacts are assigned after the task’s status is updated.

Get Started

Managing your contacts

You can manage all your Contacts, Lists and Audiences from one page by going to Contacts –> All Contacts. On this screen you can view and search all your contacts and filter them by List or Audience name from the left panel.


Each contact can be edited, moved to another list, added to another list (copy), assigned to Group or User, or deleted from your account. You can also add a new record by clicking on Create Contact. 

To preview the timeline of a contact, click on their email address. You will be able to view the Contact history of engagement and additional contact details such as Lead Scoring, Geo-location, Referral Source, Subsequent Referral source for each engagement and much more.

You can filter by engagement type and expand the details to view the details of that engagement:

To manage the lists for this contact, send a message, Call or Unsubscribe from Lists, click the options on the top right panel for this contact:

Get Started

Unsubscribe a specific contact

If you want to keep the contact but you don’t want him/her to receive emails you can do that by changing the status of the contact to Unsubscribe.
You can choose to Unsubscribe this contact from a specific list or from all lists.

Contact List Page

All you need to do is to click on Edit next to the contact you want:

Then change the status to Unsubscribe:

Contact Activity Page

You are also able to do it inside of the Contact Activity Page. On the top-right dropdown select the Unsubscribe From All Lists option.

Get Started

Add custom events to contact timeline via API

You can add custom events to your contact’s timeline and activity log using the addNewActivity API call. This is beneficial if you would like to log data from your own platform to your account, such as support tickets and more.

To add a custom event, use the function below using CURL or PHP and replace the data with your own API KEY  as well as the contact’s id:

<?php 
    require_once('../PATH/TO/services/EmailMarketingWS.php');

    // Replace {YOUR_API_KEY} with the API KEY provided from the link above.
    $user_key = array('api_key' => '{YOUR_API_KEY}');
	
    $app = new EmailMarketingWS($user_key);
    $parms = array(
        'id' => 'xxxxx',                              // Replace with the Contact ID
        'description' => 'this is my first activity', // Replace the Description with your Activity's description.
        'datetime' => '2018-08-23 18:00',             // Replace with the Date and Time the Activity is recorded
    );

    $results = $app->addNewActivity($parms);

    print_r($results);
?>

The end result will look like this:


Note that you can use the activity filter to preview the custom events within the contact’s timeline.

Get Started

Reading the referral stats and MRR

To get started with the Referral Stats review, you can access them by clicking on Partnership Summary in the left menu.

This will show you a breakdown of all the clickthroughs that came from the link you’ve shared, the unique invites you’ve sent,  the conversion signup from those clicks, as well as the commission due for that month. The status indicates if the commission was PAID or still UNPAID.

The Total Earnings will be the total commission earn-out to date and the Monthly Recurring Revenue (MRR) will reflect the Monthly Recurrent Revenue accrued this far.

Get Started

Using the platform power tools

As a partner, you get access to a variety of useful marketing tools. To preview available tools click on Tools from the left menu of the partner’ page.

There are currently 4 tools you can use:

  1. Buyer Persona Builder: This tool lets you build a buyer persona for any business and generate a downloadable template for the assembled persona profile. Some partners use this tool as a free add-on to their service offering and others charge to build a persona for a business.
  2. CAN Spam Compliance by Country: This tool lets you to check spam email compliance by country using a visual map and a search functionality. Partners use this handy tool to identify email spam requirement by country and avoid penalties that can amount to thousands of dollars per email.
  3. Product Comparison Chart: This tool lets you compare the platform to other players on the market. Partners use this tool when clients ask them for a price comparison between our platform and other platforms.
  4. Marketing Automation Generator: This tool lets you build up a full marketing journey, a lead capture form, a landing page and an email template, just by filling out a simple smart form. Partners use it as a way to prospect and start a conversation with leads they are working with.

In addition to the tools you can access the  Academy under the Certification menu, which takes you to a FREE 12 modules course, developed by the  team, and covers Digital Marketing Foundation.

The partnership portal also includes a list of rich Resources that partners can download and Co-brand so they could conduct their own webinars, workshops and even share on their own blog. These resources include articles, PowerPoint presentations and infographics prepared by the marketing team.

Get Started

Front end sales site

As a partner, you get a marketing page that is automatically provisioned for you once your partner account has been activated. This custom marketing site has all the attribution and referral back to your partner account setup and ready. You have the ability to modify and brand this page with your own content and even display your custom signup plans on the pricing table with 1 click.

Get Started

Vanity URLs

Activating Vanity URLs will allow you to use your own custom domain for tracking email and social media links. This way when your contacts click on any link you send them via email or social media posts, they will see your custom domain.

This option requires adding some code that is provided to your .htaccess file in order for this to be fully functional.  We will see now how to do that.

Go to Settings -> Whitelabel -> toggle on the Vanity URL

Copy the code provided.

After you add it to your .htaccess file, you can click on check setup.

In your .htaccess file insert a new IfModule by putting <IfModule mod_rewrite.c>
Then paste our code and close the IfModule by putting </IfModule>

Note that if you have an <IfModule mod_rewrite.c> inside your .htaccess file, make sure to put our IfModule before all the IfModule you already have.

Get Started

Email testing – inbox preview

The platform allows you to preview your emails on different apps and devices right from your dashboard using the Inbox Preview feature. To get started with the inbox preview feature, you can find it:

  1. Under the additional actions for your email template.

  2. On the third step of creating your email campaign. (Design step)

  3. Inside the email builder.
      

Once you select Inbox Preview, you will be presented with a list of apps on different devices, you can select as many as you like for the test. (This is subject to the number of credits that are offered within your plan)

After you select the apps, you can click Send Request in order to run the test. You will be redirected to the results page a few seconds later, and can switch between different apps using the left panel to view the results for the different tests.

Get Started